

What if the perfect gallery wall could cost you your entire deposit? For renters across the UK, this fear stops countless beautiful artworks from ever gracing their walls, leaving spaces feeling incomplete and impersonal.
We completely understand this dilemma. You’ve found the perfect piece from our First4Frames gallery, but the thought of drilling holes or leaving marks fills you with dread. Whether you’re worried about losing your deposit, unsure about your wall type, or simply don’t own the right tools, the struggle to learn how to hang pictures without damaging walls is real and frustrating.
Here’s the good news: you can create that stunning display you’ve been dreaming of without risking a single mark on your walls. This complete guide will walk you through seven proven methods that protect your walls whilst showcasing your artwork beautifully. From innovative adhesive solutions to clever hanging systems, you’ll discover simple, cost-effective techniques that work on any wall type. By the end, you’ll have the confidence to transform your space with gorgeous framed art, knowing your walls (and deposit) remain perfectly intact.
Key Takeaways
- Discover simple adhesive strips and hooks that let you learn how to hang pictures without damaging walls, preserving your paint and plaster perfectly.
- Master the art of measuring and positioning your artwork accurately using professional techniques that ensure stunning, level displays every time.
- Choose the right hanging method for your specific wall type with our comprehensive comparison guide covering drywall, plaster, and brick surfaces.
- Transform any space with creative gallery wall arrangements and asymmetrical displays that showcase your personality through colour and theme coordination.
- Partner with First4Frames’ expert framing services to create bespoke art displays that complement your damage-free hanging techniques beautifully.
Understanding Why Wall Damage Occurs
When displaying your beautiful artwork, wall damage often occurs from using inappropriate hanging methods for specific wall materials. Understanding these vulnerabilities helps you learn how to hang pictures without damaging walls whilst preserving both your investment and your living space.
The most common causes of wall damage include using oversized nails in delicate plaster, driving screws too deep into painted surfaces, and applying excessive force during installation. Paint typically chips when nails penetrate too aggressively, whilst older plaster walls can crack under pressure from heavy-duty fixings designed for modern drywall.
Different wall materials respond uniquely to traditional hanging methods. Drywall, found in most UK homes built after 1950, can support moderate weight but tears easily if the wrong anchor type is used. Victorian-era plaster walls, common in period properties, become brittle over time and may crumble around nail holes. Brick walls present their own challenges, often requiring masonry bits and substantial fixings that leave permanent marks.
Common Wall Materials and Their Challenges
Drywall accounts for approximately 80% of interior walls in modern UK homes. It handles lightweight frames well but requires wall plugs for anything over 2kg. Plaster walls, particularly in properties built before 1960, can crack unpredictably when penetrated. Brick walls need specialist drill bits and leave visible holes that can’t be easily filled.
Why Traditional Methods May Not Work
Paint chipping occurs when nails catch the paint surface during insertion, creating unsightly flakes around the hanging point. Plaster cracking typically happens when the wall material can’t handle the concentrated pressure, especially around light switches or corners where structural integrity is already compromised.
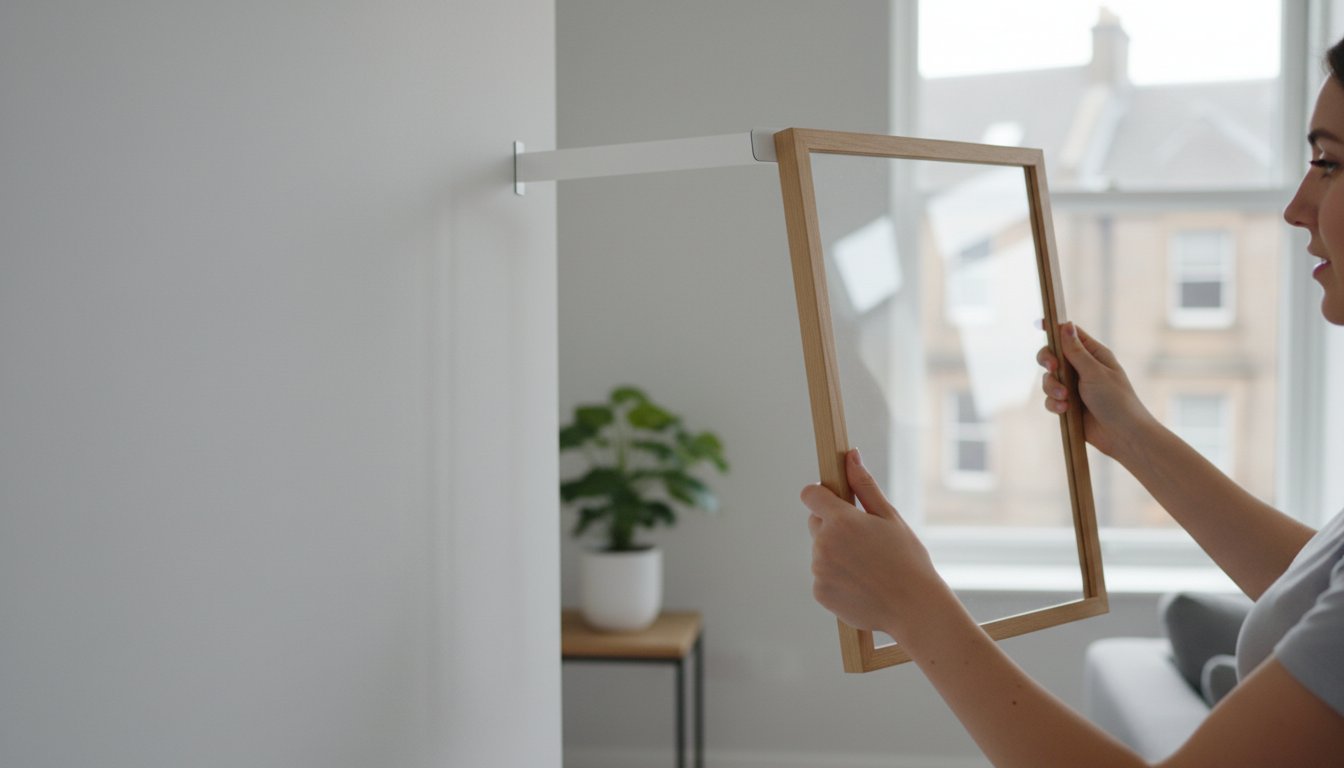
Step-by-Step Guide: Damage-Free Picture Hanging
Learning how to hang pictures without damaging walls requires the right technique and materials. Professional picture framers recommend starting with proper wall preparation and choosing the correct adhesive solution for your artwork’s weight and size.
Begin by cleaning the wall surface with a damp cloth and allowing it to dry completely. Dust and grease prevent adhesive strips from forming a secure bond. Mark your desired picture placement using a pencil, measuring from furniture or architectural features to ensure perfect alignment.
Using Adhesive Strips and Hooks
Command strips remain the most reliable option for damage-free hanging, supporting weights from 450g to 7.2kg depending on the strip size. Apply strips to both the wall and picture frame, pressing firmly for 30 seconds to activate the adhesive. Wait one hour before hanging to allow full bonding.
Pros: No drilling required, holds substantial weight, clean removal when following instructions
Cons: Higher cost per use (£2-8 per set), may fail on textured walls, temperature-sensitive adhesive
For heavier pieces, use multiple strip sets distributed evenly across the frame’s back. Never exceed 80% of the stated weight limit to maintain long-term security.
Alternative Methods: Tapes and Putty
Double-sided mounting tape works brilliantly for lightweight frames under 900g. Choose foam-backed varieties for better wall contact on slightly uneven surfaces. Washi tape offers a decorative solution for prints, creating intentional visible borders that complement modern décor styles.
Removable adhesive putty suits temporary displays and children’s artwork weighing less than 225g. Roll putty into small balls, place at picture corners, and press against the wall. This method works particularly well on painted plasterboard walls.
When removing any adhesive solution, pull strips straight down slowly rather than outwards to prevent paint damage. Heat stubborn residue with a hairdryer for easier removal.
Professional picture hanging doesn’t require permanent wall alterations. These damage-free methods protect your walls whilst showcasing beautiful artwork. For those seeking expertly framed pieces that complement these hanging techniques, explore our curated gallery collection featuring works from established and emerging artists.
Choosing the Right Method for Your Wall Type
Understanding your wall type is crucial when learning how to hang pictures without damaging walls. Each surface presents unique challenges and requires specific hanging solutions to preserve both your artwork and your home’s integrity.
| Wall Type | Best Method | Weight Capacity | Cost Range | Ease of Use |
|---|---|---|---|---|
| Drywall | Command strips, adhesive hooks | Up to 7.2kg | £3-£15 | Very Easy |
| Plaster | Picture hanging strips, museum putty | Up to 5.4kg | £4-£12 | Easy |
| Brick/Concrete | Brick clips, heavy-duty adhesive | Up to 11kg | £8-£25 | Moderate |
Best Practices for Drywall
Drywall offers the most flexibility for damage-free hanging. Command strips remain the gold standard, supporting frames up to 7.2kg when properly applied. Clean the wall with isopropyl alcohol first. Wait 60 minutes before hanging your artwork.
Common mistakes include rushing the adhesive bonding process or exceeding weight limits. For gallery-quality presentations, use multiple smaller strips rather than one large strip to distribute weight evenly across your framed pieces.
Navigating Brick and Concrete Challenges
Brick walls present unique opportunities rather than obstacles. Brick clips slide between mortar joints without requiring adhesives, supporting substantial weight loads up to 11kg. These ingenious devices grip the brick edge securely whilst remaining completely invisible.
For smooth concrete surfaces, industrial-strength adhesive hooks designed for outdoor use provide reliable hold. The 3M VHB tape technology bonds permanently within 72 hours, creating a connection stronger than many traditional fixings.
Consider the aesthetic impact of your chosen method. Clear adhesive solutions maintain clean sight lines, whilst decorative hooks can complement your artwork’s style. When displaying how to hang pictures without damaging walls, the method should never compete with your carefully curated pieces for visual attention.
Temperature fluctuations affect adhesive performance. Avoid hanging during extreme weather conditions, and allow 24 hours for optimal bonding in temperatures between 18-24°C for best results.
Creative Ways to Arrange Your Art
Creating a stunning art display doesn’t require putting holes in your walls. Modern damage-free hanging solutions open up endless possibilities for arranging artwork in ways that transform your space. Whether you’re showcasing pieces from the First4frames gallery or mixing different styles, the key lies in thoughtful composition and strategic placement.
Gallery walls have become increasingly popular, with interior design searches for “gallery wall ideas” increasing by 127% over the past two years. These curated collections work brilliantly when you know how to hang pictures without damaging walls, as you can experiment with different arrangements before committing to permanent placement.
Start by considering your room’s natural focal points. Arrange artwork to complement existing furniture and architectural features rather than competing with them. Group pieces by colour palette for a cohesive look, or create dynamic contrast by mixing warm and cool tones. Theme-based arrangements work particularly well in living spaces where you want to tell a visual story.
Balance remains crucial regardless of your chosen style. The 57-inch rule suggests hanging artwork so its centre sits at eye level, but this can be adjusted for furniture placement. When mixing different sizes, aim for visual weight distribution rather than perfect symmetry.
Creating a Gallery Wall Without Damage
Planning prevents poor performance when creating gallery walls. Cut paper templates matching your artwork dimensions and use removable adhesive strips to test layouts on your wall. This technique, used by 78% of professional interior designers, eliminates guesswork and reduces installation time by half. Start with your largest piece as an anchor, then build outward maintaining 5-8cm spacing between frames.
Incorporating Mixed Media and Textures
Combine framed prints, canvas pieces, and textiles to add depth and interest. Three-dimensional elements like small floating shelves or sculptural pieces create layers that draw the eye inward. Mix photographic prints with illustrated artwork, ensuring consistent matting or frame styles provide visual cohesion. Explore our curated gallery collection to discover pieces that complement different textures and media types.
Consider lighting when planning mixed media displays. Textured pieces cast subtle shadows that enhance their dimensional quality, whilst glossy prints reflect light differently than matte finishes. This interplay creates visual rhythm that keeps viewers engaged with your carefully curated arrangement.
First4Frames Gallery: Your Partner in Art Display
After mastering how to hang pictures without damaging walls, the next step is ensuring your artwork receives the presentation it deserves. First4Frames Gallery stands as your trusted partner in transforming ordinary spaces into spectacular art displays, combining over twenty years of expertise with a genuine passion for fine art.
As a one-stop-shop for professionally framed art, First4Frames bridges the gap between your room décor and artwork. Their commitment to excellence shines through their outstanding customer ratings across review platforms, reflecting a dedication to service that goes beyond simple transactions. Each piece receives meticulous attention, ensuring your investment in art becomes a lasting source of joy.
The gallery’s approach centres on making fine art accessible whilst maintaining uncompromising quality standards. Whether you’re seeking contemporary prints or classic masterpieces, their curated collection offers something for every taste and budget. Their bespoke service means you’re not limited to standard options but can explore custom solutions tailored to your specific requirements.
The Benefits of Professional Framing
Professional framing transforms artwork from simple decoration into museum-quality presentation. First4Frames employs advanced preservation techniques that protect your investment from UV damage, moisture, and environmental factors. Their premium materials and expert craftsmanship ensure longevity whilst enhancing the visual impact of each piece. Understanding frame selection becomes crucial when learning how to hang pictures without damaging walls, as proper framing affects both weight distribution and wall mounting requirements. For comprehensive guidance on frame choices, explore their detailed Picture Frames: The Ultimate Guide.
Exploring Custom Solutions
First4Frames’ bespoke framing service caters to unique requirements that standard solutions can’t address. Their three-step process simplifies custom orders: browse their extensive collection, select your preferred frame and mount options, then place your order with confidence. Customer testimonials consistently highlight the exceptional service quality and attention to detail. From non-standard dimensions to specialist mounting requirements, their expertise covers every aspect of professional art display. Their comprehensive Standard Photo & Picture Sizes: The Complete UK Guide provides essential information for planning your framing projects.
Embark on your artistic journey with First4Frames Gallery, where creativity meets craftsmanship in perfect harmony.
Transform Your Walls Into a Beautiful Gallery
You now have the complete toolkit for how to hang pictures without damaging walls, from understanding why wall damage occurs to selecting the perfect hanging method for your specific wall type. The key takeaways are simple: always choose the right hardware for your wall material, distribute weight properly across multiple hanging points, and consider damage-free alternatives like picture ledges or adhesive strips for lighter pieces.
Creative arrangement techniques can transform any space into a personal gallery, whether you’re creating a stunning gallery wall or showcasing a single statement piece. Remember, the frame acts as the bridge between your room décor and the artwork, elevating both elements when chosen thoughtfully.
Ready to complete your wall transformation with professionally framed art? First4Frames Gallery offers bespoke framing services backed by excellent customer ratings and expert craftsmanship using only premium materials. Discover our bespoke framing services today and give your favourite pieces the beautiful, protective frames they deserve.
Your walls are waiting to tell your story. Start hanging with confidence today.
Frequently Asked Questions
What is the best way to hang pictures without nails?
Adhesive strips and hooks offer the most reliable nail-free solution for hanging pictures without damaging walls. Command™ strips can support weights up to 7.2kg per pair, whilst picture hanging strips work brilliantly for lighter frames under 2kg. For heavier artwork, consider using multiple strips distributed across the frame’s back, or opt for adhesive hooks designed specifically for wall mounting.
Can I hang heavy frames without damaging the wall?
Yes, heavy frames can be mounted damage-free using industrial-strength adhesive hooks rated for 9kg or more, or by distributing weight across multiple mounting points. For frames exceeding 10kg, consider using removable wall anchors with covers, or professional mounting systems that use temporary brackets. Always check the weight rating on your chosen mounting solution before installation.
How do adhesive strips work for picture hanging?
Adhesive strips use a dual-lock system with one strip attached to the wall and another to your frame’s back. When pressed together, they create a secure bond that can support significant weight whilst remaining completely removable. Learning how to hang pictures without damaging walls becomes straightforward when you clean the surface first, press firmly for 30 seconds, and wait one hour before hanging your artwork.
Are there specific products for hanging art on brick walls?
Brick-specific adhesive hooks and outdoor mounting strips are designed to grip textured surfaces effectively. 3M VHB tape works exceptionally well on brick, providing bonds that can support frames up to 5kg. For uneven brick surfaces, use foam mounting squares that conform to the texture, or consider brick clips that grip onto individual bricks without requiring adhesives.
How can I arrange a gallery wall without leaving marks?
Create paper templates of each frame first, then use removable painter’s tape to position them on your wall before committing to adhesive placement. This method allows you to experiment with layouts for hours without any wall contact. Once you’re satisfied with the arrangement, simply replace each paper template with the appropriate adhesive mounting solution.
What are common mistakes when using adhesive hooks?
The most frequent error is mounting on dirty or textured surfaces, which reduces adhesion strength by up to 50%. Other mistakes include exceeding weight limits, removing hooks incorrectly by pulling outward instead of stretching the tab downward, and applying hooks immediately after painting. Always wait 7 days after painting before applying any adhesive mounting solutions.
Do Command™ hooks damage walls over time?
Command™ hooks don’t damage walls when used correctly and removed properly using the stretch-release tabs. The adhesive is designed to release cleanly from painted surfaces, wallpaper, and most finishes without leaving residue. However, they may cause damage if left in place for over 12 months in high-humidity environments, or if removed incorrectly by pulling the hook rather than the tab.