


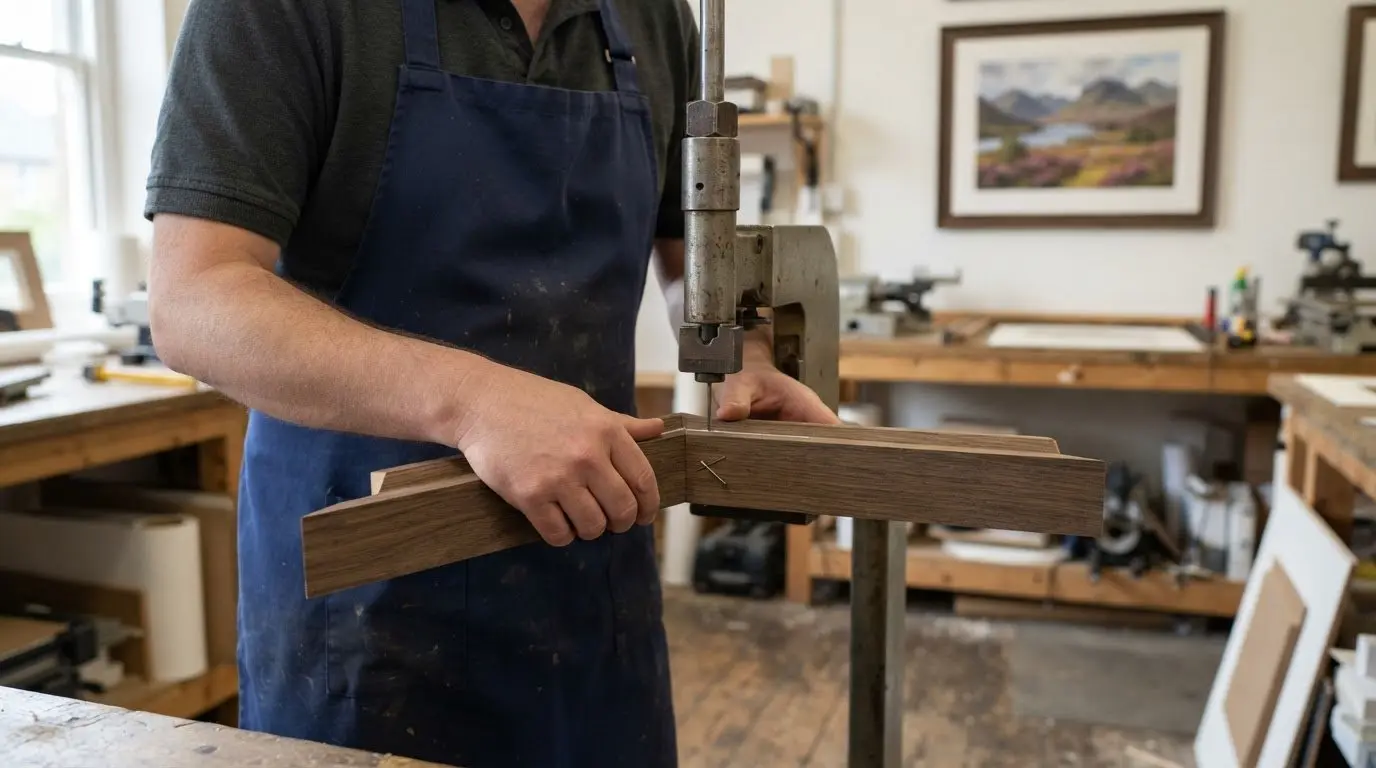
A neat mitre is only half the job; the way its corner is secured matters just as much. A picture frame is assembled from four mitred edges, with each 45-degree cut meeting its neighbour at a 90-degree corner. Understanding the different types of frame corner joins means knowing how glue, pins or nails can help hold those corners together.
It’s natural to focus on a frame’s finish, but the way its corners are joined also matters. The right method depends on the frame moulding and the tools used.
This guide explains how pins and glue reinforce an underpinned joint, how to assemble mitres carefully, and how cross-nailing can strengthen a corner. You’ll learn what each method does and why accurate cuts, close-fitting edges and secure fastening matter in a well-made frame.
Key Takeaways
- Choose V-nails that suit the moulding, aiming for a pin depth of between two-thirds and three-quarters of its depth.
- Use a strap clamp to hold the frame square while the glue sets, then inspect the mitres before adding fasteners.
- Pre-drill hardwood before hand-nailing, and use a nail punch to finish driving a nail without marking the frame.
- Clamp corners securely when cross-nailing, and angle the pins so they reinforce the joint rather than pull through it.
Frame joints: How are picture frames joined?
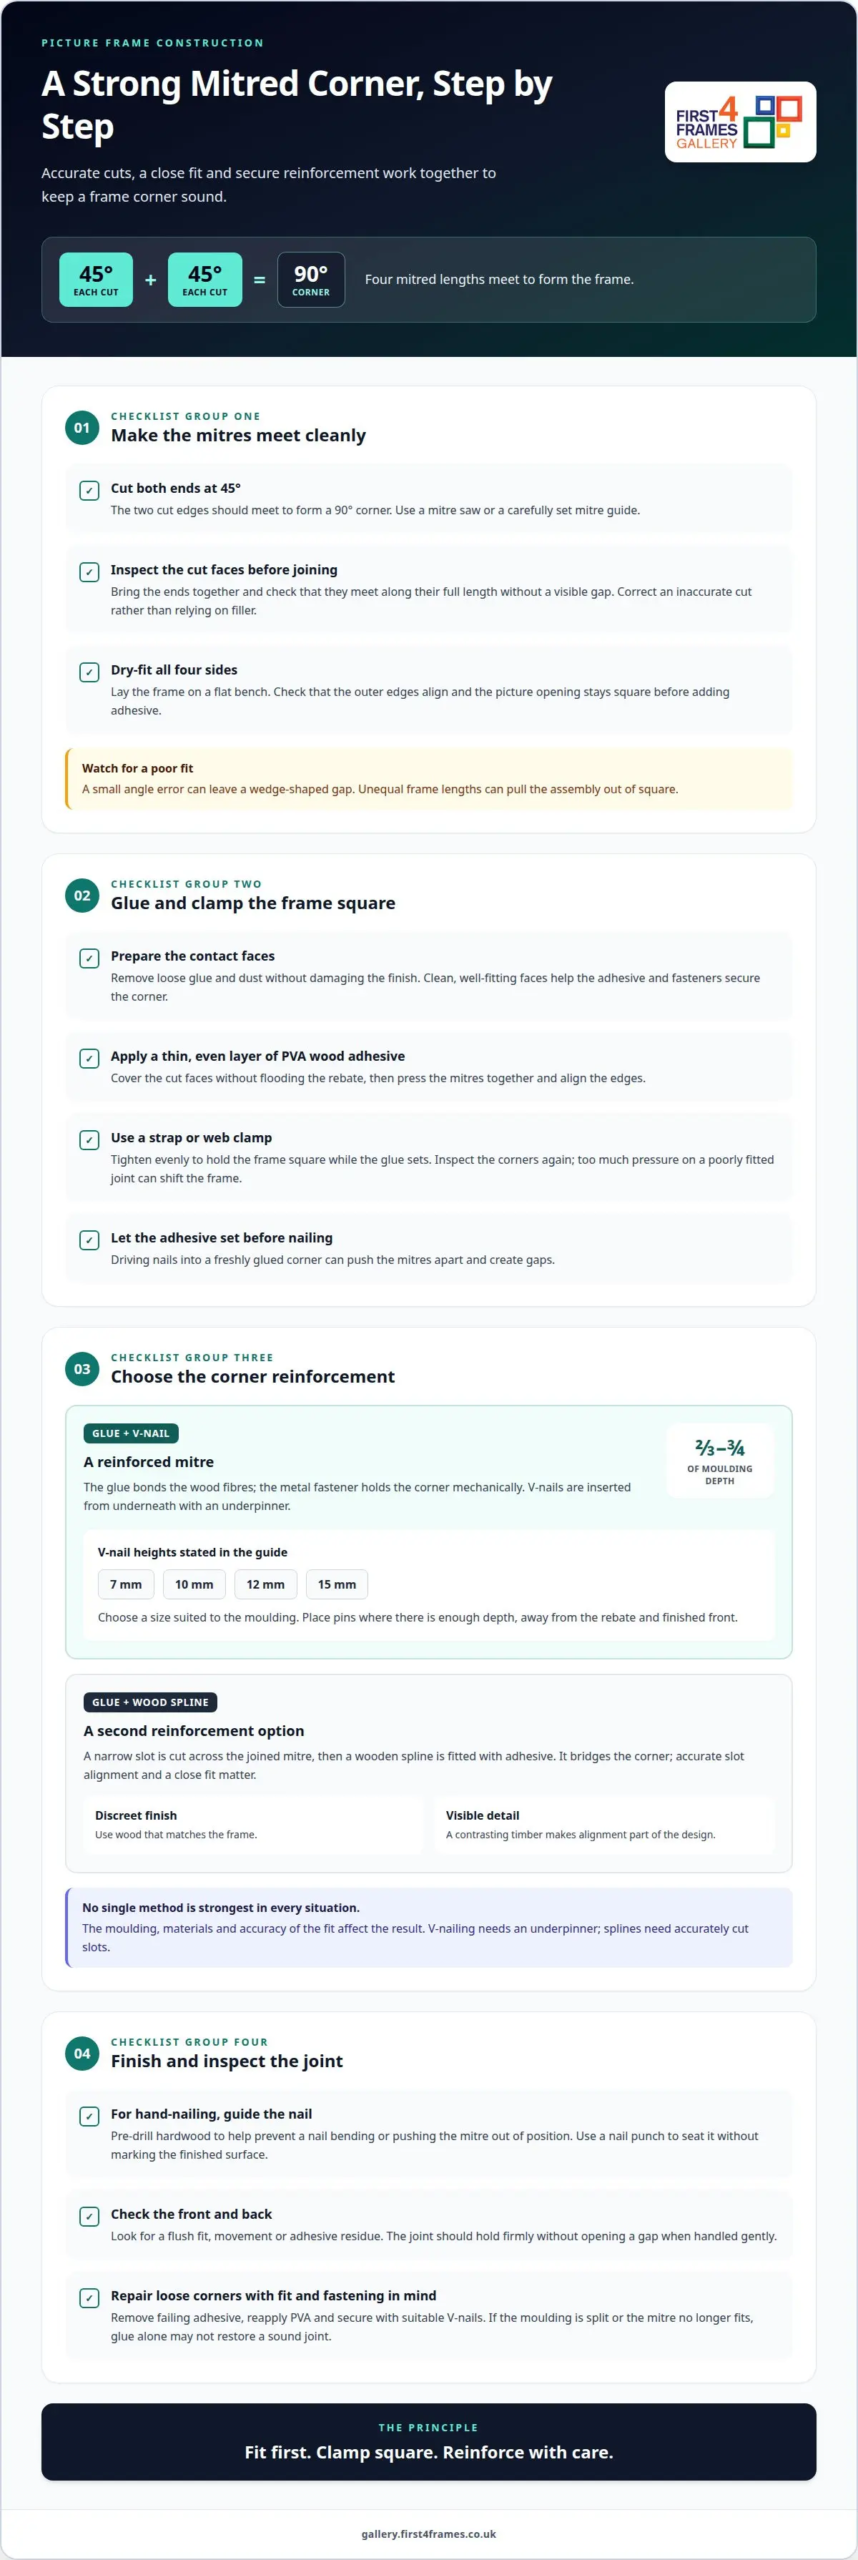
Picture frames are commonly made by joining four mitred lengths, with each 45-degree edge meeting its neighbour at a 90-degree corner. A reinforced mitre, combining adhesive and a mechanical fastener, is a standard professional approach; splines can add further reinforcement. No joint is strongest in every situation, because the moulding and accuracy of the fit matter. Cost and difficulty depend on the method: V-nails and glue need suitable tools, while cutting spline slots adds work.
-
Cut Mitres to the Correct Angle
Cut each end at 45 degrees so the two edges form a 90-degree corner. Use a mitre saw or a carefully set mitre guide, then bring the cut ends together and check that their faces meet without a visible gap. If the angles or lengths differ, the frame may sit out of square. Colour the cut mitre ends to match the finish; this can make small gaps or slight misalignment less noticeable.
-
Join Corners with V Nails
Apply PVA wood adhesive to the clean mitred faces, then press them together before inserting V-nails from underneath with an underpinner. The glue bonds the wood fibres, while the metal fastener holds the corner mechanically. V-nails commonly come in 7 mm, 10 mm, 12 mm and 15 mm heights. Choose a size that suits the moulding’s depth, rather than driving a fastener so far that it breaks through the front or back.
-
Reinforce Corners with Wood Splines
Cut a narrow slot across the joined mitre, then fit a wooden spline with adhesive. The spline bridges the corner and reinforces the joint, adding a mechanical connection to the glued faces. Use wood that matches the frame for a discreet finish, or choose a contrasting timber to make the join visible. Align the slot and spline accurately: a loose fit can weaken the joint, while a contrasting spline makes careful alignment part of the design.
-
Compare Joint Strength, Cost, and Difficulty
Choose a method to suit the moulding and finish. A glued mitre held with V-nails is a practical reinforced joint; adding a spline provides another form of reinforcement. Neither method is automatically strongest for every frame, as the fit, materials and assembly all affect the result. V-nailing requires an underpinner, while splines need accurately cut slots. Compare the tools and preparation involved rather than assuming one method is always cheaper or easier.
Underpinning with v-shaped pins and glue
To repair a loose corner, carefully separate the joint and remove failing adhesive. Reapply PVA wood glue and secure the joint with suitable V-nails. If the moulding is split or the mitre no longer fits, adding glue alone may not restore a sound joint.
- Prepare the mitred faces. Check that both edges meet cleanly and sit flush. Remove loose glue and dust without damaging the frame’s finish. Underpinning suits hard and soft woods, but clean, well-fitting faces help the adhesive and pins secure the corner.
- Apply PVA wood adhesive. Spread a thin, even layer across the cut faces, covering the contact area without flooding the rebate. Press the mitres together and align the edges. The adhesive bonds the wood fibres, while the V-nail provides mechanical reinforcement.
- Select a suitable V-nail. Choose a pin that reaches between two-thirds and three-quarters of the moulding’s depth. V-nails commonly come in 7 mm, 10 mm, 12 mm and 15 mm heights. Match the pin to the moulding so it secures the joint without breaking through its surface.
- Load and position the underpinner. Set the joined corner square in the machine, then insert the V-nail from underneath. On an Alfamacchine U200 underpinner, place the nails with their adhesive side facing up. Keep the moulding steady as the machine drives each pin into the mitre.
- Reinforce the corner carefully. Place pins where the moulding is deep enough to hold them, away from the rebate and finished front. For a hand repair, clamp the aligned corner while the adhesive sets, then use a suitable frame fastener. Don’t force a bent pin into the wood.
- Check the finished join. Inspect the front and back for a flush fit, movement or adhesive residue. A repaired corner should hold firmly without opening a gap when handled gently. For examples of framed artwork, browse the framed art gallery.

Avoiding gaps during assembly
- Inspect each mitre before adding adhesive. Bring the cut ends together and check that the faces meet along their full length. A small angle error can leave a wedge-shaped gap, while unequal frame lengths can pull the assembly out of square. Correct the cut before joining instead of relying on filler to disguise a poor fit.
- Dry-fit the four sides. Arrange the frame on a flat bench and bring the corners together without glue. Check that the outer edges align and the picture opening stays square. A strap clamp can hold the frame temporarily, making it easier to inspect each mitre before fastening.
- Clamp the frame as you apply glue. A well-cut mitre lets a web or strap clamp draw the four sides square as you apply adhesive. Tighten the clamp evenly, then inspect the corners again. Too much pressure on a poorly fitted joint can shift the frame instead of closing the gap.
- Let the adhesive set before nailing. Keep the frame clamped while the glue dries. Driving nails into a freshly glued corner can push the mitres apart and create gaps. Once the joint has set, nail the frame while keeping its corners aligned.
- Pre-drill hardwood before hand-nailing. Hardwood can resist a nail, causing it to bend or push the mitre out of position. A pilot hole helps guide the nail into the joint. Use a nail punch to seat it fully without striking or marking the frame’s finished surface.
- Fill only a tight, secured joint. You can fill a small remaining gap if the mitre fits well and has a mechanical fastener. Filler won’t make a loose corner sound: correct the fit and secure the joint first, then finish the surface to suit the frame.
- Take extra care with finished moulding. It can be difficult to join already-finished lengths without visible flaws, because the cut edges may reveal an unfinished line. Inspect the corners in good light before assembly, and don’t use colour or filler as a substitute for accurate cuts and careful alignment.
Cross-nailing frame corners
- Clamp the corner before driving nails. Hold the two frame pieces firmly together to keep the mitred faces aligned. A clamp can help keep the frame pieces aligned while you nail the corner. Check that the outer edges remain flush, and keep the frame steady throughout fastening.
- Choose thin steel nails for the moulding. Thin steel nails are advisable for frame corners rather than iron nails. Choose a length that secures the joint without emerging through the finished face or inner rebate. Headless pinner pins can give a discreet finish, but they resist pulling through less effectively than stronger mechanical fasteners.
- Cross-nail headless pins to improve hold. Drive the pins at opposing angles through the corner so their paths cross inside the joined pieces. This can help resist pull-through, a particular weakness of headless pinners. Keep the pins within the wood and away from the picture opening: an exposed tip can damage the frame or create a hazard.
- Pre-drill hardwood before hand-nailing. A pilot hole guides the nail and reduces the chance of it bending or pushing the mitre apart. A little oil or wax on the nail tip can also reduce bending as it enters the wood. Use a nail punch to seat the head fully without striking the finished surface.
- Check nail placement and the joint. Two nails along the horizontal sides can look neat, but this is the least secure arrangement among the options described. Keep the clamp on while checking the corner for movement, gaps and nail heads that sit proud. The joint should stay aligned when you release the clamp.
- Consider the finished frame as a whole. Cross-nailing is a fastening method, not a way to correct poorly fitting mitres. Accurate cuts, a held corner and carefully placed pins work together. To explore examples of finished picture frames, browse the framed art gallery.
First4Frames Gallery: Ready-to-Hang Framed Art
First4Frames Gallery offers Ready-to-Hang Framed Art, Custom Picture Framing and Giclée Fine Art Prints. For Online picture framing, choose your frame online and design your framed artwork as custom framed art prints or bespoke framed wall art. Its art print framing service brings the print and frame together, whether you’re looking for framed wall art or a print to complement your space.
Explore fine art, coastal wall art, landscape wall art and Scottish landscape art, alongside contemporary art prints, photography prints, and work by best-selling artists and famous artists. If you use a wall art visualiser, you can visualise art on your wall and see artwork before you buy. To discuss framing or artwork for your space, contact First4Frames Gallery.
Give Your Artwork a Frame That Feels Right
Understanding the different types of frame corner joins helps you recognise the care that goes into a finished frame. Then consider how the artwork’s colours, scale and character will look in your room. A thoughtfully framed piece can feel at home in its surroundings while preserving the details that drew you to it.
If you’re ready to bring artwork into your space, explore options that suit your taste and the atmosphere you want to create. First4Frames Gallery offers pieces and framing choices to help make that vision yours, whether you’re choosing art for a quiet corner or a more prominent wall.
Explore framed artwork and take the next step towards a display that feels distinctly your own.
Frequently Asked Questions
What are the main types of frame corner joints?
Common frame corner joints include mitre, butt, half-lap, spline, dovetail and mortise-and-tenon joints. A mitre creates a clean angled meeting line, while a butt joint brings square-cut ends together. Half-laps overlap, and splines reinforce mitres with an inserted strip. Dovetail and mortise-and-tenon joints use shaped, interlocking parts, creating a more visible feature or a traditional look.
How do mitre, butt, dovetail and mortise-and-tenon corner joints differ?
A mitre joins angled ends, keeping the frame’s profile continuous around the corner. A butt joint is simpler: one square-cut end meets another, leaving the end grain visible. Dovetail joints use flared, interlocking shapes. A mortise-and-tenon joint fits a projecting tenon into a matching opening, or mortise. These joinery choices affect appearance, preparation and how the pieces connect.
Which corner joints are best for wooden picture frames?
For a traditional picture frame, a glued, mechanically reinforced mitre is a practical choice because it preserves a neat, continuous profile. A spline can add reinforcement and create a decorative contrast. The best method depends on the moulding’s shape, wood and intended finish. For example, a broad, flat profile can accommodate reinforcing fasteners more readily than a narrow or unusually shaped moulding.
How are mitred frame corners joined and reinforced?
Join mitred corners by bringing the angled faces together with adhesive, then adding mechanical reinforcement suited to the moulding. Drive V-nails from beneath with an underpinner, or use hand-driven nails or splines. Keep the profile aligned as you fasten it. For a delicate finish, position fasteners away from the visible front and the frame’s inner opening.
How do you make a splined mitre joint?
First assemble the mitred corner, then cut a narrow slot across the joint using a controlled saw or router setup. Make a matching wooden spline, check its fit, then apply adhesive and insert it. Once the glue sets, trim the spline flush and sand carefully. Contrasting timber can turn the reinforcement into a deliberate visual detail.
What tools are needed to cut accurate frame corner joints?
For mitres, use a mitre saw or a mitre guide with a hand saw, plus a measuring tool and square to check lengths and alignment. A stable bench helps hold the moulding steady during cutting. Joining may require a strap clamp and underpinner. Splined joints also need a saw or router that can cut a consistent slot across the mitre.