There’s a unique frustration that comes with cleaning a beloved picture frame. You aim for a crystal-clear view, but instead, you’re left with stubborn streaks, distracting smudges, or a fine layer of lint. The worry is real, too: will the cleaner damage the beautiful wooden frame, or seep behind the glass and ruin the artwork itself? Knowing how to clean picture frame glass properly can feel like a secret reserved only for professional galleries.
It’s a secret we’re ready to share. As passionate artisans with over two decades of bespoke framing experience, we believe the glass is the invisible hero that protects and presents your art. In this guide, we will walk you through the simple, safe techniques our expert framers use to achieve that perfect, gallery-worthy finish on any type of glass, from standard glazing to special anti-glare or acrylic surfaces.
Prepare to say goodbye to streaks and worry. You’ll gain the confidence to care for your framed art safely, ensuring the view is always as spectacular as the piece itself.
Before You Start: Gathering the Right Tools for a Streak-Free Shine
The secret to a flawless, streak-free finish lies not in aggressive scrubbing, but in careful preparation. Before you even touch the glass, assembling the right tools is the most crucial step in learning how to clean picture frame glass professionally. Using the wrong supplies can lead to frustrating streaks, lint, or worse, permanent damage to your frame or the precious artwork it protects. This simple preparation is the foundation for a beautiful result every time.
For a quick visual guide on the correct technique, take a look at this helpful video:
The Best Cleaning Solutions (And What to Avoid)
Put down the standard blue window spray. The best solution is one you can make yourself: a simple 50/50 mix of isopropyl alcohol and distilled water in a spray bottle. This mixture cleans effectively and evaporates quickly without leaving residue. If you prefer a commercial product, choose one that is specifically labelled as ammonia-free and vinegar-free.
Why is this so important? Ammonia and vinegar-based cleaners are too harsh. They can seep under the edge of the glass and damage your artwork or photo mount. These chemicals can also damage special coatings found on different types of picture frame glass, such as anti-reflective or UV-protective layers. Never use abrasive cleaners or furniture polish, as they will scratch or smear the surface.
Choosing Your Cleaning Cloths
Your choice of cloth is just as critical as your cleaning solution. Forget paper towels or old t-shirts, which are notorious for leaving behind a trail of lint and fine scratches. Instead, arm yourself with two high-quality, clean microfiber cloths. Designate one for applying the cleaning solution and gently wiping the surface, and the second, completely dry cloth for buffing the glass to a perfect, streak-free shine.
Other Helpful Tools
To tackle dust and dirt like a true professional, a few extra items can make all the difference. Having these on hand will help you manage the fine details with ease.
- A soft-bristled brush: A clean paintbrush or a camera lens brush is perfect for whisking away loose dust from the frame and glass corners before you apply any liquid.
- Cotton swabs: Ideal for getting into the tight edges where the glass meets the frame, removing any grime that a cloth can’t reach.
- A can of compressed air: For stubborn dust particles that refuse to be brushed away, a quick blast of compressed air provides a touch-free solution.
The Professional 5-Step Method for Cleaning Standard Picture Glass
In our twenty years of professional framing, we’ve learned that achieving a spectacular, streak-free finish isn’t about harsh chemicals or aggressive scrubbing. It’s about precision and technique. This is the exact, fail-safe method we use in our workshop to ensure every piece of art is presented perfectly. Following these steps in order is the key to understanding how to clean picture frame glass without trapping dust under the edges or leaving behind frustrating smudges. This process works beautifully whether your frame is hanging on the wall or laid flat for a more detailed clean.
Step 1: Prepare Your Workspace and Remove Dust
Before any liquid touches the glass, your first task is to remove all loose dust and debris. If you’ve taken the frame down, lay it on a soft, clean, lint-free towel to protect both the frame and your surface. Using a very soft-bristled brush (like a watercolour or makeup brush) or a gentle puff of compressed air, carefully clear the dust from the glass surface. Pay special attention to the corners and the join between the glass and the frame, as this is where dust loves to accumulate.
Step 2: Apply the Cleaner Correctly
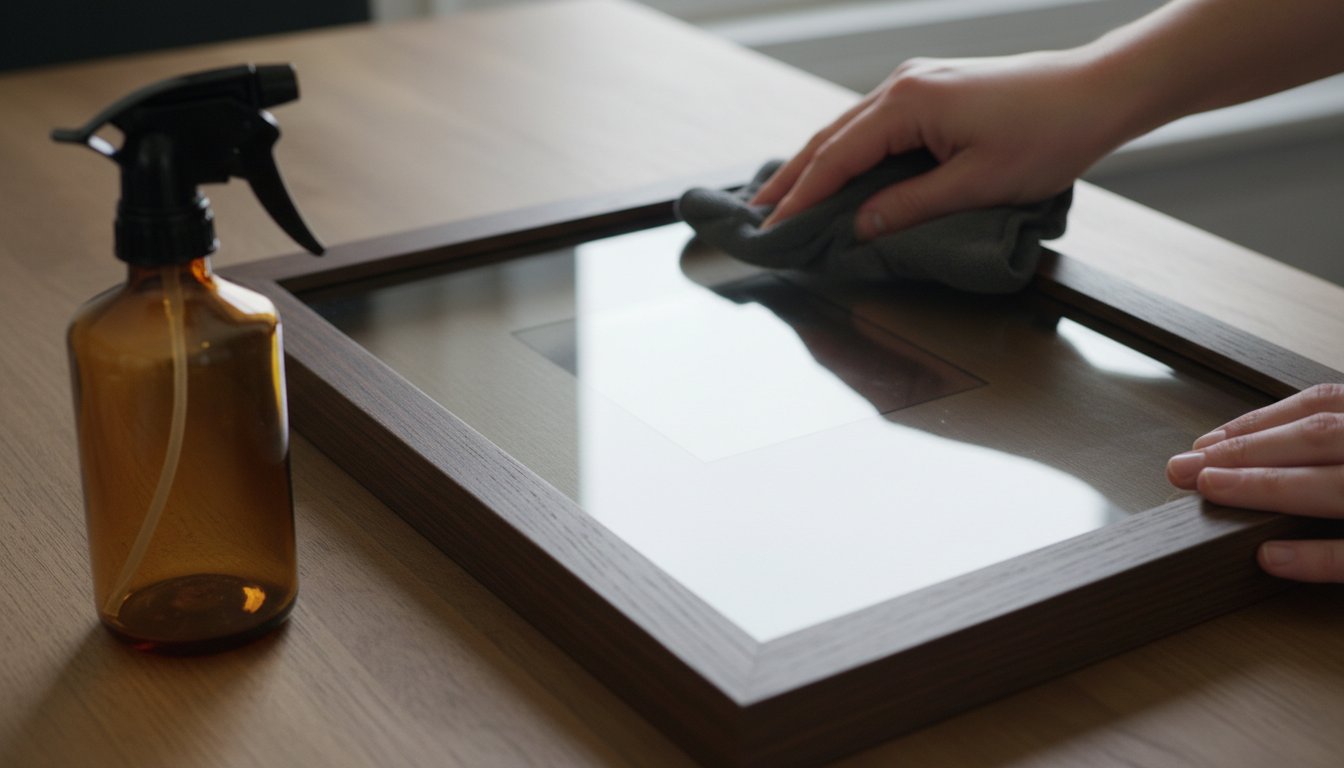
This is the most critical step for protecting your artwork. Never, ever spray cleaner directly onto the picture frame glass. This prevents any possibility of the liquid seeping under the edge of the glass and causing irreversible moisture damage to the mount, or worse, the artwork itself. Instead, lightly dampen a clean, folded microfiber cloth with your chosen cleaning solution. The cloth should be moist, not dripping wet.
Step 3: Wipe with a Purpose
Technique is everything when it comes to a flawless finish. Starting at the top corner of the glass, wipe downwards in a continuous ‘S’ pattern until you reach the bottom. Use gentle, even pressure to lift away fingerprints and grime. This professional method is echoed in many expert Tips For Cleaning Glass Surfaces, as it ensures you cover the entire surface efficiently. Avoid scrubbing in circles, which can create static electricity that attracts more dust and often just pushes the dirt around, leading to streaks.
Step 4: Dry and Buff to a Perfect Finish
Timing is key for this final step. Immediately after wiping with the damp cloth, take your second, completely dry microfiber cloth and follow the exact same path. Using the same top-to-bottom ‘S’ motion, wipe away any remaining moisture. The goal is to dry the glass before any evaporation can occur, as that’s what causes streaks. Once dry, give the glass a final, gentle buff to reveal a crystal-clear surface that lets your beautiful art shine through without distraction.
Specialty Glass Care: Cleaning Acrylic, Anti-Glare, and Museum Glass
The first step in achieving a flawless, professional finish is understanding that not all picture frame ‘glass’ is actually glass. Modern framing utilises a range of premium glazing options, each designed to protect and display your beautiful artwork perfectly. Using the wrong cleaner on these specialty surfaces can cause irreversible damage, such as clouding, crazing, or stripping away protective coatings. Before you begin, it’s crucial to identify your glazing type.
Knowing the material is the most important part of learning how to clean picture frame glass correctly. Using the wrong products can be a costly mistake, but with the right technique, you can maintain that crystal-clear view for years. For a complete overview, these professional cleaning tips for picture frames offer excellent guidance on caring for both the glazing and the frame itself.
How to Clean Acrylic or Plexiglas (Perspex)
Acrylic, often known by brand names like Plexiglas or Perspex, is a lightweight and shatter-resistant alternative to glass. However, its main drawback is that it is a soft plastic that scratches very easily. Standard glass cleaners are your enemy here.
- NEVER use cleaners containing ammonia, alcohol, or other harsh solvents. These chemicals can cause the acrylic to become cloudy or develop fine cracks over time, a process known as crazing.
- Choose the right solution. Opt for a dedicated anti-static acrylic cleaner or a simple mixture of mild washing-up liquid and water.
- Use an exceptionally soft cloth. A premium, non-abrasive microfiber cloth is essential to avoid creating fine scratches on the surface. Never use paper towels or rough fabrics.
Cleaning Anti-Reflective (AR) and Museum Glass
Premium options like Anti-Reflective (AR) and Museum Glass feature sophisticated optical coatings that minimise reflections and glare, offering an incredibly clear view of your artwork. These delicate coatings demand specific care to maintain their performance. Harsh chemicals can easily damage them, leaving you with a hazy, streaky finish. For these surfaces, the two-cloth method is essential for a professional, streak-free result. Use one clean, lightly dampened microfiber cloth to wipe the surface, and a second, completely dry microfiber cloth to immediately buff it dry.
Tips for UV-Protective Glass
UV-protective glass is designed to filter out harmful ultraviolet light that can cause the colours in your prints and photographs to fade over time. The UV-protective layer is typically integrated into the glass or applied as a durable coating. For cleaning, you should treat it like the high-quality glazing it is. If it also has an anti-reflective coating, follow the guidance for AR glass. Otherwise, a gentle, ammonia-free glass cleaner is always the safest and most effective choice to preserve both the clarity and the protective properties of the glass.
Unsure what kind of glazing is protecting your art? Explore our framing options to see the difference premium materials can make.

Top Mistakes to Avoid When Cleaning Your Framed Art
You’ve gathered your premium materials and are ready to restore that crystal-clear view of your beautiful artwork. But wait. The secret to a professional, streak-free finish isn’t just about what you do-it’s also about what you don’t do. A few common errors can quickly lead to streaks, trapped dust, or even permanent damage to your art. Learning what to avoid is a crucial step in mastering how to clean picture frame glass perfectly every time.
The Error of Spraying Directly on the Frame
This is the single most important mistake to avoid. When you spray cleaner directly onto the glass, the excess liquid inevitably runs down and pools at the bottom edge of the frame. Through a process called capillary action, this moisture can be wicked up under the glass, seeping into the mount board and, in the worst cases, onto the artwork itself. This can cause irreversible water stains and ruin your treasured piece.
Using Paper Towels or Abrasive Cloths
While convenient for other household jobs, paper towels are the enemy of a flawless finish on glass. They are made from coarse wood fibres that can leave behind tiny micro-scratches, which are especially noticeable on acrylic glazing (Perspex). Worse still, they break down as you wipe, depositing a fine layer of lint that clings to the surface. For a truly professional, lint-free result, always stick with high-quality, clean microfiber cloths.
Cleaning in Direct Sunlight or a Dusty Environment
Your environment matters more than you might think. Cleaning glass in direct sunlight or under a hot lamp causes the cleaning solution to evaporate almost instantly, before you have a chance to wipe it away cleanly. This is a primary cause of stubborn streaks. Likewise, trying to clean in a dusty room is a losing battle, as new particles will settle on the glass as fast as you can remove them. Always choose a clean, well-lit spot away from direct sun for the best results.
Avoiding these simple pitfalls is the key to ensuring your artwork remains the centrepiece, viewed through impeccably clean glass. The care you take in cleaning reflects the love you have for the art-a passion we share in the craftsmanship of every beautiful frame we create.
Long-Term Care: Keeping Your Picture Frames Dust-Free and Beautiful
Achieving a perfect, streak-free shine is a fantastic start, but the true art of preservation lies in consistent, long-term care. Proper maintenance is the bridge between a one-time clean and the lasting beauty of your framed art. By adopting a simple, regular routine, you can prevent the build-up of dust and grime that can dull your display and even cause microscopic scratches over time. This proactive approach significantly reduces how often you need to perform a deep clean with liquids, protecting both the glass and the artwork within.
While knowing how to clean picture frame glass is an essential skill, understanding how to care for the entire piece ensures its longevity and spectacular appearance on your wall.
The Weekly Dusting Routine
Your best line of defence against dirt is a quick, gentle dusting once a week. This simple act prevents airborne dust particles from settling and becoming abrasive. Use a soft, dry microfiber cloth or a traditional feather duster to lightly wipe the glass and the frame. This takes only a moment but is the single most effective way to maintain that just-cleaned clarity and protect the surface from harm.
Caring for the Frame Itself
The frame does the heavy lifting in the relationship between your art and your decor, and it deserves its own cleaning regimen. Always use a separate cloth from the one you use for the glass. Depending on the material, your approach may vary slightly:
- Wood Frames: Use a separate, lightly dampened microfiber cloth. For a deeper clean, apply a pH-neutral wood cleaner sparingly to the cloth, never directly onto the frame.
- Metal Frames: A simple wipe with a lightly damp cloth is typically all that’s needed to restore the shine to aluminium or other metal frames.
- Ornate Frames: For frames with intricate details and crevices, a soft, clean paintbrush or a new makeup brush is perfect for gently whisking away dust from hard-to-reach areas.
When to Seek Professional Help
Sometimes, a problem is beyond a simple surface clean. If you ever notice dust, condensation, or-in the worst case-mould inside the glass, do not attempt to open the frame yourself. Professionally sealed frames are designed to create a protective micro-environment for your fine art. Breaking that seal can introduce new contaminants and risk irreparable damage to the print and mount. For deep cleaning, frame repairs, or any issues within the glass, it’s always best to consult our expert team to ensure your art is handled with professional care and craftsmanship.
A Clear View of Your Cherished Art
Now that you’re equipped with professional techniques for a streak-free shine, you can preserve the beauty of your favourite pieces with confidence. The key takeaways are simple: always use the right tools, like soft microfiber cloths, and tailor your approach for specialty materials like acrylic or museum glass. Mastering how to clean picture frame glass is a vital skill for any art lover, ensuring nothing stands between you and the artwork.
Of course, a perfect clean starts with a premium frame. At First 4 Frames, we believe the frame is the bridge between your room and the art it holds. With over 20 years of bespoke framing experience, our team are experts in conservation and speciality glazing. We are proud to be trusted by artists and collectors across Scotland to deliver unparalleled craftsmanship that protects and enhances every single piece.
If you’re ready to find a new masterpiece for your space, already protected by professionally fitted, premium glass, we invite you to explore our gallery. Discover our collection of beautifully framed art, ready to hang and enjoy a spectacular, crystal-clear view from the moment it arrives.
Frequently Asked Questions
How often should I clean my picture frame glass?
The ideal frequency depends on your home’s environment. For general upkeep, a light dusting with a soft, dry microfibre cloth every one to two weeks is perfect for preventing build-up. A more thorough, streak-free clean is best done every few months or whenever you notice fingerprints or smudges. This simple routine ensures your beautiful artwork always remains the centre of attention, free from distracting marks and dust, maintaining its pristine gallery look.
What’s the best way to remove old sticker residue from frame glass?
Tackling stubborn sticker residue requires a gentle touch to protect the glass. Start by dabbing a small amount of isopropyl alcohol or a dedicated citrus-based sticker remover onto a cotton pad. Press it onto the residue for a minute to soften the adhesive, then gently rub in a circular motion. Use a plastic scraper or an old credit card to carefully lift the softened residue. Always test on an inconspicuous corner first to ensure it doesn’t affect any special coatings.
Can I use Windex or other household window cleaners on picture frames?
We strongly advise against using standard household window cleaners. Many contain ammonia or harsh chemicals that can damage the picture frame’s finish, seep behind the glass to harm the artwork, or strip away special UV-protective or anti-glare coatings. For a safe and spectacular result, stick to a simple homemade solution of distilled water and white vinegar. This professional method ensures both your frame and the precious art within are perfectly preserved for years to come.
What should I do if dust or a hair gets on the inside of the glass?
An internal speck of dust requires careful disassembly of the frame. Lay the frame face down on a soft, clean towel. Gently bend back the tabs holding the backing board in place and remove it, along with the artwork. Using a soft, dry brush or a can of compressed air, carefully remove the debris from the inside of the glass and the artwork itself. Reassemble with care, ensuring everything is perfectly aligned before securing the backing board again.
How do I clean the actual picture frame without damaging it?
The frame itself deserves just as much care as the glass. For wood or composite frames, a soft, dry microfibre cloth is usually sufficient for dusting. For a deeper clean, use a cloth that is very slightly dampened with water. For ornate or gilded frames, use only a dry, soft-bristled brush to avoid damaging the delicate finish. Never spray cleaner directly onto the frame, as moisture can cause irreparable damage. This gentle approach maintains the craftsmanship of the frame.
Is it safe to clean a very old or antique picture frame myself?
When it comes to antique frames, we recommend extreme caution. While our guide on how to clean picture frame glass is safe for most items, antique frames can be incredibly fragile. The gilding, finish, and structural integrity may be compromised by age. For pieces with significant monetary or sentimental value, we always advise consulting a professional art restorer or framer. They possess the specialist knowledge to clean and preserve your treasured item without risking damage.