You’ve poured hours of dedicated stitching into a beautiful piece of embroidery, a true testament to your skill and patience. Now comes the final, often daunting, step: displaying your creation. The fear of a single wrinkle ruining the fabric, uncertainty over which materials will protect your delicate threads, or finding that a standard frame just isn’t deep enough can be paralysing. But what if you could approach this final stage with complete confidence? The process of framing embroidered work should be a celebration of your craftsmanship, not a source of stress.
This professional guide is designed to empower you. We will walk you through every crucial step, from preparing and mounting your fabric for a perfectly taut finish to selecting the ideal bespoke frame and glazing that will enhance your art. Embark on this final part of your creative journey with us, and learn how to achieve a flawless, spectacular finish that protects your treasured piece for years to come. Let’s turn your hard work into a perfectly presented masterpiece.
Key Takeaways
- Understand that embroidery is a delicate textile art; a proper frame is essential to protect your beautiful work from dust, UV light, and damage.
- Achieving a flawless, professional finish begins long before the frame; discover the crucial preparation steps for your fabric.
- Master the two core DIY methods for mounting to achieve the perfect, drum-tight tension essential for professionally framing embroidered work.
- Learn how to select the right frame, mount, and glazing that not only protects your piece but also perfectly complements your art and your home’s décor.
Why Your Embroidered Work Deserves a Proper Frame
You’ve poured hours of passion and patience into your embroidery, creating a beautiful and tactile piece of textile art. Each stitch tells a story of dedication and creativity. But once the final thread is tied, how do you give your creation the spectacular showcase it deserves? This is where the art of framing embroidered work comes in. It’s about so much more than just hanging it on the wall; it’s about celebrating its texture and preserving its beauty for generations to come.
Unlike a flat print, your needlework has depth, dimension, and delicate materials that require specialist care. A proper frame serves two crucial purposes: presentation and preservation.
To see how a piece can be transformed, watch this helpful video on preparing embroidery for a frame:
While many stitchers display their finished work in the hoop it was made in, this method offers little protection from the elements. The essential embroidery hoops and frames are tools designed to keep fabric taut during creation, not to shield your art from long-term dangers like dust, UV light, and accidental damage. A bespoke frame acts as both a shield and a stage, enhancing the vibrant colours and intricate textures of your threadwork while ensuring its longevity.
Protecting the Stitches: The Dangers of a Standard Photo Frame
A standard, off-the-shelf photo frame might seem like a quick solution, but it can cause irreversible harm to textile art. Here’s why:
- Flattened Threads: The glass often presses directly against the stitches, crushing the delicate threads and ruining their beautiful, raised texture over time.
- Trapped Moisture: Without proper spacing, there is no airflow between the glass and the fabric. This can trap ambient moisture, creating a risk of mildew or mould growth.
- Acid Damage: Standard backing boards are typically made from materials containing acid, which can leach into your fabric, causing it to yellow and degrade.
DIY vs. Professional Framing: Making the Right Choice
For smaller, fun projects, a DIY approach can be a rewarding experience. However, for a piece that holds significant value—whether it’s a complex design, a family heirloom, or a commissioned work—professional framing is the wisest investment, much like seeking out a specialist for luxury watch repair UK is for a treasured timepiece. A professional framer uses archival, acid-free materials and specialised techniques to mount the fabric perfectly without causing damage. We create the necessary space between the glass and the artwork, ensuring your piece is both beautifully presented and properly preserved. If you have a special piece you want to protect forever, let our experts help. Get a quote for your bespoke framing project.
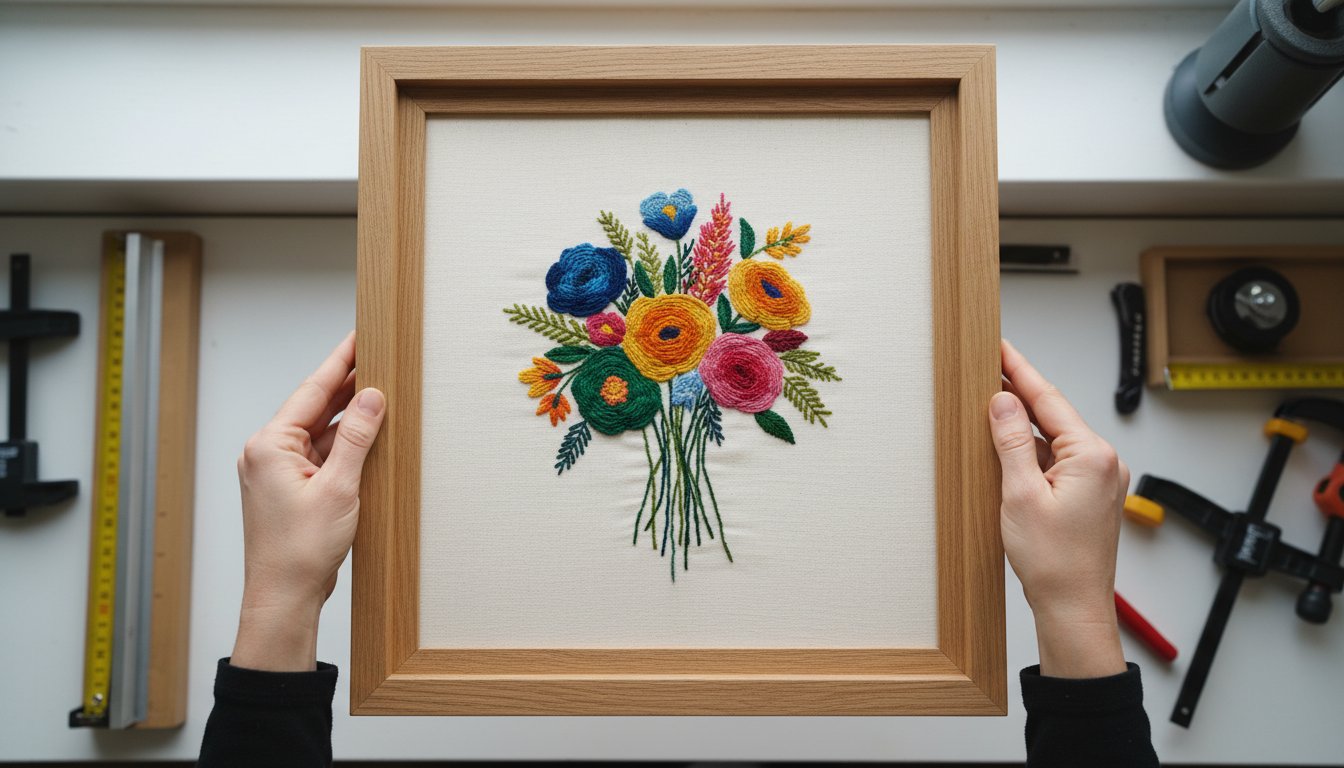
Step 1: Preparing Your Embroidery for its Frame
Before your beautiful embroidery can take pride of place on your wall, it requires careful and thoughtful preparation. This foundational stage is the most critical part of the process; it protects the hours you’ve poured into your craft and is the secret to achieving a professional, gallery-quality finish. Rushing this step can lead to puckering, distortion, or visible blemishes under the glass. Taking the time here ensures your artwork remains pristine for years to come.
To begin, gather the right tools for the job. Having these on hand will make the entire process smoother and more precise:
- A mild, pH-neutral soap (if washing is needed)
- Two clean, light-coloured towels
- An iron and a pressing cloth
- A ruler or measuring tape
- Sharp fabric scissors or a rotary cutter and mat
- Acid-free mounting board
Always handle your fabric with clean hands to avoid transferring oils to the threads or cloth. Before you begin cleaning or mounting, perform a final inspection. Check for any missed stitches or loose threads on the front and trim any stray threads from the back to prevent them from showing through the fabric. For successful stretching later, ensure you have left a generous border of at least 5-7cm (2-3 inches) of spare fabric around your stitched area.
Cleaning and Pressing Your Finished Piece
If your piece needs cleaning, gently hand-wash it in a basin of cool water with a small amount of mild soap. Submerge the piece, let it soak for 15 minutes, and then rinse thoroughly with cool, clean water. Most premium threads like DMC and Anchor are colourfast, but if you’ve used hand-dyed or vintage threads, test a small corner first to check for colour bleed. To dry, roll the piece between two clean towels and press gently to remove excess water. Never wring it out. The most important part of framing embroidered work is the pressing: place the embroidery face down on a thick, clean towel and press from the back with a warm iron. This technique irons the fabric flat without crushing your beautiful stitches.
Squaring the Fabric for a Perfect Mount
A perfectly square piece of fabric is the foundation for a flawless mount. If the fabric’s grain is not aligned, your design can appear warped or skewed once stretched within the straight lines of the frame. To square it up, find the straight grain of your fabric. On Aida or evenweave linen, you can achieve this by gently pulling a single thread from the fabric about 2-3cm from your desired edge. This creates a perfect, straight line to follow. Using a rotary cutter or sharp scissors, carefully trim along this line on all four sides, ensuring your borders are even and your corners are perfect right angles.
Step 2: Mounting Your Embroidery Like a Pro (The DIY Method)
Once your embroidery is clean and pressed, the next step is mounting. This is where you give your beautiful needlework the support it needs to look its best inside the frame. The goal is to achieve a perfectly smooth, drum-tight tension across the entire piece, without any waves or puckers. Before you begin, you’ll need a backing board. We strongly recommend an acid-free foam core or conservation board. Simply measure the inside of your frame’s opening and cut the board to that exact size. Then, lay your ironed embroidery face-up on the board and centre it perfectly, leaving an even border of excess fabric on all sides.
The Lacing Technique for Ultimate Control
Considered the gold standard by museum conservators, lacing is the traditional, archival method for mounting textiles. It creates perfectly even tension and is completely reversible, causing no damage to your fabric. It’s like creating a corset for your artwork.
- Start with a long piece of strong, neutral-coloured thread (like a heavy-duty sewing or upholstery thread).
- Fold one edge of your excess fabric over the back of the board.
- Begin stitching from the centre of one side to the centre of the opposite side, pulling the thread taut like a shoelace.
- Work your way outwards towards the corners, placing stitches about 1-2cm apart. Repeat for the other two sides.
This meticulous approach is a key part of professional framing embroidered work, ensuring your art is preserved for decades.
The Pinning Technique for a Quicker Alternative
If you’re short on time, pinning is a faster and still effective method. The key is to use high-quality, rustproof stainless steel pins. Regular pins can rust over time from moisture in the air, leaving unsightly stains on your precious work. Simply fold the fabric over the edge of the board and secure it by pushing pins directly into the edge of the foam core, not through the back. Start from the centre of each side and work outwards, placing pins every couple of centimetres and pulling the fabric taut as you go. Pay special attention to creating neat, folded corners.
Common Mounting Mistakes to Avoid
Getting the mounting right is crucial for a beautiful, long-lasting display. Avoid these common pitfalls that can unfortunately damage your work over time:
- Never use glue or tape. Adhesives can seep through the fabric, causing permanent stains and becoming brittle and acidic over time.
- Avoid improper tension. Too loose, and your fabric will look wavy; too tight, and you can distort the stitches and the fabric’s weave.
- Don’t skip the acid-free materials. Standard cardboard contains acids that will leach into your fabric, causing it to yellow and deteriorate. Protecting your art is paramount.
Taking the time to mount your piece with care will make all the difference in the final result. For inspiration on how a perfectly mounted piece looks, explore the bespoke creations in our gallery.
Step 3: Choosing the Right Frame, Mount, and Glazing
With your embroidery perfectly prepared, the final step is selecting the components that will protect and showcase your craftsmanship. A frame is more than just a border; it’s a complete system where the moulding, mount, and glazing work in harmony to elevate your art. The goal is to create a beautiful, cohesive piece that feels at home in your space. The sheer number of options can feel daunting, but understanding each element makes the process a joy. Overwhelmed by choice? Our experts can help you design the perfect frame.
Selecting the Perfect Frame Moulding
The frame itself is the bridge between your artwork and your room’s décor. The style should complement the embroidery without overpowering it. Consider the overall feel:
- Style: A rustic, natural wood frame might be perfect for a botanical piece, while a sleek, black frame could suit a modern, geometric design. Ornate frames can add a touch of classic elegance to traditional samplers.
- Colour: A fantastic professional tip is to match the frame colour to a secondary or accent colour within your embroidery. This pulls the whole piece together beautifully.
- Depth: Textile art has texture and dimension. A frame must be deep enough to accommodate the fabric, backing board, and a spacer. A ‘box frame’ is often an ideal solution for ensuring nothing gets compressed.
The Role of Mounts and Spacers
A mount (also known as a mat board) provides visual breathing room, drawing the viewer’s eye inward towards your stitching. But for embroidery, its most critical partner is the spacer. A spacer is a thin fillet that sits discreetly inside the frame, creating a crucial air gap between your embroidery and the glazing. This prevents your delicate stitches from being flattened and reduces the risk of moisture transfer or mould. For added depth and a truly bespoke look, consider a double mount, using a sliver of a secondary colour to accent your work.
Glazing Options: Protecting Your Work from UV Rays
The final protective layer is the glazing. While standard glass is an option, the time and effort you’ve invested in your embroidery deserve premium protection. When it comes to the complex process of framing embroidered work, choosing the right glazing is essential to prevent irreversible damage from sunlight.
- UV-Protective Glass: This is our top recommendation. It blocks up to 99% of harmful UV rays, which are the primary cause of thread colours fading over time.
- Anti-Reflective Glass: For crystal-clear viewing without distracting reflections, this ‘invisible’ glass makes it feel like there is nothing between you and the artwork.
- Acrylic (Perspex): A lightweight and shatter-resistant alternative to glass, it’s a safer option for large pieces or for homes with children and pets. UV-protective and anti-reflective versions are also available.
The Final Stitch: Perfecting Your Framed Embroidery
You’ve poured hours of passion and patience into every stitch, and now you have the knowledge to give your beautiful embroidery the final, spectacular presentation it warrants. From carefully preparing and mounting your fabric to selecting the perfect frame and glazing, you’re equipped to turn your textile art into a lasting treasure. While the DIY approach to framing embroidered work can be incredibly rewarding, sometimes a piece is so special it calls for a master’s touch.
For those irreplaceable pieces, or when you simply want the peace of mind that comes with a guaranteed flawless finish, consider our expert service. Our passionate team brings over 20 years of bespoke framing experience to every project, offering expert advice on design and preservation. We use only premium, conservation-grade, acid-free materials to ensure your needlework is not only beautifully displayed but also protected for generations to come.
Entrust your treasured embroidery to our experts. Explore our bespoke framing service.
Whether you embark on the DIY journey or partner with our artisans, we hope you feel inspired to display your beautiful creations with pride.
Frequently Asked Questions
How much does it cost to get embroidery professionally framed?
In the UK, the cost for professionally framing embroidery typically ranges from £50 to over £200. The final price depends on several factors: the size of your piece, the style of frame moulding you select, the type of glazing (such as UV-protective or anti-reflective glass), and whether a bespoke mount is required. A smaller piece with a standard frame will be at the lower end, while larger works with premium materials represent a greater investment in preserving your art.
Can I frame my embroidery in a deep hoop instead of a square frame?
You certainly can! Displaying your work in its hoop offers a charming and modern aesthetic that celebrates the craft itself. However, for long-term preservation, a traditional frame is superior. A bespoke frame with professional glazing protects your delicate stitches from dust, humidity, and damaging UV light. While a hoop is a lovely display method, a full frame is the best choice for turning your embroidery into a lasting piece of fine art.
How do I stop the glass from squashing my stitches?
The secret is to create a gap between the artwork and the glass. This is best achieved by using either a mount (mat board) or spacers. A mount provides a decorative border that also serves to lift the glass away from the fabric surface. Alternatively, small, hidden plastic or wood fillets called spacers can be fitted into the frame’s recess to hold the glass off the embroidery. This prevents flattening, friction damage, and protects the beautiful texture of your work.
What is the best type of backing board to use for mounting embroidery?
For the ultimate protection of your work, always use an acid-free foam core or a conservation-grade mounting board. These premium materials are chemically stable, meaning they won’t yellow or degrade your fabric and threads over time. It is crucial to avoid standard cardboard or wood backings, as their acidic nature can leach into your art, causing irreversible discolouration and damage. An acid-free board is a cornerstone of quality craftsmanship.
How do I prevent the fabric from puckering or wrinkling inside the frame?
Achieving a perfectly smooth, taut finish requires careful mounting. The fabric should be stretched evenly over an acid-free backing board before it goes into the frame. The most effective professional method is lacing, where the excess fabric is stitched together across the back, pulling it tight like a corset. This creates even tension from all sides. Careful, patient stretching is the key to ensuring your artwork looks flawless and professionally finished.
Should I use a mount (mat board) for my framed embroidery?
Yes, we highly recommend it. A mount serves two vital purposes when framing embroidered work. Aesthetically, it creates visual breathing space, drawing the viewer’s eye towards your beautiful stitching. Functionally, and most importantly, it separates the embroidery from the glass, preventing your stitches from being flattened and allowing air to circulate. A mount elevates the final presentation, giving your piece the gallery-quality finish it truly deserves.