That beautiful, substantial piece of art is ready to transform your room, but the thought of it crashing down can be daunting. The confusion over wall plugs, screws, and stud finders is often enough to leave your masterpiece leaning against the wall for weeks. But it doesn’t have to be that way. Knowing how to hang a heavy picture frame safely is the key to turning that anxiety into a feeling of pure accomplishment.
At First4Frames Gallery, we believe the final step of displaying your art should be as joyful as choosing it. That’s why we’ve poured our twenty years of craftsmanship and expertise into this definitive guide. We’ll walk you through everything, step-by-step: from identifying your wall type and finding a stud (and what to do when you can’t), to selecting the perfect, premium fixings. Get ready to hang your treasured piece securely, perfectly level, and with the pride of a job beautifully done.
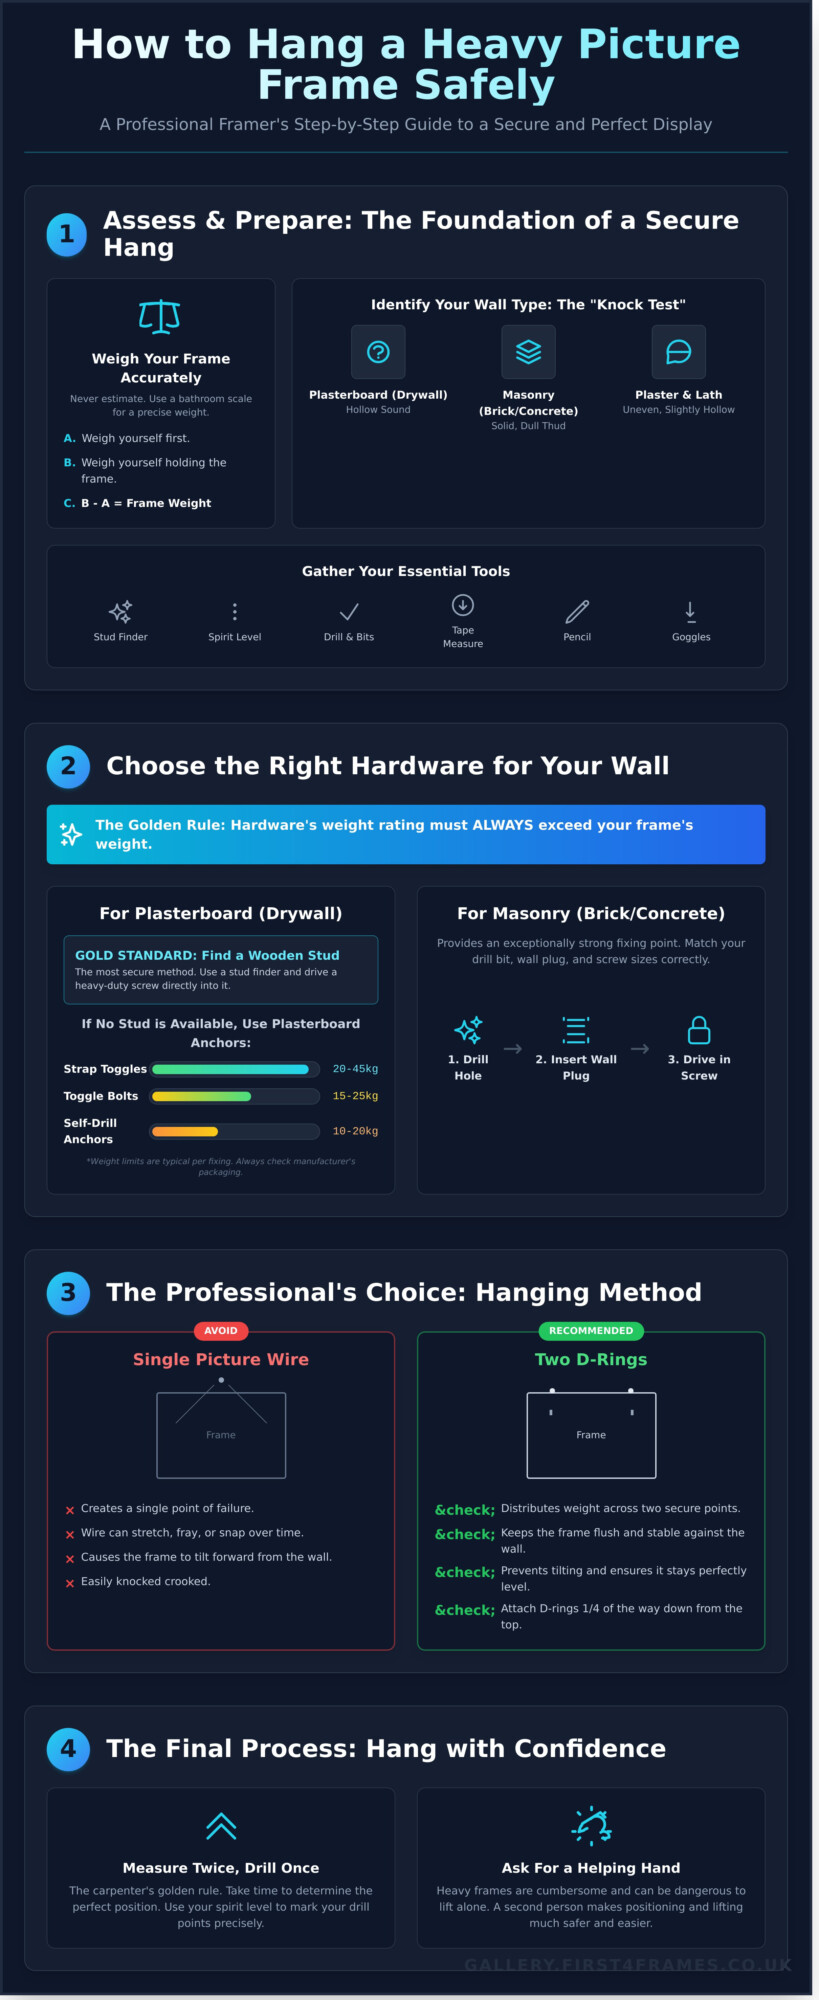
Before You Begin: Assess Your Frame and Wall
Before you pick up a hammer, the journey to displaying your beautiful artwork begins with a simple, crucial assessment. Understanding the challenge-the exact weight of your frame and the type of wall you’re working with-is the secret to a secure, professional, and lasting result. Guesswork can lead to damaged walls or a fallen frame. This initial preparation is the most important part of learning how to hang a heavy picture frame safely and with confidence.
For a visual guide on the fundamentals, this video provides an excellent overview:
How to Weigh Your Picture Frame Accurately
The substantial materials used in a premium picture frame, from solid wood to high-quality glazing, contribute significantly to its overall weight. Never estimate this figure. For an accurate measurement, use a standard bathroom scale. First, weigh yourself and note the number. Then, carefully pick up the frame and weigh yourself again. The difference between these two figures is the precise weight of your artwork. Be sure to write this down, as you’ll need it when selecting the correct hanging hardware.
Identifying Your Wall Type: The Knock Test and Beyond
The type of wall you have is the single most critical factor in choosing the right fixings. The simplest way to start is with the ‘knock test’. Give the wall a firm rap with your knuckle and listen to the sound:
- Plasterboard (Drywall): Produces a hollow sound. This is the most common internal wall type in modern UK homes.
- Masonry (Brick or Concrete): You’ll hear a solid, dull thud. These are typically external or load-bearing walls.
- Plaster & Lath: Common in older properties, this can sound uneven and slightly hollow between the wooden laths.
If you’re still unsure, drill a small test hole in an area that will be covered by the frame. The dust produced-fine and white for plasterboard, reddish or grey and gritty for masonry-will reveal its composition.
Gathering Your Essential Tools
Having the right tools on hand makes the job smoother and safer. Before you start, gather the following essentials:
- Tape measure
- Pencil
- Spirit level
- Stud finder (essential for plasterboard walls)
- Drill with the correct drill bits for your wall type
- Safety goggles, especially when drilling into masonry
Choosing the Right Hardware: A Framer’s Guide
The bridge between your beautiful artwork and the wall is the hardware, and choosing correctly is the most critical step. The golden rule is simple: the hardware’s maximum weight rating must always comfortably exceed your frame’s actual weight. Beyond that, the choice of fixing is determined entirely by your wall material. Forget standard picture hooks or small nails; for a premium, heavy frame, they are simply not up to the task. Getting this right is central to learning how to hang a heavy picture frame safely and securely for years of enjoyment.
For Plasterboard (Drywall) Walls
Most modern UK homes feature plasterboard walls. Your best and most secure option is to locate a vertical wooden stud behind the plasterboard and drive a heavy-duty screw directly into it. If a stud isn’t conveniently located, your next choice is a specialised plasterboard anchor. These clever fixings, like toggle bolts, expand behind the board to distribute the weight over a wider surface area, preventing them from pulling out. For a detailed look at various methods, wikiHow’s solutions for hanging heavy pictures offer a great overview.
| Anchor Type | Typical Weight Limit (per fixing) |
|---|---|
| Strap Toggles | 20kg – 45kg |
| Toggle Bolts | 15kg – 25kg |
| Heavy-Duty Self-Drill Anchors | 10kg – 20kg |
Always check the manufacturer’s specific weight rating on the packaging before purchase.
For Masonry (Brick or Concrete) Walls
Hanging on solid masonry provides an exceptionally strong fixing point. This requires a power drill fitted with a masonry drill bit and suitable wall plugs (often called rawl plugs). The process is straightforward: drill a hole to the specified depth, gently tap the wall plug in until it’s flush with the wall, and then drive your screw into the plug. The plug expands to create a tight, secure grip. The key to success is ensuring your drill bit, wall plug, and screw are all correctly matched in size-this information is usually found on the plug’s packaging.
Picture Wire vs. D-Rings: The Professional’s Choice
For a truly professional finish on a heavy piece, we always advise against using a single strand of picture wire. Over time, wire can stretch, fray, or even snap under significant weight. It also creates a single pivot point, causing the frame to tilt forward from the wall and easily become crooked. Instead, we recommend attaching two D-rings to the back of the frame, about a quarter of the way down from the top. Hang these on two separate, securely fixed wall hooks. This method distributes the load perfectly, keeps your beautiful frame level, and ensures it sits flush and stable against the wall.
The Step-by-Step Hanging Process
With your wall assessed and your premium hardware chosen, you’ve reached the final, rewarding stage. This methodical approach demystifies how to hang a heavy picture frame, turning a daunting task into a simple display of craftsmanship. Remember the carpenter’s golden rule: measure twice, drill once. We strongly recommend asking a friend or family member for a second pair of hands to help lift and position the frame safely.
Following these steps will ensure your beautiful artwork is not only secure but also perfectly positioned to become the focal point of your room.
Step 1: Determine the Perfect Position
Finding the right height is crucial for the artwork’s impact. A general rule used in galleries is to hang art so its centre is at eye level, which is typically around 57-60 inches (145-152cm) from the floor. Once you’ve found your ideal spot:
- Use a pencil to make a very light mark on the wall where the top centre of the frame will be.
- Turn the frame over and measure the distance from the top edge down to the hanging points (the centre of the D-rings).
- Transfer this measurement down from your top-edge mark on the wall. This new mark (or two marks, for two D-rings) is where you will drill.
Step 2: Install Your Wall Fixings
Precision here is key to a level finish. Use your spirit level to ensure your two drilling marks are perfectly horizontal. Now, carefully drill your pilot holes and insert the appropriate wall plugs for your wall type. Screw in your fixings, leaving them protruding just enough for the D-rings to slot onto securely-about 1cm is usually perfect. Give them a gentle tug to ensure they are solid and don’t wobble.
Step 3: Hang and Level Your Artwork
With your helper, carefully lift your artwork. Gently guide the D-rings or hanging wire onto the screw heads. Once the frame is resting on the fixings, place your spirit level on the top edge. Nudge the frame left or right until the bubble is perfectly centred. For a final professional touch, add small felt pads to the bottom corners of the frame to protect your wall and help the art hang straight.
With your masterpiece now beautifully displayed, perhaps it’s time to find its perfect companion? Explore our gallery of premium framed art.
Common Mistakes to Avoid When Hanging Heavy Art
You’ve chosen a beautiful piece of art and a premium, bespoke frame. The final step is getting it on the wall, but this is where the real craftsmanship of the display comes in. When you’re learning how to hang a heavy picture frame, avoiding common errors is just as important as knowing the right steps. Even a small miscalculation can lead to a fallen frame or unsightly damage to your walls. By learning from these frequent pitfalls, you can ensure your spectacular artwork remains secure and perfectly displayed for years to come.
Using a Single Nail or the Wrong Hook
It can be tempting to use a single nail for a quick fix, but this is a critical mistake for heavy art. A single fixing point creates a pivot, allowing the frame to shift easily, and it concentrates all the stress on one small area of your wall. Furthermore, standard picture hooks found in most kits are simply not rated for significant weight and can fail unexpectedly. For true peace of mind, always use at least two fixing points and ensure your hooks or screws are specifically rated to support well over the weight of your frame.
Ignoring Wall Studs
Behind your plasterboard walls lies a sturdy timber frame made of vertical supports called studs. A wall stud is by far the strongest anchor point available, offering a secure foundation that plasterboard alone cannot match. Failing to check for a stud is a major missed opportunity for maximum security. A simple electronic stud finder, often costing less than £20, is an invaluable tool that removes all guesswork. Locating a stud provides a rock-solid installation you can trust.
Skipping the Spirit Level
Hanging a picture ‘by eye’ is a gamble that rarely pays off. Our eyes can be deceiving, and what looks straight from one angle might appear crooked from another. A slanted frame can make an entire room feel off-balance, distracting from the beauty of the art it’s meant to showcase. For a professional finish, use a spirit level twice: first when marking your drill holes, and again when you place the frame on the wall for final adjustments.
These expert tips will help you hang your art with the confidence of a professional. Taking that little bit of extra care is the final touch that honours both the artwork and your home. Feeling overwhelmed by the details? To make the process completely hassle-free, explore our beautiful collection of ready-to-hang art, delivered with the perfect, professionally-selected fixings for a flawless display right out of the box.
Hang Your Masterpiece with Confidence
Hanging a substantial piece of art doesn’t have to be daunting. By carefully assessing your wall, choosing the right heavy-duty fixings, and following a precise, measured approach, you now have the expertise for how to hang a heavy picture frame safely and securely. This ensures your treasured artwork not only looks spectacular but also remains firmly on your wall for years to come.
Of course, the journey to a beautiful wall begins with the perfect piece. With over 20 years of professional framing experience, we understand the importance of quality craftsmanship. Our bespoke service uses only high-quality materials for both frames and fixings, ensuring your art is perfectly presented. If you’d rather start with art that’s designed to impress and is ready for display, we invite you to browse our gallery of beautiful, professionally framed art, ready to hang.
With the right knowledge and the perfect piece, you’re ready to transform your space. Happy hanging!
Frequently Asked Questions
How much weight can a plasterboard wall hold without a stud?
A standard screw directly into plasterboard may only hold 1-2 kg. However, with the correct heavy-duty fixing, its capacity increases significantly. A high-quality hollow wall anchor or a toggle bolt can typically support between 10 kg and 25 kg. It is essential to check the manufacturer’s specified weight limit on the fixing’s packaging to ensure your beautiful artwork is hung securely and with complete confidence.
What is the best height to hang a large picture frame?
As a professional guide, we recommend hanging artwork so its centre point is at average eye level, which is between 145 cm and 152 cm from the floor. This creates a balanced and comfortable viewing experience in most rooms. For a truly spectacular, oversized piece, you may adjust this based on your ceiling height and surrounding furniture, ensuring the art becomes a perfect focal point that elevates your space.
Can I use adhesive hooks or strips for a heavy frame?
While adhesive hooks are excellent for very light, temporary displays, we strongly advise against using them for any substantial or valuable frame. The adhesive can degrade over time due to environmental changes, posing a significant risk to your artwork, frame, and wall. For any piece with weight, a secure mechanical fixing, such as a screw with an appropriate wall plug, is the only way to guarantee a safe and lasting installation.
How do I hang a heavy mirror? Is it the same process?
The process for hanging a heavy mirror is very similar, as both demand robust and reliable support. The main difference is that a heavy mirror often requires two fixing points or a specialist French cleat system to distribute the weight evenly and prevent it from shifting. The skills for how to hang a heavy picture frame are a great starting point, but always use fixings rated well above the mirror’s actual weight for total security.
What should I do if my wall starts to crack around the hook?
If you see any cracks forming around the hook, you must take the picture frame down immediately and with great care. This is a critical sign that the current fixing is failing under the load and is not suitable for the frame’s weight or the wall type. You will need to repair the small area with filler before re-hanging the piece using a much stronger, more appropriate fixing, like a toggle bolt.
Do I need a professional to hang a very heavy piece of art?
For exceptionally heavy (over 25 kg), valuable, or awkwardly shaped art, hiring a professional picture hanger is a wise investment. They possess the specialist equipment, experience, and insurance to ensure a perfect and secure installation. The cost, often starting around £50-£75, provides complete peace of mind that your premium artwork is handled with the expert craftsmanship and care it truly deserves.