Posted on

4 Tips for Mixing Frame Styles on an Eclectic Gallery Wall

4 Tips for Mixing Frame Styles on an Eclectic Gallery Wall

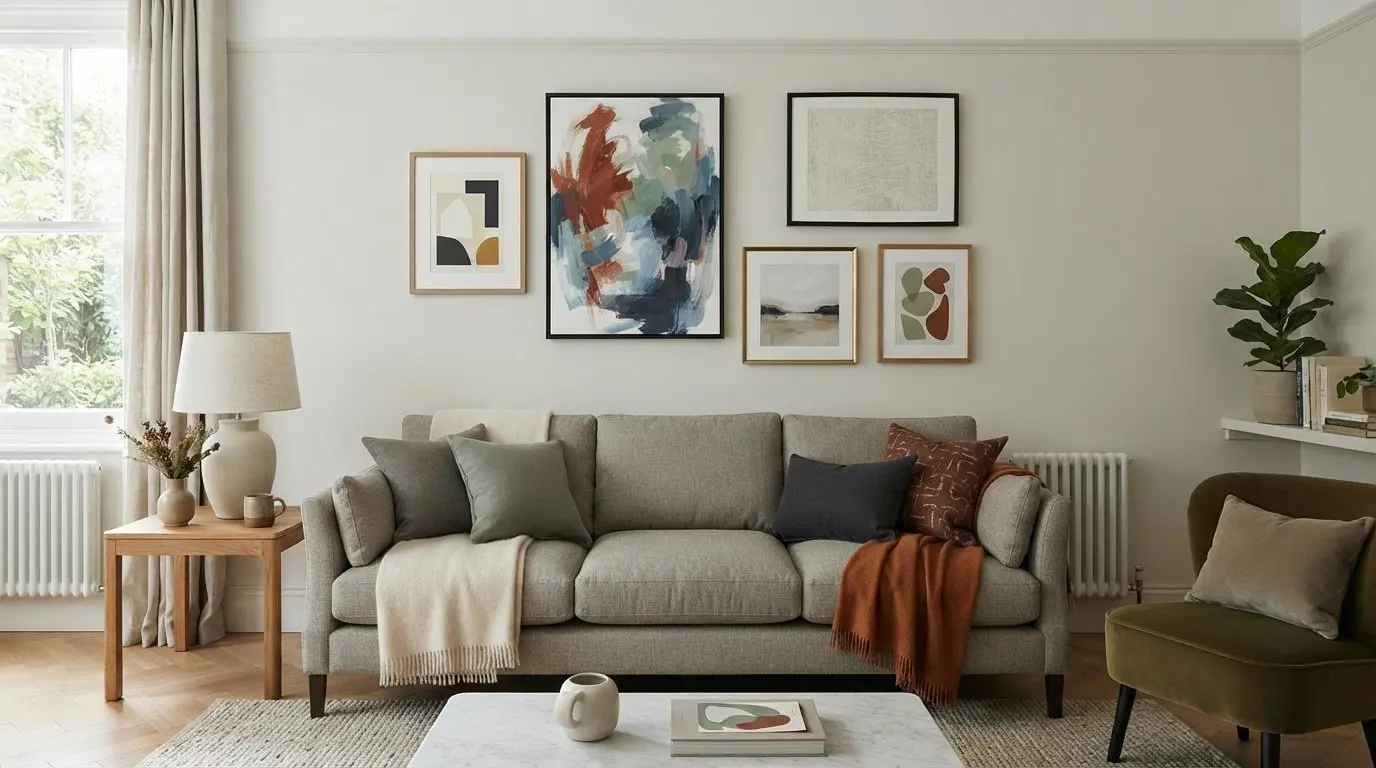
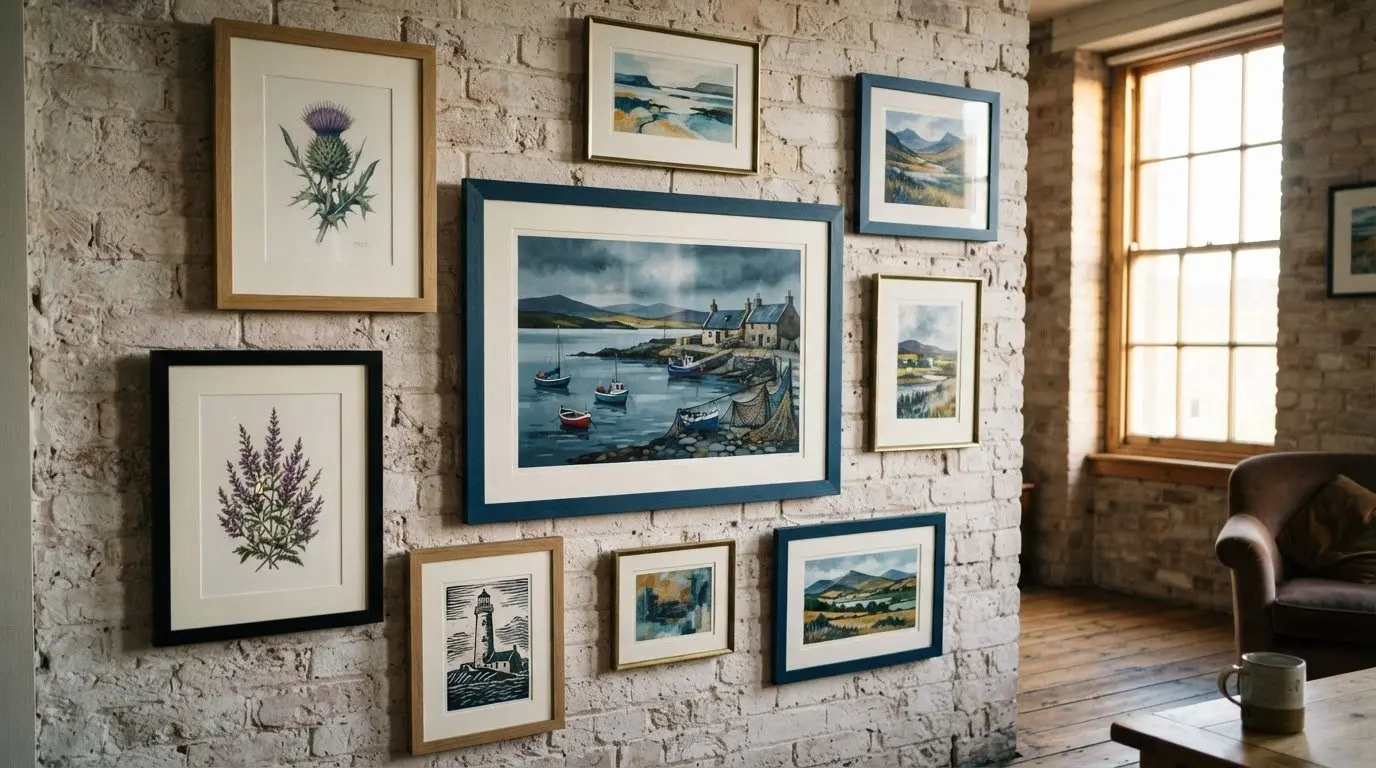
A polished gallery wall doesn’t need matching frames. Mixing different frame styles in one room adds warmth, character and contrast when a repeated colour, material or shape ties the collection together. Matching frames create a uniform look; a thoughtful mix feels personal and layered.

Choosing one frame style can feel safer: different shapes, sizes and finishes may look busy without a unifying thread. But every frame needn’t be identical for the display to feel harmonious. A clear palette and balanced arrangement bring an eclectic collection together.

These four tips explain when picture frames should match and how to combine styles, sizes and finishes with confidence. Learn how to create cohesion, balance bold and understated frames, and plan a gallery wall that feels collected rather than chaotic.

Key Takeaways

  • Frames don’t have to match: repeat a colour, material or shape to give varied styles a sense of harmony.
  • Plan the gallery wall around a central piece, then arrange the rest to create a balanced flow.
  • Mix sizes and finishes thoughtfully, spreading visual weight across the display rather than clustering heavier frames together.
  • Use contrasting frames to add character and let each artwork contribute to a more personal, layered room.

1. Should All Picture Frames Match in a Room or is Mixing Styles the Secret to Visual Harmony?

Picture frames don’t all need to match. Mixing different frame styles in one room works when a shared colour, material or shape connects the pieces. For example, pair an ornate vintage frame with a slim modern frame, then repeat their black finish elsewhere on the wall.

There’s no fixed number of frame styles for a gallery wall. Start with two or three, such as traditional wood, simple black and delicate metal, then add variety through shape or finish. This creates contrast without making every frame compete for attention.

Choose a visual thread before arranging the frames. Repeat a finish, use similar mats, or connect the artwork through a shared subject or palette. A group of coastal prints, for instance, can bring different frame designs together through recurring sea and sky colours.

Balance visual weight by spreading large, dark or ornate frames across the wall. Avoid clustering heavy-looking pieces on one side and leaving smaller, lighter frames on the other. Make a particularly decorative frame the focal point, surrounded by simpler profiles.

Frame thickness matters, too. A wide, carved frame can dominate a small print, while several thick profiles may make a display feel crowded. Pair one substantial frame with slimmer edges, and leave enough space between pieces for each profile to stand out. A common mistake is varying colour, material, thickness and shape all at once without repeating any detail.

For affordable mixed-style frames in the UK, look for ready-made options in complementary finishes and build the arrangement gradually. Use existing frames first, then add pieces that suit the artwork and wall space.

To hang mixed-size frames safely, choose fixings suited to both the wall material and each frame’s weight. Masonry and plasterboard need fixings designed for their surfaces. Position each fixing according to its instructions and use the frame’s hanging hardware as intended.

Start with a story for the collection, such as coastlines, changing seasons or places you love. Coastal wall art and Scottish landscape art can sit together through recurring blues, greens or open horizons. A shared subject gives different pieces a reason to belong, even when their styles vary.

Use a Wall art visualiser to Visualise art on your wall, or make a quick paper plan that follows the wall’s shape. Treat it as a flexible guide, not a strict template: shift the pieces until the overall composition suits the space. This also helps you see how new artwork might fit before choosing it.

Choose a focal point that reflects the collection’s story. A broad landscape print might lead a display of smaller coastal scenes, while a favourite photograph could anchor a mix of subjects. Design your framed artwork as a group, considering how each piece’s colour and subject relate to its neighbours.

Before hanging, view the planned arrangement from the room’s entrance and seating area. Those viewpoints can reveal whether the focal artwork feels hidden or the display sits awkwardly beside furniture. Browse the artwork gallery to See artwork before you buy and find pieces that could help shape your collection.

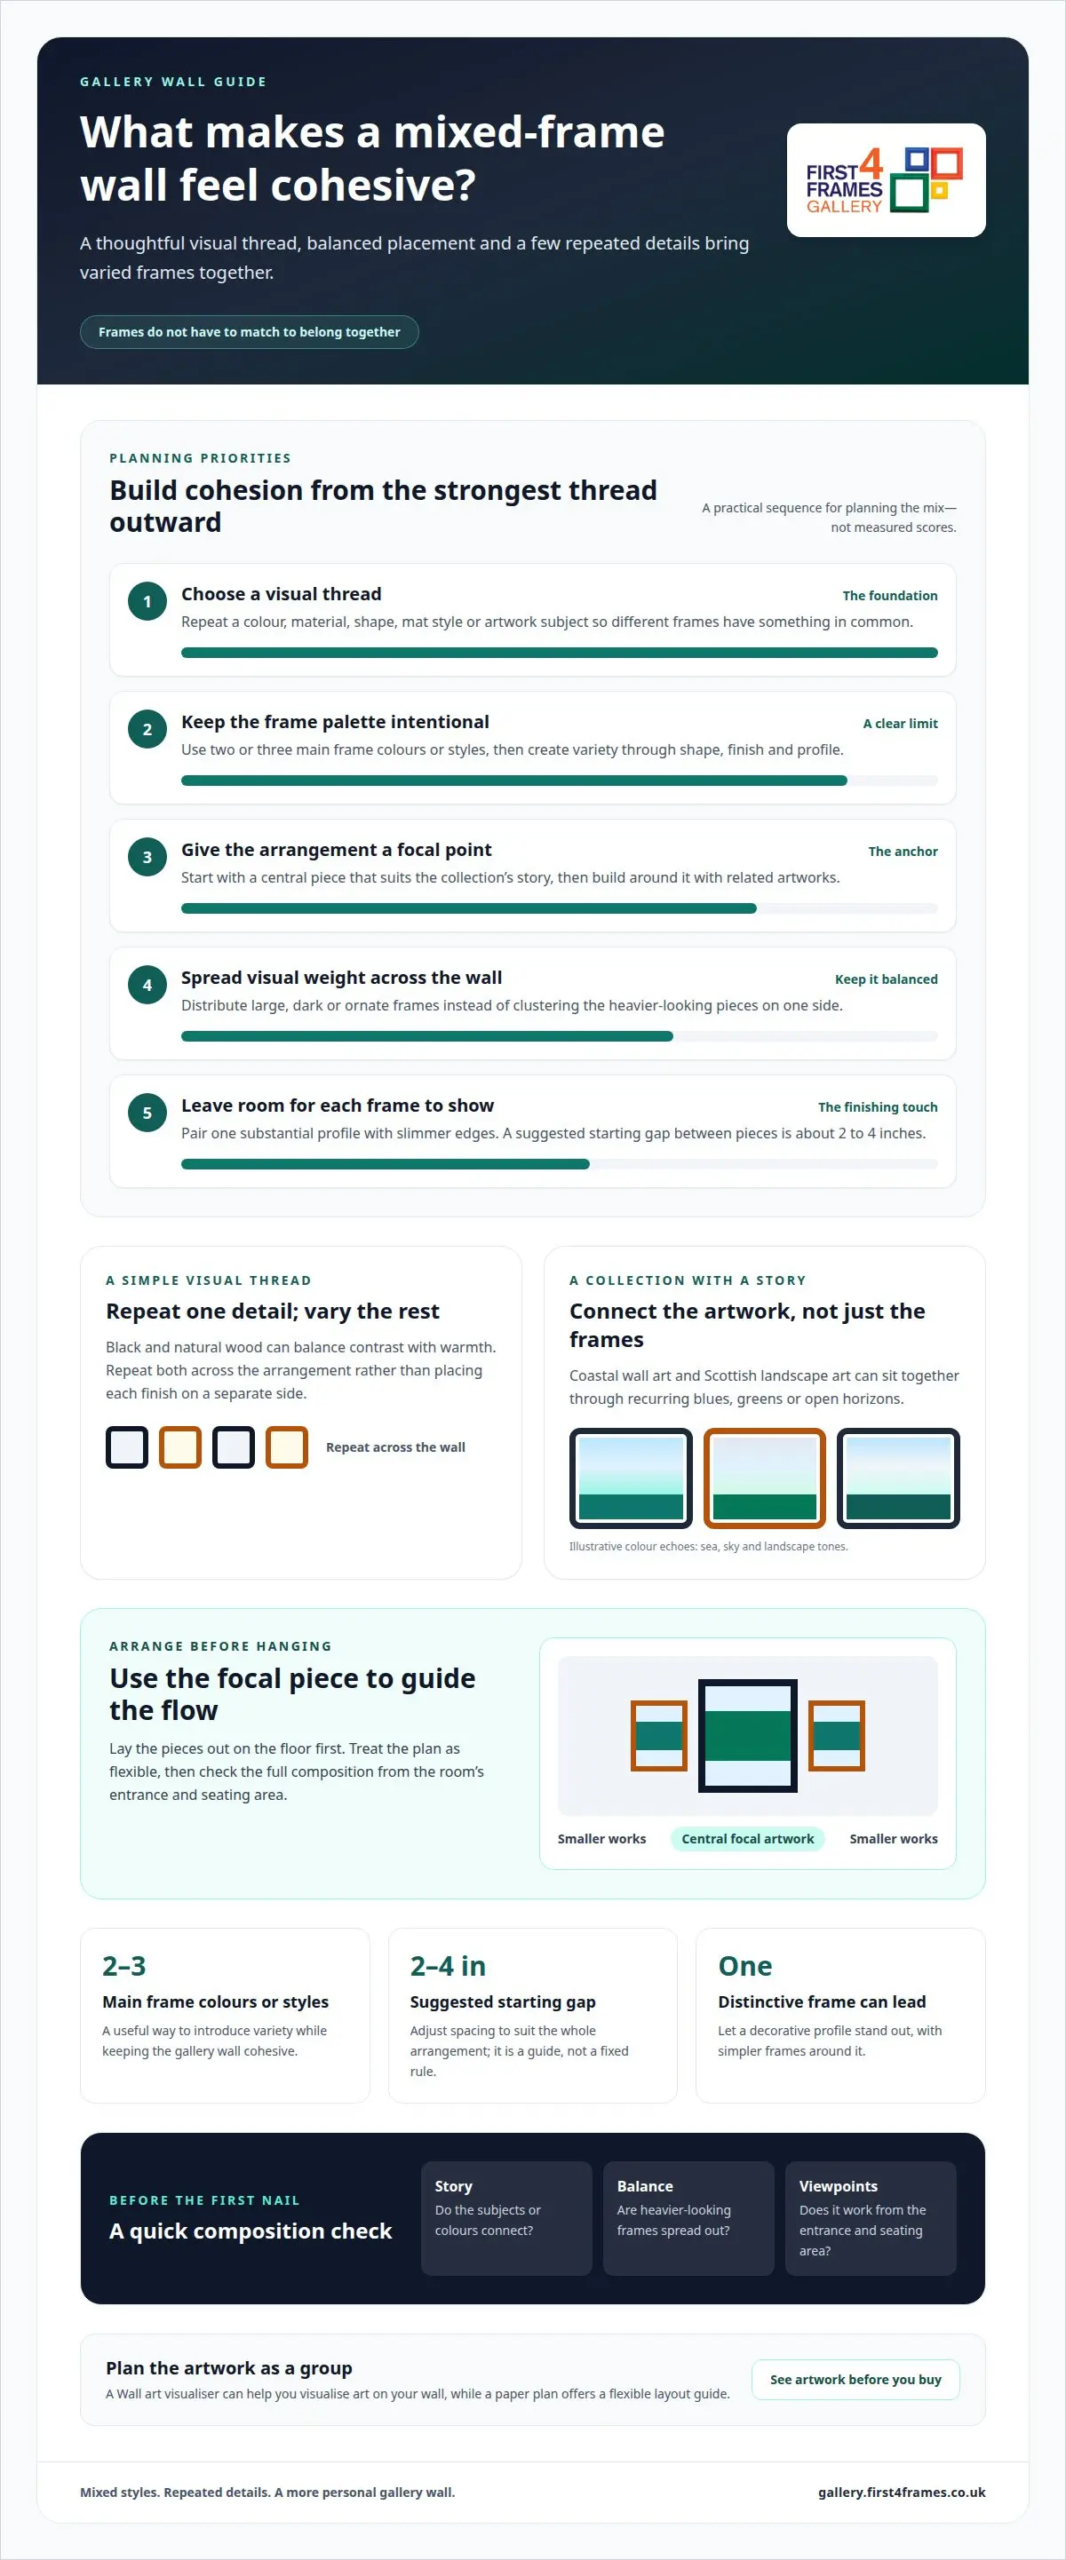
Eclectic style brings different elements together for a cohesive yet varied look, so the frames need not all match. Using two or three main frame colours is one way to add variety while keeping a gallery wall cohesive. Black and natural wood can balance contrast with warmth, helping dissimilar works feel connected without making the display uniform. Repeat these choices enough to support the mix of images and styles.

Laying out a gallery wall design on the floor before hanging can help assess its balance and flow. Starting with a central piece and building around it can help shape the display. Use the floor arrangement to judge whether its parts feel balanced and whether the progression around the centre feels cohesive. A gap of about 2 to 4 inches between gallery wall pieces is a suggested starting point; use it as an initial guide while considering the whole arrangement rather than treating every distance as fixed.
4 Tips for Mixing Frame Styles on an Eclectic Gallery Wall

3. Using different sizes and finishes

Varying frame sizes gives a gallery wall rhythm. Landscape wall art can anchor one side, while smaller prints add detail nearby. Repeat a size elsewhere to make the contrast feel intentional. For example, place two similarly sized photographs on opposite sides of a larger artwork. Repeated proportions create a quiet connection without making the arrangement too uniform.

Let the artwork guide each frame’s scale. A detailed image may benefit from a more generous border, while a bold graphic may suit a narrow profile. A mat, the border between artwork and frame, adds breathing space around a small print. Similar mat colours can create a subtle link between varied frames.

Finishes can add warmth or a cleaner edge. Natural wood complements warm or rustic rooms, especially where timber furniture or flooring already features. Metal adds a modern note beside smooth surfaces. Black frames can sharpen a pale print, while lighter wood can soften a dark image. Echo materials already in the room rather than matching every finish exactly.

Shape adds another layer of variation. Rectangular frames work naturally with many prints, while a round or oval frame can break up repeated straight edges. Choose an unusual shape for one piece, then keep the surrounding frames simpler. This makes the distinctive outline noticeable without making every artwork compete for attention.

For a considered mix, choose two or three main frame colours, then vary size and profile within that palette. Black and natural wood offer contrast and warmth; repeat both across the arrangement instead of placing each finish on a separate side. View the complete group together: a finish that looks striking alone may feel dominant beside a large, dark frame. Assess it alongside the artwork and other materials in the room.

4. Benefits of mixing picture frame styles

A mixed-frame display can tell a more personal story than a matching set. Pair a family photograph, a travel print and contemporary art prints, and each can keep its own character. Photography prints and framed wall art can sit alongside pieces by famous artists or best-selling artists, creating a collection that reflects varied interests.

Different frames can suit different artworks. A restrained frame can let a finely detailed landscape take centre stage, while a decorative profile can complement a traditional portrait. This flexibility helps each piece feel thoughtfully presented, even when the subjects and artistic periods vary.

Eclectic framing makes it easier to build a display gradually. Add a new work beside an existing favourite without replacing every frame. For example, a newly collected abstract piece can sit with older botanical illustrations when a detail connects them. The wall can grow alongside your interests.

Varied frames can also bridge different influences in a room. A simple black frame can relate to modern furniture, while a warm timber finish echoes a wooden table or shelf. Add an ornate frame as a counterpoint, and the display can feel considered rather than tied to one decorating style.

Most importantly, a varied collection gives you room to express your taste. Choose frames that suit each artwork, then consider how the complete display feels. Explore the artwork gallery for inspiration as you shape a collection that feels distinctly yours.

Create a cohesive mix by keeping either frame colour or material consistent while varying other features. Picture frames should complement the room’s decor, style and colour scheme. Combining them without a plan can make a room feel chaotic, so consider how their finishes and shapes relate to maintain balance.

First4Frames Gallery offers Ready-to-Hang Framed Art and Custom Picture Framing. Its online picture framing options let you choose your frame online for a print that suits your gallery wall. For artwork needing a particular finish, the art print framing service can create custom framed art prints and bespoke framed wall art.

Each frame is handmade for its individual order using high-quality materials, with 2 mm float glass glazing. This makes Custom Picture Framing a useful option when you want a frame tailored to a specific artwork rather than choosing a ready-to-hang piece.

For help with a framed piece that complements your collection, contact First4Frames Gallery to discuss your framing requirements.

Let your collection grow with your style

Your gallery wall can evolve as your tastes change. Leave room for a new print, a meaningful photograph or a piece that brings an unexpected colour into the room. When choosing future artwork, consider how it will contribute to the space’s mood, not just whether its frame matches the others. That freedom is part of the appeal of mixing different frame styles in one room: the display can feel considered while reflecting the life and interests behind it.

When you’re ready to add a new focal point, First4Frames Gallery offers Ready-to-Hang Framed Art, Custom Picture Framing and Giclée Fine Art Prints. Choose a finished piece or explore a print that could take your arrangement in a fresh direction.

Explore framed art and fine art prints, and find a piece that feels at home on your wall.

Frequently Asked Questions

Should All Picture Frames Match in a Room or is Mixing Styles the Secret to Visual Harmony?

No, matching every frame is optional. A consistent finish can give a room a formal feel, while varied frames make a collection feel personal. In an open-plan space, carry one detail, such as a recurring wood tone, between living and dining areas. This creates a gentle connection without making both displays identical.

Which colours and finishes work well together for mixed frames?

Choose finishes that relate to the room’s existing undertones. Warm timber and cream can sit comfortably alongside earthy artwork, while black and cool metal suit crisp, graphic pieces. If combining warm and cool finishes, repeat each in more than one place. Those small echoes make the contrast look deliberate rather than accidental.

Should artwork styles or mat colours match when mixing frames?

No, the artwork can vary in subject and style. A botanical print, a simple line drawing and a landscape can share a wall if their colours or mood have a subtle connection. Mats can help, but they needn’t match every piece. Leave one work unmounted among matted prints to add a change of pace.

Posted on

A renter’s choices: how to fit, remove and reuse picture frames

A renter’s choices: how to fit, remove and reuse picture frames

The best frames for rented flats balance appearance, weight and practical hanging needs. Frame costs depend on size, materials and finish, so think about the artwork before you choose. Online picture framing can offer choices for custom framed art prints, while an art print framing service can help bring a finished look together. Choose your frame online with the picture’s colours and proportions in mind, and design your framed artwork to suit the room.

No-drill fittings can help you display pictures while limiting marks on walls, but the right option depends on the frame and wall surface. Plan how you’ll fit and remove each piece, and consider whether you can reuse the fitting after moving. A frame that complements your artwork can make a rental feel personal without dominating the space.

From coastal wall art and landscape wall art to Scottish landscape art, artwork can set the mood of a room. Explore contemporary art prints, fine art, photography prints and work by famous artists or best-selling artists. Ideas such as “Visualise art on your wall”, “See artwork before you buy” and a “Wall art visualiser” can guide your choices; bespoke framed wall art and framed wall art can bring the finished arrangement into focus.

Key Takeaways

  • Match a no-drill fitting to the surface and frame, so it sits securely and suits your rented home.
  • Plan installation and removal with care to help minimise marks and make frames easier to reuse after a move.
  • Choose artwork and decor that make a room feel personal while keeping a cohesive look across different properties.
  • Explore bespoke framing or ready-to-hang art when you want a considered finish tailored to your artwork.

1. How different no-drill fittings attach

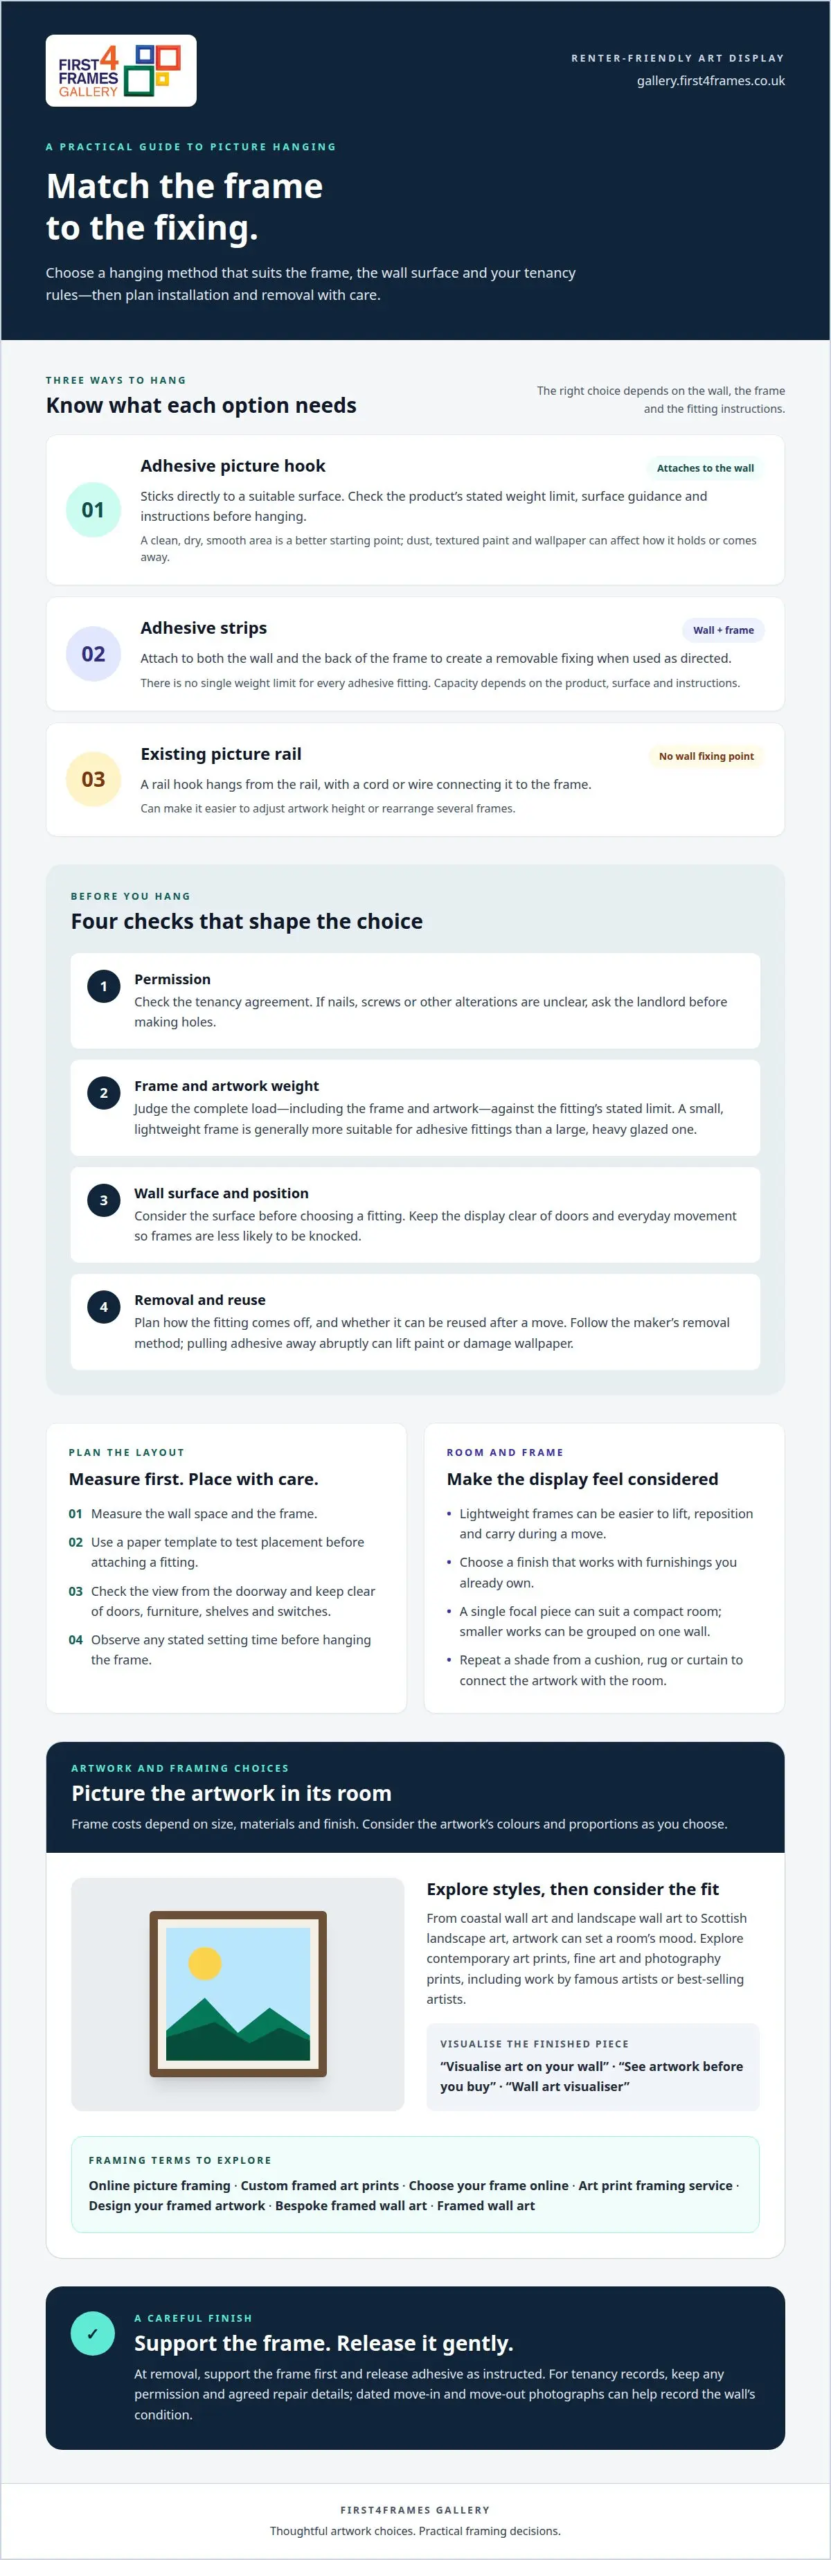
In UK rental homes, whether you can use nails or screws depends on your tenancy agreement and your landlord’s permission. Don’t assume a small picture hook is automatically allowed. Ask before making holes, especially in painted plaster or wallpaper, where repairs may affect your deposit. When choosing a frame, consider its weight and the fixing method together.

Adhesive picture hooks stick directly to suitable wall surfaces. Adhesive strips attach to both the wall and the back of a frame, creating a removable fixing when used as directed. There isn’t one weight limit for every adhesive fitting: capacity depends on the product, surface and instructions. Check the stated limit and include the frame and artwork when judging the load. A small, lightweight frame is generally more suitable than a large, heavy glazed one.

For adhesive fittings, start with a clean, dry, smooth area. Dust, textured paint and wallpaper can affect how well a fitting holds or comes away. Follow the product instructions for applying the adhesive and allowing it to set before hanging anything. Keep the frame level, and avoid placing a valuable print above a bed or other furniture until the fixing is secure.

Picture rails offer another no-drill option if the room already has one. A rail hook hangs from the existing rail, while a cord or wire connects the hook to the frame. This keeps the fixing point off the wall and can make it easier to adjust the artwork’s height. It’s useful when changing a room layout or arranging several frames.

The best frames for rented flats suit both the artwork and the fixing. A compact, lighter frame may work better with an adhesive fitting, while a heavier frame may suit an existing picture rail. Before hanging, match the fixing to the wall and frame, then follow its instructions. Keep the display clear of doors and everyday movement so frames aren’t knocked out of place.

2. Installation and removal advice

A UK tenancy agreement may set out rules for hanging pictures, including whether nails, screws or other alterations are allowed. Look for clauses about fixtures, wall damage and the property’s condition when you leave. If the wording is unclear, get your landlord’s permission before making holes. Keep their response with your tenancy records.

Plan the position before attaching anything. Measure the wall space and frame, then mark the intended top edge lightly with a pencil. In a narrow hallway, check that the frame won’t catch bags or clothes passing by. In a bedroom, keep the arrangement clear of doors and furniture. A paper template cut to the frame’s size can help you test placement without repeatedly moving a fitting.

For adhesive hooks or strips, follow the product instructions closely. Prepare the wall as directed, attach the fitting in the correct position, and observe any stated setting time before hanging the frame. Don’t exceed the fitting’s weight limit. At removal, support the frame first, then release the adhesive as instructed. Pulling a strip away abruptly can lift paint or damage wallpaper.

A landlord’s deduction for picture-hole repairs depends on the tenancy terms and evidence of the property’s condition. Keep dated move-in photographs and, before leaving, take clear pictures of the same walls. If you were permitted to hang pictures, retain that permission and any agreed repair details. Don’t assume every hole automatically results in a charge, or that every repair cost can automatically be deducted.

Before moving out, remove frames carefully and inspect each fixing point in good light. Follow the adhesive maker’s removal method; don’t scrape or repaint without checking what your agreement requires. If a mark remains, record it and deal with it in line with the agreed move-out condition. Choosing artwork that suits your wall space can also make future rearranging easier. Browse the artwork gallery for pieces to plan around your rooms.

A renter’s choices: how to fit, remove and reuse picture frames

3. Interior furnishings and decor

For a rental, favour lightweight frames with simple profiles that suit removable fittings. They’re easier to lift, reposition and carry during a move than bulky, heavy designs. A slim black frame can define a print above a desk, while a pale wood finish can complement neutral furniture. Choose a finish that works with pieces you already own, rather than matching only one room.

In a studio or compact flat, choose a frame size that suits the available wall space and nearby furniture. A single focal piece above a sofa can help a narrow room feel open. For several smaller works, arrange them together on one wall rather than spreading them across every surface. Leave clear space around doors, shelves and switches so the layout feels considered, not cluttered.

Before buying, measure the wall area and the frame itself. Use paper templates to test a gallery layout, then step back from the doorway and check the balance. A portrait print can draw the eye upwards beside a bookcase; a landscape can sit neatly above a low cabinet. These examples help you judge proportions before choosing a final arrangement.

Colour can connect framed art with soft furnishings without making every item identical. Repeat a shade from a cushion, rug or curtain in the artwork or frame finish. In a bedroom with patterned bedding, a quieter print can create visual rest. Remember that the Furniture and Furnishings (Fire) (Safety) Regulations apply to upholstered furniture supplied with a let, including fabric and upholstered bed frames, headboards and mattresses.

Think about delivery and lifting as well as appearance, especially in a flat with narrow stairs or limited storage. A lighter frame is simpler to carry between rooms and pack when moving. Prefer a layout that can adapt if a sofa, desk or bed changes position. A carefully chosen print can add character without a crowded wall or oversized frame.

4. Standardising frames across multiple properties

A shared frame scheme can make apartments feel connected without making every room look identical. Start with a repeatable base, such as slim black frames in hallways and pale wood in living areas. Then vary the artwork to suit each property’s character. This approach gives tenants a familiar visual thread while letting coastal prints or local landscapes reflect their surroundings.

Choose a small set of frame finishes and shapes that work across different wall colours. A simple rectangular profile can suit a spacious lounge or a compact bedroom. Keeping the profile consistent matters more than forcing identical artwork into every flat. For example, pair a landscape print above a sofa with a portrait piece in a narrow entrance, using the same finish.

Record the scheme in a simple property guide. Note each room’s wall colour, frame finish, artwork position and fixing method. Add photographs showing how the arrangement sits beside furniture, such as an upholstered headboard or dining table. These records help maintain the look when artwork is moved, replaced or transferred between properties.

For a rental portfolio, consider how the tenancy may change between occupants. Choose designs that feel welcoming to a broad range of tastes, then add character through artwork rather than highly personal decor. A calm landscape in a living room and a more vivid print in a home office can share a frame style while creating different moods. Keep the scheme flexible enough for varied room sizes.

Consistency also helps with planning purchases and replacements. A clear record of the frame finish and artwork dimensions makes it easier to match a piece when a room changes or a frame needs replacing. Keep spare wall space in mind, rather than filling every available area. For ideas that suit different interiors, explore framed artwork styles and consider how each piece could work within your property scheme.

First4Frames Gallery helps renters choose artwork and framing to suit their space. Its Ready-to-Hang Framed Art, Custom Picture Framing and Giclée Fine Art Prints offer different ways to create a considered look. Each frame is handmade to order for the individual piece, using high-quality materials.

Frames are glazed with 2 mm float glass. If you’re choosing artwork or framing for a rented flat, contact First4Frames Gallery to discuss a piece that suits your home.

Make your next space feel like yours

A move can bring a fresh opportunity to shape a room around the artwork you love. Choose pieces with a place in mind, and let their colours and character guide the rest of your decor. The best frames for rented flats are the ones that suit the art, the room and the way you want to display them, while fitting your plans for future moves.

When you’re ready to select a piece, First4Frames Gallery offers Ready-to-Hang Framed Art, Custom Picture Framing and Giclée Fine Art Prints. These options can help you find artwork and framing that feel right for your home, whether you’re choosing a finished piece or shaping a look around a particular print.

Explore framed artwork and find your next piece. Let your walls tell a story that can travel with you, and make your rented home feel unmistakably personal.

Frequently Asked Questions

Cost: Are They More Expensive?

Not necessarily. The cost depends on the frame’s dimensions, materials, glazing and whether artwork is included. A simple frame for a small print involves different choices from a bespoke frame made for a larger piece. Compare what each option includes, such as a mount or finished artwork, rather than judging by the frame alone. There isn’t one cost that applies to every frame.

What are the best damage-free ways to hang frames in a rental?

For the least wall impact, display a frame on a stable shelf, mantelpiece or freestanding picture easel. Keep it level and away from edges where a bag or door could knock it. If you want a wall display, choose a removable fitting suited to the frame and surface, then follow its instructions. Your tenancy agreement may also set limits on wall changes.

How can you hang heavy frames safely without drilling?

Use an existing picture rail with a hook and hanging cord rated for the frame’s full weight. If the rail or hook rating is unclear, don’t hang a heavy frame from it. Adhesive fittings aren’t a safe substitute unless their stated capacity covers the complete framed piece and the wall surface is suitable. Without a reliable rail, choose a lighter display or a stable floor-standing option.

Where can I buy affordable picture frames in the UK, and what do they cost?

You can buy frames from UK galleries and online framing businesses. First4Frames Gallery offers Ready-to-Hang Framed Art, Custom Picture Framing and Giclée Fine Art Prints. The cost varies with the artwork, frame dimensions and materials chosen, so consider what the finished piece includes before comparing options. A frame for an existing print may involve different choices from a framed print bought as one piece.

Posted on

How to Mount Artwork with Foamboard and a Subframe

How to Mount Artwork with Foamboard and a Subframe

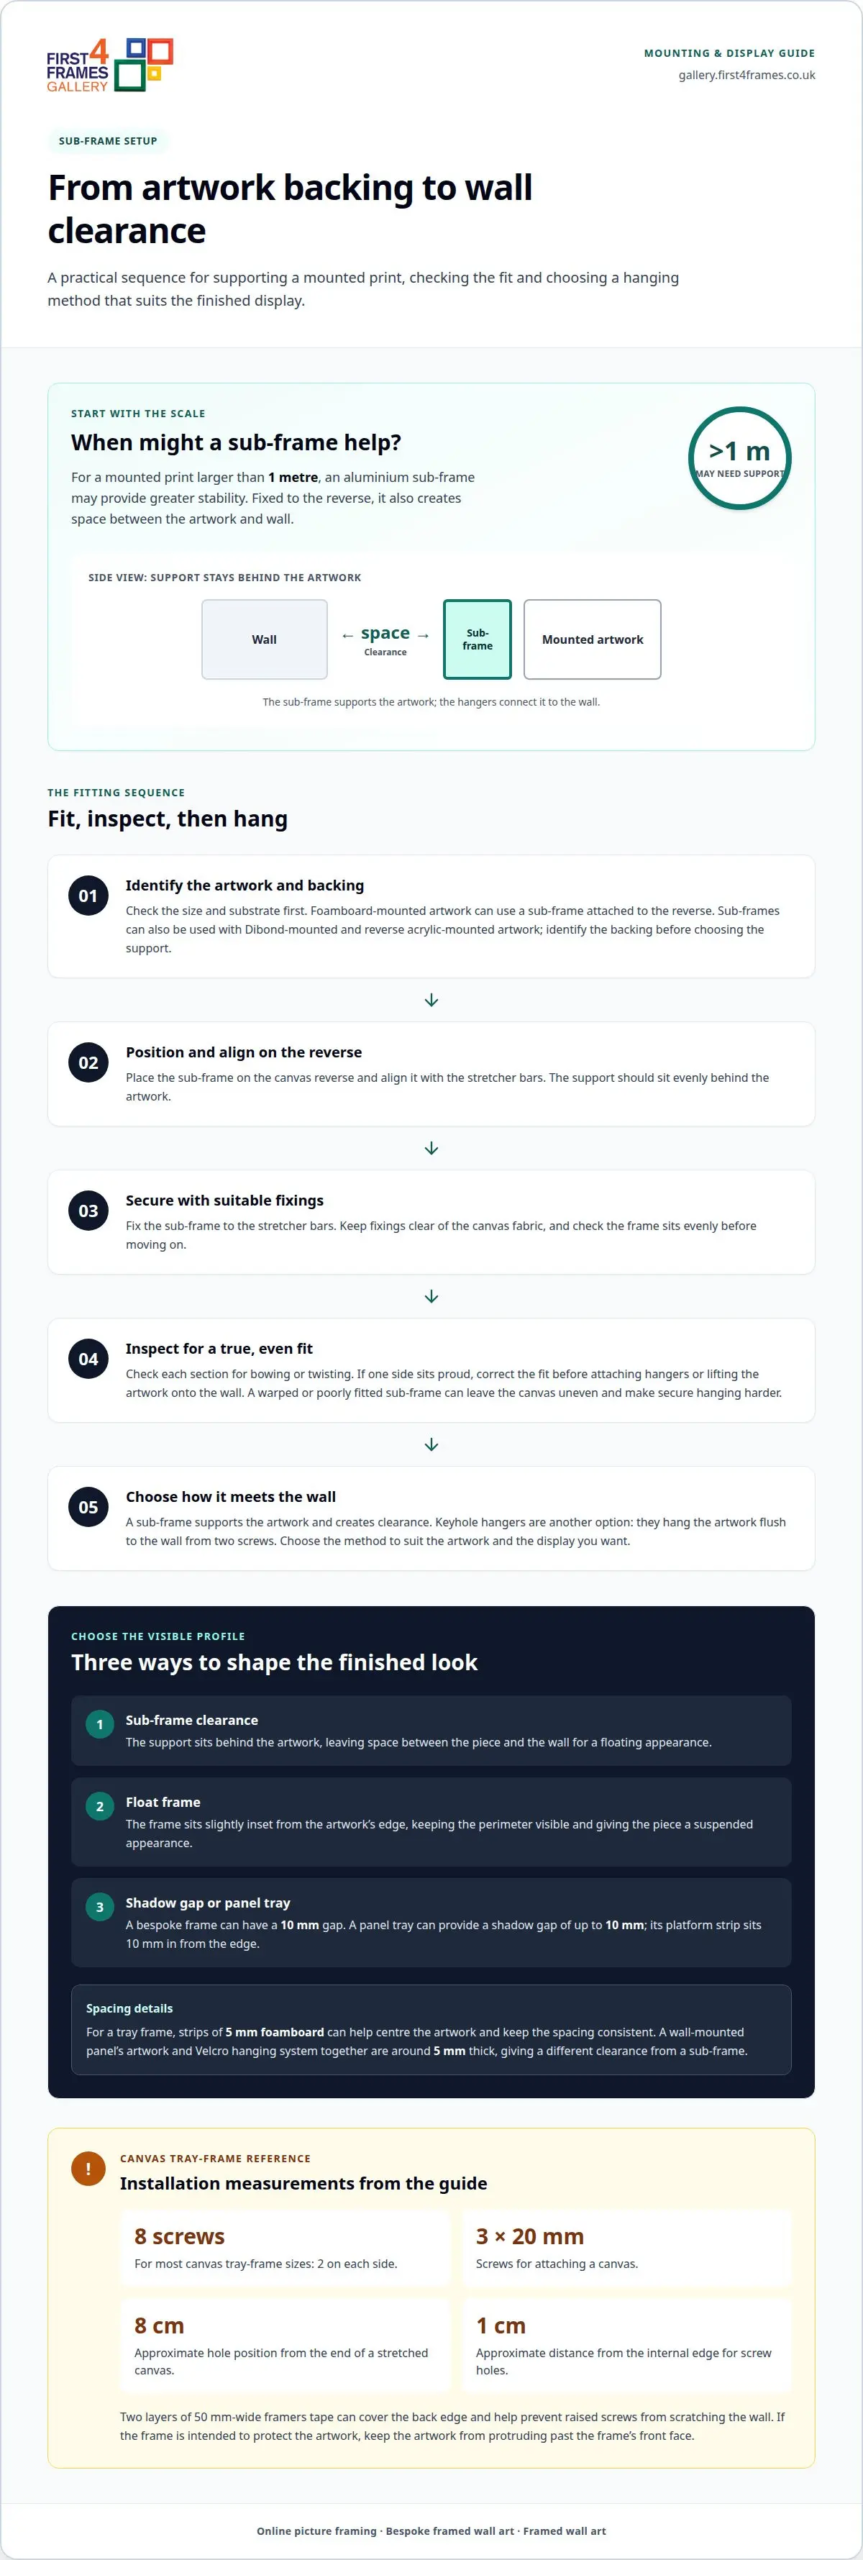
What gives a mounted print breathing room from the wall? To understand what a subframe is for mounting artwork, think of it as a support fixed to the back of the piece. It creates space behind the artwork and can give it a clean, floating appearance.

With foamboard, the hanging method matters as much as the finish. A subframe is one option for foamboard-mounted artwork, creating a neat profile while keeping the hanging structure out of sight from the front.

This guide explains what a subframe does, when a larger mounted print may benefit from one, and how the gap from the wall affects the finished look. It also covers how to consider mounting and hanging choices so the artwork feels well planned, from the wall to the frame.

Key Takeaways

  • Consider an aluminium sub-frame for larger mounted prints; pieces over 1 metre may need one for added stability.
  • Use a sub-frame to create space between the artwork and wall for a clean, floating effect.
  • Rigid mounting can help keep prints flat, while the right hanging method depends on the artwork and backing.
  • Explore how foamboard and a sub-frame work together to support a neat, considered display.

When larger mounted prints may need an aluminium sub-frame

For a mounted print larger than 1 metre, an aluminium sub-frame may provide greater stability. Its position behind the artwork also creates space between the print and wall.

Understand Aluminium Subframe Support

  1. Choose a sub-frame to support the canvas from behind and create clearance from the wall. An aluminium sub-frame is a structure attached to the artwork’s reverse, where it supports the hanging arrangement without covering the image. That gap can help keep the canvas from resting directly against the wall, but it does not protect the painted surface from every source of damage.

For example, a canvas with a support attached at the back can sit away from the wall while its front remains visible.

Assess Subframe Strength and Hanging Methods

  1. Match the hanging system to the artwork’s size and backing. Aluminium sub-frames are described as light and durable, and mounted prints larger than 1 metre may require one for greater stability. Keyhole hangers are another option: they allow artwork to hang flush to the wall from two screws. Consider whether that flush position suits the look you want.

Aluminium mounting and hanging are related but distinct: the subframe supports the artwork, while the hangers connect it to the wall.

Fit a Canvas and Check Subframe Suitability

  1. Position the sub-frame on the canvas’s reverse, align it with the stretcher bars, then secure it to those bars with suitable fixings. Keep fixings clear of the canvas fabric, and check that the frame sits evenly before hanging. A DIY sub-frame is possible if you can make a square, stable structure that fits the canvas.

Before installation, check each section for bowing or twisting. A warped or poorly fitted subframe can leave the canvas uneven, make secure hanging harder, or strain the artwork. If one side sits proud, correct the fit before attaching hangers or lifting the canvas onto the wall.

Floating appearance and wall clearance

Choose the frame position and wall clearance to suit your artwork and display. A bespoke frame can give your piece a distinctive floating appearance, with professional online picture framing helping you find the right look.

  1. Consider a float frame if you want the artwork’s perimeter to remain visible. The frame sits slightly inset from the artwork’s edge, making it less prominent and giving the piece a suspended appearance. This can work particularly well for a landscape print with visible edges, creating a different look from conventional framing where the frame meets the artwork or mount.
  2. Choose a shadow gap to match the effect you want. A bespoke frame can have a 10 mm gap between the artwork and frame, creating a clear outline around the piece. A panel tray frame can also provide a shadow gap, up to 10 mm, because its platform strip sits 10 mm in from the edge. Considering the side profile as well as the front can help you decide whether a wider gap suits your framed wall art.
  3. For a tray frame, strips of 5 mm foamboard can help centre the artwork and keep the spacing consistent around its edges. For a wall-mounted panel, the combined thickness of the artwork and Velcro hanging system is around 5 mm, giving it a different clearance from a sub-frame. Choose the option that suits your preferred display. To explore artwork for your room, browse the framed art gallery and see how bespoke framed wall art could look.

For most canvas tray frame sizes, the guide recommends 8 screws, with 2 on each side, and 3 x 20 mm screws for attaching a canvas. For a stretched canvas, screw holes are positioned about 8 cm from the end and about 1 cm from the internal edge.

Two layers of 50 mm-wide framers tape can cover the back edge and help prevent raised screws from scratching the wall. For a frame intended to protect the artwork, ensure the artwork does not protrude past the frame’s front face.

How to Mount Artwork with Foamboard and a Subframe

Benefits of mounting artwork

  1. Use dry mounting when a print needs a firm, even backing. The process permanently affixes the artwork to a rigid substrate, helping it stay flat and smooth. Prints and photographs can be dry-mounted with or without a frame. For example, a loose print intended for display without glazing can gain a smooth, supported surface this way.
  2. Add a single mount to create a border around a picture. The mount separates the artwork’s surface from the glass, helping prevent direct contact. For artwork on paper, the window aperture is normally 5 mm smaller than the artwork in both width and height. This overlap helps keep the edge of the paper covered while leaving the image visible.
  3. Choose a double mount if a layered edge would suit the image. It uses two layers of mountboard, with the lower layer slightly visible beneath the top one. A coloured inner layer can pick out a shade in the artwork, such as a muted green in a landscape print. A V-groove adds another detail: a thin decorative line cut into the mountboard, usually following the aperture shape.
  4. Attach paper-based artwork using a method that allows it to respond to changes in the air. T-hinges connect the artwork to an undermount, and at least two should be used. Avoid taping all four sides, as this can restrict movement and cause the paper to buckle. A print fixed around every edge, for example, may ripple instead of lying smoothly.

Foamboard backing and subframes

  1. Identify the backing before choosing a hanging method. Foamboard-mounted artwork can be hung with a subframe attached to the reverse. This creates support behind the panel and space between the artwork and wall. For example, a foamboard print without a conventional outer frame can have a neat, floating profile with this arrangement.
  2. Match the hanging support to the substrate. A subframe can also be used with Dibond-mounted and reverse acrylic-mounted artwork, but these materials are not interchangeable with foamboard. The panel’s backing determines how the support relates to the piece. Identify whether the artwork is foamboard, Dibond or reverse acrylic before choosing a hanging approach.
  3. Consider the front finish and back structure together. A subframe sits behind the artwork, so its position affects the gap from the wall without changing the visible image area. With foamboard, decide whether you want the piece to sit away from the wall or hang closer. This establishes the intended profile before attaching the support.
  4. Inspect the panel and support before hanging. Check that the backing sits evenly and that the subframe follows the reverse without looking out of line. The hanging system should suit the mounted piece, rather than use a method intended for a different backing. For comparison, card-mounted artwork can be fixed with Velcro, but paint may come off during removal.

Once you’ve chosen a suitable approach, explore framed artwork for inspiration on your display.

When placing a panel in a frame, use the backing-strip step as part of positioning: peel back the second backing strip by 1/4 at two opposite corners. Make the same adjustment at both corners, keeping the instruction limited to those opposite points. Then place the panel in the frame with those corners serving as the prepared locations. This follows the guide’s recommendation without peeling back the second backing strip across the full panel. Check the panel’s placement in the frame before continuing, and keep the two prepared corners opposite one another. The specified amount is 1/4, and the recommendation applies to the second backing strip, not a different strip.

First4Frames Gallery’s Commercial Artwork Curation helps businesses select artwork for properties, offices and galleries. Choose coastal wall art, landscape wall art or Scottish landscape art to set the mood, with contemporary art prints, fine art, photography prints and work by famous artists or best-selling artists adding character.

For a coordinated finish, frames are handmade to order from high-quality materials and glazed with 2 mm float glass. This bespoke framing complements custom framed art prints and ready-to-hang pieces. With online picture framing, you can choose your frame online and design your framed artwork to suit the space. Consider the image, frame and intended position together; the aim is to visualise art on your wall and see artwork before you buy. An art print framing service can bring these choices together, while a wall art visualiser may help you picture the arrangement.

Explore framed wall art and contact First4Frames Gallery to discuss artwork for your space.

Give your artwork a place to belong

The final choice involves more than how a print hangs. Consider how its depth, visible edges and spacing will work in the room. A subframe can shape the presentation, but the artwork’s backing and your intended display should guide the hanging approach.

If you’re still wondering what a subframe is for mounting artwork, use the idea as a starting point: picture the position and finish you want, then choose artwork and framing to suit. A carefully chosen piece can bring a room together and create a personal connection with the space.

Take the next step by exploring artwork that suits your setting, then decide how you’d like it displayed. For help planning your choice, contact First4Frames Gallery today. Your next display can begin with one image that feels just right.

Frequently Asked Questions

What is a subframe for mounting artwork?

A subframe for mounting artwork is a support fixed to the back of a mounted piece to provide a structure for hanging. It is separate from a decorative outer frame, so each can serve a different purpose. For example, a foamboard panel can use a rear subframe for support while keeping its edges visible in a frameless display.

What are art subframes made from?

Aluminium is one material used for art subframes. It is described as light and durable, making it an option for mounted prints that need a rear hanging structure. Subframes are chosen to suit the artwork’s backing, such as foamboard, Dibond or reverse acrylic. The backing and intended display help determine a suitable support arrangement.

How do you choose the right subframe size and depth?

Choose a subframe that fits the artwork’s backing and supports its dimensions without an uneven overhang. Consider the depth in relation to the wall clearance and floating effect you want. Mounted prints larger than 1 metre may require an aluminium sub-frame hanging system for greater stability. The hanging hardware also needs to suit the piece and its position.

Posted on

4 things to check before hanging pictures in a rented flat

4 things to check before hanging pictures in a rented flat

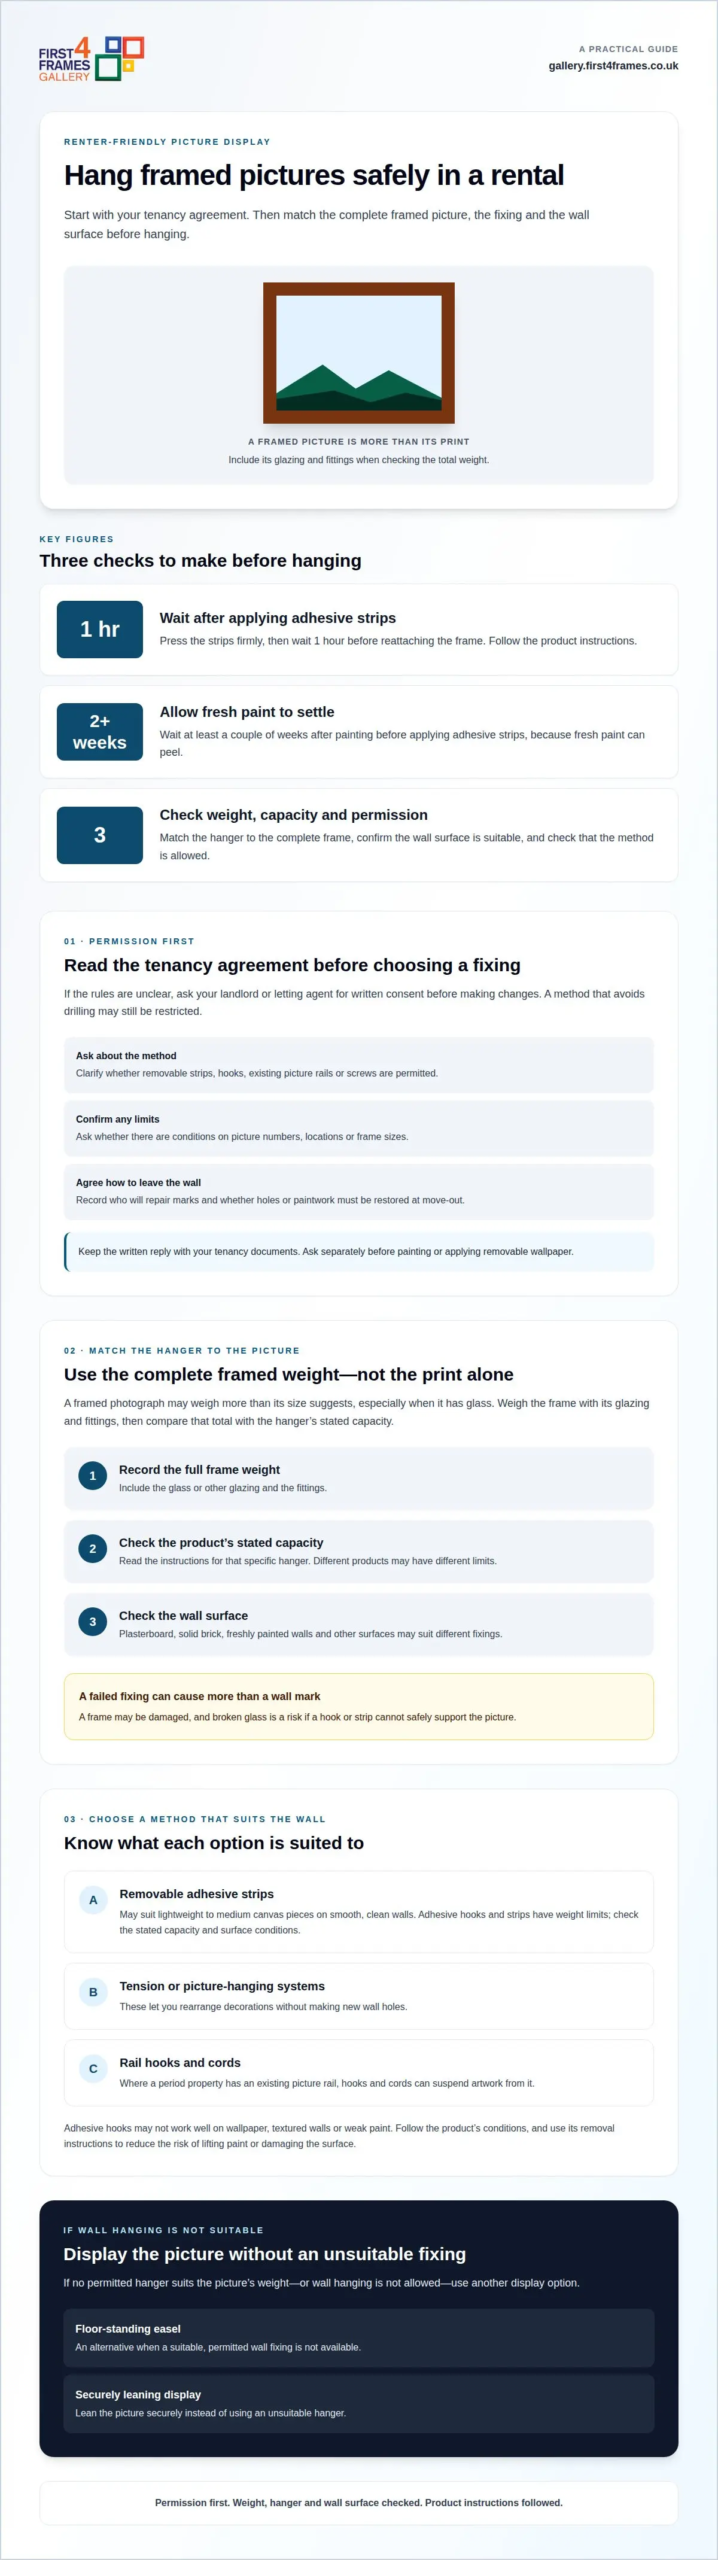
Can you make a rented flat feel like home without risking wall damage? Damage-free picture hanging for rented flats starts with one simple check: read your tenancy agreement, and ask your landlord or letting agent for written permission if the rules are unclear. What’s allowed depends on your agreement, so don’t assume removable hooks are automatically permitted.

It’s understandable to want your favourite prints and photographs on display rather than tucked away until you move. Choosing a hanging method that suits both the wall and the frame can help you make the space your own while avoiding unwanted marks.

This guide covers four practical points: what your tenancy agreement says, how to ask for permission, how to match hangers to picture weight, and what to do if wall hanging isn’t allowed. You’ll have a clearer plan for displaying art while respecting your tenancy.

Key Takeaways

  • Start with your tenancy agreement; if the rules aren’t clear, get your landlord or letting agent’s permission in writing.
  • Removable adhesive strips may suit lighter pictures on smooth, clean walls, but prepare the surface and follow the product instructions.
  • Match the hanger to the complete framed picture’s weight and the wall surface to reduce the risk of it coming loose.
  • If wall hanging isn’t permitted or a picture is too heavy, consider displaying it on an easel or leaning it securely instead.

1. Can tenants hang pictures?

You can hang pictures if your tenancy agreement permits it or your landlord agrees. Check the agreement first; if the wording is unclear, ask the landlord or letting agent for written consent. They may set conditions, such as limiting the number of pictures or requiring repairs when you leave. A careful approach to damage-free picture hanging for rented flats starts with understanding those terms.

Command Strips and other removable adhesive strips attach frames without nails, while adhesive hooks support pictures from a hook. Both have weight limits, so compare the stated capacity with the complete framed picture. Tension systems and picture-hanging systems let you rearrange decorations without making new wall holes. In period properties, rail hooks and cords can suspend artwork from an existing picture rail.

Apply strips to a smooth, clean wall. Wipe away dust with a dry cloth, press the strips firmly, then wait 1 hour before reattaching the frame. After painting, wait at least a couple of weeks before applying adhesive strips, because fresh paint can peel. Follow the product’s removal instructions to reduce the risk of lifting paint or damaging the surface.

Adhesive hooks may not work well on wallpaper, textured walls or weak paint. Removable strips are described as suitable for lightweight to medium canvas pieces on smooth, clean walls. In humid rooms, follow the product’s stated conditions. Weak paint may lift during removal, and a failed hook can damage a frame or break its glass. These checks are central to damage-free picture hanging for rented flats.

There’s no single UK price range for hanging products: costs depend on the product type, pack contents and stated weight capacity. To find existing hanging points, inspect the upper wall for a narrow picture rail, then look for hooks or cords. Check your tenancy agreement before using any fitting.

2. Getting landlord or letting-agent permission

Read your tenancy agreement before planning a picture wall or choosing frames. If it doesn’t clearly allow picture hanging, send the landlord or letting agent a written request before making changes. Ask specifically about adhesive strips, hooks, picture rails or screws. A method that avoids drilling may still be restricted by the agreement.

Make your request easy to answer. Describe the room, the hanging method and the artwork you want to display. Say whether the pictures are lightweight or framed, and explain how you’ll remove the fittings. If you’re planning a gallery wall, include its proposed location and layout. Clear details help the landlord respond to the specific change, rather than a broad request to decorate.

  • Ask which hanging methods are permitted, including removable strips or existing rails.
  • Clarify whether there’s a limit on picture numbers, locations or frame sizes.
  • Agree who will repair any marks and how the wall should be left at move-out.

Keep the reply with your tenancy documents. Written consent records the agreed method and any conditions, such as filling holes or restoring paintwork. Landlords and tenants can also agree that you’ll repair picture-hanging damage or that repair costs may come from the deposit. Put those responsibilities in writing instead of relying on a verbal conversation.

Ask separately before painting or applying removable wallpaper. Both can affect the wall finish, and permission to hang pictures doesn’t automatically cover other decorating. If the landlord approves a particular colour or asks you to restore the original finish, record that condition before starting. Once you know what’s allowed, explore artwork for your display and plan a layout that fits the permission you received.

3. Choosing hangers based on picture weight

Start with the complete framed picture, not just the print or canvas. Weigh the frame with its glazing and fittings, then compare the total with the hanger’s stated capacity. A framed photograph may weigh more than its size suggests, especially if it has glass. Choosing a hanger by appearance alone can leave the picture under-supported.

Check the package instructions for the specific product and its permitted load. Command hooks support a limited amount of weight, so match the stated capacity to your frame. Adhesive picture strips and hooks also need to suit the wall surface. Don’t assume that different products, even from the same brand, have identical limits.

The wall matters too. UK rental flats may have plasterboard, solid brick or freshly painted surfaces. Identify the surface before choosing a fixing, because a method suitable for one wall may not suit another. Removable strips are described as suitable for lightweight to medium canvas pieces on smooth, clean walls. They aren’t a universal choice for every frame or surface.

A heavier statement picture needs a suitable hanging point. Picture hooks may work where tiny pin-sized marks are allowed by the tenancy agreement. If drilling or marks aren’t permitted, don’t use a hanger that can’t safely support the frame. A picture that pulls a hook from the wall can damage the surface; a failed adhesive hook may also damage the frame or break its glass.

For a large or glazed frame, use this simple check before hanging:

  • Record the complete frame’s weight, including its glass and fittings.
  • Check the hanger’s stated capacity and permitted wall surfaces.
  • Confirm that the fixing method is allowed in your rental agreement.

If no permitted hanger suits the picture’s weight, choose another display option, such as a floor-standing easel. A lighter frame may also be more practical in living spaces where wall fixings are restricted. Match the frame, wall and permitted fixing rather than risking damage with an unsuitable hanger.

4 things to check before hanging pictures in a rented flat

4. Picture hanging in rented homes

Renting can still feel personal, even when wall fixings are restricted. Map out the room before hanging pictures: measure the wall, note furniture positions and mark proposed frame locations lightly with a pencil. A tape measure helps you avoid unnecessary holes and keep a group of frames aligned. Check the wall surface too, since rental homes can have plasterboard, solid brick or freshly painted walls.

Above a sofa, aim for artwork around 60–70% of the sofa’s width, then leave about 20–25 cm between its back and the artwork’s lower edge. A 1–2 cm tilt can look noticeable above furniture, so use a level and step back to assess the arrangement. For a gallery wall, lay out different frame sizes on the floor first. This lets you refine the composition before making any permitted fixings.

If your agreement forbids hanging, or the frame exceeds the hanger’s capacity, use a freestanding alternative. Lean a framed print securely on a shelf, display it on an easel, or place it on the floor away from walkways. These options let you change your living space without adding wall holes. Removable wallpaper can also create a backdrop, but seek permission first because it may mark or lift paint when removed.

  • Keep existing picture hooks or rail cords in place if they’re suitable and permitted.
  • Choose a small number of appropriate fixings rather than making repeated holes while adjusting frames.
  • Agree how any marks will be repaired before moving out.

A small number of nail holes may count as normal wear and tear in UK rentals. Excessive holes may lead to a charge, depending on the damage. Landlords and tenants can agree to complete repairs at the end of the tenancy or take repair costs from the deposit. Keep the arrangement in writing.

Once you’ve planned a suitable display, browse artwork for your home and choose pieces that work with your room and permitted hanging options.

First4Frames Gallery offers Ready-to-Hang Framed Art, Custom Picture Framing and Giclée Fine Art Prints. Its handmade frames are made to order with high-quality materials and 2 mm float glass. For online picture framing, choose your frame online and create custom framed art prints or bespoke framed wall art to suit your space.

Explore different tastes, from coastal wall art and landscape wall art to Scottish landscape art, photography prints and contemporary art prints. Whether you’re drawn to fine art, famous artists or best-selling artists, consider the style and finished frame weight alongside your permitted hanging method. An art print framing service can help bring the image and frame together. A wall art visualiser may help you visualise art on your wall and see artwork before you buy; use it to design your framed artwork with your room in mind.

For advice on choosing artwork or framing, contact First4Frames Gallery.

Make your rented flat feel like yours

A considered display can bring character to a room without making decorating feel permanent. Treat damage-free picture hanging for rented flats as part of choosing artwork: consider where a piece will sit, how it works with your furniture and which frame suits the space. Your display can reflect your taste while respecting the limits of your home.

When you’re ready to choose something for your walls, explore artwork that suits your room and style. First4Frames Gallery offers framed art, custom framing and Giclée prints, giving you different ways to bring a piece together. For advice on selecting artwork or framing, contact First4Frames Gallery.

Start with a piece you love, then find the right place for it in your home.

Frequently Asked Questions

Can tenants hang pictures?

Yes, if your tenancy agreement permits it or your landlord agrees. Some agreements restrict all picture hanging, while others allow it if you repair any damage when you leave. If the wording is unclear, ask the landlord or letting agent for written consent before choosing a fixing. Keep the reply with your tenancy documents, especially if it sets conditions about repairs or permitted methods.

Can I hang wall art in a UK rental without drilling?

Yes. Removable adhesive strips, adhesive hooks and existing picture rails can provide alternatives to drilling, subject to your agreement and the wall surface. In period properties, rail hooks and cords can suspend artwork from an existing rail. If no permitted method suits the frame, display it on an easel or another stable freestanding support.

Can I put pictures up in a rented house?

You can put pictures up if your agreement allows the method or your landlord consents. Permission may come with conditions, such as limiting the number of pictures or repairing holes before you move out. If you’re planning several frames, describe the display and fixing method in your request. This gives the landlord a clear basis for agreeing to the arrangement.

Can you decorate while renting?

Yes, but ask your landlord before making decorative changes, particularly painting or applying removable wallpaper. They may approve a colour scheme or ask you to restore the original finish before you leave. Get any conditions in writing, including who handles repairs. For lower-impact changes, consider personalising the room with cushions, curtains, plants or furniture you can take with you.

How can a picture hanging system help?

A picture-hanging system can let you hang and move artwork without making new holes for each arrangement. If your rental has an existing picture rail, hooks and cords can support frames from it. Before using a system, make sure it’s allowed under your agreement and suitable for the frame’s weight. It can be useful when you want to rearrange a gallery wall.

How do you personalise a rental property?

Bring in details you can take with you, such as cushions, curtains, houseplants and artwork displayed on an easel or stable furniture. Upcycling a freestanding piece can also give a room a more individual feel without altering the property. For a cohesive display, choose artwork and soft furnishings that share a colour or theme, then arrange them around the room’s existing features.

Posted on

How to Arrange Art Around a TV and Mark Hanging Points

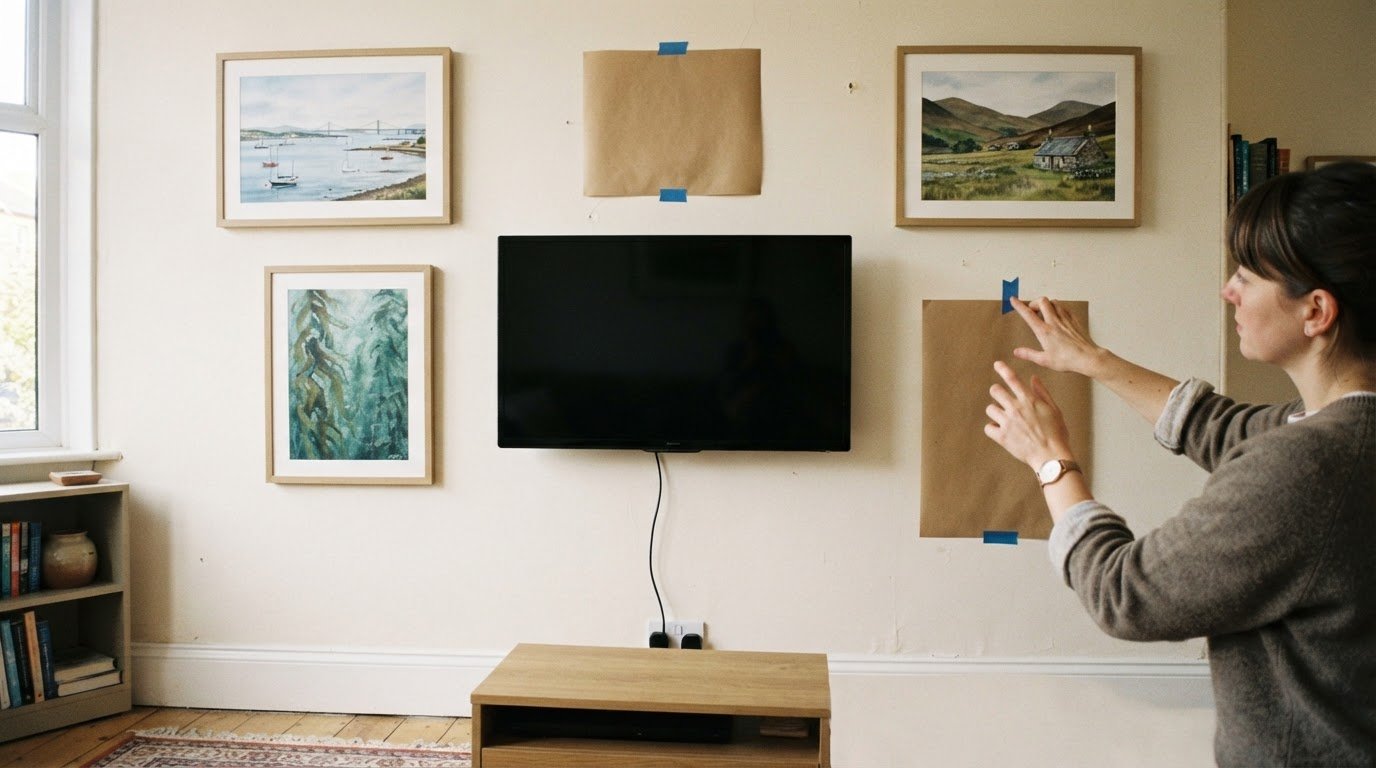
A homeowner marks a hanging point for framed Scottish prints arranged around a TV, leaving its cable accessible.

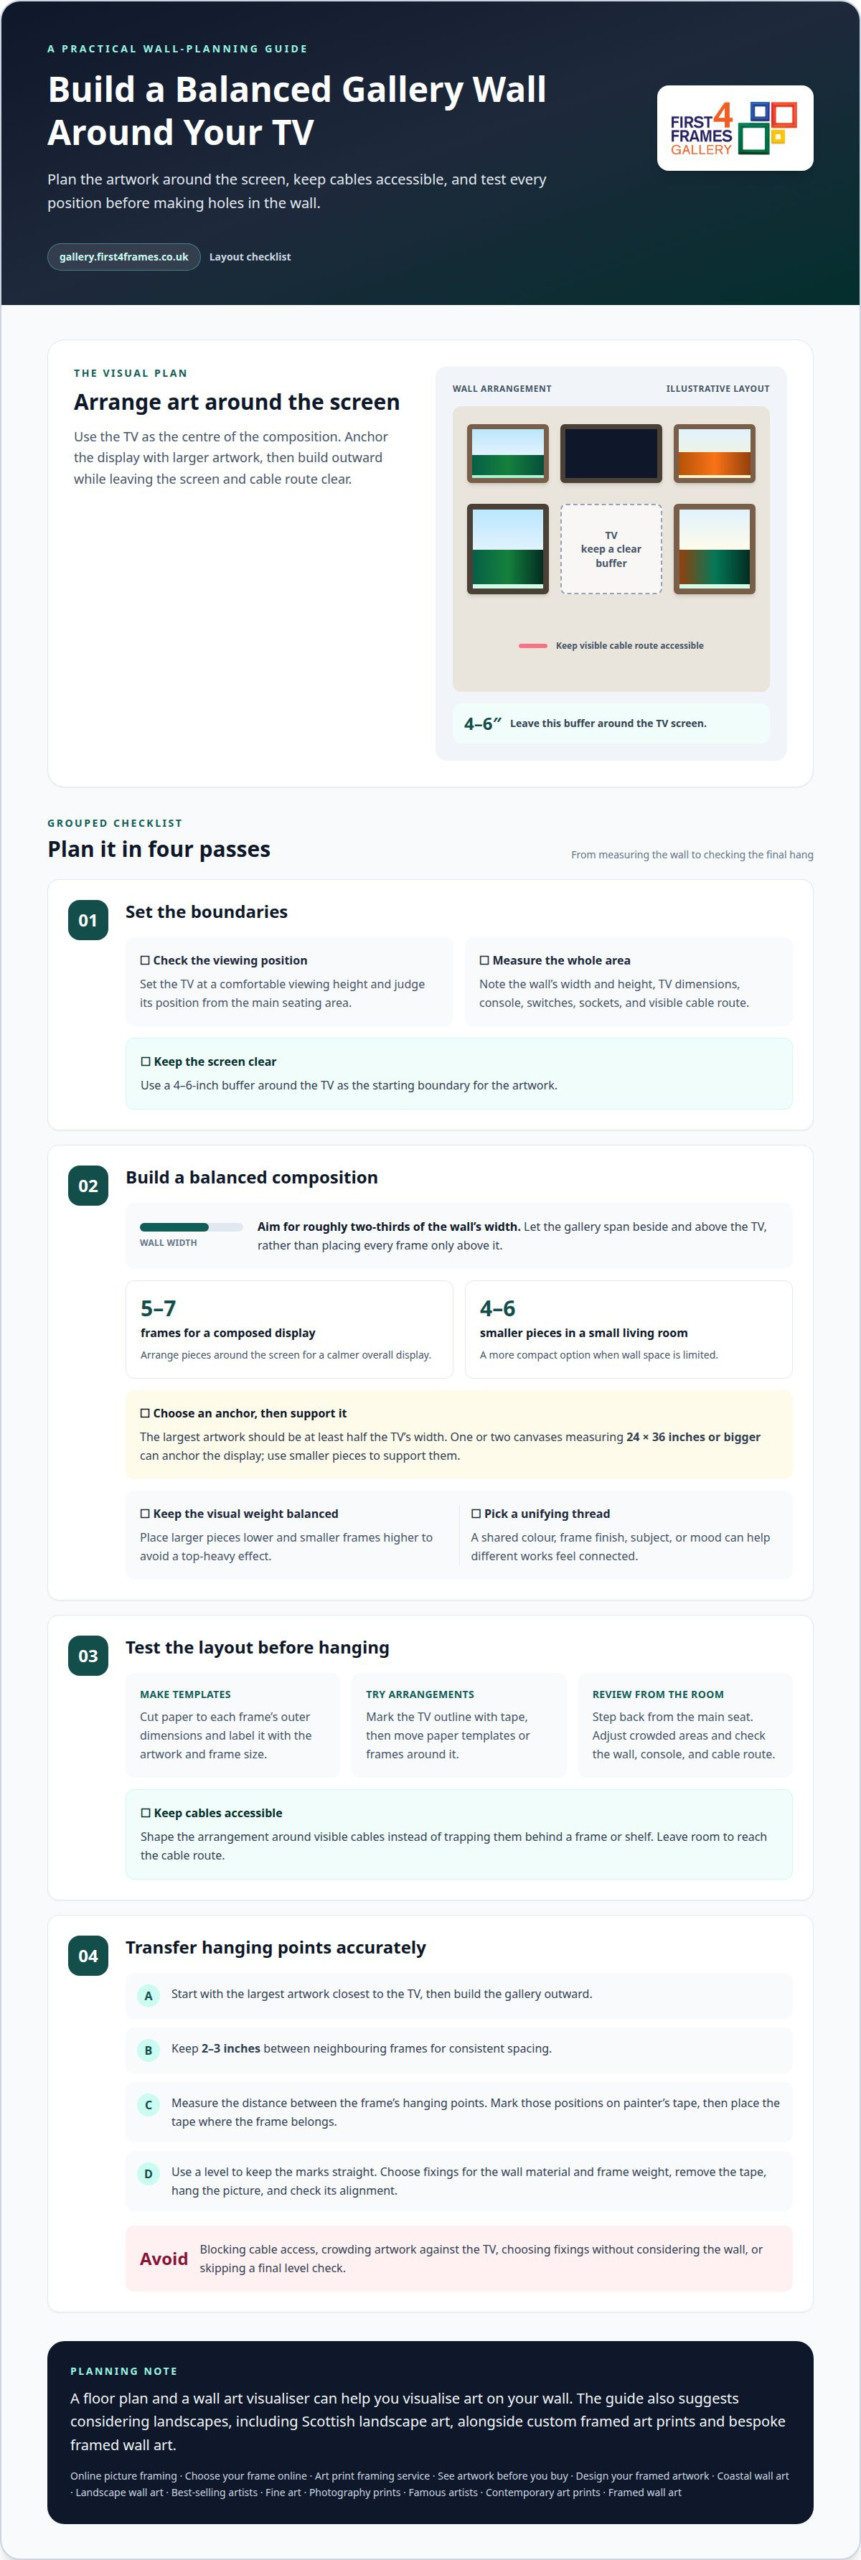
A TV doesn’t have to be the only focal point on your living-room wall. To work out how to create a gallery wall around a TV, place the largest frames near it, build the arrangement outwards and leave a 4-6-inch buffer around the screen. Visible cables can stay accessible by shaping the layout around them rather than trying to hide them behind artwork.

It’s understandable to worry that frames and cables will make a wall feel cluttered. A balanced layout can help the TV sit naturally among the room’s other details. This guide explains how to create a gallery wall around a TV, from choosing artwork and a layout to testing positions with paper templates and marking hanging points with painter’s tape. You’ll also learn how to adapt the arrangement for a smaller room, balance the display and leave space for cables, so you can plan before making holes in the wall.

Key Takeaways

  • Keep visible cables accessible by planning the arrangement around them, with framed art, shelves and decorative objects working together.
  • For a calmer display, consider using 5-7 frames and arrange pieces around the TV rather than placing them only above it.
  • Test the composition on the floor first, balancing smaller pieces higher up and larger artwork lower down.
  • Use painter’s tape to transfer a frame’s hanging-point spacing to the wall before making holes.

Yes. Arrange art and objects around the screen while keeping visible cables accessible. Leave a 4-6-inch buffer around the TV, then plan the display to work with the wall’s practical details.

  1. Combine Art, Shelves, and Decorative Objects

    Start with larger framed pieces, then add a shelf or smaller objects where they won’t obstruct the screen or cables. Keep the cable route visible and accessible instead of trapping it behind a frame or shelf. For example, place a shelf to one side of the TV, with a small vase or ornament balancing framed art on the other. This gives each element its own place without crowding the screen.

    If you display personal photos on a Samsung Frame TV, choose surrounding pictures or objects that complement the images on screen. The digital display can become part of the collection, while physical frames add depth.

  2. Choose a Unifying Palette or Frame Style

    Choose a shared colour or frame finish to bring different artworks together. Matching frames create a streamlined look; mixing wood, metal or colours can also feel considered when a tone is repeated. For example, echo a colour in a landscape print with a nearby decorative object. Keep the TV’s dark screen in mind, and avoid so many competing finishes that the artwork loses visual balance.

    Choose images with a related mood, subject, or palette to make the collection feel cohesive. Browse the artwork gallery for ideas such as landscapes, then consider how each print will sit beside the television.

  3. Test Placement with Paper Templates

    Cut paper to match each frame’s outer dimensions and label each template with its artwork. Arrange the templates around the TV, moving them until larger pieces anchor the layout and smaller ones fill the gaps. Keep the cable path clear and leave breathing room around the screen. Step back and view the plan from the main seating area before settling on positions.

    Use the templates to compare different frame sizes without lifting or shifting the artwork. If the arrangement feels crowded, move a template outward or remove an object, then review the balance.

Planning the wall layout and overall arrangement

  1. Set the TV at a comfortable viewing height before arranging art. Check its position from the main seating area, where seated eye level helps you judge the screen’s placement. Measure the wall’s width and height, including the TV console, and note any switches or sockets. Leave a 4-6-inch buffer around the screen, then use that clear space as the layout’s starting boundary.
  2. Plan the composition around the TV, rather than placing every frame above it. A gallery wall can span roughly two-thirds of the wall’s width, with art beside and above the screen. Aim for 5-7 frames for a composed display, or 4-6 smaller pieces in a small living room. A symmetrical arrangement can make the TV and console feel connected, while an asymmetrical layout may suit a varied collection.
  3. Choose a visual anchor before adding supporting pieces. The largest artwork should be at least half the TV’s width, so it holds visual weight beside the screen. One or two canvases measuring 24×36 inches or bigger can anchor the display, with smaller frames supporting them. A Scottish landscape art print, for example, could set the palette for custom framed art prints nearby. Keep larger pieces lower and smaller frames higher to avoid a top-heavy effect.
  4. Test the layout on the floor before hanging anything. Mark the TV’s outline with tape, then arrange paper templates or frames around it. Step back and compare the composition with the wall and console. A wall art visualiser can help you see how art might look on your wall, while a floor plan lets you move pieces by hand. Consider how bespoke framed wall art will balance with the room’s furnishings before choosing positions.

For an online picture framing plan, browse the artwork gallery and consider how each piece might fit your TV-wall arrangement.

How to Arrange Art Around a TV and Mark Hanging Points

Using painter’s tape to mark hanging points

Before marking the wall, measure its width and height, the TV’s dimensions and the screen’s height above the floor. Note the console’s dimensions and visible cable route too. These details show where artwork can fit without blocking access.

For plasterboard, brick or plaster walls, choose fixings to suit both the wall material and the frame’s weight. Heavier pieces may need wall anchors and screws, while lighter frames can use a sturdy nail. Common mistakes include choosing fixings without considering the wall, crowding artwork against the TV and skipping a final level check.

  1. Dry-run the arrangement with paper templates before making holes. Label each template with its picture and frame dimensions, then place them around the TV. Check the composition from the main seat and adjust any template that clashes with the console or cable route.
  2. Start with the largest artwork closest to the TV, then build the gallery outward. Keep 2-3 inches between neighbouring frames for consistent spacing. Use the same gap around smaller pictures, and step back after placing each template to spot uneven clusters.
  3. Measure the distance between the frame’s hanging points, then mark those positions on painter’s tape. Place the tape on the wall where the frame belongs, using a level to keep the marks straight. This transfers the frame’s actual fixing points without estimating from its outer edges.
  4. Hammer a nail or drill for a screw through the marked points in the tape, then remove the tape before hanging the picture. Match the fixing to the wall and frame weight. Once the frame is hung, check its alignment with a level and adjust it before moving on to the next piece.

Keep the TV’s dimensions and wall measurements beside your layout as you work. This simple reference helps prevent a common mistake: planning attractive spacing on paper that doesn’t fit the actual wall.

  1. Use artwork to give a broad living-room wall more presence. A 55-65-inch TV is usually too small to anchor a large wall on its own, so the surrounding space can feel bare. A considered arrangement gives the screen visual company and makes it part of a wider display. For example, place prints around the TV to connect its position with the rest of the room.
  2. Make the wall feel intentional, even when the television is off. The dark screen can dominate a living room, but framed artwork nearby adds colour, subject matter and detail. Choose pieces that reflect what you enjoy, such as a landscape that recalls a favourite place or a striking contemporary print. The display can then feel personal, rather than centred only on a device.
  3. Use the gallery to connect separate elements in the room. Artwork can link the TV wall, furniture and other details without requiring everything to match. For example, a print featuring a colour already found in a rug can help the two areas feel connected. Choose images for their meaning as well as their appearance, so the arrangement adds character to everyday viewing.
  4. Let the display evolve as your tastes change. A gallery wall can bring together different subjects, such as a favourite landscape, an abstract composition and a meaningful print, while the TV remains in place. Start with pieces you genuinely want to live with, then leave room for a future addition. Explore artwork for your living room to find prints that could give the screen a more considered setting.

First4Frames Gallery can help bring a planned TV-wall arrangement together with Ready-to-Hang Framed Art. Choose a print and frame to suit your palette, or use Custom Picture Framing for artwork that needs a bespoke fit. Frames are handmade for each order using high-quality materials, with 2 mm float glass glazing.

For a more personal display, Giclée Fine Art Prints offer another way to select artwork for your wall. Consider how each image’s colours and frame will sit beside the television before choosing pieces for your arrangement.

If you’d like guidance on framed art for your layout, contact First4Frames Gallery.

Let Your TV Wall Reflect Your Style

To create a gallery wall around a TV, treat the screen as part of the living space, not as an obstacle to decorating. Begin with artwork that feels meaningful to you, then let its colours and character guide future choices. Your display can grow over time, bringing together pieces that reflect places, memories and subjects you love.

Before choosing your next print, picture how it might sit alongside the room’s existing textures and furnishings. A considered addition can refresh the wall without replacing the entire arrangement. Follow your own taste and let the collection take shape at a comfortable pace.

Explore artwork for your TV wall and find a piece to inspire your next design choice. Your living room can become a more personal space, one artwork at a time.

Frequently Asked Questions

How much space should be between the TV and the artwork?

Leave a 4-6-inch buffer between the TV and the nearest frame, measuring from the screen’s edge to the frame’s outer edge. This gives the display breathing room and keeps artwork from feeling pressed against the screen. If the TV sits above a console, consider that furniture’s outline too, so the nearest pictures don’t appear squeezed between the screen and the console.

Is a gallery wall around the TV a good idea in a small living room?

Yes, a gallery wall can suit a small living room when its scale matches the available wall space. Try 4-6 smaller pieces rather than filling every gap with oversized frames. A compact arrangement can add personality without overwhelming the TV or seating area. Keep the composition focused, and choose artwork that works together so the eye can move naturally between each piece.

Should the frames match my TV?

Frames don’t have to match the TV exactly. A consistent finish, such as black frames echoing a dark screen, can create a unified look, while wood or metal frames add contrast. For a mixed collection, repeat one colour or material across several pieces. This shared detail helps different frames feel intentional beside the screen.

What size art works best around a TV?

Choose artwork in proportion to both the TV and the wall. The largest piece should be at least half the TV’s width to hold visual weight beside the screen. One or two canvases measuring 24×36 inches or bigger can anchor the arrangement, with smaller pictures supporting them. In a tighter space, use smaller works so the composition stays balanced.

How much space should you leave between a TV and framed pictures?

Keep the closest framed picture 4-6 inches from the TV’s edge, measuring to the outside of the frame rather than the artwork inside. That distinction matters with wide frames, which can reduce the visible gap. Use the same measurement on both sides if you want a symmetrical arrangement, or adjust each side to suit the wall’s shape and nearby furnishings.

How to hide TV cables within a gallery wall

Keep the cable route accessible by arranging artwork and shelves around it, rather than trapping cables behind them.

Posted on

How to Arrange Frames on a Narrow Wall in Rows or Stacks

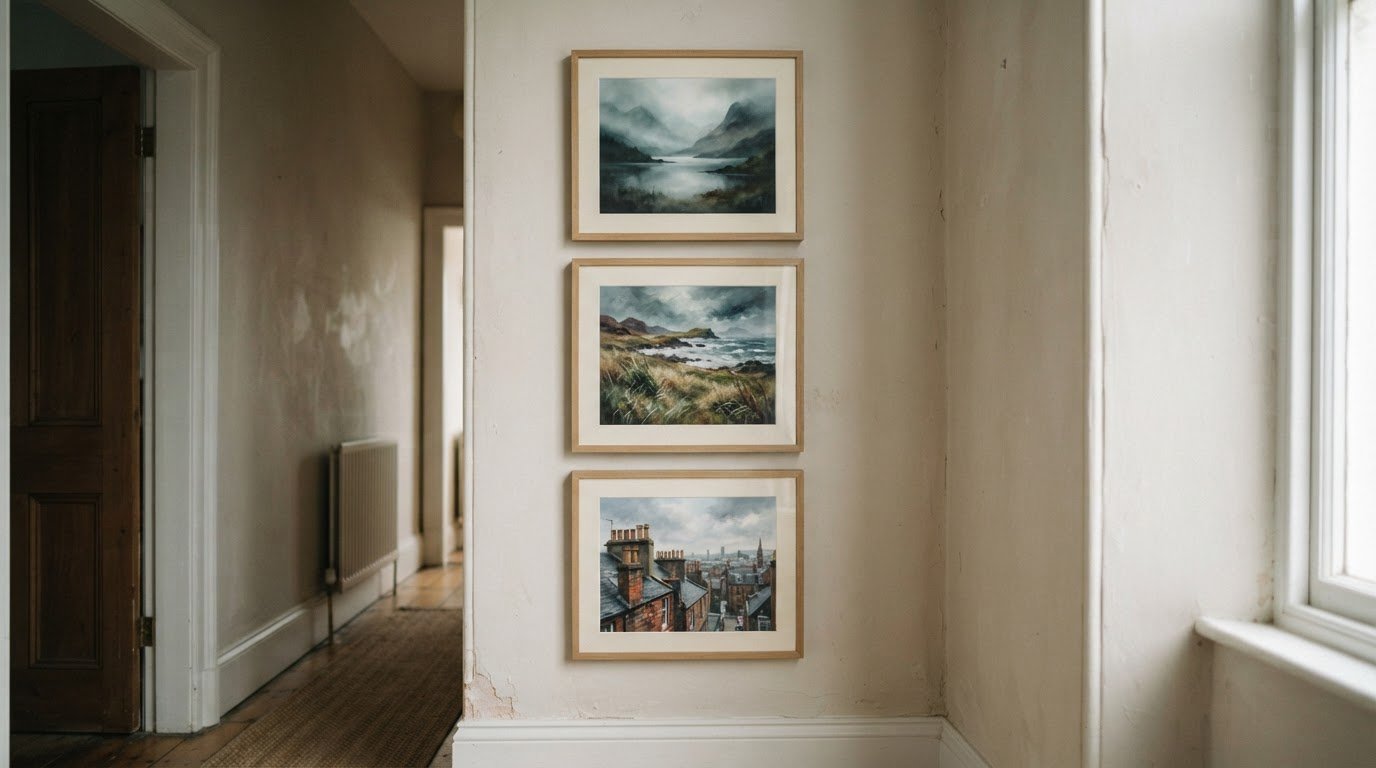
Three Scottish art Giclée prints in oak frames stacked on a narrow hallway wall

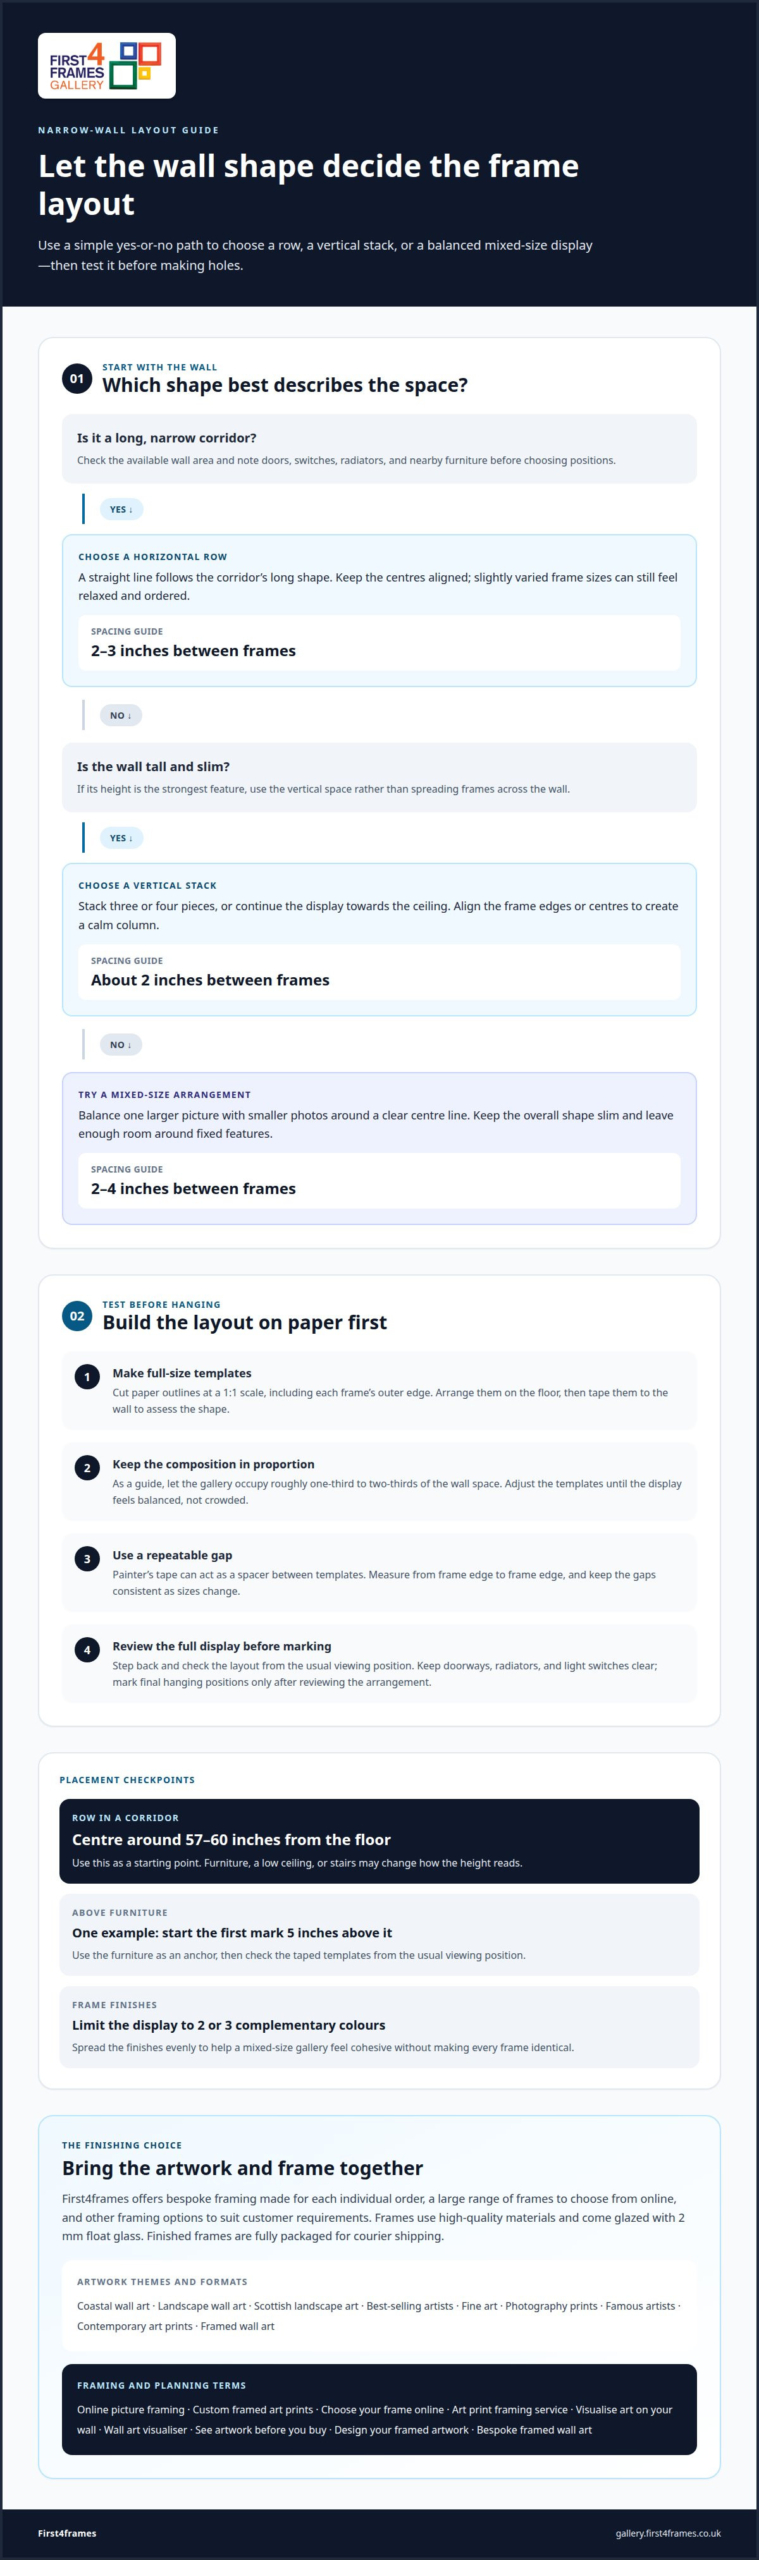
The best way to arrange frames on a narrow wall is usually a vertical stack in a tall, slim space, or a single horizontal row in a narrow corridor. A vertical display can hold three or four pieces, or continue towards the ceiling. Leave about 2 inches between frames in a stack, or 2 to 3 inches in a row.

A narrow wall can be tricky to fill without making it feel crowded, so plan the layout before making holes. Place full-size paper templates where you want each frame, then adjust the spacing and alignment until the composition feels balanced.

This guide shows you how to map out a layout, choose between a row, a mixed-size arrangement and a vertical stack, and keep the gaps intentional. You’ll also learn how to make a small wall feel considered rather than squeezed, giving your chosen art room to make an impression.

Key Takeaways

  • Match the layout to the wall’s proportions: a row can suit a corridor, while a vertical arrangement makes use of a tall, narrow space.
  • Use painter’s tape to keep gaps consistent when arranging frames of different sizes.
  • Test how a mixed-size composition looks before settling on the positions and balance of each piece.
  • Explore bespoke framing when you want artwork and frame choices to work together as a finished display.

Plan the composition before marking the wall. Full-size paper templates let you test frame placement, height and spacing while leaving the wall untouched.

  1. Match the layout to the wall

    Measure the available wall area, then sketch a layout that follows its proportions. A narrow wall usually suits a vertical arrangement or a slim row better than a broad, sprawling grid. As a guide, let the gallery wall occupy roughly one-third to two-thirds of the wall space. Cut paper templates at a 1:1 scale, arrange them on the floor, then tape them up to assess the overall shape.

  2. Select frame sizes, styles, and colours

    Choose frame sizes to suit the pictures you want to display, then use paper outlines to compare their visual weight. For example, place one larger picture beside smaller photos and check that the arrangement fits the wall’s width. Limit frame finishes to two or three complementary colours, spread evenly across the display. This gives a mixed-size gallery wall cohesion without making every frame identical.

  3. Choose the gallery wall height

    Mark the intended centre of the arrangement and consider how it relates to nearby furniture and the room’s sightlines. Above a sofa, console table or dresser, use the furniture as an anchor rather than placing frames too high. One example for a gallery wall above furniture is to make the first mark 5 inches above it. Tape up the templates and check their height from the usual viewing position.

  4. Decide how many frames to hang

    Choose a frame count that fills the planned shape without crowding its edges. A 3-by-3 grid gives you an example with 9 frames, while fewer, larger pictures can create a calmer display on a slim wall. Trace each outline, including its frame edge, and move the templates until the overall placement feels balanced. Use a pencil to mark the final positions only after reviewing the full arrangement.

A straight row keeps artwork aligned along a narrow hallway without making the passage feel crowded. Plan its direction in relation to how the corridor connects with adjoining rooms.

  1. Plan a single-row corridor display

    Arrange frames in a horizontal line to suit the long, narrow shape of a corridor. Leave 2 to 3 inches between pieces, then use a laser level to keep the line straight. For a relaxed feel, vary the frame sizes slightly while keeping their centres aligned. Before settling the placement, look from both ends of the hallway and check that the prints don’t interrupt doors or switches.

  2. Adapt the display to hallways and stairs

    Follow the natural movement through the space. In a level hallway, keep the row horizontal; beside a staircase, arrange the artwork to rise with the steps. Use paper outlines to see how the display looks from both the landing and the foot of the stairs. If the hallway opens towards a living room, consider how the artwork and colours relate to that room.

  3. Position the gallery at eye level

    Centre a horizontal row around 57-60 inches from the floor, then stand back to assess its height. That measurement gives you a starting point, not a reason to ignore the room: a low ceiling, nearby furniture or a staircase can change how the placement reads. Check the display while walking through the corridor, since the artwork should feel comfortable from the usual viewing path.

  4. Connect adjoining spaces with a shared colour, subject or frame finish rather than matching every piece. For example, a coastal print in the hallway can echo a colour in the living room without repeating the same image. If you prefer a looser gallery, vary frame sizes and let the arrangement follow the available wall shape, while keeping its overall direction clear. Browse artwork for a hallway display to consider which prints suit your route through the home.

How to Arrange Frames on a Narrow Wall in Rows or Stacks

What is the best way to arrange different sized picture frames?

On a narrow wall, use a vertical stack or a slim row, then balance frame sizes around a clear centre line. Leave 2 to 4 inches between frames, adjusting the composition to suit the wall.

Treat a doorway, radiator or light switch as a boundary. Arrange frames beside or above it, leaving access clear and avoiding a cramped display.

  1. Mark frame spacing with painter’s tape

    Cut painter’s tape to the gap you want and place it between the paper frame templates. This creates a repeatable guide as you adjust the display’s visual rhythm. For example, use the same tape width between each pair of frames, even where sizes change. Step back to check the spacing from across the room before marking hanging positions.

  2. Set spacing for a vertical display

    Stack frames from the bottom upwards, keeping their edges or centre line aligned. For a vertical display of three photo frames, leave about 2 inches between each frame. If sizes vary, align the centres to create a calm column, or align one edge for a more structured look. Place the paper templates first, then check that the top and bottom pieces fit the available wall height.

  3. Keep gaps consistent and even

    Measure between the outer edges of each frame, not between the pictures inside them. A gap of 2 to 4 inches usually works well; keep it consistent across horizontal and vertical spaces. In a relaxed arrangement, even spacing still helps different sizes feel connected. Use a ruler or a tape spacer at every gap, then view the display from your usual position to spot uneven distances.

  4. Arrange frames around fixed features

    Mark the outline of a doorway, radiator or light switch on your layout before placing frames. Treat it as a boundary, then group pictures to one side or arrange them evenly above it. Keep the gallery’s visual centre clear of switches, and don’t let a frame overlap the doorway’s edge. Test the layout with paper templates to make sure the display feels deliberate.

Vertical frame stacks for tall, narrow walls

For a tall, narrow wall, a vertical stack usually uses the space more effectively than a horizontal row. A stack can hold 3 or 4 pieces, or continue towards the ceiling.

  1. Build a vertical frame stack

    Measure the usable wall space from the furniture or skirting board to the ceiling, then map the stack with paper templates. Place the largest picture near the centre, balancing it with smaller pieces above or below. Keep the column’s centre line consistent and check that the top frame doesn’t look isolated near the ceiling. View the full stack from the doorway before planning the hanging points.

  2. Choose between a vertical stack and a row

    Match the layout to the wall’s shape and the surrounding space. Choose a vertical stack for a tall, slim area, such as the wall beside a doorway. A single row suits a long hallway where the wall extends sideways. If the wall has enough height and width for either option, compare paper outlines and choose the arrangement that leaves the clearest visual space.

  3. Measure each frame’s outer dimensions and hanging point before marking the wall. The frame edges determine the space the full stack needs, while the hanging hardware determines where each fixing sits. Transfer both measurements to the templates so the frame edges, not the fixings, are evenly spaced. This prevents a straight centre line from concealing uneven gaps.
  4. Let the artwork guide the order of the pieces. For example, a portrait photograph can anchor the centre, while smaller landscape prints lead the eye upwards or downwards. Keep frame finishes consistent if the subjects vary, or use a shared colour to connect different styles. Before hanging, step back and check that the stack reads as one composition rather than separate pictures competing for attention.

Explore artwork for a vertical display and consider how each image will relate to its neighbours before choosing the final order.

First4Frames Gallery offers Ready-to-Hang Framed Art, Custom Picture Framing and Giclée Fine Art Prints. Explore online picture framing to choose your frame online and create custom framed art prints or bespoke framed wall art. Consider how fine art, contemporary art prints, coastal wall art, landscape wall art or Scottish landscape art might suit your display.

As you browse, consider the artwork and framing together. Whether you’re drawn to well-known artists, popular artists or photography prints, picture the art on your wall before you buy. A wall art visualiser can help you plan the arrangement, while professional framing can bring your chosen pieces together as ready-to-hang wall art.

Visit First4Frames Gallery online to explore the artwork and framing options.

Let your wall tell a story

A narrow wall can be more than a space to fill. Treat it as a small composition with a clear point of view: choose artwork that reflects a mood, memory or subject you want to live with. Finding the best way to arrange frames on a narrow wall starts with deciding what you want the space to express, then choosing pieces that feel connected without competing for attention.

Before hanging anything, consider how the display will look with the room’s colours and furnishings. A quiet series of prints can create a gentle rhythm in a hallway, while a striking central image can give a slim wall a confident focal point. Choose pieces that feel personal and give the finished arrangement room to become part of your home.

Explore the artwork and framing options at First4Frames Gallery to find pieces that suit your space and style. Browse the gallery and take the next step towards a display that feels distinctly yours.

Frequently Asked Questions

How do you space multiple frames on a wall?

Measure the gap between each frame’s outer edges, using the same reference point throughout. In a mixed-size display, compare the spaces between frames rather than between the picture contents, since mounts can make those gaps look different. Lay out paper shapes first and view them from the room entrance to spot any frame that feels detached from the group.

Should all frames on a gallery wall be the same colour?

No. Frames can have different finishes if the overall display still feels connected. Create a visual link by repeating one finish on the largest pieces or matching frame tones to colours in the artwork. For example, black frames can anchor a few lighter wood frames. Spread each finish across the arrangement instead of clustering matching frames in one corner.

What if my frames have 2 hooks, one on each side, instead of one in the centre?

Measure between the hooks and transfer that distance to the wall, keeping the frame’s centre aligned with your planned position. For hooks 12 inches apart, mark the fixing points 6 inches either side of the centre. Check both marks with a level before hanging, so the frame sits straight and its weight rests evenly on both fixings.

What frame layouts work best on a narrow wall?

The best way to arrange frames on a narrow wall is to match the layout to its shape: choose a vertical stack for a tall, slim space or a single row along a corridor. A mixed-size arrangement can also work if its overall outline stays narrow, such as one larger picture beside smaller pieces. Account for nearby doors and switches when mapping the usable space.

How much spacing should there be between picture frames?

A gap of 2 to 4 inches between frame edges is a useful starting point for many displays. Keep the distance consistent across the arrangement, including between larger and smaller frames. If the artwork has wide mounts, judge the frame edges rather than the visible image area. A paper spacer cut to your preferred gap makes repeated measurements easier.

How high should picture frames be hung in the UK?

For a horizontal row, centre the arrangement around 57-60 inches from the floor, then assess it from the usual viewing position. For the best way to arrange frames on a narrow wall, measure to the centre of the complete display, not the top edge of the first frame. In a stairwell, test the height with paper templates first.

Posted on

Framed Art Prints as Housewarming Presents for a New Home

Framed Art Prints as Housewarming Presents for a New Home

A highly personal framed print can be a risky present: bold slogans, intimate subjects or a strong style may not suit the recipient’s taste. For housewarming presents, framed artwork feels thoughtful when the subject and palette leave room for the recipient’s own style. A versatile image is often a safer choice than one that dictates a room’s mood.

It’s natural to want a present to feel distinctive, especially when someone is settling into a new home. Art can make a space feel warmer and more complete, but the right choice depends on the recipient’s preferences and how well you know their décor. Consider what they enjoy, not only what looks striking to you.

This guide explores why prints can make lasting housewarming presents, which styles may be risky, and how to choose framed artwork for a new home. You’ll find practical ways to weigh subject, colour, size and framing, so your gift feels personal without asking the recipient to redesign a room around it.

Key Takeaways

  • Choose artwork that complements the recipient’s taste without requiring the whole room to follow one strong theme.
  • Consider how the print’s subject, colours and scale will work in the home before settling on a gift.
  • Personal touches can make a print feel more meaningful, while a highly specific style may be harder to place.
  • Explore bespoke framing when you want the artwork and frame to feel thoughtfully matched.

Why Are Art Prints a Good Housewarming Gift?

A print can create a focal point in a new room and remain part of the home as its décor changes. For a housewarming gift, choose a subject the recipient can enjoy without needing to match every detail of their interior.

Lasting Gift Appeal

Unlike flowers or food, a framed print can stay on display long after the moving-day boxes are unpacked. It might add colour above a reading chair or bring a hallway wall to life. Look for an image with lasting appeal rather than a design tied to a short-lived trend.

Match the print’s scale to its likely location. For a living room or bedroom feature piece, consider 16×24 or 20×30 inches. For a kitchen, bathroom or hallway, 12×16 or 11×14 inches may feel more at home. A 5×7-inch print can seem tiny as a housewarming gift, while at least 8×10 inches gives the artwork more presence.

Standard print dimensions can make choosing a frame more straightforward. Before deciding, consider the wall space, nearby furniture and whether the recipient already owns frames. A coordinated set of 2-3 prints can suggest a ready-made gallery arrangement above a sofa or along a stairway.

Versatile Styles for Gifting

Choose artwork that connects with the recipient without relying on an exact colour scheme. Coastal scenes, landscapes and botanical subjects offer familiar themes, while photography or contemporary art can suit different rooms. For example, a calm seascape might appeal to someone who loves the coast, while an abstract print could suit a friend with modern furnishings.

Consider how much attention the image demands. A quiet landscape can sit alongside varied furnishings, while a vivid composition or humorous slogan may dominate a room. If you’re unsure of their taste, choose a balanced palette and a familiar subject. The print can add character without defining the entire space.

Artwork as a housewarming present

A framed print can mark a move without adding another practical item to an already busy home. Choose artwork with a clear connection to the recipient, such as a favourite landscape, a meaningful place or a subject linked to a shared memory. That personal detail gives the gift a story, while the image can still suit the new room.

Think about how the artwork will arrive as well as how it will look. A framed piece should have sturdy outer packaging, with the frame and glazing cushioned against knocks in transit. If you’re giving it in person, attach a card to the outside of the protective wrapping so the message stays separate from the artwork.

If you’re sending the gift directly, choose framed artwork supplied ready to hang and protected for delivery. A finished frame can be awkward to wrap at home, and loose paper or ribbon won’t protect its corners. Protective packaging helps the artwork arrive ready for its new wall.

Before settling on a print, work through three practical checks:

  • Room: Picture a specific spot, such as the wall beside the dining table or above a hallway console.
  • Connection: Choose a place or subject the recipient recognises, rather than a design based only on your own taste.
  • Presentation: Decide whether a single piece or a coordinated pair better suits the available wall space.

For a couple who enjoy long countryside walks, a landscape can recall favourite weekends without spelling out a message. For a first-time buyer, a familiar local scene may help the new house feel like home. These choices make the present personal while leaving room for the recipients’ own decorating decisions.

Browse artwork for a housewarming gift by subject and mood, then choose a piece that connects with the people receiving it. A thoughtful image, secure wrapping and a short handwritten note can make the unboxing feel as considered as the artwork.

What framed artwork makes a good housewarming present?

Good framed artwork reflects the recipient’s taste without imposing one look on every room. Start with a subject they already enjoy, then consider how its colour, message and frame will sit alongside their belongings.

Some styles carry more risk than others. A large political slogan, explicit image or joke about a personal subject can feel uncomfortable in a shared home. Highly religious imagery may also feel too specific unless you know the recipient welcomes it. A striking portrait of someone they don’t know could be difficult to place, even if it is beautifully made.

Use these checks before choosing a print:

  • Message: Read every word in a slogan print and consider how it might feel on daily display.
  • Subject: Match a recognisable interest, such as gardening, architecture or music, rather than an uncertain in-joke.
  • Palette: Look at the room’s existing colours, including a rug, sofa or curtains.
  • Frame: Choose a finish that supports the image, such as a simple profile for a detailed print.

For a considered choice, explore fine art, architectural studies or photographs of places the recipient loves. These subjects can feel distinctive without relying on a bold slogan or current trend. A gift for a couple should suit both people, so avoid artwork that assumes they share one hobby or taste.

Think about where the piece could hang. A detailed image may suit a quiet study, while a busy composition can compete with patterned wallpaper in a small hallway. Picture the print above a console or beside a bookcase to judge its visual weight. When uncertain, choose a balanced image and a frame that complements its tones, rather than an ornate finish that draws attention away from the artwork.

Framed Art Prints as Housewarming Presents for a New Home

Can you personalise framed artwork with names, dates or locations?

Yes, you can make a framed print feel personal through its image, setting and presentation. A location with shared meaning often adds warmth without changing the artwork itself. Put names and dates in a handwritten card to keep the print flexible for display.

Choose a detail that connects with the new home or its residents. It might be the place where they met, a coastline they return to, or a landscape near their former home. A print of a familiar city, for example, could mark a couple’s time there without adding text across the image. This keeps the artwork decorative as well as meaningful.

For a personal gift, use this simple sequence:

  • Pick the connection: Decide whether a place, shared memory or favourite subject matters most.
  • Choose the image: Find artwork that reflects that connection while suiting the recipients’ taste.
  • Add the details separately: Write names, a moving date or a short message inside the accompanying card.
  • Consider the room: Think about where the framed print might hang and whether its colours suit that space.

Putting names or dates directly onto artwork makes the design more specific. That may suit a carefully planned interior, but it can also limit where the piece works later. A separate note preserves the personal meaning while leaving the image uncluttered. For a shared gift, a place or subject both residents recognise can feel more inclusive than a message aimed at one person.

Keep the inscription concise. A date and a few sincere words usually feel more considered than a long dedication. You can also write the story behind the chosen image, such as why a particular view matters to the household. Browse artwork by subject and style to find an image that carries that connection naturally.

First4Frames Gallery offers Ready-to-Hang Framed Art with handmade, bespoke frames made for each order from high-quality materials. Each frame is glazed with 2 mm float glass. The careful packaging and courier delivery help the finished gift arrive ready for its new home.

Explore framed wall art from best-selling artists and famous artists, or choose Custom Picture Framing and Giclée Fine Art Prints. You can also have your own digital photograph printed and framed. With Online picture framing, you can choose your frame online and design your framed artwork as custom framed art prints or bespoke framed wall art. See artwork before you buy, and visualise art on your wall by considering how its subject and frame might suit the room. Treat a wall art visualiser as a planning idea, not a requirement. The Art print framing service makes it easier to bring a personal image or fine art print together with a considered frame.

Choose a Gift That Feels Like Theirs

The best housewarming presents don’t dictate how a new home should look. Choose something that reflects the people who live there, while leaving them to decide where it belongs. That balance makes framed artwork feel personal and gives the recipient freedom to shape their own rooms.

Before choosing, picture the moment they unwrap it. Will the image bring a favourite place to mind, start a conversation or simply make them smile? That question can help you move beyond a generic new-home motif and choose something with lasting meaning.

Take a relaxed look through the available artwork and notice which pieces feel connected to the recipient, rather than just suited to a trend. Explore framed art for a housewarming gift and find an image that feels right for their next chapter. A thoughtful choice can help a new space begin to feel like home.

Frequently Asked Questions

What Art Styles Should I Avoid as Gifts?

Avoid artwork built around an unfamiliar cultural reference, niche humour or a strong decorative theme. The recipient may not connect with its meaning, even if the image looks striking. Consider whether the subject assumes a particular lifestyle, such as travel or pet ownership. A gift that depends on knowing these preferences can feel less thoughtful than an image with broader appeal.

What if I don’t know their interior style?

Choose an image that feels complete without relying on a particular room colour or furniture trend. A simple architectural study or softly toned botanical print can work in different settings. If you’ve visited their home, notice recurring materials, such as pale wood or dark metal, and use that clue when selecting the frame. A gift receipt or exchange option can also give them flexibility.

Where can I buy framed artwork gifts in the UK?

You can buy framed artwork from UK galleries that sell finished prints, as well as from businesses offering bespoke framing. First4Frames Gallery offers Ready-to-Hang Framed Art, Custom Picture Framing and Giclée Fine Art Prints. This gives you options whether you want to select an existing framed piece or choose a print and frame combination for a particular recipient.

How much does framed artwork cost in the UK?

The cost depends on the print, its dimensions and framing choices. Larger artwork uses more materials, while the frame profile, mount and glazing affect the finished piece. Compare like with like: check whether the price covers both print and frame, and whether it arrives ready to hang. Bespoke framing is tailored to the artwork and the finish you choose.

What are popular styles of framed art for housewarming gifts?

Landscape scenes, botanical studies, architectural images and contemporary abstracts are useful styles to explore. A line drawing of a familiar building, for example, can suit someone interested in design, while a calm seascape may appeal to a coastal walker. Choose a style because it connects with the recipient, not simply because it appears often in home décor photographs.

How do I choose framed artwork to suit someone’s home decor?

Start with the room where the recipient might display the artwork, and note its wall colour, furniture materials and existing art. Repeat one feature, such as a warm timber tone or muted blue accent, rather than trying to match every colour. Consider the room’s purpose too: a restful image may suit a bedroom, while a more energetic piece can bring character to a workspace.

Posted on

4 Ways to Choose Art for Above a Sofa

4 Ways to Choose Art for Above a Sofa

The artwork above your sofa shouldn’t feel like an afterthought. Knowing how to choose art for above a sofa starts with scale: aim for a piece or arrangement around two-thirds to three-quarters of the sofa’s width, then leave roughly 15 to 25 cm between the sofa back and the frame’s bottom edge. These proportions help the art feel connected to the furniture without overwhelming it.

It’s easy to focus on a favourite image and overlook how it will sit on the wall. When considering how to choose art for above a sofa, think about the room’s focal point, the sofa’s shape and the balance you want to create.

This guide covers four practical decisions: measuring the available space, setting a comfortable hanging height, choosing a single print or a group, and selecting a focal point that brings the room together. You’ll also find simple ways to preview the arrangement before committing, so the art feels considered and at home above your sofa.

Key Takeaways

  • Aim for artwork or an arrangement around two-thirds to three-quarters of your sofa’s width, and centre it over the seating.
  • Leave roughly 15 to 25 cm between the sofa back and the frame’s bottom edge, adjusting the layout to suit nearby windows and the room.
  • Choose a statement print, a coordinated set or a gallery wall to suit the wall’s proportions and the look you want.
  • Build the display around a piece you love, then use its colours and framing to create a focal point that feels at home in the room.

1. Artwork placement for sectionals and window-adjacent sofas

For balanced proportion, choose artwork or a complete arrangement around two-thirds to three-quarters of your sofa’s width. A 140-160 cm two-seater suits artwork 93-120 cm wide; a 180-200 cm three-seater suits 120-150 cm. For a 220-260 cm corner sofa, aim for 147-195 cm. Measure the full sectional, including its return, before choosing a horizontal piece.

Above a sofa, position the frame’s bottom edge 15-25 cm above the back. Centre the artwork over the seating, not automatically over the whole wall. If a window sits beside the sofa, keep the artwork visually balanced with the window rather than squeezing it into a narrow strip. A single horizontal piece between a window and ceiling needs at least 50 cm of space above it.

For a visual guide to scale and balance, watch this short video:

Artwork costs in the UK vary by image, size and framing. Decide on your preferred format and the space available first, then compare pieces that suit both your room and budget.

Coordinate the artwork with your sofa without matching every colour exactly. A neutral sofa can anchor a vivid abstract print, while a patterned sofa may work better with art that picks up one subtle shade. Consider visual weight too: a dark, detailed image can feel heavier than a pale landscape of the same size.

Common mistakes include choosing a print that looks too small, hanging it too close to the sofa, or letting its colours compete with the room. Use painter’s tape to mark the proposed artwork’s width on the wall. For a sectional sofa, outline the full arrangement and check how its horizontal shape relates to the seating and nearby windows.

Using symmetry, frames and cohesive themes

Symmetry gives a sofa wall a composed feel, especially when the room already has strong patterns. Try a pair of prints with matching outer dimensions, or arrange four pieces in a 2-by-2 grid. For a more relaxed gallery, repeat one colour or subject across different sizes. A shared detail, such as soft blue in each print, helps varied artwork feel connected.

Plan the gallery as one visual shape, rather than separate frames scattered above the sofa. Keep 5-8 cm between frames for a consistent rhythm, then check the arrangement’s full outline against the seating. A 2-by-3 grid creates a clear rectangular layout, while a looser cluster can suit an informal living interior. Leave enough space between the arrangement and the ceiling.

Choose frames that echo the room’s existing materials. A slim, simple frame can complement a contemporary interior; a more decorative profile can suit traditional furnishings. Matching every frame creates order, while mixing profiles works best when another detail, such as colour or finish, ties them together. Remember that frames can add 1-3 inches to the overall artwork size.

Framed prints and canvas create different visual effects. A framed print gives the image a defined edge, and a mount can add breathing space around the artwork. Standard mount widths range from 2-4 inches. Canvas presents the image without a separate frame, creating a more continuous surface. Choose the format that supports the image and the balance you want above the sofa.

Before committing, arrange paper templates on the floor or wall to compare spacing, symmetry and overall scale. Include the frame and mount in each template, not just the print dimensions. This makes it easier to see whether a balanced grid or varied gallery suits the room. Explore framed artwork and print options for ideas that could bring your chosen theme together.

4 Ways to Choose Art for Above a Sofa

A single statement print gives the sofa wall one clear focal point. It suits a medium-sized wall, especially when the image has enough detail or colour to hold attention on its own. Examples include a horizontal print measuring 24 × 36 inches or 24 × 48 inches. Part of how to choose art for above a sofa is deciding whether one image can carry the room’s visual story.

A set of prints creates rhythm across the wall. Two or three related pieces can share a subject, palette or style while giving each image room to stand out. A diptych pairs two coordinated artworks; a triptych uses three. Keep the gaps even so the frames read as one considered arrangement rather than competing pieces.

For a larger wall, a gallery wall can bring together varied prints and personal objects. Plan the full outline first: arrange templates on the floor, then test the shape above the sofa. A standard sofa gallery arrangement may span 50-70 inches overall. Include each frame in that measurement, and consider how the grouping relates to nearby windows, shelves and the ceiling.

Renters can lean framed artwork on a long console or floating shelf, layering smaller pieces in front of a larger print. If you’re weighing how to choose art for above a sofa, this flexible approach lets you explore a grouping before hanging it. For wall-mounted frames, choose hardware suited to the wall material and finished frame weight. Plasterboard and masonry need different fixings. Adhesive strips offer another option for lightweight artwork, with heavy-duty strips described as supporting prints up to around 3 kg. Follow the strip maker’s stated limits for the surface and load.

Compare the visual impact of one large image with several smaller frames. A bold abstract can anchor a simple interior, while a gallery wall adds personality. Choose the arrangement that gives the sofa a focal point without crowding the wall.

4. Choosing a focal point above the sofa

Abstract art, landscapes and photographic prints can all work above a sofa. Choose a style that suits your living room, then let one artwork lead the arrangement. A vivid abstract, a calm coastal scene or a diptych can each create a focal point, in a different way.

First decide what should catch the eye. If your sofa has a distinctive shape or colour, choose art that complements it without copying every detail. In a neutral room, a clear subject or rich colour can become the anchor. In a patterned room, a quieter image may keep the wall from feeling crowded.

Think about how the image connects with the rest of the room. Pick one or two colours from a rug, cushion or nearby wall, then look for artwork that repeats them naturally. A blue landscape, for example, can link a pale sofa with a patterned rug. This creates a visual connection without making the art feel like a matching accessory.

Scale affects whether the focal point feels connected to the sofa. A single framed print measuring 70 × 100 cm can suit a standard three-seater; a panoramic artwork measuring 150 cm wide offers another option. Artwork that feels too small can look detached, so consider the full composition and its frame against the furniture before choosing.

Choose the image because you want to live with it, not simply because it matches the sofa. Then decide whether surrounding objects support its role or distract from it. A clear focal point gives the room a visual centre, while carefully chosen colours and subject matter help the artwork feel beautifully connected to its setting. Explore artwork for your living room and find a piece that could anchor your space.

First4Frames Gallery offers Ready-to-Hang Framed Art, Custom Picture Framing and Giclée Fine Art Prints. Its artwork can inspire choices from coastal wall art and landscape wall art to Scottish landscape art, contemporary art prints and fine art by best-selling artists or famous artists. For a personal image, photography prints can be paired with framing to create custom framed art prints and bespoke framed wall art.

With online picture framing, you can choose your frame online and design your framed artwork to suit your room. Before deciding, visualise art on your wall or use a wall art visualiser to see artwork before you buy. Consider the art print framing service when selecting a finished piece of framed wall art for above your sofa.

Choose a piece you’ll love living with

Before settling on a design, imagine seeing it every day. When deciding how to choose art for above a sofa, look beyond matching colours and ask whether the image means something to you. It might recall a favourite landscape, bring energy to a quiet room or simply make you pause and look again.

Give yourself time to compare subjects and moods. Notice which artwork feels right alongside your furniture and suits the atmosphere you want to create. The strongest choice isn’t necessarily the most dramatic; it’s the one that feels at home and continues to speak to you.

Let your preferred image guide the next decision, then explore the available styles and subjects at First4Frames Gallery. Browse artwork and find your favourite, and take the next step towards a wall that feels distinctly yours.

Frequently Asked Questions

How big should wall art be above a sofa?

A useful starting point is artwork around two-thirds to three-quarters of the sofa’s width. Measure the complete framed piece or arrangement, not just the image, so its visual footprint feels proportionate. For instance, a 200 cm sofa can suit a composition around 130-150 cm wide. The room’s layout and the artwork’s visual weight can help you refine that starting size.

Single Painting or Diptych?

Choose a single painting for an uninterrupted image and a clear, simple focal point. A diptych, or pair of coordinated artworks, can suit a wide landscape or abstract composition. Consider the wall’s shape and the image itself: splitting a scene can create rhythm, while one piece keeps the subject visually whole.

What Size Art Should I Get for My Wall?

Start with the wall’s usable area, then consider nearby furniture, doors and windows. A large, open wall can take artwork measuring 36 × 48 inches or larger, while a small nook may call for a more modest scale. In rooms with ceilings under 2.4 m, horizontal artwork can preserve a sense of space. Include the frame in your measurements.

What size should art be above a sofa?

For a 200 cm sofa, a composition about 130-150 cm wide is a practical reference. That composition could be one piece or several arranged together, with gaps included in its total width. Check the artwork’s height as well as its width: a tall image can feel imposing above low seating, while a very shallow one may seem visually slight.

How wide should artwork be compared with the sofa?

Aim for artwork or a grouped display roughly two-thirds to three-quarters as wide as the sofa. Measure from the outside edge of the leftmost frame to the outside edge of the rightmost. This is more accurate than adding print dimensions alone, especially when the arrangement includes several pieces and gaps.

Should you choose one large artwork or a gallery wall above a sofa?

Choose one large artwork for a clean, simple display or when a single image deserves attention. A gallery wall suits a broader space or a collection of personally meaningful images. Consider how much detail is already in the room: a quieter interior can support a varied collection, while patterned furnishings may work better with one focused image.

Posted on

Polymer Picture Frames

Colourful, whimsical painting of a stone-paved street lined with tilted, vibrant houses under a cloudy sky, framed in grey wood with a white mount.

The Benefits of a Lighter, Cost-Effective Alternative to Wood

When choosing a picture frame, most people naturally think of wood. Timber has been the conventional material used by picture framers for generations, and it remains an excellent choice.

However, wood isn’t the only option.

At First4Frames, we also use high-quality polymer picture-frame mouldings where they are appropriate for the artwork and the type of finished frame we’re creating.

Modern polymer mouldings can offer some significant advantages, particularly when you’re looking for a large frame or a wide, substantial moulding without the additional weight and cost that can come with an equivalent timber frame.

One of the ranges available to professional framers is Polcore® from Mainline Mouldings, which is manufactured using recycled polystyrene. Mainline currently describes Polcore as containing 80–95% recycled polystyrene and being 100% recyclable. (mainlinemouldings.com)

What is a polymer picture frame?

A row of  polymer picture frame corners in various colours and finishes is displayed on a light wooden surface, with each frame angled upright against a white background.
A row of wooden and polymer picture frame corners in various colours and finishes is displayed on a light wooden surface, with each frame angled upright against a white background.

A polymer picture frame uses a manufactured polymer moulding for the outer frame rather than a traditional timber moulding.

The range of styles available is surprisingly extensive. Polymer mouldings can have contemporary finishes, traditional profiles, metallic effects, ornate designs and realistic wood finishes. Mainline’s Polcore collection, for example, includes black, bronze, gold, silver, white, coloured and wood-tone mouldings. (mainlinemouldings.com)

Close-up of a polymer picture frame with a black, glossy outer edge and a white inner mount, focusing on the corner where the frame and mount meet.

This means choosing polymer doesn’t necessarily restrict the appearance of your finished frame.

For many pictures, you’d be unlikely to know simply by looking at the finished frame on the wall whether the moulding underneath the decorative finish was polymer or timber.

The big advantages: cost and weight

Two ornate polymer picture frame corners, one white and one black with gold, rest on a dark blue fabric chair.

There are two particularly good reasons for considering a polymer frame: cost and weight.

Good-quality polymer mouldings can provide an impressive finished frame at a lower cost than many comparable timber mouldings. Mainline similarly describes its Polcore range as offering the appearance of traditional wood at a fraction of the weight and cost. (mainlinemouldings.com)

The difference becomes particularly interesting when we start looking at wide mouldings and large frames.

A substantial frame can require several metres of moulding. With traditional timber, increasing the width and depth of the moulding can add considerably to both the price and the overall weight of the finished picture.

A polymer moulding can give you the appearance and impact of a substantial frame while keeping the finished piece considerably lighter.

The bigger the frame, the more important weight can become

Weight isn’t necessarily a major consideration with a small picture. As frame dimensions increase, however, it becomes much more significant.

A lighter moulding makes a large finished picture easier to handle, transport and hang. Mainline also specifically highlights these weight advantages for larger Polcore frames. (mainlinemouldings.com)

This can make polymer particularly attractive when somebody wants a large statement frame or a wide moulding without unnecessarily increasing the weight hanging on the wall.

The frame may be polymer, but the rest of the framing doesn’t change

This is an important distinction.

Choosing a polymer moulding doesn’t mean choosing inferior glass, mountboard or other framing materials.

The polymer is the moulding used to create the outer frame.

We can use the same quality glass and mountboards that we would use when producing a frame with a traditional wooden moulding.

The artwork can therefore receive the same careful mounting, glazing and professional framing treatment. What changes is the material used to manufacture the outer moulding.

That allows us to take advantage of the reduced weight and cost of polymer where appropriate without compromising the other components that go into creating a quality finished picture frame.

Some examples of our finished frames

Here are a few examples showing how different moulding styles can work with very different types of artwork.

Border Bothy

Two brown hares stand on their hind legs boxing in a wildflower meadow, with a cottage, trees, and a colourful, swirling sky in the background. The scene is framed in grey and cream.

The combination of a substantial dark frame, generous mount and colourful artwork demonstrates how the frame itself can become an important part of the overall presentation.

Colourful landscape painting with orange fields, a blue sky, and two small white houses by water. Impressionist style with bold brushstrokes. Framed with a beige and gold border.

A lighter-toned moulding works particularly well with the intense blues, oranges and yellows in this colourful landscape.

Midnight Tour London

People in paper boats float on the River Thames near Big Ben and Westminster Bridge at sunset, blending fantasy elements with a London cityscape.

The wide light-coloured frame and mount provide a strong contrast to this atmospheric London night scene.

Circus Lane & Clock Tower

Colourful painting of a cobbled street lined with bright houses, flower pots, and benches, leading to a tall church tower under a cloudy sky. White wooden frame surrounds the artwork.

Another example of a wide frame giving a picture real presence, while allowing the colourful artwork itself to remain the focus.

You can see many more examples of finished artwork and framing combinations in the:

First4Frames Gallery

Why doesn’t every picture framer use polymer mouldings?

Working successfully with polymer mouldings requires different skills and techniques from traditional timber framing.

Although the finished frames may look very similar, polymer behaves differently when it is being cut, joined and assembled.

Depending on the moulding, a framer may need different machinery, cutting equipment or workshop settings to achieve a clean and accurate mitre. Joining also requires the correct technique to produce strong, neat corners.

At First4Frames, we also use a different type of glue specifically suited to polymer mouldings, rather than the conventional wood glue used when assembling timber frames.

Getting the combination of cutting, joining and adhesive right is particularly important with wider mouldings, where the quality and accuracy of a corner can be much more noticeable.

For a framing workshop that has traditionally worked exclusively with wood, introducing polymer mouldings can therefore mean investing in additional equipment and materials, as well as developing the practical skills and experience required to work with the material consistently.

This is one reason some picture framers choose to stay with timber.

Wood remains the conventional framing material and is an excellent choice. However, with the appropriate equipment, materials and expertise, polymer mouldings can produce strong, attractive and professionally finished frames while offering the advantages of lower weight and, in many cases, lower cost.

What about the environmental benefits?

It’s easy to assume that because a product is made from a polymer, timber must automatically be the more environmentally responsible option.

The reality deserves a little more consideration, particularly when recycled materials are involved.

According to Mainline, its Polcore mouldings are manufactured from 80–95% recycled polystyrene and are 100% recyclable. (mainlinemouldings.com)

Mainline has also published information about the lifecycle and production of Polcore. Its sustainability document states that moulding which fails its manufacturing standards is returned to the manufacturing process for reuse, while packaging includes 100% recyclable cardboard and recyclable low-density polyethylene sheets.

The same document reports a study by Hillside Environmental Services which found Polcore to be 38% more carbon efficient than an equivalent wood moulding. Mainline also states that its Polcore manufacturing sites use solar power and hydroelectric energy.

Those are Mainline’s published environmental claims and provide useful additional context when comparing the two materials.

Read Mainline’s Polcore: A Sustainable Approach document

Are there disadvantages to polymer picture frames?

As with most materials, there are advantages and disadvantages.

One consideration with polymer is repairability.

If a polymer moulding becomes badly damaged, repairing the affected section isn’t always practical. Depending on the type of damage and whether the same moulding remains available, it may be necessary to replace the complete outer frame.

Wood can sometimes offer more possibilities for repair. Depending on the finish and extent of the damage, a wooden frame may be capable of being filled, touched up, refinished or otherwise repaired.

However, it’s important to say that wooden frames aren’t always repairable either.

Serious damage, damage to a corner joint, an unusual finish or a discontinued moulding can mean that replacing a timber frame is also the most practical option.

It’s therefore something we consider alongside the many other factors when selecting an appropriate moulding.

Polymer or wood – which should you choose?

We don’t see framing as a question of polymer versus wood, with one material automatically being better than the other.

They each have their place.

There are pictures where a particular timber moulding is exactly what is required. There are other situations where a polymer moulding makes excellent practical and economic sense.

Polymer is particularly worth considering for:

  • Large pictures and frames
  • Wide or substantial mouldings
  • Projects where reducing overall weight is beneficial
  • Customers looking for the appearance of a larger frame while keeping costs under control
  • Projects where one of the many available polymer finishes works particularly well with the artwork

Modern polymer mouldings are available in a surprisingly broad selection of styles. Mainline’s current Polcore collection ranges from simple contemporary profiles to wood effects, metallic finishes and highly decorative traditional mouldings. (mainlinemouldings.com)

Professional picture framing from First4Frames

Ultimately, the material used to manufacture the moulding is only one part of creating a successful picture frame.

The style, proportions, mount, glazing, colour and quality of construction all need to work together with the artwork.

Our aim at First4Frames is to choose the combination that works for the individual picture. Sometimes that’s a traditional timber moulding; sometimes a polymer moulding offers exactly the appearance we want along with the practical benefits of reduced weight and cost.

And for those larger pictures and wider statement frames, those advantages can become particularly significant.

For ideas and inspiration, take a look through our online gallery to see examples of artwork professionally framed by First4Frames.

Browse the First4Frames Gallery

Posted on

Why Framed Prints Make the Perfect Gifts

Rocky coastal landscape at sunset, with sunlight reflecting off the water and clouds in the sky, framed in black with a white mount.

Finding the perfect gift can be difficult. You want something personal and thoughtful, but ideally something that will also be enjoyed for many years. Whether you’re looking for a wedding present, birthday gift or new home present, a beautifully framed print can be a wonderful choice.

Unlike many presents that are quickly used or forgotten, framed artwork becomes part of someone’s home. It can reflect their personality, remind them of a favourite place or memory, and bring colour and character to a room.

With the wide selection of framed prints available from First4frames Gallery, there is artwork to suit many different tastes and interiors. Better still, the different framing options can be viewed on the website, helping you choose a combination of artwork and frame that makes the gift feel even more personal.

Why Framed Prints Make Such Thoughtful Gifts

One of the biggest advantages of choosing a framed print as a gift is the opportunity to find something that has a genuine connection with the person receiving it.

Perhaps they love a particular location, landscape, subject or style of art. You might choose something that reminds them of a favourite holiday, somewhere they grew up, or simply an image that you know will suit their personality and home.

Rather than choosing a generic present, you’re able to spend a little time finding something specifically for them.

And because you’re choosing a framed print, you’re giving a finished piece of wall art that’s ready to display.

A Memorable Wedding Present

Choosing a wedding present isn’t always straightforward, particularly when couples already have many of the traditional household items associated with wedding gifts.

Framed artwork offers something different.

A carefully selected print can become part of the home the newlyweds create together. You might choose an image connected to a favourite place, something that represents a shared interest or simply a piece of artwork you think they will both love.

While many wedding presents eventually get replaced, a special piece of framed artwork could remain in the couple’s home for decades, becoming a lasting reminder of their wedding and the person who gave it to them.

Framed Prints as Birthday Gifts

Painting of tall green grass and purple thistle flowers in the foreground, with a stormy, cloudy sky and open landscape in the background. The scene is framed with a thick, dark, decorative border.

If you’re searching for a birthday gift that’s a little different, framed wall art gives you plenty of possibilities.

Instead of buying another conventional present, you can look for artwork that reflects the recipient’s interests and personality.

Perhaps they love the countryside, architecture, travel, wildlife or a particular style of art. Choosing a print around something they genuinely enjoy makes the gift much more personal.

The extensive choice available through First4frames Gallery means you can browse different images and styles until you find something that feels right for the person you’re buying for.

The Perfect New Home and Housewarming Gift

Moving into a new home usually means one thing: plenty of empty walls waiting to be filled.

That’s why a framed print can make an excellent new home or housewarming present.

Artwork can immediately bring personality to a new room, helping transform a house into a home. Whether it’s destined for the living room, dining room, bedroom, hallway or home office, a carefully chosen framed print can provide that important finishing touch.

It can also become a reminder of an important milestone. Years later, the artwork may still remind the recipient of those exciting first weeks in their new home.

Choose the Artwork – Then Find the Right Frame

The artwork itself is only part of the finished piece. The right frame can completely change its appearance.

A contemporary frame might give an image a clean, modern feel, while a different framing combination can create a more traditional or distinctive appearance.

With First4frames Gallery, you can explore the available framing options on the website and see how different choices work with your selected artwork.

This is particularly useful when buying framed artwork as a present. Rather than trying to imagine how a print and frame might look together, you can experiment with the available options before making your choice.

It allows you to create a finished piece that feels much more considered and suited to the person receiving it.

See How Your Framed Print Could Look in a Room

A woman with red hair sits on a light grey sofa in a modern living room, gazing at a large framed landscape painting of a stormy sea and cliffs on the wall—an impressive piece of artwork for property staging that adds sophistication to the space.

Choosing artwork online can sometimes be difficult because it’s not always easy to imagine how a picture will look once it’s hanging on a wall.

That’s why being able to view framed prints within different room environments can be so useful.

The First4frames Gallery website allows you to see selected artwork and framing choices presented within certain environments, giving you a much better impression of how the finished piece could look as part of an interior.

This can be particularly helpful when buying a new home gift or housewarming present. If you know the recipient prefers a contemporary, traditional or minimalist interior, seeing the artwork displayed within a room setting can help you visualise whether it will complement their style.

It takes some of the guesswork out of buying framed artwork online and can give you greater confidence that you’ve chosen something they’ll be delighted to hang on their wall.

A Gift That Can Last for Years

Another reason framed prints make excellent presents is their longevity.

Flowers are beautiful but eventually fade. Chocolates and wine are enjoyed and disappear. Other gifts may eventually be put away and forgotten.

A quality piece of framed artwork can remain on display for years.

It may move from room to room as someone’s home changes and can even travel with them when they move house. A framed print given as a wedding present could still be hanging on the wall many anniversaries later.

That makes artwork much more than something to unwrap on the day. It can become part of someone’s everyday surroundings.

Finding the Right Framed Print for Someone Special

When choosing framed artwork as a gift, think about the person rather than simply the occasion.

Consider their interests, favourite places, the colours they enjoy and the style of their home. A print doesn’t necessarily need to match their furniture perfectly; sometimes an image with a personal meaning will make a much more memorable present.

The wide selection available from First4frames Gallery gives you plenty of opportunity to explore different subjects and styles.

Once you’ve found the right image, you can then look at the different framing options available and visualise how your chosen framed print could look within an interior.

Together, these options make it much easier to create a gift that feels as though it has been chosen specifically for the recipient.

Discover Framed Prints at First4frames Gallery

Whether you’re shopping for a wedding present, birthday gift, housewarming present or new home gift, framed artwork offers something personal, decorative and long-lasting.

Explore the wide selection of prints available from First4frames Gallery, choose the artwork that catches your eye and then discover the different framing options available to create the finished piece.

With the ability to see framing choices on the website and view artwork within selected room environments, you can get a much better idea of the finished result before making your decision.

Instead of giving someone another present that might eventually be forgotten, you could give them a piece of framed artwork that becomes part of their home – and something they’ll continue to enjoy every day for years to come.