A truly professional gallery wall isn’t defined by perfectly matching frames; it’s defined by a curated thread of quality that ties diverse pieces together. If you’ve ever stared at a pile of prints wondering how to create a cohesive gallery wall without turning your home into a cluttered mess, you’re not alone. Many homeowners struggle with the fear of making permanent mistakes or finding that their collection looks accidental rather than curated. At First4Frames Gallery, we believe your walls should be an everyday exhibit of your personality.
In this 2026 guide, we’ll share our expert framework for selecting art and utilizing bespoke framing to ensure your collection feels intentional. You’ll learn how to mix different styles with confidence and discover why professional craftsmanship is the secret to a high-end finish. Whether you need a specific print, a custom frame not listed on our site, or flexible UK shipping and workshop collection options, we provide a seamless solution. We encourage you to check our reviews on Trustpilot, Google, and Yell to see why we’re a trusted partner for creating stunning, professional displays.
Key Takeaways
- Define a clear “Visual Thread” to balance variety and unity, ensuring your collection guides the eye across the room.
- Learn the professional floor-to-wall layout method to visualize your display and place your “Anchor Piece” without making unnecessary holes.
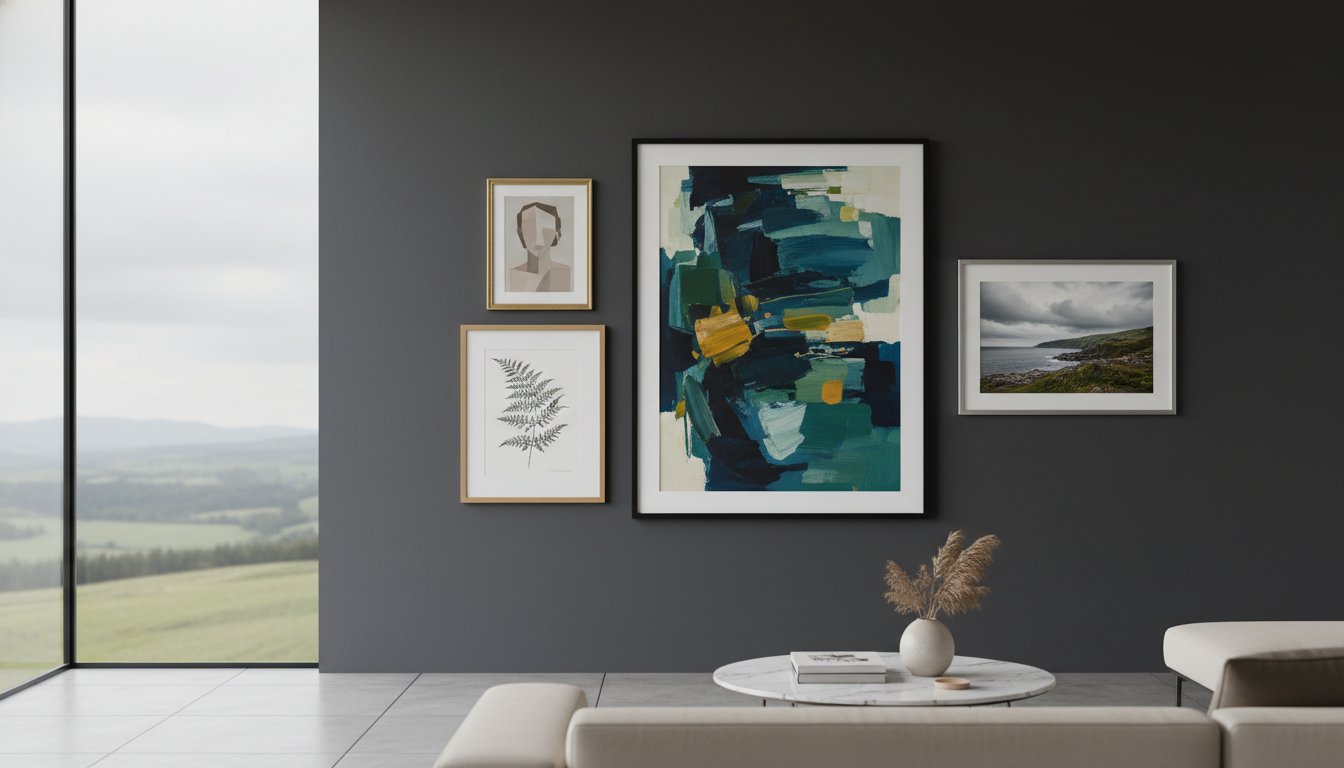
- Discover how to create a cohesive gallery wall by using consistent mount colours and bespoke framing to unify diverse artistic styles.
- Understand the advantage of sourcing rare prints and custom frame designs that aren’t available in standard shops to reflect your personal story.
What Defines a Cohesive Gallery Wall? Understanding the ‘Visual Thread’
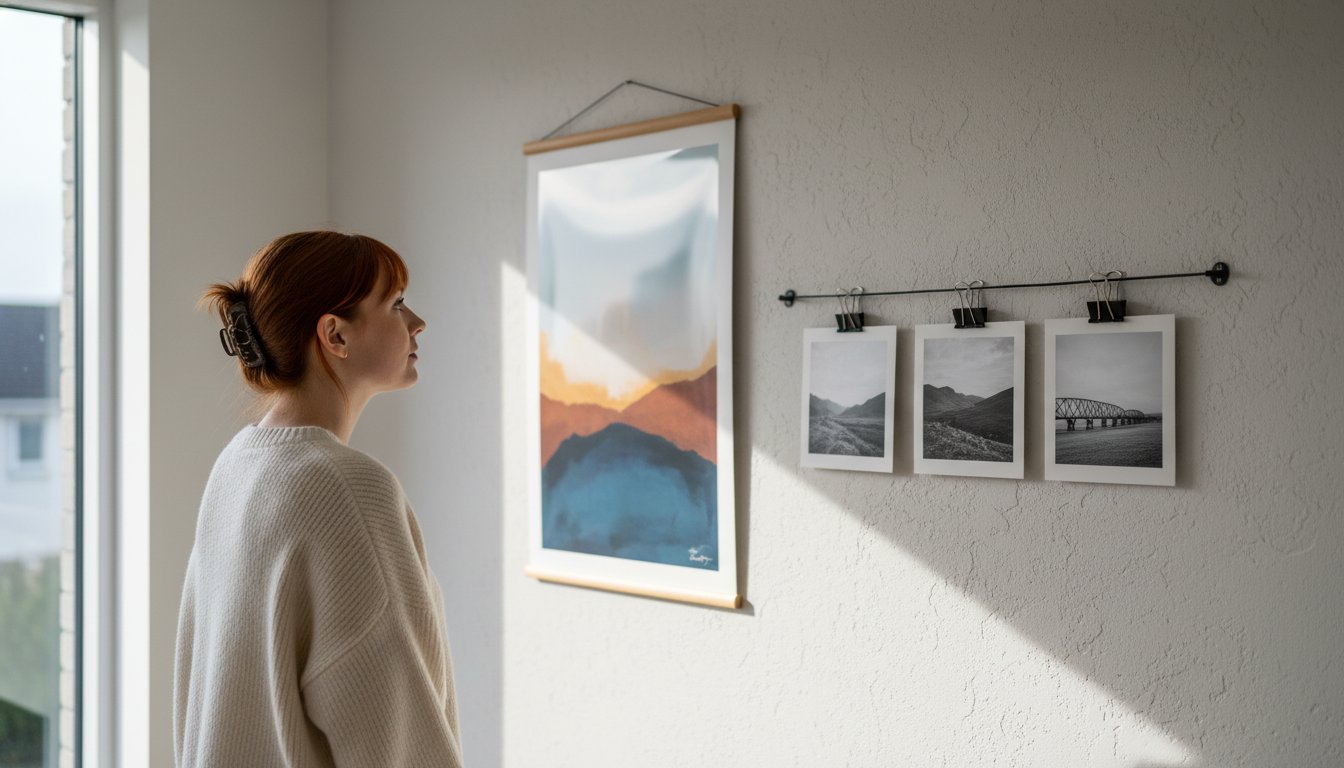
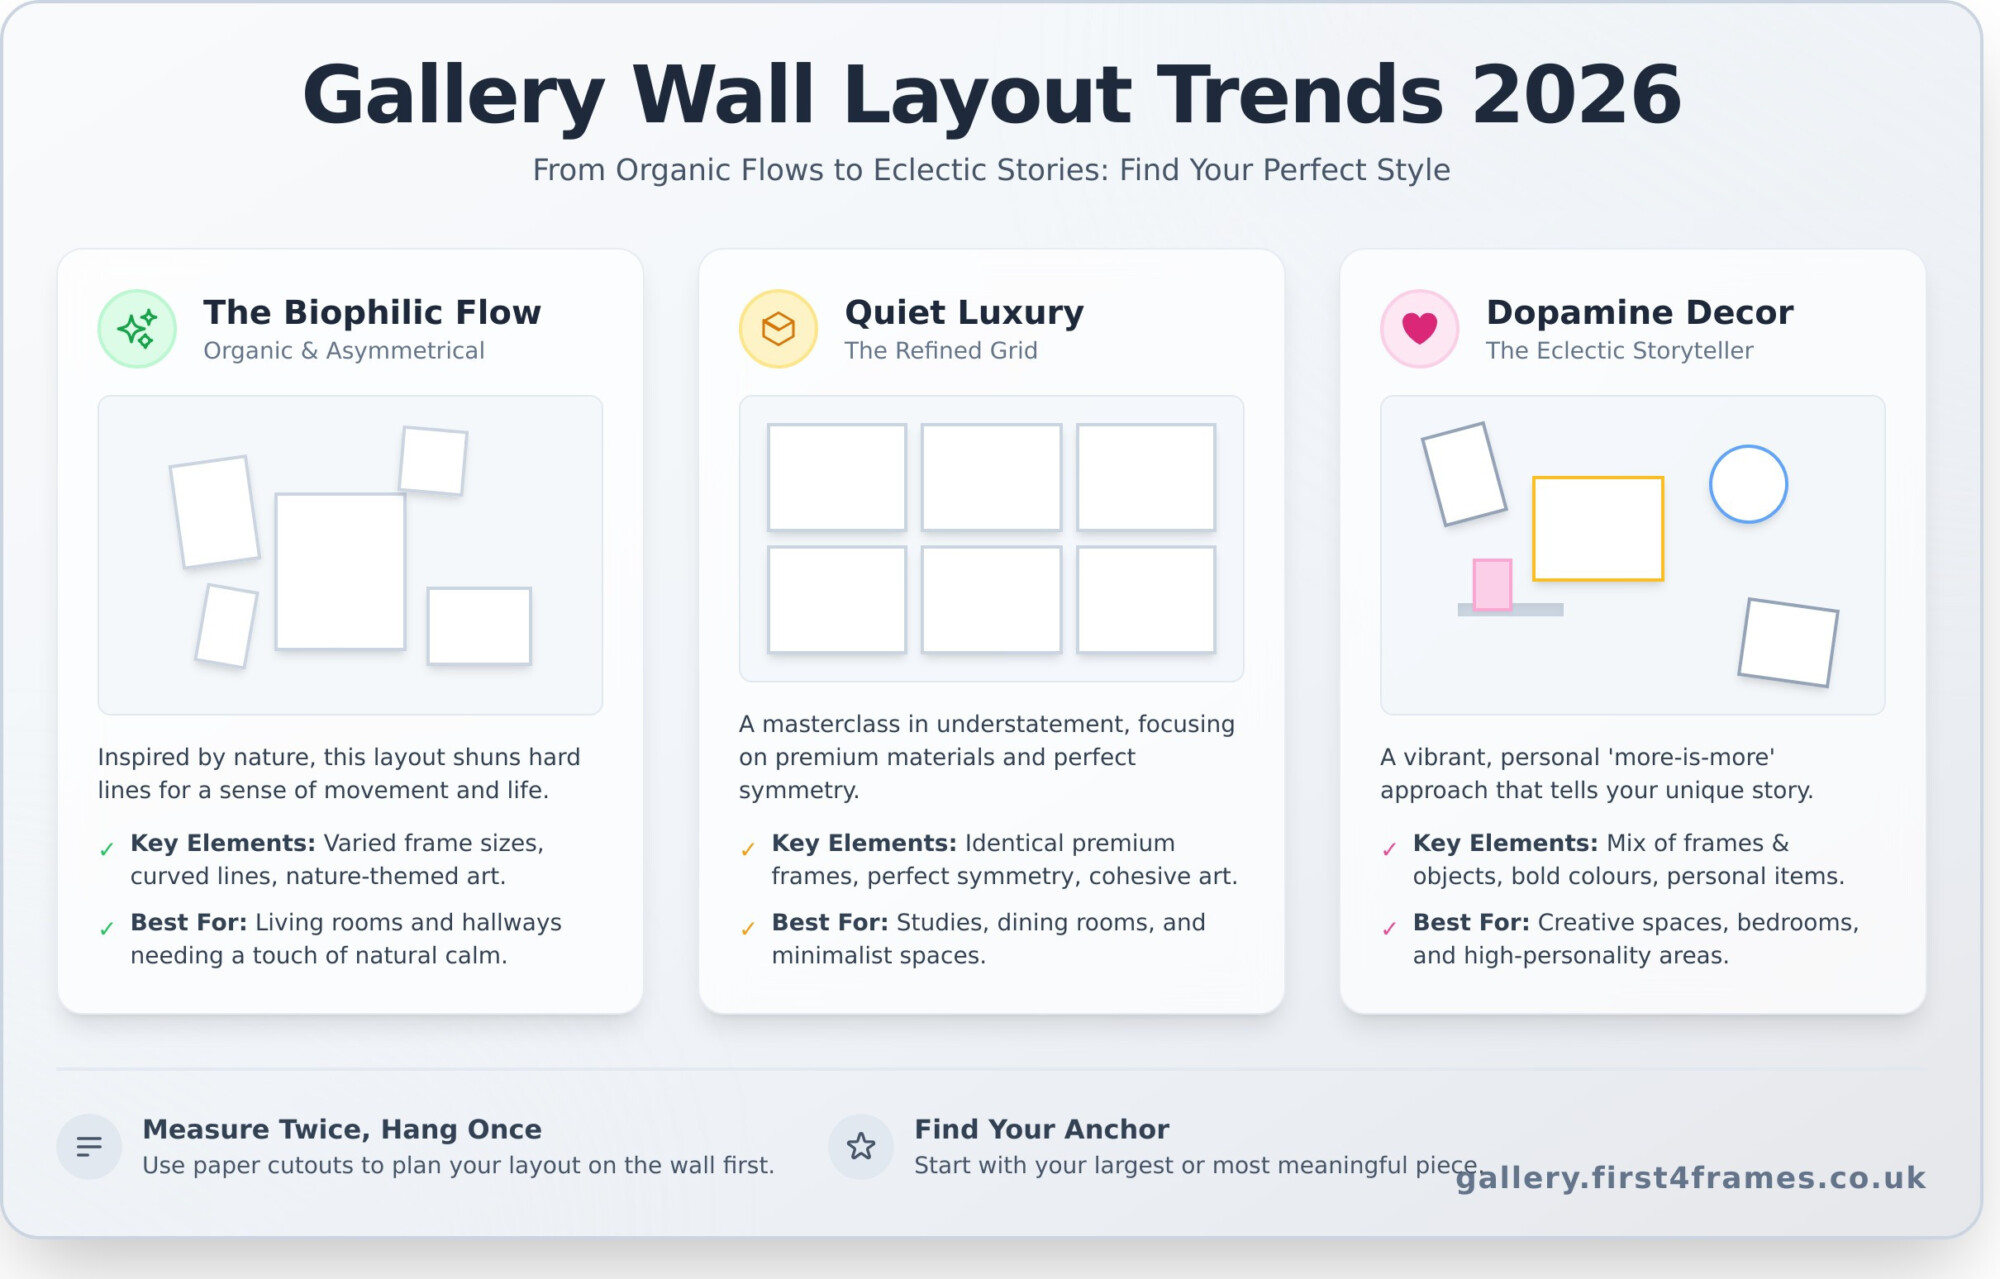
Cohesion is often misunderstood as a synonym for “matching,” but in professional design, it’s actually the delicate balance between variety and unity. When you’re figuring out how to create a cohesive gallery wall, you’re looking for a way to guide the viewer’s eye across several pieces without any single item feeling like an outlier. This is achieved through a “Visual Thread,” a recurring element that ties the collection together. It’s the silent narrator of your wall’s story.
This concept isn’t new. It draws inspiration from historical Salon-style hanging, where diverse works were displayed from floor to ceiling to create a rich, immersive experience. Today, that thread might be a specific colour palette, a shared theme, or a consistent level of print quality. High-fidelity Giclée prints are particularly effective here, as their professional finish provides a standard of excellence that binds different subjects together.
To better understand how these elements come together in a real space, watch this helpful guide:
Cohesion vs. Uniformity: Why You Don’t Need Matching Frames
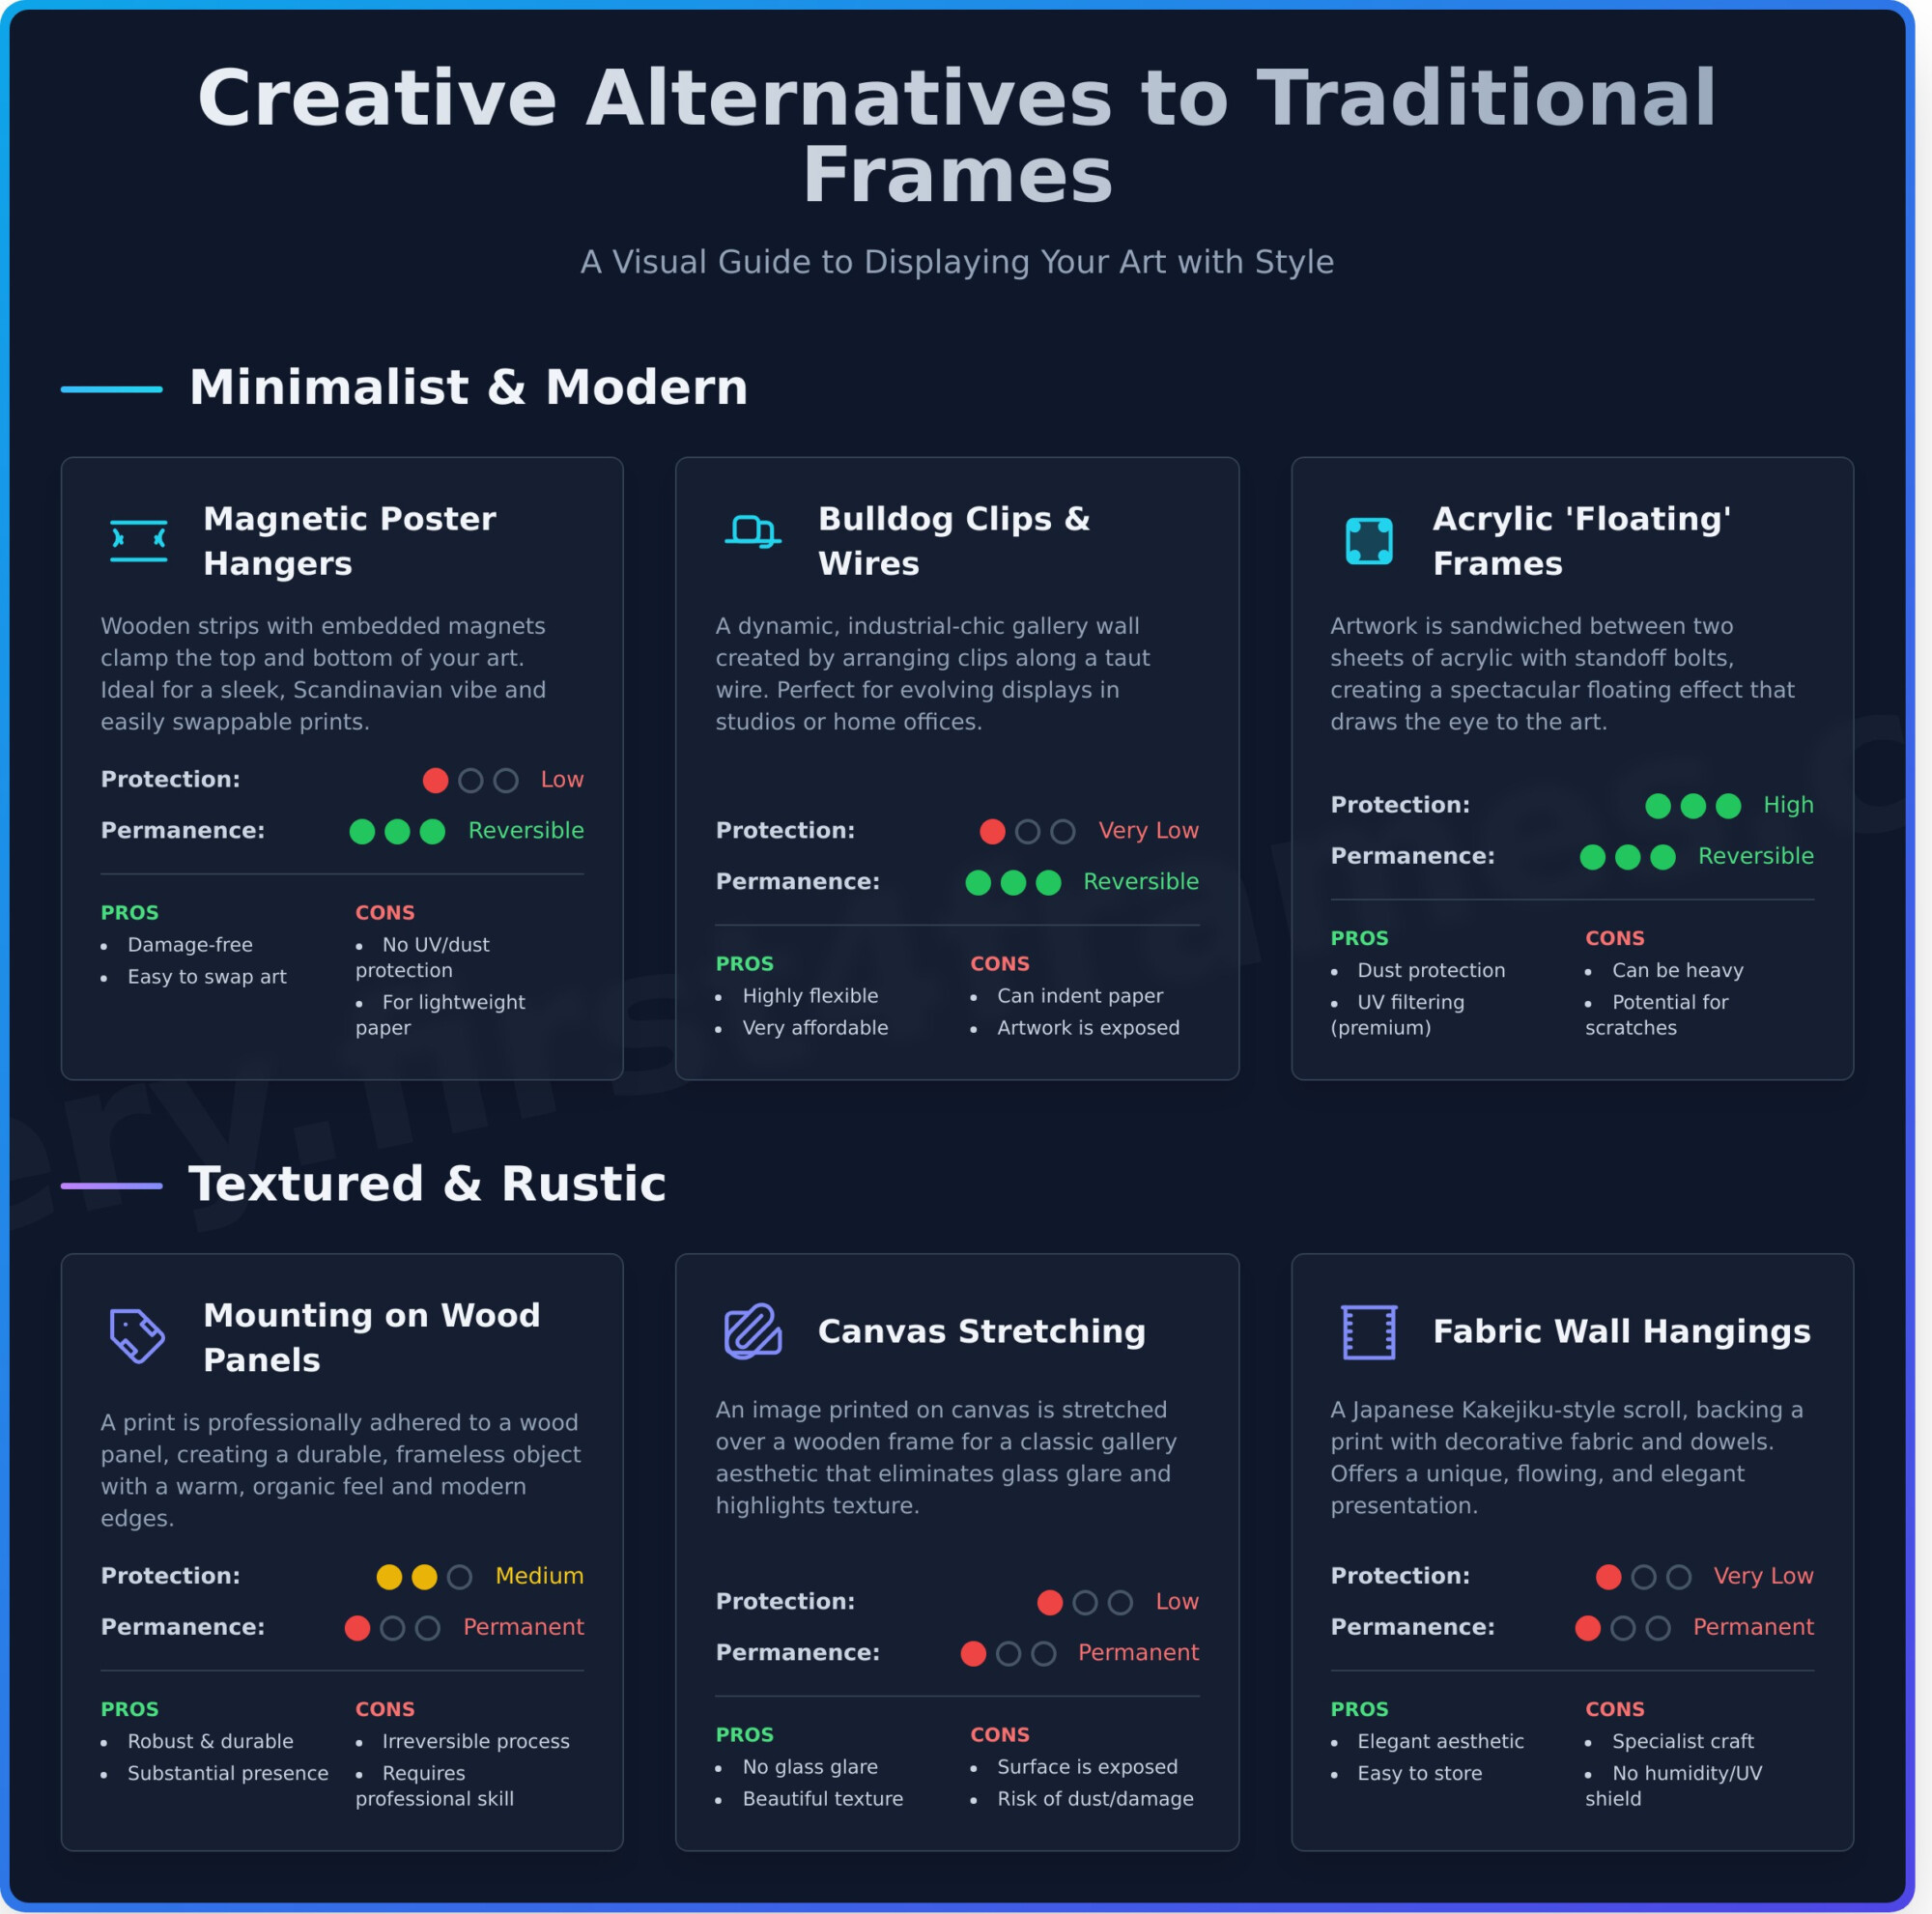
A common mistake is thinking every frame must be identical. While a “grid” layout relies on uniform frames for a clinical look, a “salon” display thrives on character. Bespoke framing is a vital tool when learning how to create a cohesive gallery wall because it allows you to mix textures while keeping a singular quality standard. If you have a specific vision, First4frames can source almost any frame available in the UK. This ensures your collection remains professional, even with diverse materials. For more advice on curating your collection, explore our resource on Art in the Frame.
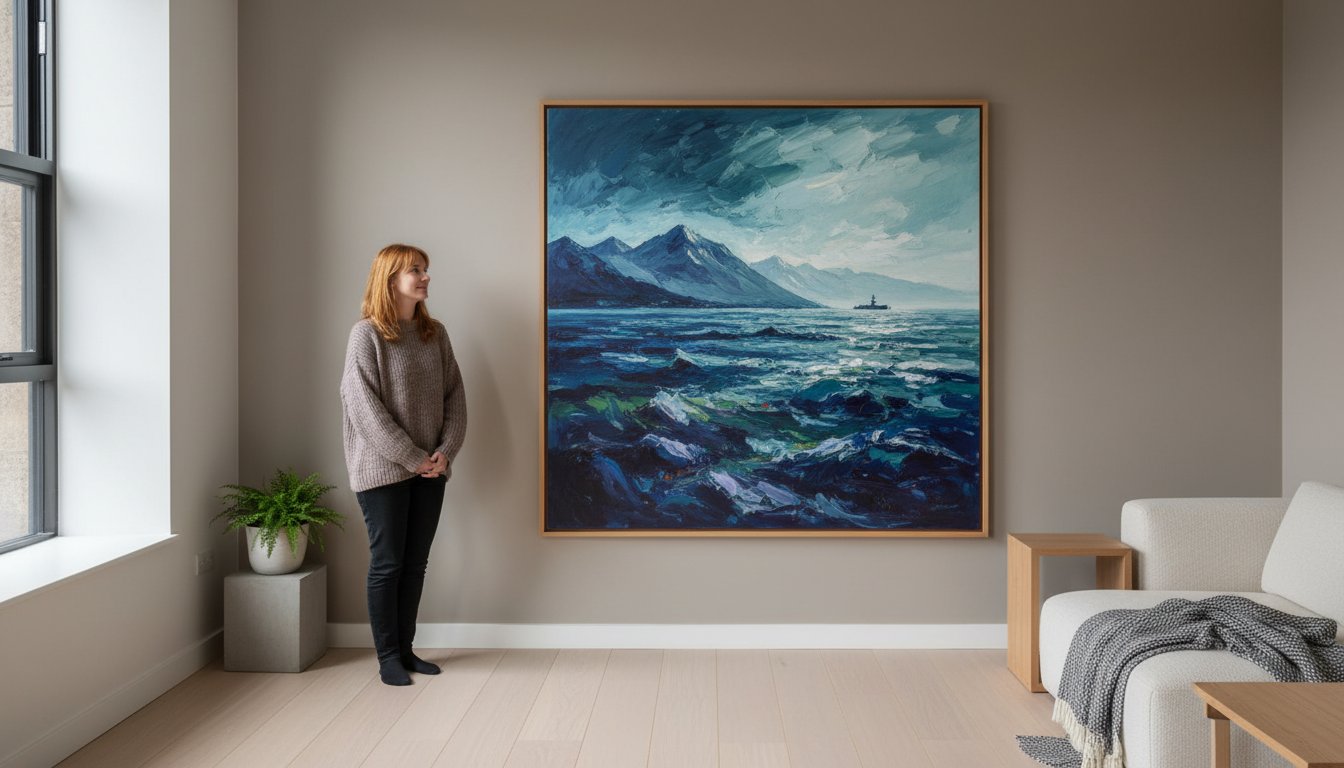
The Role of Scottish Fine Art in Modern Curation
Using vibrant Scottish landscapes from artists like Jolomo or the whimsical illustrations of Matylda Konecka can provide a powerful thematic anchor for your wall. We can source specific prints for you even if they aren’t currently on our website. To ensure these pieces last for decades, we use Giclée printing, which is the gold standard for gallery-wall longevity and colour fidelity. Whether you choose to have your art shipped directly or prefer workshop collection, our team ensures every piece meets the standards our customers rave about in our Google and Trustpilot reviews.
The No-Fail Layout Strategy: From Floor to Wall
Planning a display shouldn’t happen directly on the wall. First, measure your available wall space. Mark a corresponding “boundary box” on your floor using masking tape to mirror that area. This allows you to shuffle pieces without leaving a single mark. It’s essential to account for the outer dimensions of your frames, not just the art itself. If you’re unsure about dimensions, our guide on Standard Photo & Picture Sizes provides the exact UK measurements you’ll need for planning.
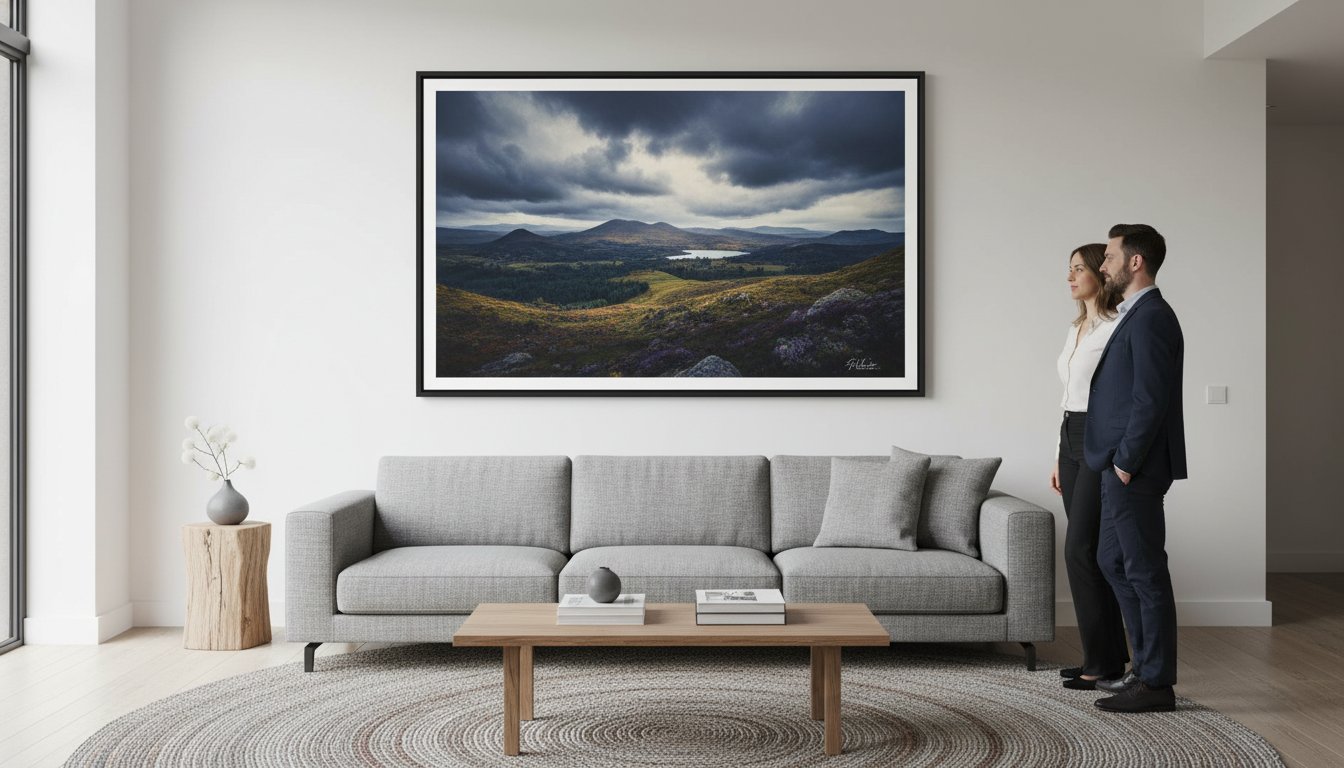
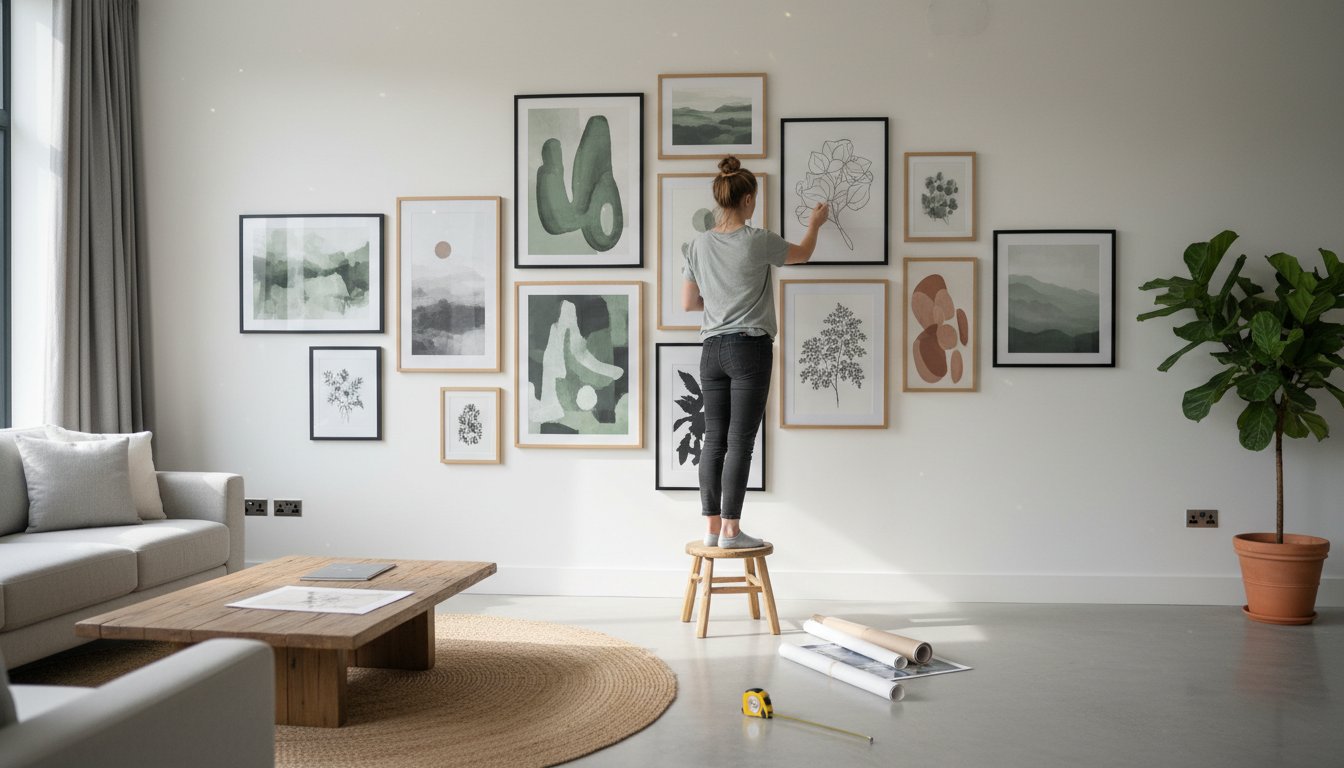
Once your box is set, place your “Anchor Piece” first. This is typically your largest or most vibrant work. Position it slightly off-centre to avoid a rigid, clinical look. From there, work outwards, maintaining a consistent gap between frames. While some suggest 3 inches, we recommend a tighter 50mm to 80mm gap to keep the collection feeling like a single unit. This spacing helps when learning how to create a cohesive gallery wall that feels intentional.
The ‘Anchor and Orbit’ Method
Your anchor piece sets the emotional tone. It acts as the sun while smaller works “orbit” around it. To keep the flow dynamic, balance horizontal and vertical orientations across the box. If one side feels heavy, swap a landscape print for a portrait one. For more inspiration on balancing these elements, check out these 7 must-know rules for a perfect gallery wall.
Testing Your Display Without the Drill
Before reaching for the hammer, trace each frame onto brown paper and tape the templates to your wall. This is the ultimate way to refine how to create a cohesive gallery wall. Follow the “145cm rule” by ensuring the central point of the entire arrangement sits at eye level, roughly 145cm from the floor. If a specific frame size is missing from your layout, remember that First4frames can source almost any frame available in the UK to fill that gap. Whether you choose workshop collection or home shipping, we make the process effortless. You can view our curated gallery to see how professional layouting transforms a space.

Creating Unity Through Professional Bespoke Framing
Many homeowners believe that buying a stack of identical, mass-produced frames is the only way to achieve a uniform look. However, true professional curation uses bespoke framing to elevate individual pieces while maintaining a “Gallery Standard” across the entire wall. This is a secret weapon when learning how to create a cohesive gallery wall. By choosing custom options, you ensure that even a simple postcard or a high-end Giclée print receives the same level of care and visual weight.
The mount is often the most overlooked element of a display. Using a consistent mount colour, such as a soft off-white or a classic cream, acts as a visual bridge between varying art styles. It provides a clean border that separates the art from the frame, allowing the eye to rest and focus on the work itself. For more structural advice on balance and layout, you might find these 5 foolproof tips for creating a gallery wall helpful. If you’re looking for frame style inspiration, our Gallery showcases how different textures and finishes can live together harmoniously.
Don’t be afraid to mix frame textures. Pairing sleek, modern woods with more ornate metallics can create a sophisticated, “collected” look that feels intentional rather than accidental. The key is to maintain a high standard of production across all pieces so the quality itself becomes the unifying factor.
Choosing the Right Frame for Scottish Art
When framing Scottish art, consider the specific light of the piece. A moody Highland landscape might benefit from a deep, textured wood frame that echoes the rugged terrain. Conversely, a vibrant Glasgow cityscape could pop against a clean, contemporary metallic finish. If you have a specific vision in mind, First4Frames can source almost any frame available in the UK to match your decor perfectly.
Preservation and Quality: The First4Frames Standard
Professional craftsmanship isn’t just about aesthetics; it’s about preservation. Off-the-shelf frames often use acidic materials that can yellow or damage your art over time. Our bespoke frames use high-quality materials designed for longevity, ensuring your collection stays as fresh as the day it was hung. We take immense pride in our workmanship. We encourage you to check our Trustpilot, Google, and Yell reviews to see why our customers trust us as their dedicated partner. To begin your project, explore our custom picture framing services today.
Execution and Sourcing: Bringing Your Gallery to Life
Once you’ve mastered the layout and selected your bespoke frames, the final stage is the physical assembly. At First4Frames, we provide a “Ready-to-Hang” advantage that simplifies the process of how to create a cohesive gallery wall. Instead of juggling loose prints and separate frames from different suppliers, you receive your artwork already professionally paired and secured. This ensures your Giclée prints and custom mounts are perfectly aligned and protected before they ever reach your home.
Finding the right art is often the biggest hurdle. If you’re searching for a specific print that isn’t currently featured on our website, let us know. We can often source particular works for our customers, acting as your personal art scout. For our UK clients, we offer logistical flexibility that fits your lifestyle. You can choose safe, insured shipping to your doorstep or opt for personal collection at our Falkirk workshop. This commitment to service is why we encourage you to read our customer feedback on Google, Yell, and Trustpilot.
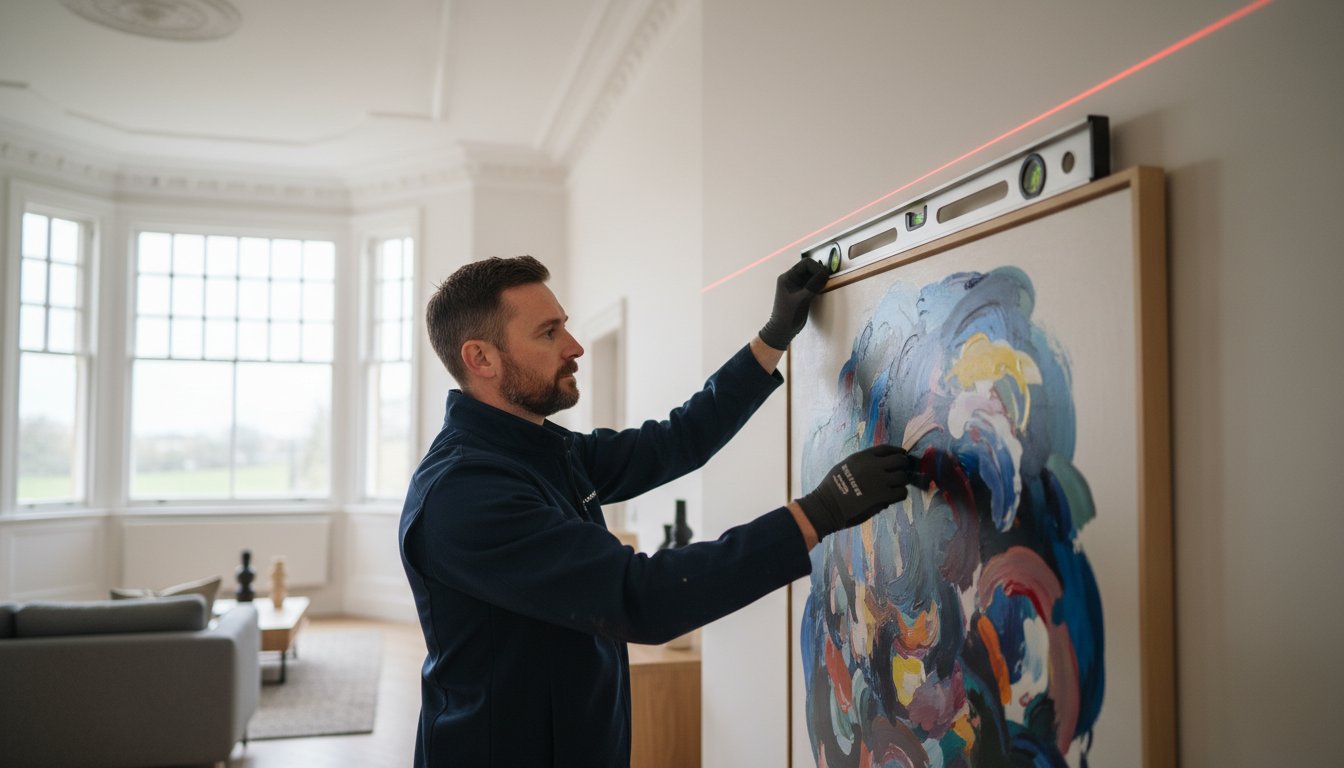
Safety is a vital part of professional execution. Before you begin hanging, verify the weight of each frame. Large bespoke pieces with glass can be heavy, so it’s essential to use the correct wall fixings for your specific wall type, whether it’s plasterboard or masonry. A secure display is a professional display that stands the test of time.
Commercial and Large-Scale Curation
Your journey toward a stunning home display begins with a single piece. We invite you to explore our selection of Scottish artist prints to find the anchor piece that sets your room’s emotional tone. Whether you’re looking for a specific theme or need a frame sourced from across the UK, we’re your dedicated partner in craftsmanship. Contact the First4Frames team today for a bespoke framing consultation and let’s bring your vision to life.
Transform Your Space with Professional Curation
Creating a beautiful display is about more than just hanging pictures; it’s about telling your unique story through a curated visual thread. By now, you understand how to create a cohesive gallery wall using the anchor and orbit layout and the unifying power of bespoke mounts. These professional techniques remove the guesswork, ensuring your collection looks intentional and sophisticated rather than cluttered.
At First4frames, we’re here to help you execute your vision with precision. Whether you need a specific artist’s print sourced or a custom frame from across the UK, we provide the craftsmanship your home deserves. We invite you to check our 5-star reviews on Trustpilot, Google, and Yell to see why we’re the trusted partner for art lovers nationwide. You can choose secure UK-wide shipping or visit us for a workshop collection in Falkirk.
Ready to turn your empty wall into an everyday exhibit? Explore our Ready-to-Hang Scottish Art Collection and find the perfect pieces to start your display. Your home is a canvas, and we can’t wait to help you fill it with art that inspires you every day.
Frequently Asked Questions
How do I choose a colour palette for my gallery wall?
You should choose a colour palette by identifying two or three core tones found in your largest anchor piece or your room’s existing soft furnishings. This creates a natural harmony that guides the eye across the display. When learning how to create a cohesive gallery wall, you can also use neutral mounts to bridge pieces with slightly clashing backgrounds. This method ensures your display feels like a deliberate part of your interior design.
Can I mix black and white photos with colourful paintings?
You can certainly mix black and white photography with vibrant paintings to create a dynamic, eclectic look. The key to success is using a visual thread, such as consistent bespoke framing or a shared subject matter. For instance, pairing monochrome street scenes with colourful urban landscapes works well. We can source almost any frame available in the UK to help you find a style that unifies these different media perfectly.
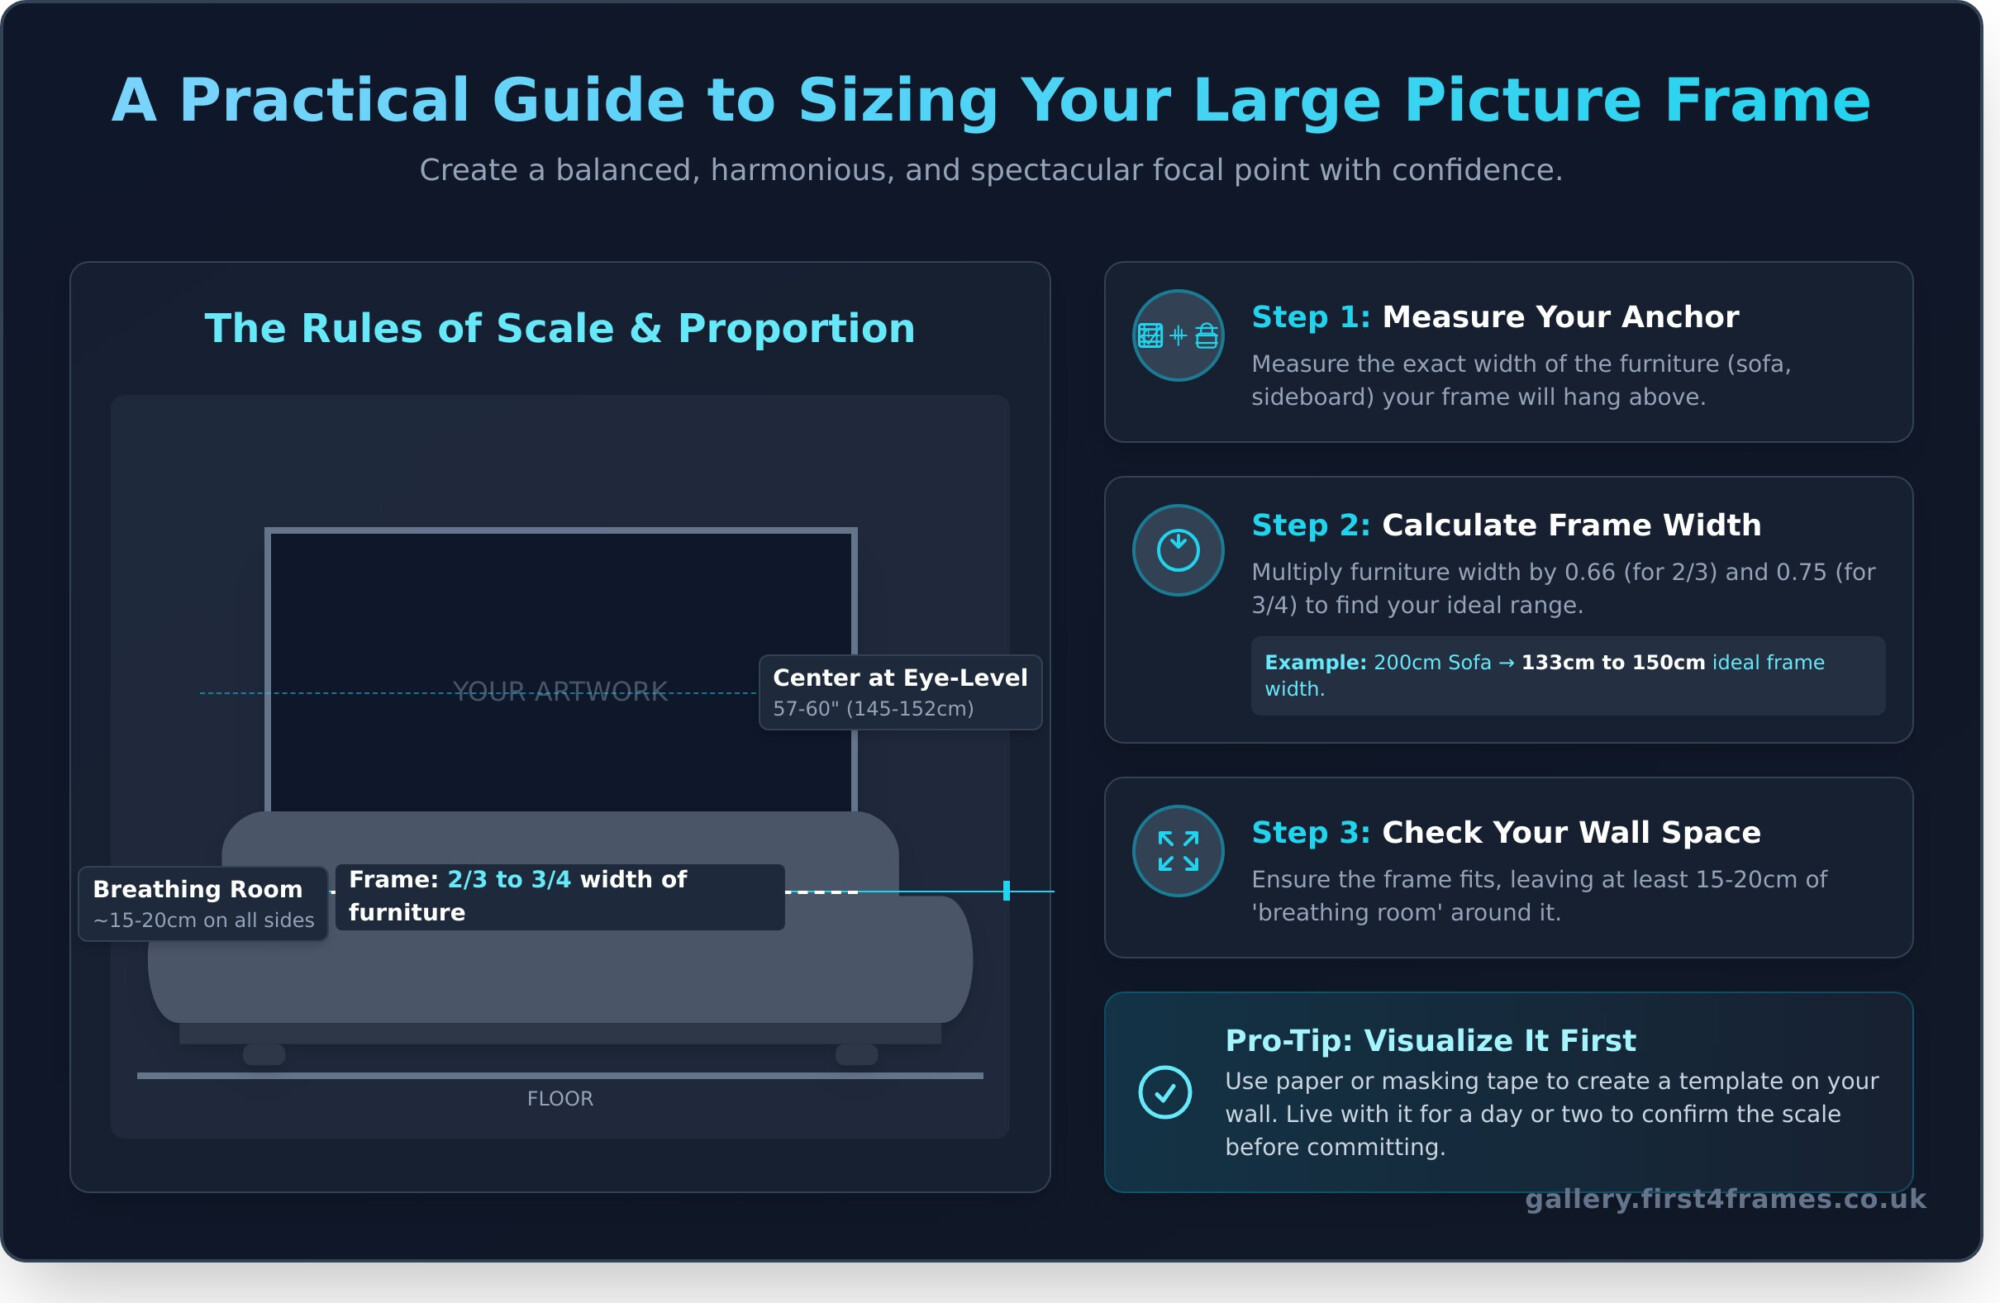
What is the best height to hang a gallery wall?
The best height to hang a gallery wall is at eye level, which is generally considered to be 145cm from the floor to the centre of the arrangement. This gallery standard ensures the art is comfortable to view for most people. If you’re hanging art above a sofa or sideboard, aim for a gap of 15cm to 20cm above the furniture to maintain a balanced relationship between the pieces and your decor.
How do I make a gallery wall look professional on a budget?
You can achieve a professional look on a budget by investing in high-quality Giclée fine art prints and professional mounting rather than expensive original canvases. A well-cut, acid-free mount in a consistent colour instantly elevates a simple print to a gallery-standard statement. This is a vital step in how to create a cohesive gallery wall without overspending. Our ready-to-hang options provide a cost-effective way to receive professionally paired art and frames.
Does First4Frames ship framed art across the UK?
Yes, we offer secure UK-wide shipping for all our framed art and bespoke orders. We take pride in our protective packaging to ensure your display arrives in perfect condition. Alternatively, customers can choose to collect their orders directly from our Falkirk workshop. We invite you to read our 5-star reviews on Trustpilot, Google, and Yell to see why we’re a trusted partner for art lovers throughout the country.