Have you ever wandered through the hallowed halls of a gallery, completely captivated by the stories captured in each face, and wished you could bring that same magic to your own walls? It’s a common feeling. You leave inspired by spectacular art, but the thought of curating your own display feels daunting, and the world of professional framing can seem complex. Nowhere is this feeling more potent than at London’s magnificent National Portrait Gallery, home to some of the most iconic figures in British history, from Tudor monarchs to modern-day trailblazers.
This guide is designed to bridge that gap between inspiration and creation. We’ll embark on a journey through the gallery’s most celebrated masterpieces, uncovering the secrets behind their timeless appeal. Then, armed with that knowledge, we will demystify the art of choosing, arranging, and framing portraits for your own space. You’ll learn the principles of beautiful curation and gain the confidence to build a stunning, bespoke portrait wall that tells your unique story, transforming your house into a home filled with personal, meaningful art.
Key Takeaways
- Discover the unique mission of the National Portrait Gallery and how it uses art to tell the captivating story of a nation through its people.
- Learn why the right frame is more than just a border; it’s a crucial bridge that connects your artwork to your room’s décor and enhances its story.
- Uncover the secrets behind iconic masterpieces and how the principles of great portrait display can be applied to your own home.
- Get a simple, step-by-step guide to curating, framing, and hanging your own beautiful portrait wall, transforming your space with personal art.
What Makes the National Portrait Gallery an Iconic Institution?
Though physically situated in London, the National Portrait Gallery stands as a spectacular treasure trove of British history and culture, its collection narrating the story of a nation through the faces of its people. Its unique mission is to chronicle the individuals who shaped the UK, offering a deeply personal and human connection to the past and present. This focus on the sitter, rather than the artist, sets it apart as a truly national institution, appreciated across the country, from Falkirk to Cornwall. For those of us at **First4Frames Gallery** in Falkirk, Scotland, it serves as a powerful inspiration for celebrating personal and national stories through portraiture.
To get a feel for its beautiful Tudor collection, this video offers a wonderful glimpse into the stories behind the portraits:
A Brief History: From Victorian Vision to Modern Landmark
Founded with a clear Victorian vision in 1856, the gallery was established to honour the great and good of British history. After several temporary locations, it found its permanent home at St Martin’s Place in 1896. As the world’s very first portrait gallery, its influence has been immense. A recent multi-million-pound redevelopment project has revitalised its spaces, ensuring it remains a modern and welcoming landmark for generations to come. The rich history of the National Portrait Gallery is a testament to its enduring importance in the nation’s cultural life.
More Than Just Paintings: A Diverse Collection
While home to some of the most famous paintings in British art, the collection’s diversity is one of its greatest strengths. Spanning from the Tudors to today, it includes not only celebrated monarchs, scientists, and artists but also unsung heroes who have contributed to the fabric of the nation. The collection, which numbers over 220,000 works, is a rich tapestry of different media, showcasing premium craftsmanship across centuries.
- Paintings and Drawings: Iconic works from masters like Hans Holbein to contemporary visionaries such as David Hockney.
- Photography: A vast and growing archive capturing modern British life and its defining personalities.
- Sculpture: Powerful three-dimensional representations of historical and modern figures.
Must-See Masterpieces: Iconic Portraits Through the Ages
A walk through the National Portrait Gallery is a journey through British history, told by the faces that shaped it. Each portrait is more than just a painting; it’s a story of power, creativity, and influence. This spectacular collection fulfills the official mission of the National Portrait Gallery to promote the appreciation of the men and women who have made and are making British history. Here are a few unmissable masterpieces that showcase the gallery’s incredible range.
The Chandos Portrait: The Face of Shakespeare?
Perhaps the most famous face in the entire collection, the Chandos Portrait is widely believed to be the only likeness of William Shakespeare painted in his lifetime. Attributed to artist John Taylor, its mysterious origins and the endless debate over its authenticity only add to its allure. Presented within a beautiful, ornate gold frame, its intricate craftsmanship reinforces the historical weight and timeless importance of the man it portrays, pulling you into the gaze of a literary genius.
Tudor Royalty: The Ditchley Portrait of Elizabeth I
Commanding immediate attention, the Ditchley Portrait of Elizabeth I by Marcus Gheeraerts the Younger is a powerful statement of authority. The Queen stands upon a map of England, a storm raging behind her while the sun shines upon her-a masterful piece of political propaganda. Every detail was designed to project an image of a divine ruler. The grand, majestic frame is not merely a border; it’s an integral part of the composition, amplifying the portrait’s regal splendour and solidifying its majestic impression.
Modern Icons: From David Hockney to Malala Yousafzai
The gallery brilliantly connects the past with the present, showcasing modern icons who continue to shape our world. Here, historical oil paintings give way to vibrant contemporary works, from David Hockney’s insightful self-portraits to powerful photographic portraits of figures like Malala Yousafzai. This modern collection demonstrates the evolving nature of portraiture. The presentation shifts, too; these pieces are often housed in simpler, cleaner frames. This deliberate choice allows the artwork to breathe, ensuring the focus remains squarely on the subject’s powerful, contemporary story.
The Unsung Hero: Why Framing is Crucial for Great Portraits
After admiring the masterpieces within the National Portrait Gallery, it’s easy to overlook one of the most critical elements of their presentation: the frame. Far from being a simple border, a frame is an integral part of the artwork’s experience. It does the heavy lifting, completing the artist’s vision and connecting the portrait to the world in which it hangs. The gallery’s collection is a masterclass in this craft, offering powerful lessons we can bring into our own homes.
A Frame is a Window to the Story
Think of a frame as a window that isolates a portrait from the visual noise of its surroundings. It creates a dedicated space, commanding your attention and pulling you into the subject’s world. By defining the artwork’s boundaries, a frame directs your eye, focuses your engagement, and adds the final punctuation to the story the artist is telling. It provides context, enhances emotion, and transforms a simple image into a complete artistic statement.
Matching the Frame to the Artwork and a Room’s Decor
The curators at the NPG expertly match frames to the era and style of the portraits. Heavy, ornate gilded frames embrace the grandeur of Tudor monarchs, while sleek, minimalist profiles suit the clean lines of modern photography. This principle of thoughtful presentation is a hallmark of world-class institutions, from London to Australia’s National Portrait Gallery. At home, the frame acts as a beautiful bridge between your artwork and your interior style. Consider these tips:
- Wood frames offer warmth and a timeless, traditional feel suitable for classic portraits and cosy interiors.
- Metal frames provide a sleek, contemporary look that complements modern art and minimalist decor.
- Colour choice is key. A frame can pick up a subtle colour from within the artwork or harmonise with the tones of your room to create a cohesive look.
Conservation and Protection: The Practical Role of a Frame
Beyond aesthetics, a frame serves a vital protective purpose. A professionally crafted frame shields precious art and memories from the permanent damage caused by dust, moisture, and fading from UV light. The key components-conservation-grade glazing, acid-free mounts, and protective backing boards-work together to preserve your artwork for generations. Viewing a frame as an investment in preservation ensures that your cherished portraits remain as vibrant as the day they were created. Learn more about our conservation-grade bespoke framing services.
How to Create Your Own Portrait Gallery at Home
Feeling inspired after a visit to a grand institution like the national portrait gallery? You can capture that same sense of history, personality, and beauty right in your own home. Creating a personal gallery wall isn’t about replicating a museum; it’s about telling your unique story through a curated collection of art and memories. It’s a spectacular way to bring character to any room, turning a blank wall into a beautiful focal point. Follow these simple steps to begin your journey.
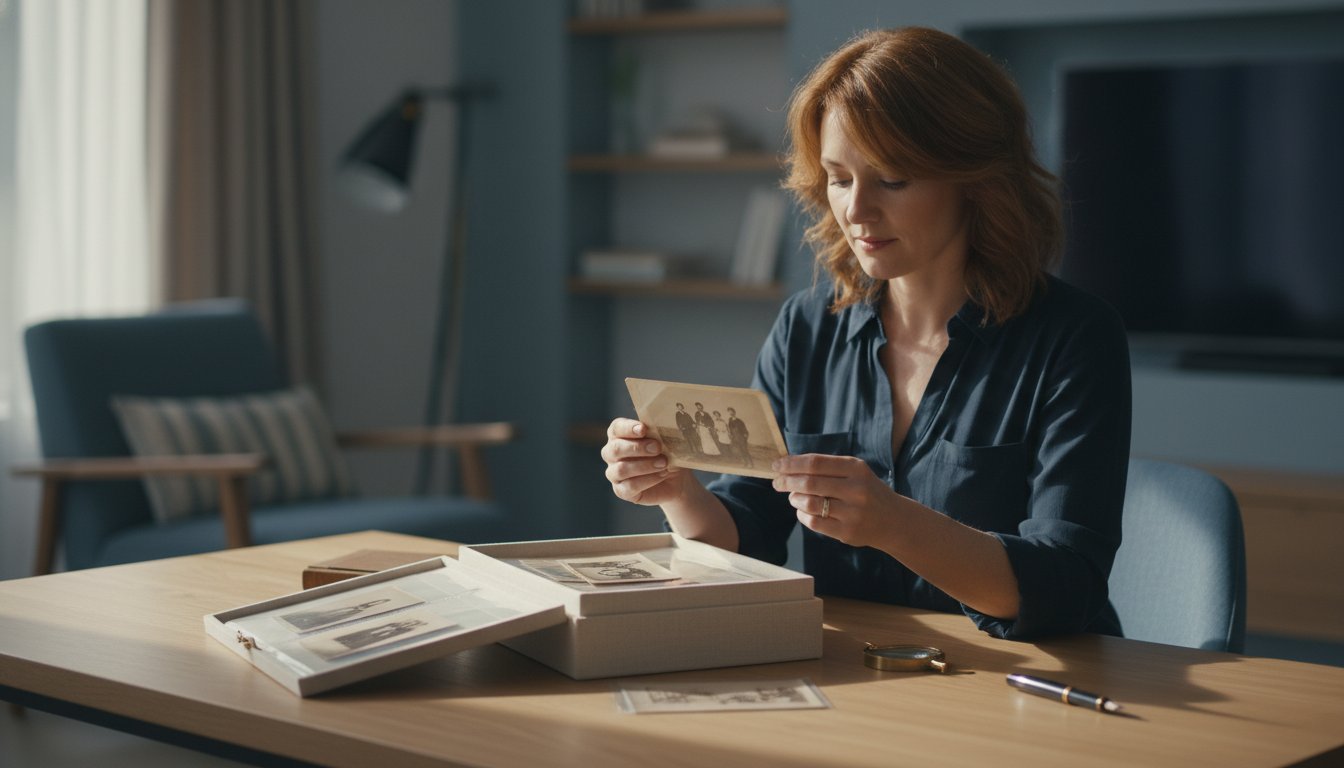
Step 1: Curate Your Personal Collection
The first step is deciding what story you want to tell. Your collection should be a true reflection of you. Consider building your gallery around a central theme to create a cohesive narrative. Some ideas include:
- Family History: Mix vintage family portraits with recent snapshots.
- Travel Memories: Combine photographs from your adventures with art prints from places you’ve visited.
- A Colour Palette: Choose pieces that share a complementary colour scheme for a harmonious look.
Don’t be afraid to mix professional fine art prints with your own treasured photographs. For lasting beauty, invest in high-quality Giclée prints, which use archival inks to prevent fading and preserve vibrant colour for decades.
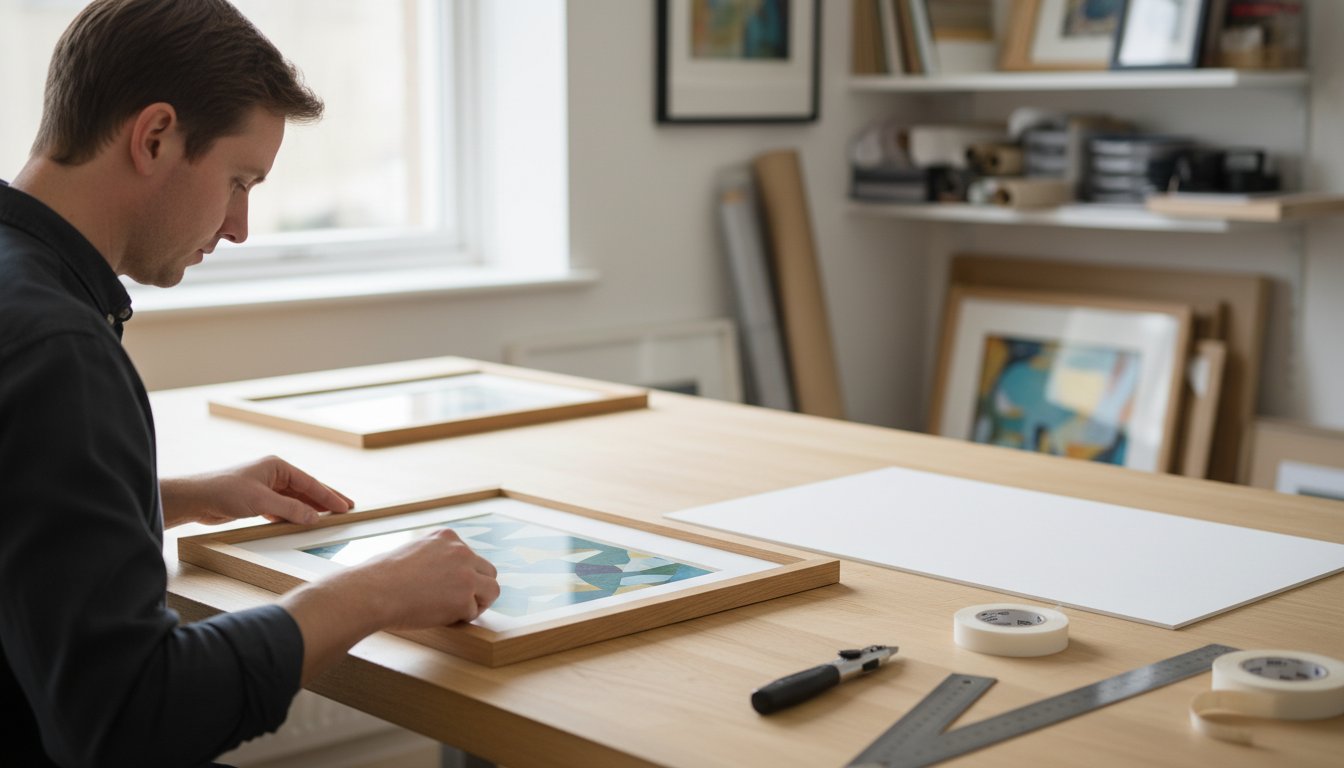
Step 2: Choose the Perfect Frames
Frames are the essential bridge between your art and your decor. For a clean, uniform look, choose matching frames in a single colour and style. If you prefer a more eclectic, bohemian feel, mix and match different frame styles, materials, and colours. A professionally cut mount provides crucial ‘breathing space’ around your image, drawing the eye inward and giving it a premium finish. Always measure your artwork and wall space carefully to ensure a perfect, bespoke fit.
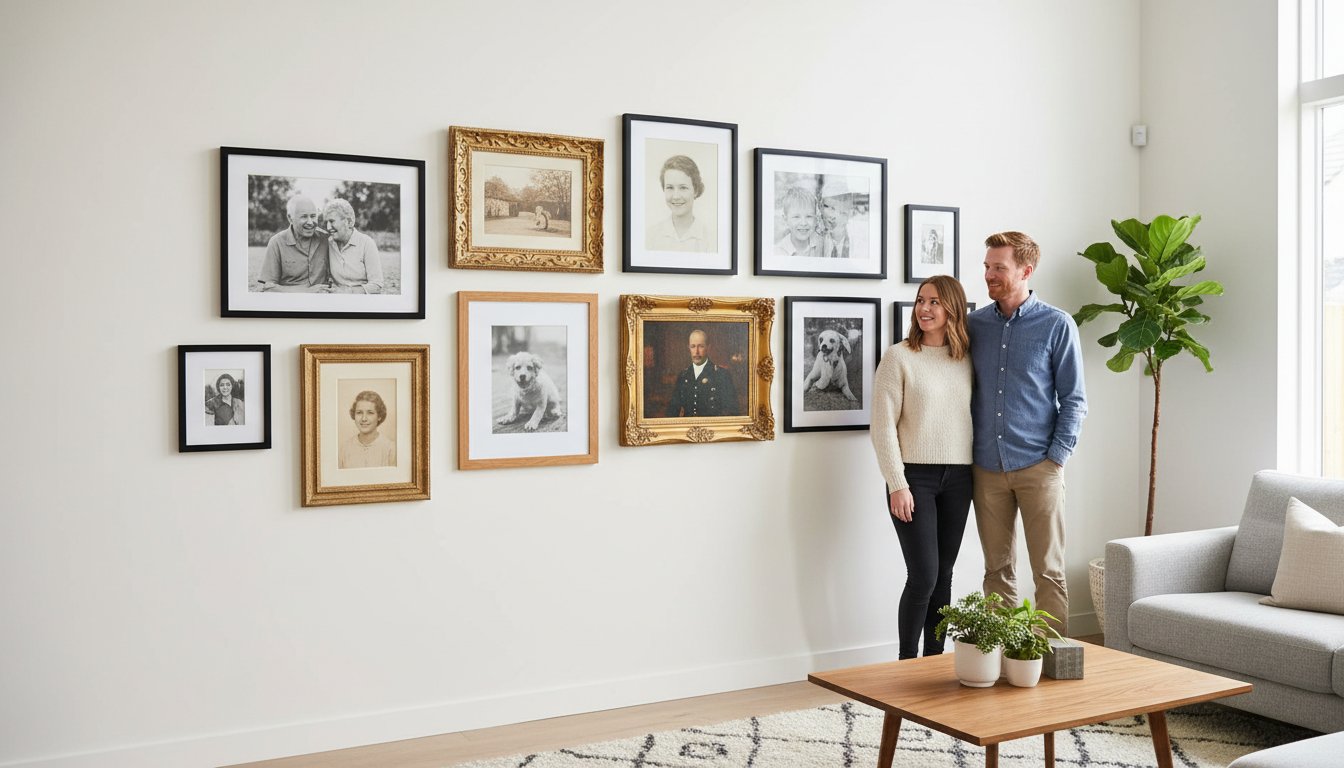
Step 3: Design Your Gallery Wall Layout
Before you pick up a hammer, plan your layout. A great tip is to start with a large “anchor” piece, placing it slightly off-centre, and then arranging smaller frames around it. Lay all your framed pieces on the floor to experiment with different arrangements until you find one you love. This allows you to visualise the final result without making unnecessary holes. As a general rule, aim for a consistent gap of 2-3 inches between each frame for a balanced and professional appearance.
Ready to find your centrepiece? Browse our collection of beautiful art prints.
From the National Portrait Gallery to Your Own Walls
The stories held within the National Portrait Gallery reveal the timeless power of a well-presented portrait. As we’ve explored, creating your own gallery wall is a deeply personal journey, and the secret to elevating it from a collection of pictures to a stunning display lies in the quality of the presentation. A beautiful, bespoke frame is the crucial bridge between your image and your decor, providing the finishing touch that turns a print into a cherished piece of art.
Ready to turn that inspiration into reality? At First4Frames Gallery, we bring over 20 years of bespoke framing experience to every project. Based in Scotland and serving the entire UK, we pair our passion for craftsmanship with beautiful, museum-quality Giclée prints from talented artists. We provide a simple, one-stop-shop to help you curate a spectacular portrait wall that tells your unique story.
Start your art journey today. Explore our curated prints and bespoke frames!
Frequently Asked Questions
Is the National Portrait Gallery in London free to enter?
Yes, visiting the main collection at the National Portrait Gallery is completely free for everyone, making it a wonderful and accessible day out in central London. While the permanent galleries don’t require an entry fee, it’s worth noting that some special or temporary exhibitions may have a charge. We recommend checking their official website before your visit for the most up-to-date information on ticketing for these unique displays, which often require pre-booking.
What is the most famous painting in the National Portrait Gallery?
While fame can be subjective, many consider the ‘Chandos’ portrait of William Shakespeare to be the most famous work in the collection. It’s the only portrait of the playwright believed to have been painted during his lifetime. Other spectacular highlights include powerful portraits of historical figures like Queen Elizabeth I and contemporary icons such as Malala Yousafzai. Each piece tells a unique story, making a visit a true journey through British history and culture.
Can you take photographs inside the National Portrait Gallery?
Yes, you are welcome to take photographs for personal, non-commercial use in most areas of the gallery. However, to protect the beautiful artwork, flash photography, tripods, and selfie sticks are not permitted. Some specific artworks or temporary exhibitions may have further restrictions, so always look for the accompanying signage. Capturing the memory of your favourite portrait is a wonderful way to bring a piece of the gallery experience home with you.
What is the difference between the National Gallery and the National Portrait Gallery?
It’s a common question, as they are neighbours in Trafalgar Square! The main difference lies in their collections. The National Gallery focuses on Western European paintings from the 13th to the 19th centuries, celebrating the art itself. The National Portrait Gallery, however, is dedicated to portraits of historically important and famous British people. Here, the primary focus is on the sitter-the person depicted-and their story, rather than the artist who painted them.
How do I choose the right size frame for my picture?
Choosing the perfect frame size begins with your artwork. First, carefully measure the exact height and width of your print or photo. Next, decide if you want to include a mount (the card border inside the frame), which adds breathing space and a professional finish. A mount will mean you need a larger frame. For a truly bespoke look, the frame should complement the art, not overpower it, acting as a beautiful bridge between the piece and your room’s décor.
Should all the frames in a gallery wall match?
Not at all! This is a matter of personal style. A uniform look with matching frames creates a clean, formal, and cohesive display that is very elegant. Alternatively, an eclectic mix of different frame styles, colours, and textures can create a dynamic, personal, and visually interesting gallery wall. The key is to find a common element, such as a consistent colour palette in the prints or a single frame colour mixed with different styles, to tie it all together.
How do I protect my photos and prints from fading?
Protecting your cherished memories and fine art prints from fading is crucial for their longevity. The most significant factor is light exposure, so always avoid hanging artwork in direct sunlight. For ultimate protection, we recommend using premium framing materials, including UV-protective glazing (glass or acrylic) and acid-free mounts and backing boards. This professional craftsmanship ensures your beautiful pieces are preserved and will not fade over time, remaining vibrant for years to come.