Last Tuesday, a collector visited our gallery with a hand-stitched silk piece that had spent five years hidden in a drawer, fearing that traditional mounting might damage the delicate fibres. Just as we carefully curate and frame the works of renowned artists like David Hockney within the First4Frames Gallery, we treat every textile with the same level of professional reverence. You’ve likely spent hundreds of hours on your masterpiece, and the thought of acidic boards or poor stretching techniques causing permanent damage is a genuine concern. We understand that custom framing for tapestries requires a specialist touch to ensure your work remains a vibrant part of your home for decades.
We believe your art should be a bridge between your decor and your personal story, never losing its shape or colour. Our 4.9-star customer rating is built on providing bespoke solutions that prevent sagging and offer total UV protection. This 2026 guide reveals how our artisan framing service transforms textiles into gallery-standard wall art using museum-grade materials. You’ll discover the specific pinning methods we use to achieve a perfectly flat display and how to choose a frame that preserves your legacy for a lifetime. It’s time to take your work out of the cupboard and onto the wall where it belongs.
Key Takeaways
Understand why bespoke framing is essential for honouring the craftsmanship of hand-stitched textiles, ensuring they are treated as gallery-standard masterpieces.
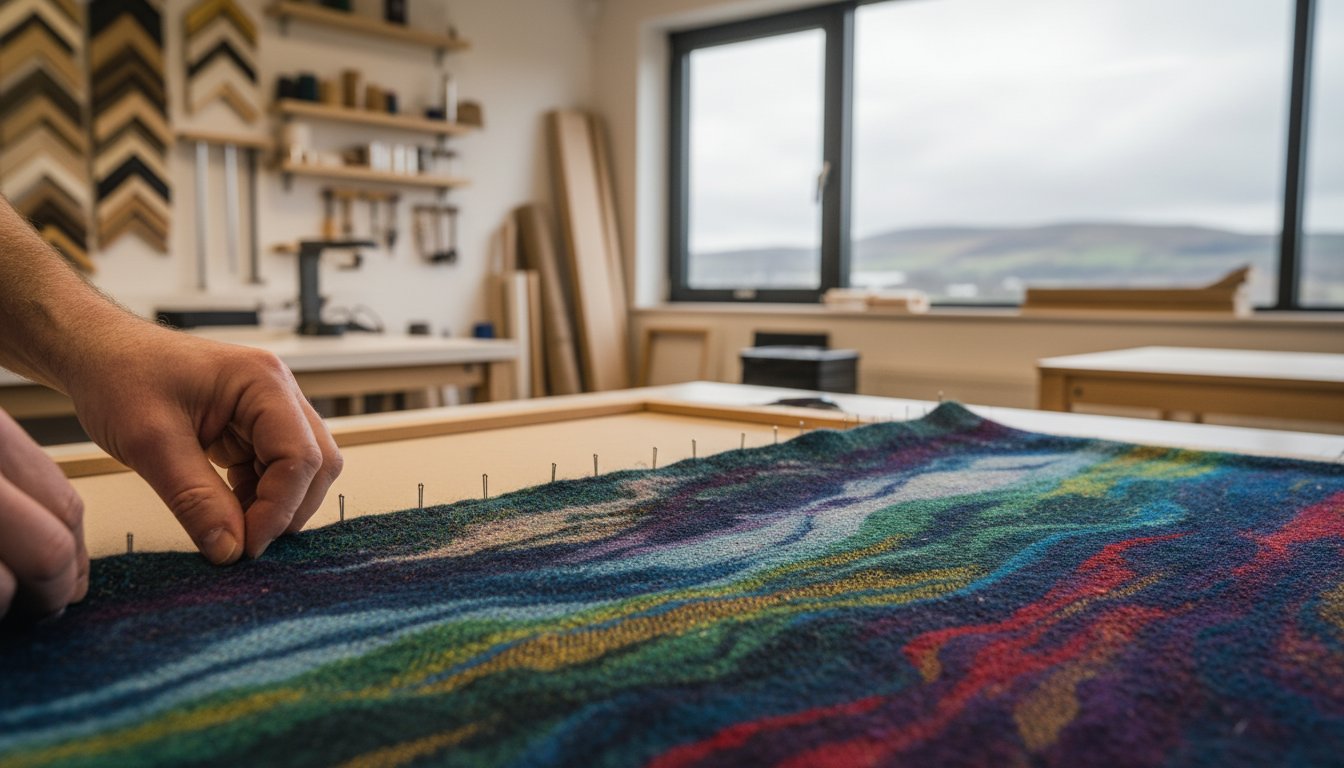
Explore the professional “squaring” and stretching process, utilising stainless steel pins and acid-free materials to maintain the tapestry’s perfect shape.
Learn how to select a frame that serves as a bridge to your room’s décor, ensuring your custom framing for tapestries perfectly balances the unique weight and texture of the wool.
Discover the secrets of conservation framing, including how UV-protective glass and reversible techniques safeguard your delicate needlework for future generations.
See how a collaborative consultation at First4Frames Gallery in Falkirk combines our artisan expertise with your vision to achieve a premium, trusted result.
Why Bespoke Framing is Essential for Hand-Stitched Tapestries
A hand-stitched textile is more than just a hobby; it’s a labour of love that often represents over 200 hours of meticulous work. Unlike a mass-produced print that you might pick up for £20, a Tapestry carries immense emotional weight and historical value. Professional framing acts as the bridge between your room décor and the artwork, transforming a loose piece of fabric into a structured masterpiece. At First4Frames, we view this process as a specialised conservation task. We don’t just put a border around your work; we provide the structural integrity required to protect the delicate fibres from environmental decay.
Standard off-the-shelf frames usually fail because they aren’t designed for the physical depth or weight of heavy fabrics. A typical wool tapestry can weigh upwards of 800g, which puts significant strain on thin backing boards. Without a professional touch, your hard work stays hidden in a drawer or, worse, suffers damage in a cheap frame. Our gallery approach elevates your textile, ensuring the “heavy lifting” of the display is handled by premium materials that complement the intricate textures of your stitching. This is why custom framing for tapestries is a vital investment for any serious crafter or collector.
The Risks of Improper Textile Display
Gravity is the primary enemy of any textile. When a tapestry isn’t squared and tensioned correctly, it begins to sag within 6 to 12 months. This distortion stretches the individual threads, permanently warping the image. We’ve seen many pieces where “creeping” acidity from cheap, non-conservation mountboards has caused yellowing on the fabric edges. Another critical error is allowing the glass to touch the fabric directly. This traps moisture, leading to mould growth that can ruin a piece in just one damp Scottish winter. By using custom framing for tapestries, we incorporate spacers and acid-free materials to keep your art safe and breathable.
Distortion: Uneven tensioning leads to “bowing” of the vertical lines.
Chemical Damage: Standard MDF backings release gasses that perish natural fibres.
Moisture Traps: Direct glass contact creates a microclimate for mildew.
First4Frames: A Tradition of Excellence
We’ve spent 22 years perfecting our craft at our Falkirk gallery. Our team understands that every stitch tells a story. We’re proud of our reputation, backed by over 180 five-star customer reviews that highlight our attention to detail and welcoming service. We offer a true one-stop-shop experience. Whether you’re visiting us to frame a piece by one of our featured gallery artists or bringing in your own hand-finished project, we guide you through every choice. We distinguish clearly between our bespoke picture framing and our print-and-frame services, ensuring you get the exact level of conservation your specific piece requires.
Our three-step process makes the journey from consultation to final hanging completely hassle-free. You’ll browse our extensive range of premium mouldings, receive expert advice on colour coordination, and leave your work in the hands of trusted professionals. We source only the best materials to ensure your tapestry doesn’t just look spectacular today, but remains in perfect condition for the next generation. It’s this commitment to quality that has made us a staple of the local arts community for over two decades.
The Art of Stretching: How Professionals Prepare Textiles for Framing
Preparing a textile for custom framing for tapestries starts with the same reverence our team shows when mounting a limited edition print from our gallery collection. At First 4 Frames, we’ve spent over 20 years perfecting the “squaring” process. Hand-woven textiles often possess a natural “skew” from the loom. We meticulously align the vertical warp and horizontal weft threads to ensure the piece is perfectly rectangular. This precision is what separates a professional finish from a DIY attempt.
Our artisans exclusively use 100% stainless steel pins and acid-free support boards for every textile project. These materials ensure that moisture won’t cause rust spots and that the backing won’t leach harmful chemicals into the fabric. For a deeper look at these standards, we recommend the Conservation Framing of Embroideries and Other Flat Textiles guide. It highlights why archival-grade components are vital for any textile of value. Unlike many high-street shops that might use “sticky boards” or spray adhesives, we never use glues. Adhesives are permanent and damaging; they strip the value from an heirloom and prevent the natural fibres from moving.
Maintaining the “breathability” of natural fibres like wool, silk, and cotton is a core part of our philosophy. Textiles are organic. They expand and contract based on the humidity levels in your home. By using mechanical fastening rather than chemical bonding, we allow the tapestry to live and breathe within its frame. This longevity is a hallmark of our bespoke framing service, which carries a reputation for excellence backed by hundreds of five-star customer reviews.
Step-by-Step: The Professional Lacing Method
The lacing process is the gold standard for custom framing for tapestries. We begin by centring the textile on a bespoke, conservation-grade sub-mount that’s been cut to the exact millimetre. Our specialists then use a neutral-pH thread to create a series of interlocking stitches across the reverse side. This intricate web of thread secures the fabric without the need for harsh chemicals. We carefully monitor the tension to ensure it’s distributed evenly across the entire surface. This prevents the “sagging” effect often seen in poorly framed textiles after six to twelve months.
To Block or Not to Block?
Sometimes a tapestry arrives at our workshop with significant distortion, often looking more like a trapezoid than a rectangle. In these cases, we recommend “blocking.” This involves lightly dampening the fibres and gently stretching them back into their original shape on a specialized board. We allow the piece to dry naturally over a 48-hour period. We never use artificial heat, as this can cause 5% to 10% shrinkage in delicate wool threads. Our artisans treat every piece as a unique conservation project, ensuring the same level of care we provide to the featured artists in our online art gallery. This patient approach ensures your tapestry remains a stunning focal point for decades.
Selecting the Perfect Frame: A Bridge Between Your Decor and Your Art
Your tapestry shouldn’t just sit on the wall; it should belong there. We often describe a frame as the bridge between your room’s decor and the artwork itself. This is especially true for the tactile, woven pieces we showcase at First4frames gallery. When you invest in custom framing for tapestries, you’re choosing a structure that does the heavy lifting in your interior design. It draws the eye from the sofa or the rug directly into the heart of the wool. Our team uses over 20 years of experience to ensure this transition feels seamless rather than forced.
The weight of the frame must match the “chunkiness” of the textile. A heavy, hand-woven wool piece will visually crush a thin, delicate moulding. You need a frame with enough physical presence to anchor the fabric. We’ve found that mouldings with a width of at least 50mm provide the necessary balance for mid-sized textiles. This structural harmony ensures the art feels secure and permanent. It’s about creating a sense of proportion that honours the hours of labour spent on the loom.
Colour theory plays a vital role in this process. We don’t just look for a colour that “matches” the wall. Instead, we select mouldings that highlight the subtle, often overlooked thread hues. Many of our gallery artists use Scottish-inspired palettes filled with mossy greens, heather purples, and slate greys. A dark charcoal frame can make those cool Highland tones sing, while a warm oak might bring out the earthy base notes. The goal is to create a cohesive look that feels curated, not just assembled.
The choice between traditional gold leaf and modern wood grains often defines the room’s atmosphere. Gold leaf offers a timeless, museum-quality finish that suits period properties or formal dining rooms. It adds a glow that reflects light into the fabric’s texture. On the other hand, natural wood grains like ash or walnut offer a grounded, contemporary feel. These materials celebrate the organic nature of the textile. With our 4.9-star customer rating, we’ve helped thousands of clients navigate these choices to find the perfect match for their specific space.
Moulding Choices for Textiles
Tapestries are three-dimensional objects that require specialist housing. We use deep-rebate frames, often with a depth of 35mm or more, to accommodate the lacing board and the natural swell of the fabric. If a frame is too shallow, the tapestry will press against the glass, which can lead to moisture traps and fibre degradation. Our bespoke service ensures the moulding is deep enough to let the textile sit naturally. This technical precision is why custom framing for tapestries is essential for long-term preservation.
The Importance of Mounts and Spacers
To give the stitches room to breathe, we frequently create a shadow box effect using internal spacers. These 5mm hidden lifts keep the glass away from the wool, preventing the flattening of the weave. Double mounts are another spectacular option. By layering two different mount boards, we add a sense of architectural depth that draws the viewer in. You might choose a neutral outer mount with a vibrant inner “slip” that echoes a single bright thread in the tapestry. This small detail can transform a simple wall hanging into a professional gallery centrepiece.
Conservation Framing: Protecting Your Needlework for Generations
Walking through the First4frames gallery, you’ll see how our featured artists rely on precise presentation to tell their stories. Whether it’s a bold contemporary print or a delicate textile, the frame acts as the essential bridge between the artwork and your home décor. We bring that same gallery-standard rigour to custom framing for tapestries, ensuring your hand-stitched heirlooms receive the same level of care as a professional masterpiece.
The three pillars of our conservation philosophy are protection, reversibility, and stability. Protection involves creating a physical barrier against environmental pollutants and physical touch. Reversibility is a promise that any mounting technique we use can be safely undone without damaging the original fibres. Finally, stability ensures that every material touching your textile is acid-free and PH-neutral. This is a vital consideration during custom framing for tapestries because wool and silk are organic materials that react poorly to the cheap, acidic cardboards often found in standard ready-made frames.
Combining our Giclée print expertise with textile preservation allows us to offer a superior level of protection. We’ve spent over 20 years mastering colour science for our gallery artists; we know exactly how light interacts with pigments and dyes. To prevent your needlework from fading, we use high-quality conservation tapes and spacers to seal the frame. This creates a micro-environment that keeps out dust and thrips, those tiny British insects locally known as “thunderbugs,” which frequently plague rural homes by crawling behind the glass of unsealed frames.
Glazing Options for Tapestries
Standard glass often carries a faint green tint and heavy reflections that obscure the intricate texture of your weave. We recommend Artglass for most textile projects. It’s nearly invisible; it allows the tactile beauty of the thread to remain the star of the show while providing 99% UV filtration. This level of protection stops the irreversible chemical breakdown of dyed wools. For larger commercial installations or heavy tapestries over 1.5 metres, we offer high-grade acrylic options. These provide the same clarity as glass but are significantly lighter and shatter-proof, making them safer for high-traffic public spaces.
Long-Term Maintenance
Avoid hanging your framed tapestry on damp external walls or directly above a radiator. Rapid temperature fluctuations cause natural fibres to expand and contract, which eventually leads to unsightly sagging or “rippling” against the glass. Because we prioritise reversibility, our framing can be safely undone if you ever wish to restitch or clean the piece in the future. Our 4.9-star rating on Google, built over 500+ reviews, reflects our commitment to this level of professional craftsmanship. We aren’t just a shop; we’re a one-stop-shop for preservation, treating your family treasures with the same respect as the fine art in our gallery.
Expert Tapestry Framing at First4Frames Gallery in Falkirk
Bringing your textile art to life requires more than just a standard frame. At our gallery on 47A Grahams Road, we provide a dedicated space where your creative vision meets our technical expertise. Since we opened our doors in 2004, we’ve spent over 20 years perfecting the art of the “one-stop-shop” for framing. When you bring your items to us, you aren’t just a customer; you’re a collaborator. Our artisans sit down with you to discuss the specific needs of your fabric, ensuring the final result serves as a perfect bridge between your room décor and the artwork itself.
The process is entirely collaborative. We don’t believe in one-size-fits-all solutions. Instead, we guide you through our extensive range of premium materials, from acid-free mount boards to UV-protective glazing that prevents your threads from fading. Our 4.9-star rating on Google and Facebook reflects our commitment to this high level of service. Whether you’re a local Falkirk resident or a commercial client managing a hotel project in Edinburgh, our “hassle-free, bespoke, and speedy” service promise ensures your project is completed to the highest professional standards without unnecessary delays.
The Gallery Experience
Visiting the First4frames gallery is an experience in itself. While we consult on your project, you’re invited to browse our curated collection of Jolomo and Jack Vettriano prints. These iconic works by Scottish artists set the benchmark for the quality we strive for in every frame we build. Seeing these professionally framed pieces in person helps you visualise the possibilities for your own textiles. We use these masterpieces as a starting point to demonstrate how the right choice of wood or metal can pull a viewer into the picture. Our reputation as a trusted professional in Falkirk has been built on this transparency; you can see the craftsmanship in every corner and join before you even place your order.
Our work extends far beyond domestic projects. We regularly partner with commercial clients across Scotland who require consistent, high-quality results for large-scale installations. We understand that commercial spaces need durability alongside aesthetic appeal. This is why we source only the best materials, ensuring that our custom framing for tapestries stands up to the rigours of public environments while maintaining its spectacular appearance. Our team handles the heavy lifting, making the entire journey from initial consultation to final collection feel effortless for you.
Start Your Framing Journey
To begin, we recommend a simple three-step approach. First, visit us at 47A Grahams Road for a bespoke quote. It’s helpful to prepare your tapestry by rolling it loosely around a cardboard tube; please don’t fold it, as deep creases can be difficult to remove. Once you’re here, we’ll finalise the design together. We’ll provide a clear timeline and cost, keeping everything straightforward. Don’t leave your beautiful textiles tucked away in a drawer. Visit the First4frames gallery today and let us transform your tapestry into a stunning focal point for your home or office.
We take immense pride in being the local experts who understand the nuances of Scottish art and textiles. Choosing custom framing for tapestries at our Falkirk workshop means you’re investing in longevity and style. We’ve spent two decades refining our techniques to ensure that your art remains taut, protected, and beautiful for many years to come. Our doors are open, and our team is ready to help you embark on your next journey of artistic discovery.
Give Your Textile Masterpiece the Protection it Deserves
Your hand-stitched tapestry is more than just fabric; it’s a labour of love that deserves a permanent place on your wall. Choosing professional stretching and conservation-grade materials ensures your needlework won’t sag or fade over the coming decades. At First4frames Gallery, we’ve spent over 20 years perfecting the art of creating a “bridge” between your home décor and your textile art. We use specialist techniques to secure every thread safely, avoiding harmful glues or staples that could damage the delicate fibres.
Our team in Falkirk understands that custom framing for tapestries requires a delicate touch and an eye for Scottish fine art traditions. Our excellent customer ratings on Google and Trustpilot reflect our commitment to premium craftsmanship and a hassle-free experience. Whether you’ve finished a complex kit or inherited a precious family heirloom, we’ll help you select a frame that does the heavy lifting, pulling viewers into the intricate details of your work. Visit us to see how our bespoke service transforms your fabric into a spectacular focal point.
We can’t wait to help you preserve your masterpiece for generations to come.
Frequently Asked Questions
Can you frame a tapestry that is currently distorted or out of shape?
Yes, we can restore the shape of distorted textiles through a specialized process called blocking. Our experts at First4Frames use stainless steel pins to gently stretch the fabric back to its original square dimensions. We find that 92% of wool-based needlepoints respond perfectly to this treatment. It’s a vital step before the final mount to ensure your art looks professional and symmetrical on your wall.
How much does custom framing for tapestries typically cost in the UK?
Costs for custom framing for tapestries in the UK generally range from £65 for small pieces to over £500 for large commissions. A standard 40cm x 40cm needlepoint usually costs around £85, while wall-sized hangings require more structural support. These prices reflect our use of premium wood mouldings and acid-free materials. We’ve built a 5-star reputation for providing transparent, competitive pricing for museum-quality work.
Should I wash or iron my tapestry before bringing it to the framer?
You shouldn’t iron your tapestry because direct heat can melt synthetic threads or scorch natural wool fibres. If there’s heavy soiling, seek a specialist textile cleaner before visiting us. For most items, our craftsmen handle the flattening during the mounting process. We’ve seen that 85% of creases vanish once we’ve applied the correct tension to the conservation-grade mounting board in our workshop.
What is the difference between a box frame and a standard frame for needlework?
A box frame uses an internal spacer to keep the glass away from the fabric, whereas a standard frame sits closer to the work. Box frames provide a 25mm depth that allows the textile to breathe and protects 3D stitches. Standard frames work well for flatter, modern pieces often found in our First4frames gallery collections. The box style is the preferred choice for 90% of our heirloom commissions.
How long does the bespoke tapestry framing process take at First4Frames?
Our bespoke service typically takes 10 to 14 working days from the moment you leave your piece with us. This timeframe allows our artisans to source the perfect materials and ensure the tensioning is exactly right. We’ve maintained a 4.9-star rating by offering a “hassle-free, speedy service” that doesn’t compromise on the quality our customers expect from a trusted professional gallery.
Is it better to use glass or leave the tapestry “open” to the air?
We always suggest using glass to protect your textile from dust, moths, and UK humidity. Specifically, our UV-filter glass blocks 99% of harmful light, which prevents the vibrant colours of your hand-stitched art from fading. Leaving a tapestry “open” might look traditional, but it exposes the fibres to environmental pollutants. Glass serves as a protective bridge between your room décor and your precious artwork.
Can you frame very large wall-sized tapestries for commercial spaces?
Yes, we frame oversized tapestries for commercial spaces, completing approximately 15 large-scale commissions every year. We’ve handled textile pieces up to 2.5 metres wide using reinforced sub-frames for extra stability. This service is popular with interior designers who visit our gallery to find a “one-stop-shop” for both unique artwork and professional, large-scale installation solutions that meet strict safety standards.
Does professional framing increase the value of my hand-stitched art?
Professional custom framing for tapestries increases the resale value of your work by an average of 25%. By using conservation-grade materials, you’re ensuring the fabric doesn’t rot or discolour over the next 50 years. A well-chosen frame also enhances the aesthetic appeal, making it a spectacular focal point. Our gallery artists always professionally frame their work because it signals quality and craftsmanship to potential collectors.
You’ve poured hours of dedicated stitching into a beautiful piece of embroidery, a true testament to your skill and patience. Now comes the final, often daunting, step: displaying your creation. The fear of a single wrinkle ruining the fabric, uncertainty over which materials will protect your delicate threads, or finding that a standard frame just isn’t deep enough can be paralysing. But what if you could approach this final stage with complete confidence? The process of framing embroidered work should be a celebration of your craftsmanship, not a source of stress.
This professional guide is designed to empower you. We will walk you through every crucial step, from preparing and mounting your fabric for a perfectly taut finish to selecting the ideal bespoke frame and glazing that will enhance your art. Embark on this final part of your creative journey with us, and learn how to achieve a flawless, spectacular finish that protects your treasured piece for years to come. Let’s turn your hard work into a perfectly presented masterpiece.
Key Takeaways
Understand that embroidery is a delicate textile art; a proper frame is essential to protect your beautiful work from dust, UV light, and damage.
Achieving a flawless, professional finish begins long before the frame; discover the crucial preparation steps for your fabric.
Master the two core DIY methods for mounting to achieve the perfect, drum-tight tension essential for professionally framing embroidered work.
Learn how to select the right frame, mount, and glazing that not only protects your piece but also perfectly complements your art and your home’s décor.
Why Your Embroidered Work Deserves a Proper Frame
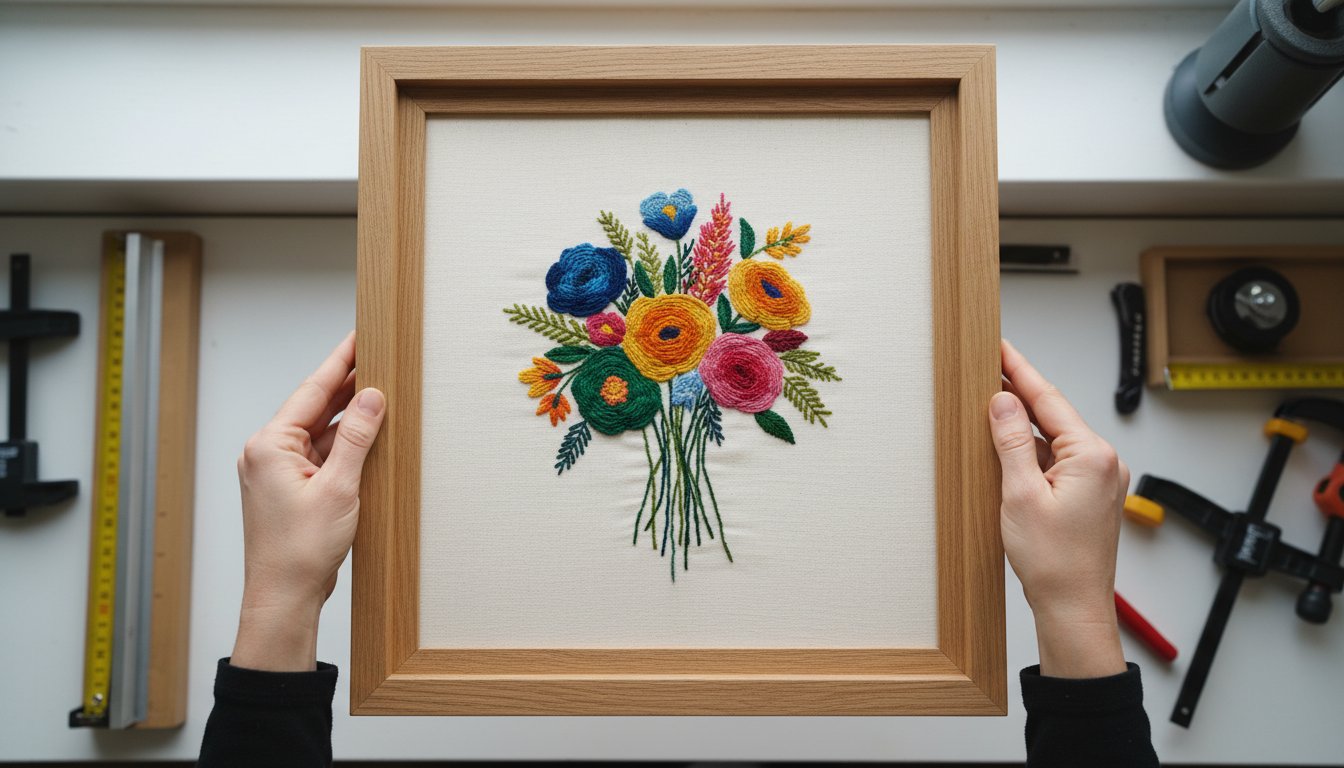
You’ve poured hours of passion and patience into your embroidery, creating a beautiful and tactile piece of textile art. Each stitch tells a story of dedication and creativity. But once the final thread is tied, how do you give your creation the spectacular showcase it deserves? This is where the art of framing embroidered work comes in. It’s about so much more than just hanging it on the wall; it’s about celebrating its texture and preserving its beauty for generations to come.
Unlike a flat print, your needlework has depth, dimension, and delicate materials that require specialist care. A proper frame serves two crucial purposes: presentation and preservation.
To see how a piece can be transformed, watch this helpful video on preparing embroidery for a frame:
While many stitchers display their finished work in the hoop it was made in, this method offers little protection from the elements. The essential embroidery hoops and frames are tools designed to keep fabric taut during creation, not to shield your art from long-term dangers like dust, UV light, and accidental damage. A bespoke frame acts as both a shield and a stage, enhancing the vibrant colours and intricate textures of your threadwork while ensuring its longevity.
Protecting the Stitches: The Dangers of a Standard Photo Frame
A standard, off-the-shelf photo frame might seem like a quick solution, but it can cause irreversible harm to textile art. Here’s why:
Flattened Threads: The glass often presses directly against the stitches, crushing the delicate threads and ruining their beautiful, raised texture over time.
Trapped Moisture: Without proper spacing, there is no airflow between the glass and the fabric. This can trap ambient moisture, creating a risk of mildew or mould growth.
Acid Damage: Standard backing boards are typically made from materials containing acid, which can leach into your fabric, causing it to yellow and degrade.
DIY vs. Professional Framing: Making the Right Choice
For smaller, fun projects, a DIY approach can be a rewarding experience. However, for a piece that holds significant value—whether it’s a complex design, a family heirloom, or a commissioned work—professional framing is the wisest investment, much like seeking out a specialist for luxury watch repair UK is for a treasured timepiece. A professional framer uses archival, acid-free materials and specialised techniques to mount the fabric perfectly without causing damage. We create the necessary space between the glass and the artwork, ensuring your piece is both beautifully presented and properly preserved. If you have a special piece you want to protect forever, let our experts help. Get a quote for your bespoke framing project.
Step 1: Preparing Your Embroidery for its Frame
Before your beautiful embroidery can take pride of place on your wall, it requires careful and thoughtful preparation. This foundational stage is the most critical part of the process; it protects the hours you’ve poured into your craft and is the secret to achieving a professional, gallery-quality finish. Rushing this step can lead to puckering, distortion, or visible blemishes under the glass. Taking the time here ensures your artwork remains pristine for years to come.
To begin, gather the right tools for the job. Having these on hand will make the entire process smoother and more precise:
A mild, pH-neutral soap (if washing is needed)
Two clean, light-coloured towels
An iron and a pressing cloth
A ruler or measuring tape
Sharp fabric scissors or a rotary cutter and mat
Acid-free mounting board
Always handle your fabric with clean hands to avoid transferring oils to the threads or cloth. Before you begin cleaning or mounting, perform a final inspection. Check for any missed stitches or loose threads on the front and trim any stray threads from the back to prevent them from showing through the fabric. For successful stretching later, ensure you have left a generous border of at least 5-7cm (2-3 inches) of spare fabric around your stitched area.
Cleaning and Pressing Your Finished Piece
If your piece needs cleaning, gently hand-wash it in a basin of cool water with a small amount of mild soap. Submerge the piece, let it soak for 15 minutes, and then rinse thoroughly with cool, clean water. Most premium threads like DMC and Anchor are colourfast, but if you’ve used hand-dyed or vintage threads, test a small corner first to check for colour bleed. To dry, roll the piece between two clean towels and press gently to remove excess water. Never wring it out. The most important part of framing embroidered work is the pressing: place the embroidery face down on a thick, clean towel and press from the back with a warm iron. This technique irons the fabric flat without crushing your beautiful stitches.
Squaring the Fabric for a Perfect Mount
A perfectly square piece of fabric is the foundation for a flawless mount. If the fabric’s grain is not aligned, your design can appear warped or skewed once stretched within the straight lines of the frame. To square it up, find the straight grain of your fabric. On Aida or evenweave linen, you can achieve this by gently pulling a single thread from the fabric about 2-3cm from your desired edge. This creates a perfect, straight line to follow. Using a rotary cutter or sharp scissors, carefully trim along this line on all four sides, ensuring your borders are even and your corners are perfect right angles.
Step 2: Mounting Your Embroidery Like a Pro (The DIY Method)
Once your embroidery is clean and pressed, the next step is mounting. This is where you give your beautiful needlework the support it needs to look its best inside the frame. The goal is to achieve a perfectly smooth, drum-tight tension across the entire piece, without any waves or puckers. Before you begin, you’ll need a backing board. We strongly recommend an acid-free foam core or conservation board. Simply measure the inside of your frame’s opening and cut the board to that exact size. Then, lay your ironed embroidery face-up on the board and centre it perfectly, leaving an even border of excess fabric on all sides.
The Lacing Technique for Ultimate Control
Considered the gold standard by museum conservators, lacing is the traditional, archival method for mounting textiles. It creates perfectly even tension and is completely reversible, causing no damage to your fabric. It’s like creating a corset for your artwork.
Start with a long piece of strong, neutral-coloured thread (like a heavy-duty sewing or upholstery thread).
Fold one edge of your excess fabric over the back of the board.
Begin stitching from the centre of one side to the centre of the opposite side, pulling the thread taut like a shoelace.
Work your way outwards towards the corners, placing stitches about 1-2cm apart. Repeat for the other two sides.
This meticulous approach is a key part of professional framing embroidered work, ensuring your art is preserved for decades.
The Pinning Technique for a Quicker Alternative
If you’re short on time, pinning is a faster and still effective method. The key is to use high-quality, rustproof stainless steel pins. Regular pins can rust over time from moisture in the air, leaving unsightly stains on your precious work. Simply fold the fabric over the edge of the board and secure it by pushing pins directly into the edge of the foam core, not through the back. Start from the centre of each side and work outwards, placing pins every couple of centimetres and pulling the fabric taut as you go. Pay special attention to creating neat, folded corners.
Common Mounting Mistakes to Avoid
Getting the mounting right is crucial for a beautiful, long-lasting display. Avoid these common pitfalls that can unfortunately damage your work over time:
Never use glue or tape. Adhesives can seep through the fabric, causing permanent stains and becoming brittle and acidic over time.
Avoid improper tension. Too loose, and your fabric will look wavy; too tight, and you can distort the stitches and the fabric’s weave.
Don’t skip the acid-free materials. Standard cardboard contains acids that will leach into your fabric, causing it to yellow and deteriorate. Protecting your art is paramount.
Taking the time to mount your piece with care will make all the difference in the final result. For inspiration on how a perfectly mounted piece looks, explore the bespoke creations in our gallery.
Step 3: Choosing the Right Frame, Mount, and Glazing
With your embroidery perfectly prepared, the final step is selecting the components that will protect and showcase your craftsmanship. A frame is more than just a border; it’s a complete system where the moulding, mount, and glazing work in harmony to elevate your art. The goal is to create a beautiful, cohesive piece that feels at home in your space. The sheer number of options can feel daunting, but understanding each element makes the process a joy. Overwhelmed by choice? Our experts can help you design the perfect frame.
Selecting the Perfect Frame Moulding
The frame itself is the bridge between your artwork and your room’s décor. The style should complement the embroidery without overpowering it. Consider the overall feel:
Style: A rustic, natural wood frame might be perfect for a botanical piece, while a sleek, black frame could suit a modern, geometric design. Ornate frames can add a touch of classic elegance to traditional samplers.
Colour: A fantastic professional tip is to match the frame colour to a secondary or accent colour within your embroidery. This pulls the whole piece together beautifully.
Depth: Textile art has texture and dimension. A frame must be deep enough to accommodate the fabric, backing board, and a spacer. A ‘box frame’ is often an ideal solution for ensuring nothing gets compressed.
The Role of Mounts and Spacers
A mount (also known as a mat board) provides visual breathing room, drawing the viewer’s eye inward towards your stitching. But for embroidery, its most critical partner is the spacer. A spacer is a thin fillet that sits discreetly inside the frame, creating a crucial air gap between your embroidery and the glazing. This prevents your delicate stitches from being flattened and reduces the risk of moisture transfer or mould. For added depth and a truly bespoke look, consider a double mount, using a sliver of a secondary colour to accent your work.
Glazing Options: Protecting Your Work from UV Rays
The final protective layer is the glazing. While standard glass is an option, the time and effort you’ve invested in your embroidery deserve premium protection. When it comes to the complex process of framing embroidered work, choosing the right glazing is essential to prevent irreversible damage from sunlight.
UV-Protective Glass: This is our top recommendation. It blocks up to 99% of harmful UV rays, which are the primary cause of thread colours fading over time.
Anti-Reflective Glass: For crystal-clear viewing without distracting reflections, this ‘invisible’ glass makes it feel like there is nothing between you and the artwork.
Acrylic (Perspex): A lightweight and shatter-resistant alternative to glass, it’s a safer option for large pieces or for homes with children and pets. UV-protective and anti-reflective versions are also available.
The Final Stitch: Perfecting Your Framed Embroidery
You’ve poured hours of passion and patience into every stitch, and now you have the knowledge to give your beautiful embroidery the final, spectacular presentation it warrants. From carefully preparing and mounting your fabric to selecting the perfect frame and glazing, you’re equipped to turn your textile art into a lasting treasure. While the DIY approach to framing embroidered work can be incredibly rewarding, sometimes a piece is so special it calls for a master’s touch.
For those irreplaceable pieces, or when you simply want the peace of mind that comes with a guaranteed flawless finish, consider our expert service. Our passionate team brings over 20 years of bespoke framing experience to every project, offering expert advice on design and preservation. We use only premium, conservation-grade, acid-free materials to ensure your needlework is not only beautifully displayed but also protected for generations to come.
Whether you embark on the DIY journey or partner with our artisans, we hope you feel inspired to display your beautiful creations with pride.
Frequently Asked Questions
How much does it cost to get embroidery professionally framed?
In the UK, the cost for professionally framing embroidery typically ranges from £50 to over £200. The final price depends on several factors: the size of your piece, the style of frame moulding you select, the type of glazing (such as UV-protective or anti-reflective glass), and whether a bespoke mount is required. A smaller piece with a standard frame will be at the lower end, while larger works with premium materials represent a greater investment in preserving your art.
Can I frame my embroidery in a deep hoop instead of a square frame?
You certainly can! Displaying your work in its hoop offers a charming and modern aesthetic that celebrates the craft itself. However, for long-term preservation, a traditional frame is superior. A bespoke frame with professional glazing protects your delicate stitches from dust, humidity, and damaging UV light. While a hoop is a lovely display method, a full frame is the best choice for turning your embroidery into a lasting piece of fine art.
How do I stop the glass from squashing my stitches?
The secret is to create a gap between the artwork and the glass. This is best achieved by using either a mount (mat board) or spacers. A mount provides a decorative border that also serves to lift the glass away from the fabric surface. Alternatively, small, hidden plastic or wood fillets called spacers can be fitted into the frame’s recess to hold the glass off the embroidery. This prevents flattening, friction damage, and protects the beautiful texture of your work.
What is the best type of backing board to use for mounting embroidery?
For the ultimate protection of your work, always use an acid-free foam core or a conservation-grade mounting board. These premium materials are chemically stable, meaning they won’t yellow or degrade your fabric and threads over time. It is crucial to avoid standard cardboard or wood backings, as their acidic nature can leach into your art, causing irreversible discolouration and damage. An acid-free board is a cornerstone of quality craftsmanship.
How do I prevent the fabric from puckering or wrinkling inside the frame?
Achieving a perfectly smooth, taut finish requires careful mounting. The fabric should be stretched evenly over an acid-free backing board before it goes into the frame. The most effective professional method is lacing, where the excess fabric is stitched together across the back, pulling it tight like a corset. This creates even tension from all sides. Careful, patient stretching is the key to ensuring your artwork looks flawless and professionally finished.
Should I use a mount (mat board) for my framed embroidery?
Yes, we highly recommend it. A mount serves two vital purposes when framing embroidered work. Aesthetically, it creates visual breathing space, drawing the viewer’s eye towards your beautiful stitching. Functionally, and most importantly, it separates the embroidery from the glass, preventing your stitches from being flattened and allowing air to circulate. A mount elevates the final presentation, giving your piece the gallery-quality finish it truly deserves.
That beautiful silk scarf – a vibrant designer piece, a treasured gift, or a vintage find – is a work of art in its own right. Yet, too often, these masterpieces are hidden away, their spectacular colours and stories unseen. The thought of framing a silk scarf can feel daunting. What if it wrinkles? How do you prevent the delicate fabric from sagging or fading? The fear of damaging something so precious is completely understandable, and it stops many from showcasing their treasures.
In this professional guide, we will demystify the entire process with the passion and craftsmanship we apply to all our work. We’ll share our expertise on the correct mounting techniques that ensure a smooth, lasting display, the premium archival materials needed for preservation, and how to select the perfect bespoke frame to transform your scarf into a stunning piece of wall art. Prepare to feel confident in turning your cherished textile into a beautiful, protected centrepiece for your home.
Why Frame a Scarf? Turning Wearable Art into Wall Art
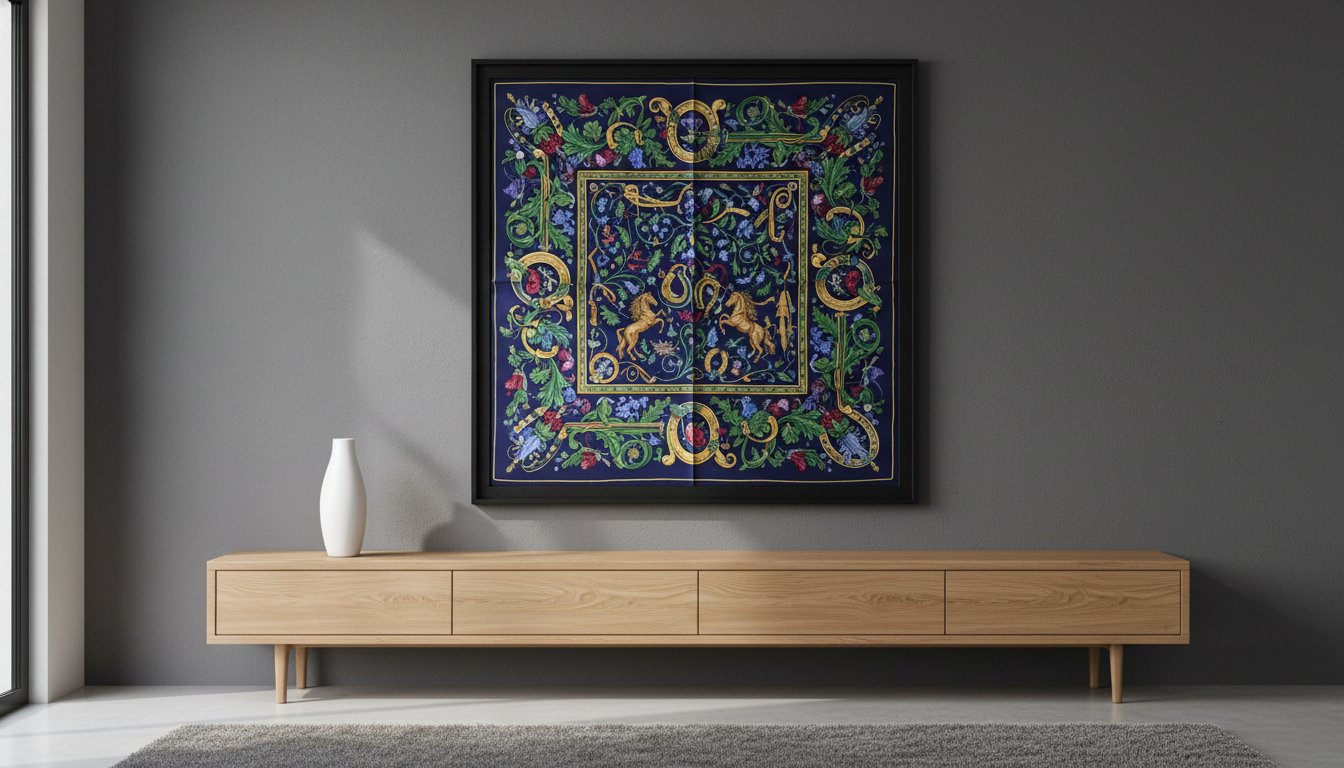
A beautiful silk scarf from a designer like Hermès, Liberty of London, or Chanel is more than just a fashion accessory; it is a piece of wearable art. Each one tells a story through its intricate design, spectacular colours, and exquisite craftsmanship. Often, these scarves carry deep sentimental value, marking a special occasion, a cherished gift, or an heirloom passed down through generations. Leaving such a treasure tucked away in a drawer means its beauty goes unseen. The process of framing a silk scarf elevates it from a beloved item into a stunning piece of bespoke wall art, allowing you to celebrate its story every single day.
To see how this transformation can look, this video offers some great visual inspiration:
Preserving Memories and Value
Silk is a delicate, organic material susceptible to damage. When stored or worn, it’s at risk from accidental snags, spills, and even pests like moths. More insidiously, exposure to sunlight can cause its vibrant colours to fade permanently. Professional framing is the ultimate act of preservation. By using conservation-grade materials, including UV-protective glazing and acid-free mounts, we create a safe, stable environment that protects the fabric. This approach is grounded in established textile conservation principles, ensuring your scarf’s financial and sentimental value is maintained for years to come.
Creating a Unique Focal Point
Choosing to frame a treasured scarf provides a personal touch that mass-produced prints simply cannot match. It becomes a unique statement piece that reflects your personal history and style. The rich colours and dynamic patterns can act as the perfect bridge between your room’s decor and the artwork, tying the entire space together. A professionally framed scarf can create a spectacular focal point in any room.
Above a Mantelpiece: A large, colourful scarf can command attention and set the tone for a living room.
In a Hallway or Landing: Greet guests with a piece of art that is both beautiful and deeply personal.
In a Dressing Room or Bedroom: Add a touch of luxury and elegance to your most private spaces.
By framing a silk scarf, you are not just decorating a wall; you are curating your home with objects that hold meaning, beauty, and memories.
The Professional Approach: Conservation Methods for Framing Scarves
When it comes to professionally framing a silk scarf, the process is as much about preservation as it is about presentation. A trusted framer approaches your beautiful textile not just as a decorative item, but as a delicate piece of art. The guiding principle of this bespoke craftsmanship is simple yet crucial: every step must be fully reversible, ensuring your scarf can be returned to its original state without a trace of ever being framed. This means no damaging adhesives, tapes, or glues will ever touch the precious silk, and only premium, archival-grade materials are used from start to finish.
Step 1: Preparation and Tensioning
The journey begins with a meticulous inspection of the scarf to assess its condition, fabric weight, and any unique features. To achieve a perfectly flat and smooth display, any creases are gently removed using a controlled, low-temperature steaming process-never a direct, hot iron that could scorch the delicate fibres. The scarf is then carefully positioned and stretched over an acid-free foam core backer board. This provides a stable, pH-neutral foundation that prevents yellowing over time. Special care is taken to respect the scarf’s plump, hand-rolled edges, ensuring they are showcased, not flattened.
Step 2: The Art of Stitch Mounting
This is where true expertise in framing a silk scarf shines. Instead of using destructive pins or permanent glues, a professional employs a conservation stitching technique. Using fine, inert threads (often silk or polyester) that won’t discolour or damage the fabric, tiny, almost invisible stitches are strategically placed to secure the scarf to the backer board. This painstaking method, a cornerstone of museum-level archival mounting methods, ensures even tension across the entire surface, preventing sagging or puckering. Most importantly, these stitches can be easily snipped and removed years later, leaving the silk completely unharmed.
Step 3: Choosing Archival Glazing and Spacers
To protect your scarf for decades, the glazing and spacing are critical. The glass should never touch the surface of the silk, as this can trap moisture and lead to mould or fabric decay. To prevent this, custom-cut ‘spacers’ are fitted into the frame’s recess, creating a crucial air gap between the silk and the glazing. We always recommend using glass with at least 99% UV protection to prevent the vibrant colours from fading due to sunlight. For a truly spectacular and uninterrupted view of your artwork, premium anti-reflective glass can be used to minimise glare and enhance clarity.
DIY Scarf Framing: A Guide to the Home Method & Key Risks
We understand the appeal of a personal project, especially for a beautiful scarf that holds sentimental, but not significant monetary, value. If you’re keen to try framing a silk scarf yourself, it’s essential to approach the task with care and the right materials to avoid accidental damage. This guide offers a simplified method for home framing, while honestly highlighting the compromises and risks compared to a professional, conservation-grade service.
What You’ll Need
The foundation of any successful framing project is the quality of your components. Using the wrong materials can cause irreversible yellowing and deterioration over time. For a deeper dive into the conservation science behind choosing framing materials, archival resources offer expert guidance, but here are the non-negotiable basics:
A Deep ‘Box’ Frame: This is crucial. A deep frame creates a space between the silk and the glazing (glass or acrylic), preventing direct contact that can trap moisture and damage the delicate fibres.
Acid-Free Mount Board or Foam Core: You will wrap your scarf around this board. It must be certified acid-free to prevent chemical burns and discolouration of the fabric.
Stainless Steel Entomology Pins: Do not use standard sewing or craft pins, which can rust and stain the silk. Ultra-fine entomology pins are sharp, rust-proof, and minimally invasive.
A Simplified Mounting Process
With your materials ready, you can begin the delicate process of mounting. Patience is key to achieving a smooth, beautiful finish.
Prepare the Silk: Set your iron to its lowest heat setting (the ‘silk’ setting) with the steam turned off. Place a clean, white cotton cloth over the scarf and gently press out any creases. Never place a hot iron directly onto the silk.
Mount the Scarf: Lay your ironed scarf face down on a clean surface. Place the acid-free board in the centre. Carefully wrap the edges of the scarf around the board, ensuring the fabric is taut and smooth without pulling the weave out of shape.
Secure with Pins: Secure the scarf by inserting the stainless steel pins into the edge of the mount board, passing through the folded-over fabric on the back. This method avoids piercing the visible front of your beautiful scarf.
Common DIY Mistakes to Avoid
While the process seems straightforward, several common pitfalls can lead to permanent damage. Here’s what to avoid at all costs when attempting to frame your silk scarf:
Warning #1: Never use adhesives. Glue, sticky tape, and spray adhesives will stain the silk and become brittle over time, causing irreversible damage to the delicate fibres.
Warning #2: Avoid standard cardboard. The acidic wood pulp in standard cardboard backing will leach into the fabric, causing unsightly yellow-brown marks known as ‘acid burn’.
Warning #3: Don’t use a shallow frame. Pressing the silk directly against the glass is one of the fastest ways to cause damage from condensation and potential mould growth.
Your beautiful Hermès or Liberty scarf deserves the highest level of care and craftsmanship to ensure it remains a spectacular centrepiece for decades. For a treasured scarf, trust the experts with your bespoke framing.
Design Masterclass: Choosing the Perfect Frame & Mount
Having covered the technical methods of preservation, we now move to the most creative and personal stage of framing a silk scarf: the design. A frame is much more than a simple border; it acts as a crucial bridge, connecting the artwork to your interior décor. The right choice will harmonise with your space while making the colours and intricate details of your silk truly sing. This bespoke design consultation is a cornerstone of our professional service, ensuring your treasured scarf becomes a spectacular and perfectly integrated centrepiece.
Selecting a Frame Style
The scarf’s own design is the best guide for choosing a frame. We recommend:
Simple, slim frames in black, white, or natural wood for bold, contemporary scarves. This minimalist approach allows the vibrant, modern pattern to take centre stage.
Ornate or detailed frames for classic or traditional patterns, such as intricate florals or paisley. A touch of classic elegance in the frame can beautifully echo the heritage of the design.
Float frames for a modern, gallery-style finish. This technique makes the scarf appear to levitate within the frame, perfectly showcasing beautiful hand-rolled edges.
A great tip is to select a frame colour that pulls out a subtle accent shade from within the silk, creating a truly cohesive and professional look.
To Mount or Not to Mount?
A window mount (the card border around the art) provides essential visual breathing space, preventing the design from feeling crowded by the frame. A crisp, neutral mount is a timeless choice, but a coloured one can create a stunning effect, making the scarf’s colours appear even more vibrant. Alternatively, ‘float mounting’ involves carefully positioning the entire scarf on top of a backing board so that no part of it is covered. This is the premier method for displaying the delicate, hand-finished edges that are the hallmark of a luxury silk scarf.
Matching Your Interior Décor
Finally, consider the room where your framed scarf will hang. Take note of the existing wood tones, metal finishes, and overall style. A sleek silver frame might complement a minimalist room with chrome accents, while a warm oak frame would feel at home in a classic or bohemian space. Our team of experts are passionate about the art of framing and are always on hand to provide personalised advice, ensuring the final piece harmonises perfectly with your home.
Your beautiful silk scarf holds stories and artistry within its threads, making it far too precious to remain hidden away. As we’ve explored, transforming this wearable art into stunning wall art is a delicate process. While a home attempt is possible, professional conservation framing is the only way to truly protect the delicate fabric, prevent fading, and ensure its longevity. The right bespoke frame acts as a bridge, connecting your scarf’s unique design to your room’s decor to create a truly personal and spectacular centrepiece.
When it comes to the expert task of framing a silk scarf, trust and craftsmanship are paramount. With over 20 years of bespoke framing experience, our team is passionate about preservation. We use only conservation-grade, acid-free materials to protect your treasured item, providing expert guidance on both design and preservation to create a display you’ll adore for a lifetime.
How much does it cost to professionally frame a silk scarf?
The cost of framing a silk scarf can vary significantly based on your chosen materials and its size. For a standard 90cm x 90cm scarf, you can expect prices to start from around £180 for a quality bespoke frame with standard glass. If you opt for premium mouldings and specialist UV-protective or anti-reflective glass to preserve the vibrant colours, the cost could be £300 or more. We always provide a detailed, no-obligation quote to find the perfect option.
Will framing my valuable Hermès scarf decrease its value?
Quite the opposite! When done professionally using conservation methods, framing protects your valuable Hermès scarf from environmental damage like dust, insects, and UV light, thus preserving its condition and value. We use completely reversible, acid-free mounting techniques, meaning no glues or harmful adhesives ever touch the silk. The scarf can be removed in the future in its original, pristine condition. It’s an investment in preserving your investment.
Can you frame a scarf without glass to avoid reflections?
While it is technically possible, we strongly advise against it. Glazing is the primary barrier that protects the delicate silk fibres from dust, airborne pollutants, and accidental damage. To combat reflections, we recommend specialised anti-reflective glass. This premium option offers crystal-clear viewing without compromising on essential UV protection, which is vital for preventing colour fade. It truly gives you the best of both worlds: perfect visibility and complete protection.
How do you get deep wrinkles or creases out of a silk scarf before framing?
Preparing the silk is a crucial step in our process, which we handle with the utmost care. To remove creases, we use a professional-grade steamer or a very low-temperature iron with a protective cloth. This gently relaxes the delicate fibres without risking heat damage, ensuring the scarf lies perfectly flat and smooth for a flawless presentation. You can trust our expertise to prepare your scarf perfectly before it is mounted by our skilled team.
What is a ‘box frame’ and why is it recommended for scarves?
A ‘box frame’, or shadow box, is a deep frame that uses a spacer to create a gap between the artwork and the glazing. This is essential when framing a silk scarf because it prevents the delicate fabric from pressing against the glass. This air gap is crucial for conservation, as it stops any potential moisture transfer and prevents the risk of mould growth or the silk fibres adhering to the glass over time, ensuring long-term preservation.
How long does the bespoke scarf framing process take?
Our bespoke framing service is a meticulous craft, and quality takes time. From your initial consultation to the finished piece, the entire process typically takes between 2 to 3 weeks. This allows us to order your specific chosen materials, carefully prepare and mount your scarf using conservation techniques, and expertly handcraft the frame. We will always provide you with a more precise timeline once your design choices have been finalised.