
Posted on

How to Frame a Vinyl Record Cover for Display

How to Frame a Vinyl Record Cover for Display

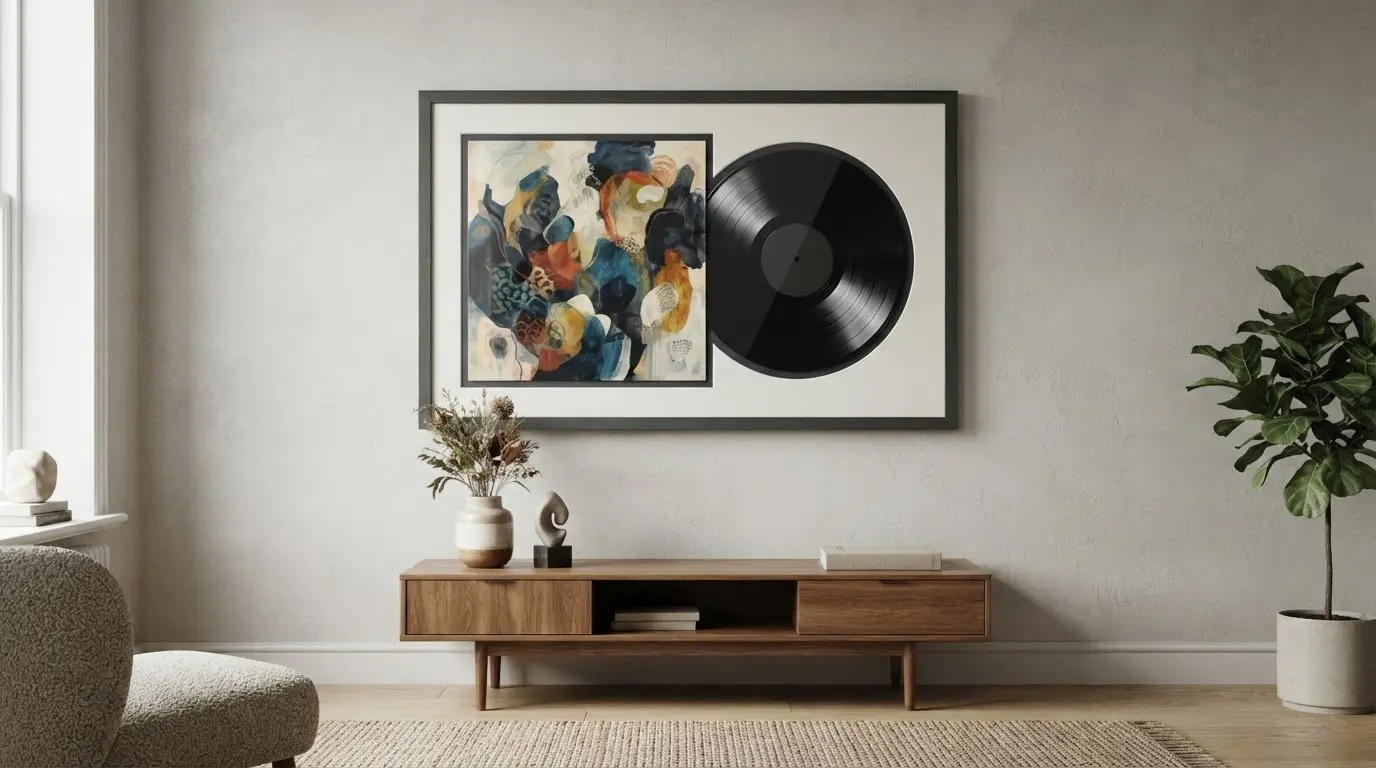
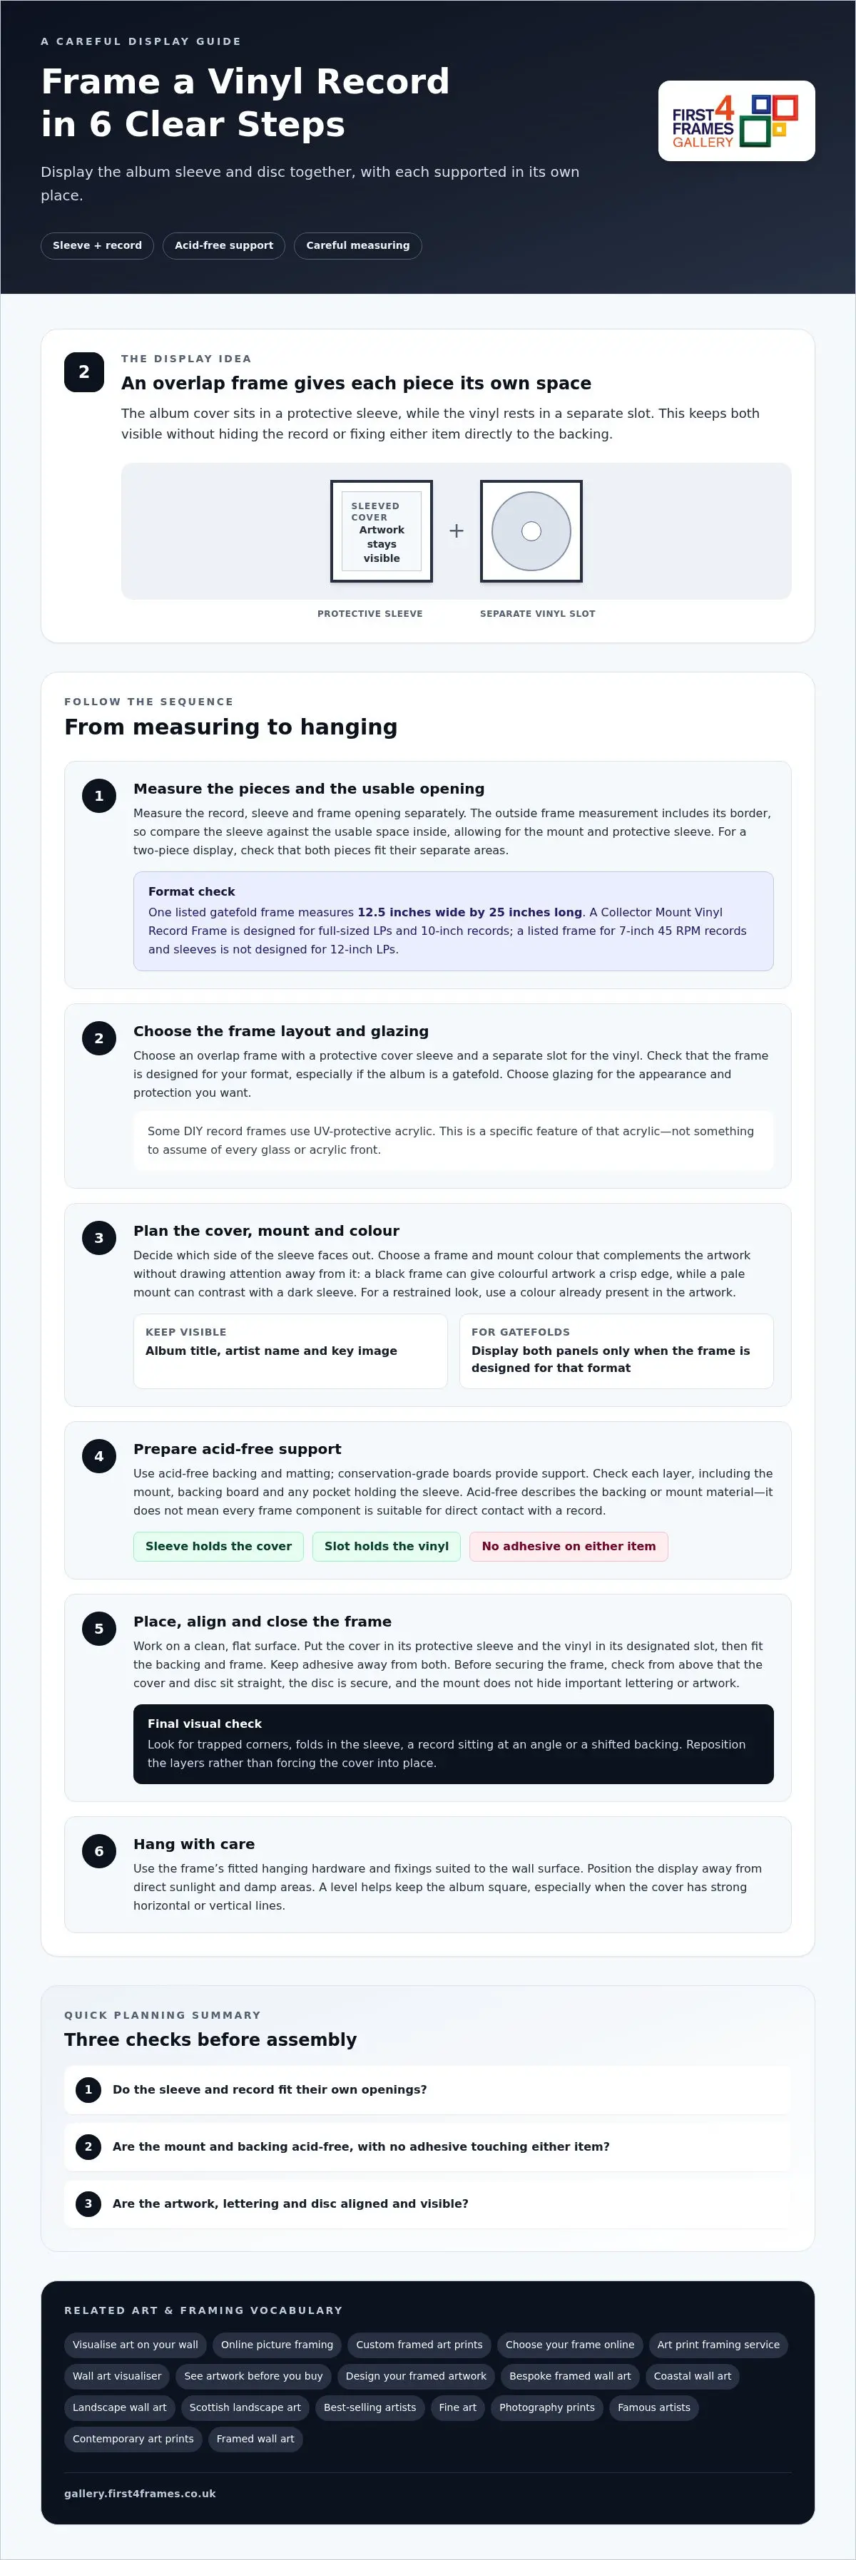
To frame a vinyl record cover for display, choose an overlap frame with a protective sleeve for the cover and a separate slot for the record. Place the cover in its sleeve, position the vinyl in its slot, and use acid-free backing and matting, keeping adhesive away from both items. Check the frame’s internal dimensions against the sleeve and record before assembling it.

A favourite album can bring back a time, place or sound, so it’s worth taking care with its presentation. The right frame displays the cover and record together while supporting both. Measuring carefully helps prevent a cramped or insecure fit.

This guide explains how to frame a vinyl record cover, what to look for in an overlap frame and how to use acid-free materials. You’ll also learn which dimensions to check before choosing a frame, so you can plan a display that gives the album artwork the attention it deserves.

Key Takeaways

  • Choose a frame and mount colour that complement the album artwork without drawing attention away from it.
  • An overlap frame lets the sleeve and record share the display, with each held in its own place.
  • Acid-free backing and matting help create a suitable barrier between the display materials and your album.
  • Measure the record, sleeve and available wall space before choosing a frame; bespoke framing can help when a standard size won’t suit.

How do I frame a vinyl record?

To frame a record and its sleeve, choose a frame with a cover sleeve and a separate slot for the vinyl. Slide the album cover into its protective sleeve, then position the record in its designated slot. This overlap layout displays both pieces together and keeps them in place. It suits a favourite album when the artwork and disc matter equally.

Choose a frame and mount colour that complement the cover’s palette. A black frame can give colourful artwork a crisp edge, while a pale mount can contrast with a dark sleeve. For a restrained look, choose a mount colour already present in the artwork. Check that the mount opening leaves the title, artist name and key image visible.

  1. Lay out the sleeve and record on a clean, flat surface.
  2. Place the sleeve in its holder and the vinyl in its slot.
  3. Fit the backing and frame, keeping adhesive away from both items.
  4. Check the cover and disc sit straight before securing the frame.

For wall mounting, use the frame’s fitted hanging hardware and choose fixings suited to the wall surface. Position the frame away from direct sunlight and damp areas. A level helps keep the album square, especially when the cover has strong horizontal or vertical lines.

The cost of custom vinyl record framing in the UK depends on the frame dimensions, materials, glazing and whether it holds the sleeve alone or the sleeve and record together. These choices determine the finished specification, so compare them when planning your budget.

Some DIY record frames use UV-protective acrylic to help protect against sun damage and fading. This is a specific feature of that acrylic, not one to assume of every glass or acrylic front. Choose glazing based on the protection and appearance you want for your display.

Record and sleeve overlap frames

An overlap frame displays an album sleeve and vinyl record side by side. The sleeve sits in a protective pocket, while a separate slot holds the disc. This arrangement keeps the artwork visible without hiding the record. It works especially well when the label, coloured vinyl or familiar grooves are part of the story you want the display to tell.

Before assembly, decide which side of the sleeve should face out. For a gatefold album, open the cover and consider displaying both panels, provided the frame is designed for that format. One listed gatefold frame measures 12.5 inches wide by 25 inches long. That example shows why a gatefold needs a different layout from a standard single-cover display.

Keep the sleeve and record centred in their own openings. Place the cover in its protective sleeve first, then slide the vinyl into its designated slot. Check that the disc sits securely and doesn’t obscure the sleeve’s title or artwork. If the frame includes a mount, check that its opening shows the whole cover, including details near the edges.

Plan the composition before closing the frame. Arrange the cover and disc on a clean surface, then check their alignment from above. Placing the record beside the sleeve creates a balanced look; positioning it above or below may suit a taller format. Follow the frame’s assembly order and keep adhesive away from the sleeve and vinyl.

For an album-led display, choose a frame that accommodates both pieces rather than forcing them into an unsuitable opening. Browse artwork in the online gallery for visual ideas, then use the same care to plan how your own record and sleeve will sit together.

Acid-free backing and matting

Use acid-free backing and matting between the album cover, record and frame. Conservation-grade boards provide support without adhesive touching the sleeve or vinyl. In a display showing both pieces, keep the record in its slot and the album cover in its sleeve. Don’t stick either directly to the backing.

Acid-free describes the material used for the backing and mount. It doesn’t mean every frame component is suitable for direct contact with a record. Check each layer, including the mount, backing board and any pocket holding the sleeve. Some DIY vinyl record frames use conservation-grade backing and matting.

Prepare the layers on a clean, flat surface, keeping the frame components in assembly order. Place the backing board first, then position the mat so its opening frames the picture without covering important lettering. Put the sleeved cover in its holder and the vinyl in its slot. Keep adhesive away from both throughout.

  • Choose backing and matting described as acid-free and conservation-grade.
  • Use a sleeve to hold the album cover, rather than fixing it to the mount.
  • Keep the record in its designated slot, with no adhesive touching the disc.
  • Check that the mat opening doesn’t hide the album title or artwork.

Before closing the frame, inspect the layout from the front. Look for trapped corners, folds in the sleeve or a record sitting at an angle. If the backing shifts during assembly, reopen the frame and reposition the layers rather than forcing the cover into place. A straight, supported arrangement presents the sleeve and disc neatly together.

For a display of the cover alone, the same principle applies: keep the album cover in its sleeve, with acid-free matting and backing behind it. In a record-and-sleeve frame, check that both display areas are supported and free from adhesive contact.
How to Frame a Vinyl Record Cover for Display

Checking frame dimensions

Measure the record, sleeve and frame opening separately before choosing a size. The frame’s outside measurement includes its border, so it doesn’t show how much space is available inside. Compare the sleeve’s width and height with the usable opening, allowing room for any mount and protective sleeve. For a record-and-sleeve display, check that both pieces fit their separate areas.

Format matters. A gatefold album opens wider than a single sleeve, and one listed Gatefold Album Frame measures 12.5 inches wide by 25 inches long. A Collector Mount Vinyl Record Frame is designed for full-sized LPs and 10-inch records. By contrast, a listed frame for 7-inch 45 RPM records and sleeves isn’t designed for 12-inch LPs.

Some frames use metric measurements, so compare like with like. A listed black-gloss double vinyl LP frame measures 72L x 40W cm and is for 12-inch vinyl. That overall size describes the frame, not necessarily its internal opening. Check the maker’s stated fit and compare it with your actual sleeve and record before buying.

  1. Measure the sleeve across its widest points, including any gatefold panels.
  2. Measure the record diameter and note whether the frame holds one disc or more.
  3. Check the frame’s internal opening and each display area, not only its outer dimensions.
  4. Allow for the mount, sleeve and backing so they don’t crowd the artwork.

Finally, consider the wall space. Hold a paper template matching the frame’s outer dimensions against the intended spot, then check its proportions beside nearby furniture. For a double LP layout, the 72L x 40W cm example will occupy a different shape from a single-cover frame. If a standard opening won’t suit your album, browse framed artwork for display ideas and consider a frame made to fit the sleeve and record together.

First4Frames Gallery offers Custom Picture Framing for an album display and Ready-to-Hang Framed Art for a wider room scheme. Browse Giclée Fine Art Prints, including Scottish landscape art and contemporary art prints, to find pieces that sit comfortably alongside your collection. Online picture framing makes it easy to choose your frame online and design framed artwork that feels personal.

Explore the gallery to browse artwork and picture it on your wall. Whether you’re drawn to coastal or landscape prints, or bespoke framed art, consider how each piece will work alongside your record display.

Visit First4Frames Gallery to explore artwork and framing options.

Give your record a place in your story

A framed album can be the starting point for a more personal wall display. Build around its colours, the memories attached to its music or other pieces that make the room feel distinctly yours. Knowing how to frame a vinyl record cover gives you a thoughtful way to bring that connection into view.

For a record that needs a tailored presentation, First4Frames Gallery offers Custom Picture Framing. Its Ready-to-Hang Framed Art and Giclée Fine Art Prints can also help you shape a wider display around your collection. Choose pieces that complement the album without competing with its character.

Explore the gallery and find inspiration for your wall, then take the next step towards a display that feels like yours. Your favourite album deserves to be seen.

Frequently Asked Questions

How do I frame a vinyl record cover step by step?

Start by choosing a frame designed for the sleeve-and-record arrangement you want. Check that the cover and disc fit their separate display areas, then place the cover in its sleeve. Position the vinyl in its slot, arrange the backing and mount, and inspect the layout before closing the frame. Keep the title visible and don’t force anything into place.

What frame size fits a 12-inch vinyl record sleeve in the UK?

A frame for a 12-inch LP needs an opening that fits the actual sleeve and record layout, not just a 12-inch label. Measure the sleeve and compare it with the frame’s internal display area. One listed black-gloss double vinyl LP frame measures 72L x 40W cm and is designed for 12-inch vinyl, but that outer measurement doesn’t establish its internal opening.

What are the best frames for displaying a vinyl record and sleeve?

An overlap frame is a practical choice for displaying a sleeve and disc together. Look for a dedicated sleeve holder and separate record slot, so each has its own space. For example, a gatefold album needs a wider arrangement than a single cover. Acid-free backing and matting, with no adhesive touching the album, are useful material choices.

How can I frame a vinyl record without damaging the cover?

Keep the album cover inside a sleeve and don’t attach it directly to the frame or mount. Choose an opening that accommodates the sleeve without bending its corners. During assembly, support the cover on a flat surface and reposition it if it catches or creases. Keep adhesive away from the sleeve and record, and don’t force either into a tight space.

How do I mount a vinyl record and cover in a frame?

Use a frame with separate spaces for the sleeved cover and vinyl. Lay the frame components on a flat surface, place the cover in its sleeve holder and position the record in its slot. Check that both sit straight and the mount doesn’t obscure important artwork. Once assembled, use the frame’s fitted hanging hardware and choose wall fixings suited to the surface.

Do vinyl record frames need acid-free backing and archival materials?

Acid-free backing and matting are sensible choices for displaying a record and sleeve, particularly if you want to avoid adhesive contact. Some DIY vinyl record frames use conservation-grade boards. Check the materials in each layer, including the mount and backing, and keep the sleeve and disc in their holders rather than fixing them directly to the board.
Posted on

Conservation Framing for Delicate Art: A Complete Preservation Guide

Conservation Framing for Delicate Art: A Complete Preservation Guide

That beautiful watercolour from your travels, the delicate antique print you inherited-each holds a story you want to preserve forever. But behind a standard frame, a silent threat can cause cherished colours to fade and paper to turn brittle and yellow. This is where the true craftsmanship of conservation framing for delicate art provides an essential shield. It’s more than just a beautiful border; it’s a bespoke preservation system designed to safeguard your irreplaceable pieces for the long term, ensuring they are protected for generations to come.

Feeling confused by terms like ‘archival’ or wondering if the extra cost is justified? You’re not alone. In this complete preservation guide, we demystify the entire process. We’ll walk you through the premium, acid-free materials and specialist techniques that protect your art from damage and decay. By the end, you will understand the value of professional conservation and feel confident in choosing the perfect, permanent protection to keep your artwork as vibrant as the day you first fell in love with it.

What is Conservation Framing (and Why Delicate Art Needs It Most)?

When you choose a frame for a treasured piece of art, you’re doing more than just selecting a beautiful border. You are appointing a guardian for that piece. A standard frame might look the part, but true preservation goes much deeper. This is where conservation framing comes in-a bespoke approach that uses specialised materials and techniques to actively protect your art from the environmental factors that cause fading, discolouration, and decay.

The ultimate goal is to preserve your artwork in its original, pristine state for generations to come. It’s a science and an art form dedicated to creating a safe, stable micro-environment for irreplaceable items, whether they hold immense financial or sentimental value. To see these principles in action, the video below offers a great visual explanation.

Defining ‘Delicate Art’: What Needs Extra Protection?

While any artwork benefits from proper framing, some pieces are particularly vulnerable to damage over time. The professional practice of conservation framing for delicate art is essential for items that are inherently fragile or irreplaceable. This includes:

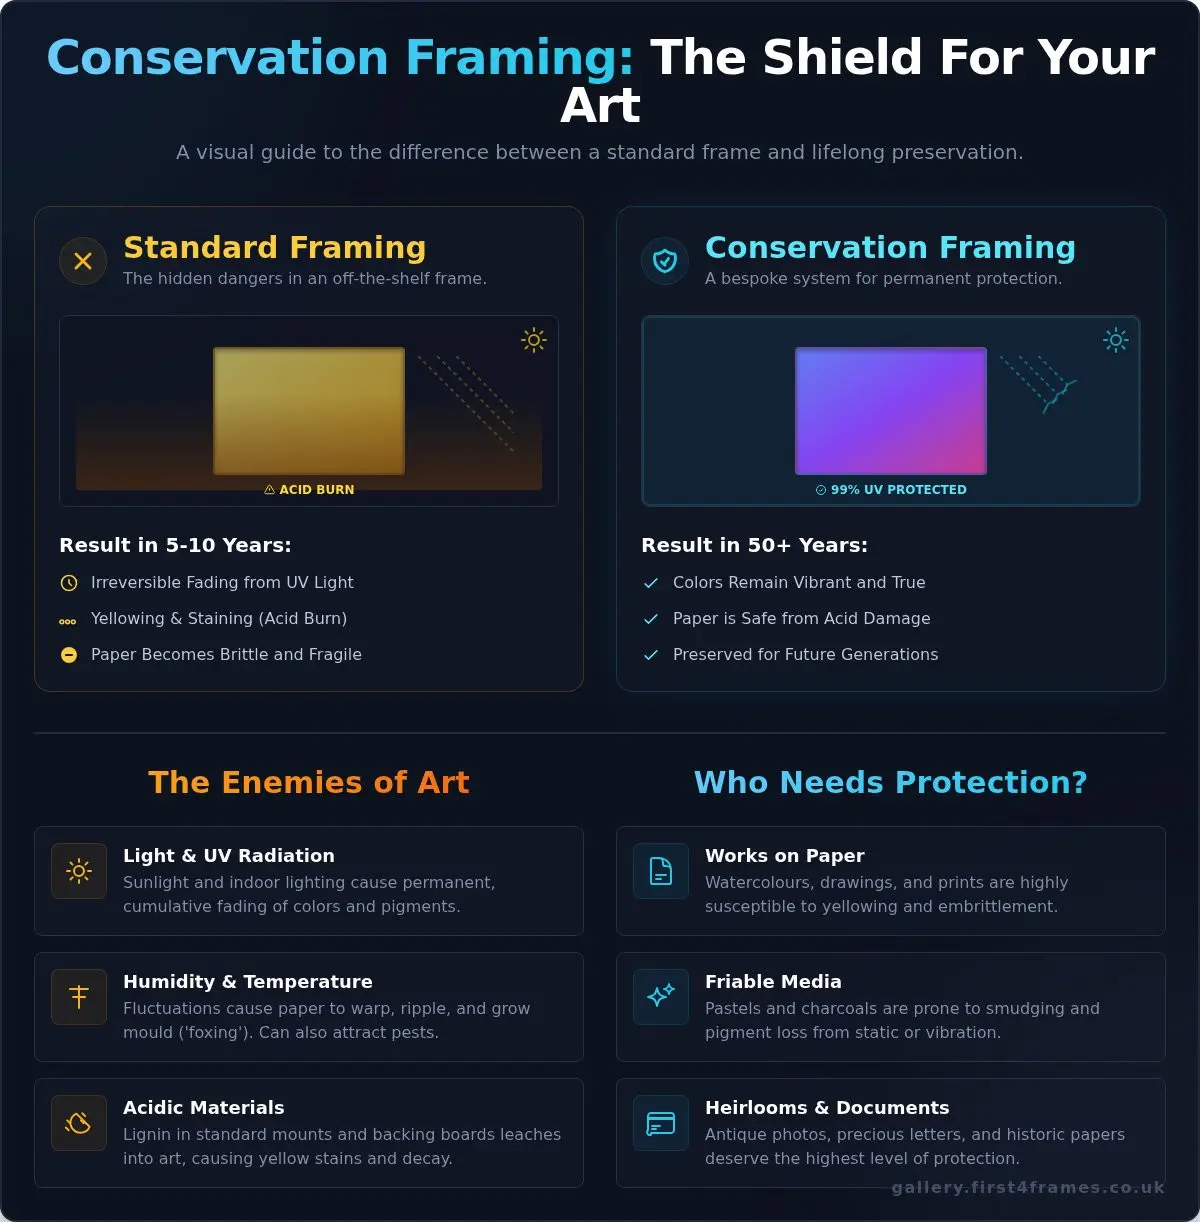
  • Works on paper: Watercolours, drawings, and fine art prints can easily yellow or become brittle when exposed to acid and light.
  • Friable media: Pastels and charcoals are prone to smudging and pigment loss from vibration or static electricity.
  • Heirloom items: Antique photographs, precious letters, and historic documents contain memories that deserve the highest level of protection.
  • Unique textiles: Needlework, silks, and antique fabrics can be damaged by moisture, pests, and acidic materials.

Standard vs. Conservation Framing: A Quick Comparison

The difference between a standard, off-the-shelf frame and a conservation-grade one is what happens to your art in 5, 10, or 50 years. Standard frames often use backing boards and mounts made from wood pulp, which contains acid that leaches into the artwork, causing permanent yellowing. In contrast, conservation framing uses 100% acid-free, archival matting and backing boards. Furthermore, standard glass offers little to no protection from ultraviolet (UV) light, a primary cause of fading. Conservation glazing, however, blocks up to 99% of harmful UV rays, keeping colours as vibrant as the day they were created.

The Enemies of Art: Identifying Risks to Your Delicate Pieces

Your home is a sanctuary for you, but it can be a surprisingly hazardous place for your treasured artwork. Everyday elements, often unseen, are constantly at work, posing a significant threat to delicate pieces like watercolours, prints, and photographs. Over time, these forces can cause irreversible fading, discolouration, and physical decay. Understanding these enemies is the first step towards true preservation, highlighting why professional conservation framing for delicate art is not a luxury, but a necessity. A bespoke conservation frame acts as a premium shield, meticulously designed to protect your art from these hidden dangers for generations to come.

The Invisible Damage of Light

Light is perhaps the most relentless enemy of art. The ultraviolet (UV) radiation in sunlight is the primary cause of fading, breaking down the chemical bonds in pigments and paper. But it’s not just the sun; common household fluorescent and halogen lights also emit damaging UV rays that contribute to the slow bleaching of your artwork. This damage is cumulative and tragically permanent-once colours have faded, they cannot be restored. This is why a piece can lose its vibrancy even when not placed in a direct sunbeam, as reflected light still carries harmful UV radiation.

Humidity, Temperature, and Pests

The atmosphere in your home is in constant flux, and your art feels every change. Shifting humidity levels cause paper to expand and contract, leading to unsightly rippling and warping within the frame. Consistently high moisture creates a perfect breeding ground for mould and mildew, which appear as small brown or black spots known as ‘foxing’. Extreme temperature swings can make paper, canvas, and inks brittle and prone to cracking. A poorly sealed frame also offers an open invitation to tiny pests like thunderbugs or silverfish, who can get trapped behind the glass and cause significant damage.

The Hidden Threat: Acidic Materials

One of the most insidious threats comes from within a standard, off-the-shelf frame itself. Many mount boards and backing papers are made from wood pulp that contains an acidic compound called lignin. Over years, this acid ‘leaches’ out of the materials and into your artwork, causing the tell-tale yellow or brown stains often called ‘acid burn’. This is a core issue addressed by professional conservation framing for art on paper, which mandates the use of 100% acid-free, archival-quality materials. This acid not only discolours but actively breaks down the paper fibres, leaving your precious art weak, brittle, and fragile.

The Pillars of Protection: Anatomy of a Conservation Frame

A common misconception is that a frame is just a decorative border. In reality, professional conservation framing for delicate art creates a complete, sealed package of protective materials. Think of it less as a simple holder and more as a bespoke preservation system. Each component has a specific job, working in harmony to shield your artwork from the elements that cause fading and decay. These premium materials all meet the high standards set by organisations like the Fine Art Trade Guild, ensuring your art receives the best possible care. Let’s break down the four key elements that form this protective shield.

UV-Filtering Glazing: Your Art’s Sunscreen

The first line of defence is specialist glass or acrylic designed to block up to 99% of harmful ultraviolet (UV) rays-the primary cause of fading. Your choice of glazing impacts both protection and viewing clarity.

  • Conservation Clear Glass: The industry standard, offering excellent UV filtering for most situations.
  • Museum Glass: The ultimate choice, combining 99% UV protection with incredible anti-reflective properties for a crystal-clear view of your art.
  • Conservation Acrylic (Perspex): A lighter and shatter-resistant alternative, perfect for very large pieces or artwork that may be shipped or hung in high-traffic areas.

Acid-Free Mountboard: A Safe Barrier

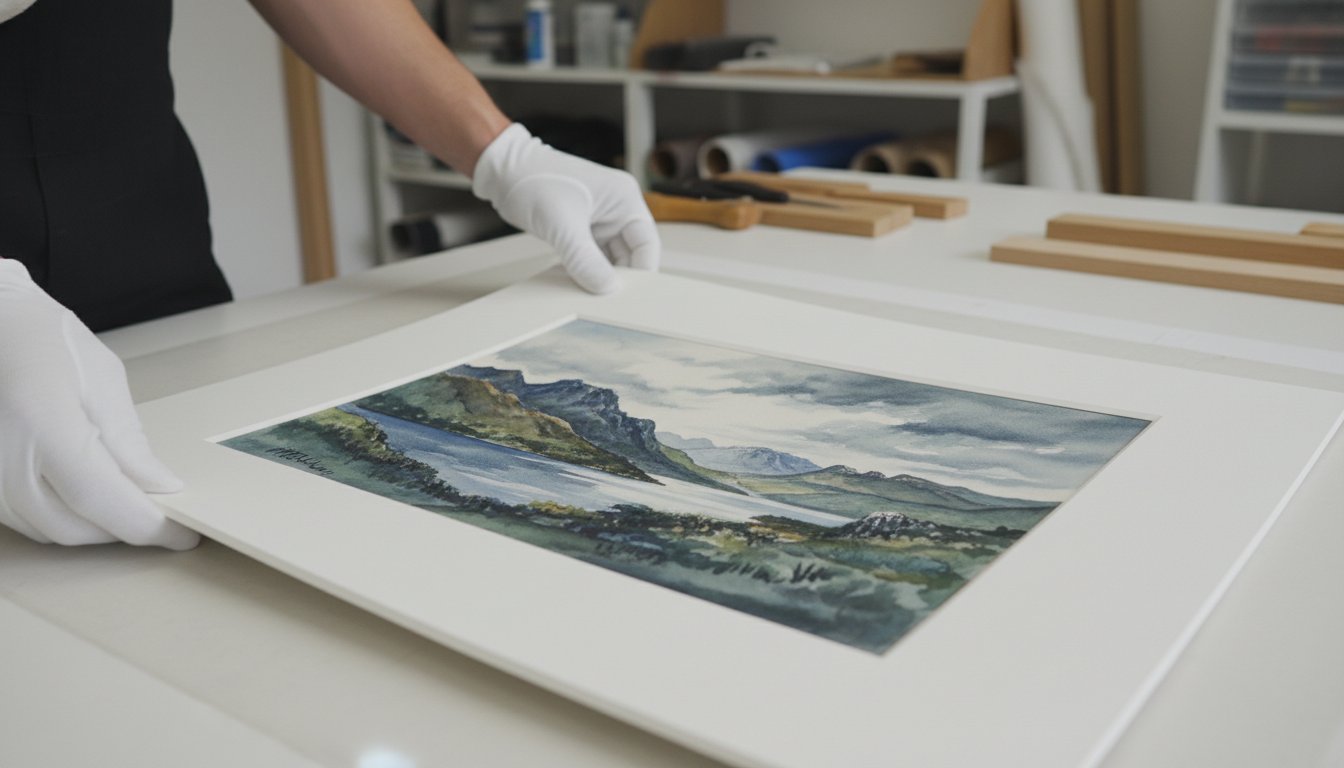
The mountboard, often called a mat, does more than just create a beautiful visual border. Its most critical function is to create a small air gap, preventing the artwork from touching the glazing where condensation could form. Conservation-grade mountboards are made from 100% cotton rag or purified alpha-cellulose. They are completely acid-free and lignin-free, which stops the yellowing and “acid burn” that can permanently damage delicate paper over time.

Archival Backing and Mounting

How the artwork is secured within the frame is crucial. Instead of using damaging glues or tapes, we “hinge” the art to the acid-free mountboard using a special Japanese paper and reversible wheat-starch paste. This method, detailed in the professional NEDCC guide to matting and framing, allows the paper to naturally expand and contract with temperature and humidity changes, preventing buckling. The package is completed with a sturdy, acid-free backing board that offers structural support and protects the art from behind.

Sealing the Package for Final Protection

The final, vital step in conservation framing for delicate art is to seal the entire “sandwich” of glazing, mount, artwork, and backing board. A special framing tape is applied around the edges, creating a barrier that prevents dust, airborne pollutants, moisture, and even insects from entering the frame. This step creates a stable micro-environment for the artwork, slowing the effects of ageing. It’s a hallmark of true conservation craftsmanship and a detail often overlooked in standard, ready-made frames.

Conservation Framing for Delicate Art: A Complete Preservation Guide

Framing Specific Types of Delicate Art: Tailored Techniques

When it comes to conservation framing for delicate art, a bespoke approach is not just a luxury-it’s a necessity. Different artistic media have unique vulnerabilities and requirements for both preservation and presentation. A professional framer’s expertise lies in adapting their techniques to the specific piece, ensuring its physical safety and aesthetic integrity for years to come. From the paper’s absorbency to the fragility of surface pigments, every detail informs the framing process.

Works on Paper: Watercolours, Prints, and Drawings

Art on paper is particularly susceptible to environmental damage. To secure it safely within the frame, we use non-invasive, museum-standard methods. The key is reversibility-nothing should be done that cannot be undone without harming the artwork. Best practices include:

  • Using ‘T-Hinges’: The artwork is attached to the mountboard using small, acid-free paper hinges and a conservation-grade wheat paste. This allows the paper to expand and contract naturally with changes in humidity.
  • Avoiding Permanent Adhesives: Valuable paper art should never be permanently glued or dry-mounted, as this can cause irreversible damage and significantly devalue the piece.
  • Creating Space: A high-quality, acid-free mountboard is essential. It creates a crucial air gap, preventing the paper from making direct contact with the glazing, which could lead to moisture transfer and mould growth.

Remember, premium Giclée prints are created with archival inks and paper, and they deserve the same level of professional care as an original watercolour or drawing.

Pastels, Charcoals, and Friable Media

Artwork created with pastels, charcoal, or other ‘friable’ (powdery) media presents a unique challenge: the pigment rests loosely on the surface and can be easily smudged or dislodged. The primary goal here is to prevent anything from touching the delicate surface. To achieve this, a framer will use spacers or a deep-bevel mount to create extra depth within the frame. This “safe zone” ensures the dusty media cannot transfer onto the inside of the glazing, keeping both the artwork and the view of it perfectly clean. Gentle and precise handling is, of course, absolutely paramount throughout the entire process.

Textiles and Needlework

Unlike paper, textiles require careful structural support to prevent gravity from causing sagging, stretching, and distortion over time. The best practice is to meticulously stitch the fabric onto a supportive, acid-free backing board. This method provides even tension across the entire piece without introducing harmful chemicals. Glues and adhesives are never used, as they can seep into the fibres, causing permanent stains and brittleness. For textiles, UV-filtering glazing is especially vital, as the organic and synthetic dyes used in threads are often highly susceptible to fading when exposed to light.

A trusted professional understands these nuances, ensuring your treasured piece is perfectly preserved and presented. You can see examples of our meticulous framing work in our online gallery.

Finding a Professional Framer You Can Trust

You’ve invested in beautiful art; the final step is entrusting it to a skilled professional. Choosing the right framer is just as critical as selecting the correct materials for the job. You aren’t just looking for a service; you’re seeking a partner in preservation. A passionate, experienced framer acts as a consultant, guiding you through the options to find the perfect bespoke solution that both protects and enhances your piece.

What to Look For in a Framing Studio

A true professional’s dedication is evident in their work and environment. Look for a clean, organised workshop and a welcoming consultation area. Ask to see a portfolio, paying close attention to work on items similar to yours. Membership in a respected professional body, like the UK’s Fine Art Trade Guild, is a strong indicator of commitment to high standards. Most importantly, a good framer will be happy to explain their process and material choices, demonstrating their expertise.

Key Questions to Ask Before You Commit

Don’t be afraid to ask detailed questions to ensure you’re confident in their approach. A trustworthy framer will welcome your interest. Here are a few key things to ask:

  • Do you use fully reversible mounting techniques? This ensures the art can be returned to its original state without damage.
  • Can you show me the specific conservation-grade materials you’ll use? They should be able to present the acid-free mountboard and backing.
  • What type of UV-filtering glazing do you recommend for my piece and why? Their answer will show an understanding of your art’s specific needs.
  • Can you provide a detailed, itemised quote? Transparency in pricing is a hallmark of a professional service.

Why Expertise Matters for Your Artwork

Ultimately, expertise is what separates an adequate frame from a truly protective one. An experienced framer understands the unique properties of different media-from the fragility of a watercolour wash to the delicate surface of a pastel. They can spot potential issues before they arise and engineer a frame that is not only beautiful but structurally sound for decades to come. This level of craftsmanship is the cornerstone of true conservation framing for delicate art.

Trust our 20+ years of expertise with your delicate art. We’re here to help you preserve your treasures for a lifetime.

Your Masterpiece Deserves a Masterful Defence

Your delicate artwork is more than just an image; it’s an irreplaceable piece of history, emotion, and craftsmanship. As we’ve explored, threats from UV light, humidity, and acidic materials can cause irreversible damage. The solution is not just a frame, but a complete protective system-a thoughtful combination of archival materials, from UV-filtering glazing to acid-free mounts, that work in harmony to preserve its beauty for generations.

Choosing the right partner for this crucial task is paramount. This is the very essence of professional conservation framing for delicate art. At First 4 Frames, we bring over 20 years of bespoke framing experience to every project. We use museum-quality, archival materials as standard and proudly uphold the rigorous conservation standards of the Fine Art Trade Guild, ensuring your piece is not just displayed, but truly protected.

Don’t leave the future of your art to chance. Become the custodian of its legacy and ensure its story can be shared for years to come. Protect your irreplaceable art. Get a bespoke conservation framing quote today.

Frequently Asked Questions About Conservation Framing

How much more does conservation framing cost compared to standard framing?

As a worthwhile investment in your art’s future, conservation framing typically costs more than standard options due to the premium, specialised materials used. Depending on the size of your piece and the specific choices you make, you can expect to invest anywhere from £40 to over £150 more than a basic frame. This price difference covers essential protective elements like UV-filtering glazing and acid-free, museum-grade mounts, which are vital for long-term preservation.

Can conservation framing reverse damage that has already occurred?

Unfortunately, conservation framing is a preventative measure, not a restorative one. It cannot reverse existing damage such as fading, discolouration, or ‘mat burn’ caused by acidic materials. However, its primary purpose is to halt further deterioration in its tracks. By creating a stable, protective environment, it effectively shields your artwork from the elements that cause harm, preserving it in its current state for decades to come. For existing damage, we recommend consulting a professional art restorer.

How long will the protection from a conservation frame last?

When crafted with professional care and premium materials, the protective benefits of a conservation frame are designed for the long haul. The UV-filtering properties of the glazing and the archival quality of the mounts and backing boards will safeguard your art for many decades, often 20 years or more. To maximise this lifespan, we always advise displaying your framed art away from direct sunlight and sources of extreme humidity, ensuring the beautiful piece remains protected for a generation.

Is ‘acid-free’ the same as ‘archival’ or ‘museum-quality’?

While these terms are related, they are not interchangeable. ‘Acid-free’ is the minimum standard, meaning the material has a neutral pH at the time of manufacture. However, ‘archival’ or ‘museum-quality’ represents a higher grade of preservation. These materials, such as 100% cotton rag matboards, are not only acid-free but also lignin-free. Lignin is a compound in wood pulp that can break down and produce acid over time, so its absence ensures the ultimate long-term protection for your art.

Do I really need conservation framing for a modern art print?

Absolutely. Even the highest quality modern prints, including fine art Giclée prints, are vulnerable to damage from UV light and environmental pollutants. The inks can fade and the paper can yellow if not properly protected. Opting for conservation framing for delicate art, including contemporary prints, is the best way to protect your investment. It ensures the colours remain vibrant and the paper stays pristine, allowing you to enjoy the spectacular piece exactly as the artist intended for years to come.

How should I clean the glass and frame without damaging the art?

Proper cleaning is simple and ensures no harm comes to your treasured artwork. Never spray cleaning fluid directly onto the glass, as it can seep under the edge of the frame and damage the mount or the art itself. Instead, lightly spray an ammonia-free glass cleaner onto a soft, lint-free microfibre cloth. Gently wipe the glass with the damp cloth. For the frame itself, a quick wipe with a separate dry, soft cloth is usually all that is needed to remove dust.