
Posted on

How to Join Frame Corners with Pins, Glue and Nails

How to Join Frame Corners with Pins, Glue and Nails

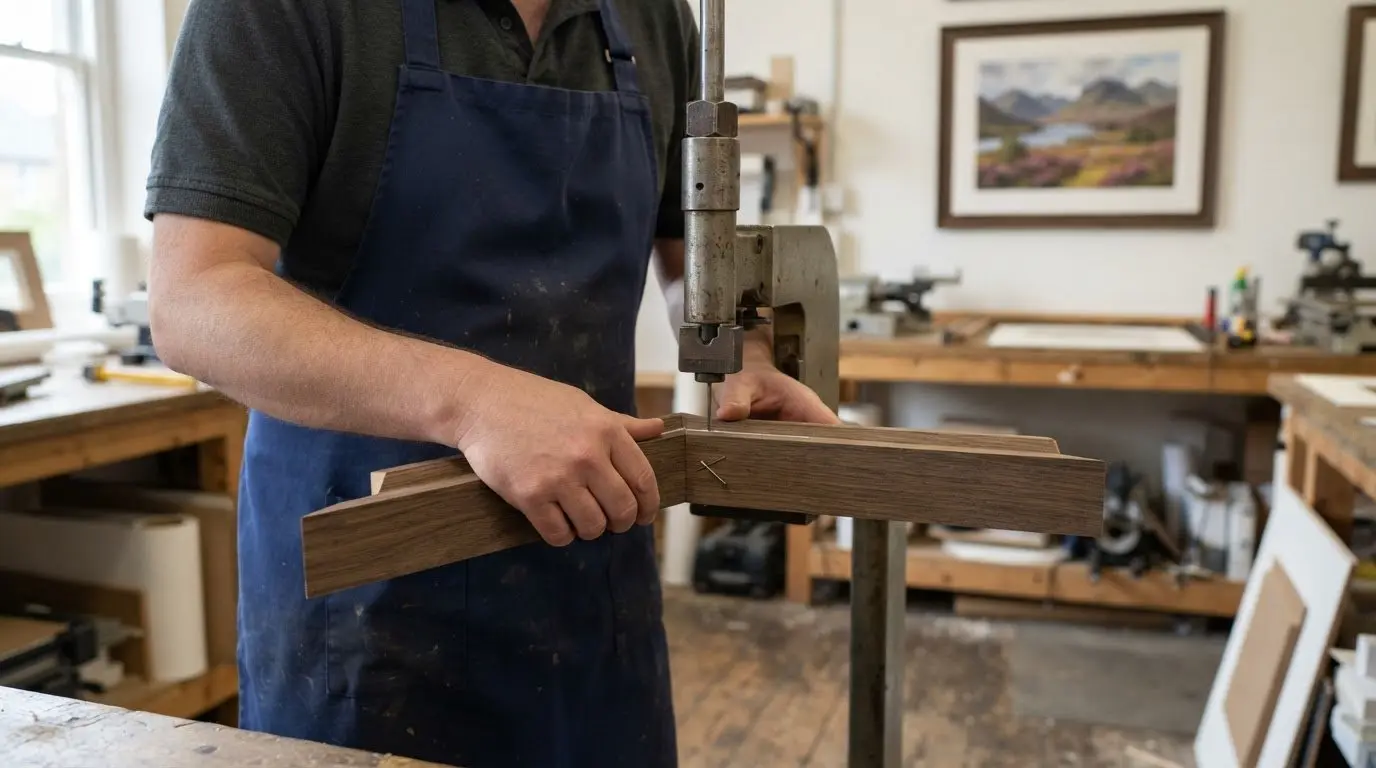
A neat mitre is only half the job; the way its corner is secured matters just as much. A picture frame is assembled from four mitred edges, with each 45-degree cut meeting its neighbour at a 90-degree corner. Understanding the different types of frame corner joins means knowing how glue, pins or nails can help hold those corners together.

It’s natural to focus on a frame’s finish, but the way its corners are joined also matters. The right method depends on the frame moulding and the tools used.

This guide explains how pins and glue reinforce an underpinned joint, how to assemble mitres carefully, and how cross-nailing can strengthen a corner. You’ll learn what each method does and why accurate cuts, close-fitting edges and secure fastening matter in a well-made frame.

Key Takeaways

  • Choose V-nails that suit the moulding, aiming for a pin depth of between two-thirds and three-quarters of its depth.
  • Use a strap clamp to hold the frame square while the glue sets, then inspect the mitres before adding fasteners.
  • Pre-drill hardwood before hand-nailing, and use a nail punch to finish driving a nail without marking the frame.
  • Clamp corners securely when cross-nailing, and angle the pins so they reinforce the joint rather than pull through it.

Frame joints: How are picture frames joined?

Picture frames are commonly made by joining four mitred lengths, with each 45-degree edge meeting its neighbour at a 90-degree corner. A reinforced mitre, combining adhesive and a mechanical fastener, is a standard professional approach; splines can add further reinforcement. No joint is strongest in every situation, because the moulding and accuracy of the fit matter. Cost and difficulty depend on the method: V-nails and glue need suitable tools, while cutting spline slots adds work.

  1. Cut Mitres to the Correct Angle

    Cut each end at 45 degrees so the two edges form a 90-degree corner. Use a mitre saw or a carefully set mitre guide, then bring the cut ends together and check that their faces meet without a visible gap. If the angles or lengths differ, the frame may sit out of square. Colour the cut mitre ends to match the finish; this can make small gaps or slight misalignment less noticeable.

  2. Join Corners with V Nails

    Apply PVA wood adhesive to the clean mitred faces, then press them together before inserting V-nails from underneath with an underpinner. The glue bonds the wood fibres, while the metal fastener holds the corner mechanically. V-nails commonly come in 7 mm, 10 mm, 12 mm and 15 mm heights. Choose a size that suits the moulding’s depth, rather than driving a fastener so far that it breaks through the front or back.

  3. Reinforce Corners with Wood Splines

    Cut a narrow slot across the joined mitre, then fit a wooden spline with adhesive. The spline bridges the corner and reinforces the joint, adding a mechanical connection to the glued faces. Use wood that matches the frame for a discreet finish, or choose a contrasting timber to make the join visible. Align the slot and spline accurately: a loose fit can weaken the joint, while a contrasting spline makes careful alignment part of the design.

  4. Compare Joint Strength, Cost, and Difficulty

    Choose a method to suit the moulding and finish. A glued mitre held with V-nails is a practical reinforced joint; adding a spline provides another form of reinforcement. Neither method is automatically strongest for every frame, as the fit, materials and assembly all affect the result. V-nailing requires an underpinner, while splines need accurately cut slots. Compare the tools and preparation involved rather than assuming one method is always cheaper or easier.

Underpinning with v-shaped pins and glue

To repair a loose corner, carefully separate the joint and remove failing adhesive. Reapply PVA wood glue and secure the joint with suitable V-nails. If the moulding is split or the mitre no longer fits, adding glue alone may not restore a sound joint.

  1. Prepare the mitred faces. Check that both edges meet cleanly and sit flush. Remove loose glue and dust without damaging the frame’s finish. Underpinning suits hard and soft woods, but clean, well-fitting faces help the adhesive and pins secure the corner.
  2. Apply PVA wood adhesive. Spread a thin, even layer across the cut faces, covering the contact area without flooding the rebate. Press the mitres together and align the edges. The adhesive bonds the wood fibres, while the V-nail provides mechanical reinforcement.
  3. Select a suitable V-nail. Choose a pin that reaches between two-thirds and three-quarters of the moulding’s depth. V-nails commonly come in 7 mm, 10 mm, 12 mm and 15 mm heights. Match the pin to the moulding so it secures the joint without breaking through its surface.
  4. Load and position the underpinner. Set the joined corner square in the machine, then insert the V-nail from underneath. On an Alfamacchine U200 underpinner, place the nails with their adhesive side facing up. Keep the moulding steady as the machine drives each pin into the mitre.
  5. Reinforce the corner carefully. Place pins where the moulding is deep enough to hold them, away from the rebate and finished front. For a hand repair, clamp the aligned corner while the adhesive sets, then use a suitable frame fastener. Don’t force a bent pin into the wood.
  6. Check the finished join. Inspect the front and back for a flush fit, movement or adhesive residue. A repaired corner should hold firmly without opening a gap when handled gently. For examples of framed artwork, browse the framed art gallery.

How to Join Frame Corners with Pins, Glue and Nails

Avoiding gaps during assembly

  1. Inspect each mitre before adding adhesive. Bring the cut ends together and check that the faces meet along their full length. A small angle error can leave a wedge-shaped gap, while unequal frame lengths can pull the assembly out of square. Correct the cut before joining instead of relying on filler to disguise a poor fit.
  2. Dry-fit the four sides. Arrange the frame on a flat bench and bring the corners together without glue. Check that the outer edges align and the picture opening stays square. A strap clamp can hold the frame temporarily, making it easier to inspect each mitre before fastening.
  3. Clamp the frame as you apply glue. A well-cut mitre lets a web or strap clamp draw the four sides square as you apply adhesive. Tighten the clamp evenly, then inspect the corners again. Too much pressure on a poorly fitted joint can shift the frame instead of closing the gap.
  4. Let the adhesive set before nailing. Keep the frame clamped while the glue dries. Driving nails into a freshly glued corner can push the mitres apart and create gaps. Once the joint has set, nail the frame while keeping its corners aligned.
  5. Pre-drill hardwood before hand-nailing. Hardwood can resist a nail, causing it to bend or push the mitre out of position. A pilot hole helps guide the nail into the joint. Use a nail punch to seat it fully without striking or marking the frame’s finished surface.
  6. Fill only a tight, secured joint. You can fill a small remaining gap if the mitre fits well and has a mechanical fastener. Filler won’t make a loose corner sound: correct the fit and secure the joint first, then finish the surface to suit the frame.
  7. Take extra care with finished moulding. It can be difficult to join already-finished lengths without visible flaws, because the cut edges may reveal an unfinished line. Inspect the corners in good light before assembly, and don’t use colour or filler as a substitute for accurate cuts and careful alignment.

Cross-nailing frame corners

  1. Clamp the corner before driving nails. Hold the two frame pieces firmly together to keep the mitred faces aligned. A clamp can help keep the frame pieces aligned while you nail the corner. Check that the outer edges remain flush, and keep the frame steady throughout fastening.
  2. Choose thin steel nails for the moulding. Thin steel nails are advisable for frame corners rather than iron nails. Choose a length that secures the joint without emerging through the finished face or inner rebate. Headless pinner pins can give a discreet finish, but they resist pulling through less effectively than stronger mechanical fasteners.
  3. Cross-nail headless pins to improve hold. Drive the pins at opposing angles through the corner so their paths cross inside the joined pieces. This can help resist pull-through, a particular weakness of headless pinners. Keep the pins within the wood and away from the picture opening: an exposed tip can damage the frame or create a hazard.
  4. Pre-drill hardwood before hand-nailing. A pilot hole guides the nail and reduces the chance of it bending or pushing the mitre apart. A little oil or wax on the nail tip can also reduce bending as it enters the wood. Use a nail punch to seat the head fully without striking the finished surface.
  5. Check nail placement and the joint. Two nails along the horizontal sides can look neat, but this is the least secure arrangement among the options described. Keep the clamp on while checking the corner for movement, gaps and nail heads that sit proud. The joint should stay aligned when you release the clamp.
  6. Consider the finished frame as a whole. Cross-nailing is a fastening method, not a way to correct poorly fitting mitres. Accurate cuts, a held corner and carefully placed pins work together. To explore examples of finished picture frames, browse the framed art gallery.

First4Frames Gallery offers Ready-to-Hang Framed Art, Custom Picture Framing and Giclée Fine Art Prints. For Online picture framing, choose your frame online and design your framed artwork as custom framed art prints or bespoke framed wall art. Its art print framing service brings the print and frame together, whether you’re looking for framed wall art or a print to complement your space.

Explore fine art, coastal wall art, landscape wall art and Scottish landscape art, alongside contemporary art prints, photography prints, and work by best-selling artists and famous artists. If you use a wall art visualiser, you can visualise art on your wall and see artwork before you buy. To discuss framing or artwork for your space, contact First4Frames Gallery.

Give Your Artwork a Frame That Feels Right

Understanding the different types of frame corner joins helps you recognise the care that goes into a finished frame. Then consider how the artwork’s colours, scale and character will look in your room. A thoughtfully framed piece can feel at home in its surroundings while preserving the details that drew you to it.

If you’re ready to bring artwork into your space, explore options that suit your taste and the atmosphere you want to create. First4Frames Gallery offers pieces and framing choices to help make that vision yours, whether you’re choosing art for a quiet corner or a more prominent wall.

Explore framed artwork and take the next step towards a display that feels distinctly your own.

Frequently Asked Questions

What are the main types of frame corner joints?

Common frame corner joints include mitre, butt, half-lap, spline, dovetail and mortise-and-tenon joints. A mitre creates a clean angled meeting line, while a butt joint brings square-cut ends together. Half-laps overlap, and splines reinforce mitres with an inserted strip. Dovetail and mortise-and-tenon joints use shaped, interlocking parts, creating a more visible feature or a traditional look.

How do mitre, butt, dovetail and mortise-and-tenon corner joints differ?

A mitre joins angled ends, keeping the frame’s profile continuous around the corner. A butt joint is simpler: one square-cut end meets another, leaving the end grain visible. Dovetail joints use flared, interlocking shapes. A mortise-and-tenon joint fits a projecting tenon into a matching opening, or mortise. These joinery choices affect appearance, preparation and how the pieces connect.

Which corner joints are best for wooden picture frames?

For a traditional picture frame, a glued, mechanically reinforced mitre is a practical choice because it preserves a neat, continuous profile. A spline can add reinforcement and create a decorative contrast. The best method depends on the moulding’s shape, wood and intended finish. For example, a broad, flat profile can accommodate reinforcing fasteners more readily than a narrow or unusually shaped moulding.

How are mitred frame corners joined and reinforced?

Join mitred corners by bringing the angled faces together with adhesive, then adding mechanical reinforcement suited to the moulding. Drive V-nails from beneath with an underpinner, or use hand-driven nails or splines. Keep the profile aligned as you fasten it. For a delicate finish, position fasteners away from the visible front and the frame’s inner opening.

How do you make a splined mitre joint?

First assemble the mitred corner, then cut a narrow slot across the joint using a controlled saw or router setup. Make a matching wooden spline, check its fit, then apply adhesive and insert it. Once the glue sets, trim the spline flush and sand carefully. Contrasting timber can turn the reinforcement into a deliberate visual detail.

What tools are needed to cut accurate frame corner joints?

For mitres, use a mitre saw or a mitre guide with a hand saw, plus a measuring tool and square to check lengths and alignment. A stable bench helps hold the moulding steady during cutting. Joining may require a strap clamp and underpinner. Splined joints also need a saw or router that can cut a consistent slot across the mitre.
Posted on

How to Spot a Badly Made Picture Frame: The 2026 Quality Checklist

How to Spot a Badly Made Picture Frame: The 2026 Quality Checklist

What if that bargain frame you bought for your favorite Scottish landscape art is actually destroying it from the inside out? It’s a common worry for collectors who fear that a low-quality border might warp over time or ruin an expensive Giclée print. Knowing how to spot a badly made picture frame is essential for anyone looking to preserve fine art or photography prints for a lifetime. You deserve to feel certain that your custom framed art prints will look as professional in a decade as they do the day they arrive at your door.

We understand the frustration of receiving a wobbly frame or struggling with hazy glazing that hides the detail of your contemporary art prints. This 2026 checklist provides the red flags you need to watch for when using an online picture framing service. You’ll learn why we insist on 2mm float glass for superior clarity and how a wall art visualiser helps you see artwork before you buy. Whether you are framing coastal wall art or works by famous artists, this guide ensures you can design your framed artwork with the confidence of a professional artisan. We’ll show you why bespoke framed wall art is the only way to truly protect your investment.

Key Takeaways

  • Understand why structural flaws are more than just cosmetic and how a poor frame can actually damage your Giclée prints over time.
  • Master the “Mitre Joint Test” to learn how to spot a badly made picture frame by identifying gaps and uneven corners that signal weak craftsmanship.
  • Discover why 2mm float glass is the gold standard for clarity, offering a professional finish that hazy, budget perspex alternatives simply cannot provide.
  • Learn how to use a wall art visualiser to see artwork before you buy, ensuring your bespoke framed wall art perfectly complements your space.
  • Identify the differences between solid wood mouldings and cheap MDF substitutes to ensure your fine art prints are held in a frame built to last.

The Anatomy of Quality: Why a Badly Made Frame Matters

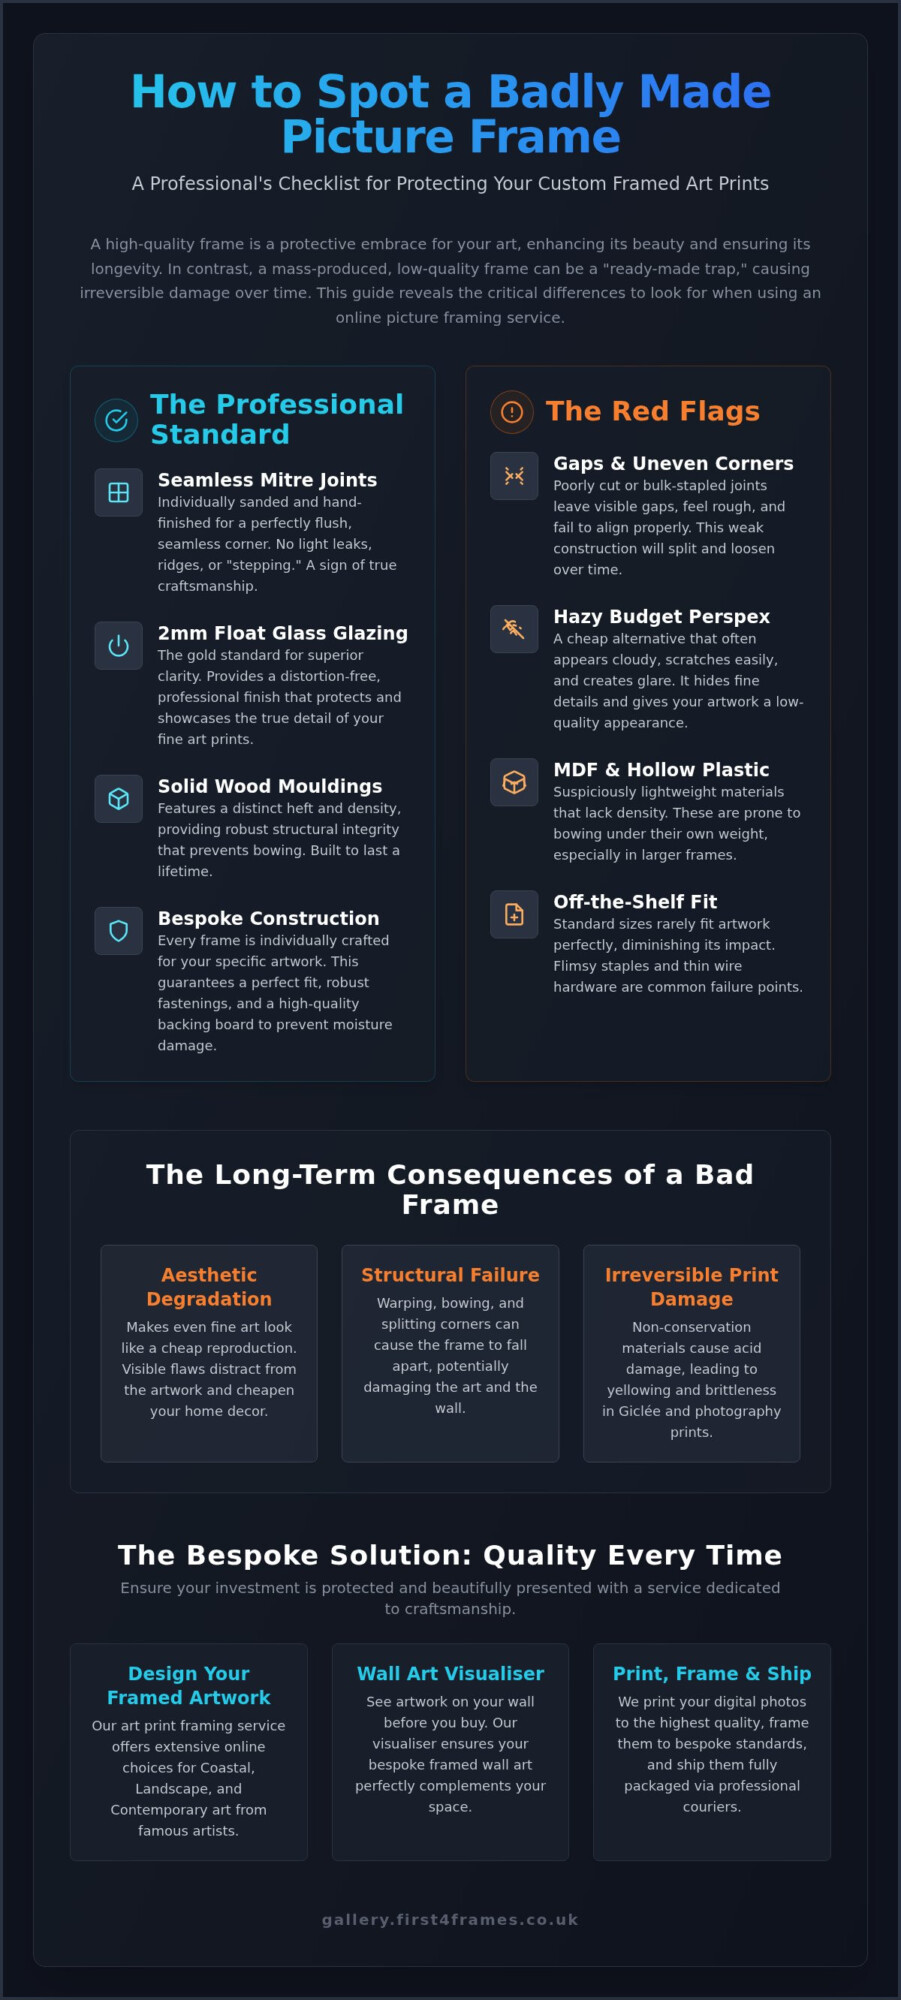
A frame is more than just a border; it is a protective embrace for your art. When you choose bespoke framed wall art, you’re investing in a hand-crafted shield designed to last. In contrast, mass-produced “ready-made traps” often rely on inferior components that fail to support the weight or dimensions of your piece. Understanding The Anatomy of a Picture Frame helps you see that every layer, from the backing board to the glazing, must work in harmony. If you’re wondering how to spot a badly made picture frame, start by looking at the relationship between the frame and the artwork. A standard, off-the-shelf product rarely accounts for the specific needs of unique pieces like Scottish landscape art, leading to an ill-fitting appearance that diminishes the art’s impact.

The visual consequences of a poor frame are immediate. It acts like a heavy anchor, dragging down the perceived value of your entire collection. When you buy a cheap, mass-produced border, you risk warping and moisture damage that can ruin the integrity of the piece over time. These structural failures aren’t just ugly; they’re dangerous for the longevity of your investment.

The Aesthetic Impact of Poor Craftsmanship

A low-quality frame can make even expensive fine art look like a cheap reproduction. For contemporary art prints, clarity and proportion are essential to ensure the frame enhances the composition rather than distracting with visible gaps or rough edges. Professional craftsmanship ensures that the frame complements the artwork’s scale, creating a finish that makes your home decor look intentional and curated.

The Preservation Risk

By 2026, many collectors have discovered that using non-conservation materials leads to irreversible acid damage, causing prints to yellow and brittle over time. You can explore our online gallery to see how quality framing preserves value and keeps your collection pristine for years to come. Learning how to spot a badly made picture frame is the first step in becoming a true guardian of your art.

Construction Red Flags: A Checklist for Structural Integrity

Structural integrity is the backbone of any piece of bespoke framed wall art. If the foundation is weak, the aesthetic appeal will eventually crumble. When you choose your frame online, it’s vital to look past the surface finish. Cheap frames often hide their flaws behind thin veneers or clever photography. Learning how to spot a badly made picture frame requires a keen eye for the ‘hidden’ components that mass-produced competitors ignore.

Inspecting the Mitre Joints

The corners, or mitre joints, are where a frame’s quality is most visible. For those using an online picture framing service, follow this 3-step check once your piece arrives:

  • Check for light leaks: Hold the corner up to a bright light. If you see even a sliver of light passing through the join, the cut is inaccurate.
  • Feel for ridges: Run your finger over the join. It should be perfectly flush. Any jagged edges indicate a lack of hand-finishing.
  • Look for “stepping”: The two pieces of moulding must meet at the exact same height. If one side is higher, the frame will look lopsided on your wall.

Hand-finished corners are individually sanded and joined to ensure a seamless bond. This process is far superior to mass-produced joins that are often just stapled in bulk, leaving them vulnerable to splitting as the wood naturally breathes and reacts to your home environment.

Weight and Balance

High-quality moulding has a distinct heft. If a large frame feels suspiciously light, it’s likely hollow plastic or low-density MDF rather than solid wood. This lack of density is a major red flag; it often leads to bowing, especially when protecting larger photography prints. Sturdy hanging hardware is equally important. Flimsy staples or thin wire can’t support a professional build. We ensure every frame is individually crafted with robust fastenings and high-quality backing boards to prevent moisture damage. You can visualise art on your wall through our gallery to see how these substantial materials create a premium look that lasts a lifetime.

How to Spot a Badly Made Picture Frame: The 2026 Quality Checklist

Glazing and Mounting: Spotting the Cheap Alternatives

Glazing serves as the protective shield for your artwork, yet it is often where budget manufacturers cut corners. If you are learning how to spot a badly made picture frame, pay close attention to the clarity of the surface. Many competitors in the online picture framing market use thin perspex or cheap acrylic to save on shipping costs. While these materials are lightweight, they often possess a distinct haze that dulls the colors of vibrant coastal wall art or fine art prints. Over time, low-grade plastic glazing is prone to yellowing and scratching, which can permanently obscure the details of your collection.

In contrast, we use 2mm float glass for our bespoke framed wall art. This professional standard provides superior fidelity, ensuring that the intricate textures of Scottish landscape art or contemporary art prints remain sharp and true to life. It doesn’t warp or cloud; it acts as a silent guardian for your art. Our logistics process reflects this commitment to quality. Every order is fully packaged to prevent damage and shipped via professional couriers to ensure your custom framed art prints arrive in pristine condition.

Clarity and Glare

The visual difference between professional 2mm float glass and standard discount-store glazing is stark. Cheap glazing often creates distracting reflections or a slight grey tint that flattens the image. When you choose your frame online, you should demand materials that enhance rather than hide your art. Ensuring the glazing offers high clarity is essential for maintaining the visual impact of your landscape wall art or contemporary pieces.

Mount Board Quality

A mount should draw the eye inward, not distract with ragged edges. Badly made mounts are often mass-cut from acidic wood pulp boards. You can spot these by looking at the bevel. If the inner edge looks yellow or brown, it is likely leaching acid into your photography prints. True conservation-grade mounts remain pure white at the core. When you use our art print framing service, every mount is precision-cut with a crisp, clean bevel. You can use our wall art visualiser to see artwork before you buy, allowing you to design your framed artwork and visualise art on your wall with absolute precision. Whether you are framing fine art by best-selling artists or contemporary art prints by famous artists, our process remains the same: hand-crafted quality that lasts a lifetime. Explore our collection today to start your bespoke framing journey.

The Bespoke Solution: How to Ensure Quality Every Time

Once you understand how to spot a badly made picture frame, the limitations of high-street “off-the-shelf” options become clear. Mass-produced frames are built for speed and low cost, often sacrificing the structural integrity and archival safety your art requires. Choosing to work with a specialist artisan ensures that every component is tailored to your specific piece. When you visualise art on your wall using modern digital tools, you remove the guesswork that often leads to sizing errors and aesthetic disappointment.

Quality doesn’t end at the workshop bench. The logistical process is a vital part of the professional service we provide. Unlike budget retailers who may use flimsy mailers, we ensure every finished piece is fully packaged to prevent damage during transit. By using professional couriers, we guarantee that your bespoke framed wall art arrives ready to hang, maintaining the high standards of our Falkirk workshop from our hands to your home.

Designing Your Framed Artwork Online

Our art print framing service is designed to be a collaborative journey. You don’t have to be an expert to create something beautiful. By using our wall art visualiser, you can experiment with different mouldings and mount widths to see exactly how they complement specific styles like Scottish landscape art or coastal wall art. This interactive experience allows you to see artwork before you buy, giving you the confidence that the final product will perfectly match your interior decor.

The First4Frames Guarantee

Every piece of bespoke framed wall art we produce is individually crafted for each order. We take immense pride in our traditional craftsmanship, using only premium materials like 2mm float glass for superior clarity. This dedicated approach ensures your fine art prints and photography prints are protected for a lifetime. If you have a unique project or require a specific size not listed online, please contact us to discuss your custom framing options. We are here to help you turn your creative vision into a professional reality.

Elevate Your Art with Professional Craftsmanship

You now have the essential checklist for how to spot a badly made picture frame. By focusing on structural integrity and the superior clarity of 2mm float glass, you can protect your investment from the risks of warping or acid damage. A frame is more than a utility; it’s a partner to your artwork that should enhance its beauty while ensuring it stays in pristine condition for years to come. Choosing bespoke quality means you’re no longer guessing about the safety of your favorite prints.

We take pride in every piece hand-crafted in our Falkirk workshop, a standard trusted by best-selling Scottish artists. Your art is safe with us, as every order is expertly packaged for damage-free UK shipping via professional couriers. It’s time to stop settling for “good enough” and start choosing quality that reflects your passion for art. Whether you are framing a family photograph or a limited edition print, the right construction makes all the difference.

Design your framed artwork today with our online visualiser to see your vision come to life. We look forward to crafting a bespoke home for your favorite prints that you’ll be proud to display for a lifetime.

Frequently Asked Questions

How can I tell if a picture frame is made of real wood or MDF?

You can identify real wood by looking for natural grain patterns and variations in the surface texture. MDF is a dense, engineered material that usually feels heavier than natural pine but lacks the organic character of solid timber. If the back of the moulding is visible, MDF looks like a uniform, brownish compressed board, while real wood shows distinct fibers or growth rings. Our bespoke frames always use high-quality materials to ensure your art is supported by a solid foundation.

Is perspex or glass better for framing fine art prints?

2mm float glass is the professional standard for fine art because it offers superior clarity and doesn’t cloud over time. While many budget providers use perspex to reduce shipping costs, it often has a distinct haze that dulls the colors of your contemporary art prints. Glass provides a crisp, flat surface that lets the true vibrance of your Giclée prints shine through without the static or scratching common with plastic alternatives.

What causes the corners of a picture frame to separate over time?

Corner separation usually happens because of poor mitre joinery or the use of cheap staples instead of professional wood glue. This is a common sign of how to spot a badly made picture frame. When mass-produced frames are exposed to natural changes in home temperature and humidity, the weak joints expand and contract. This eventually creates visible gaps or “light leaks” that compromise the structural integrity of your bespoke framed wall art.

Can a badly made frame actually damage my digital photography prints?

Yes, a low-quality frame can cause irreversible damage to your photography prints through acid leaching and moisture trapping. If the backing board or mount isn’t conservation-grade, chemicals can migrate into the paper, causing brown spots known as foxing. Additionally, if the frame doesn’t provide enough space between the glass and the print, the ink can stick to the glazing. This makes it impossible to remove the artwork without tearing the image.

Why does my framed art look hazy or yellowed after a few years?

Hazy or yellowed art is often the result of using low-grade acrylic glazing and non-conservation mount boards. Cheap plastic glazing reacts to sunlight, developing a cloudy film that obscures your Scottish landscape art. Yellowing edges usually indicate that the mount board is made of acidic wood pulp rather than alpha-cellulose or cotton. Choosing an expert art print framing service ensures you use materials designed to stay bright and clear for a lifetime.