Posted on

10 Common Picture Framing Mistakes That Can Ruin Your Artwork

10 Common Picture Framing Mistakes That Can Ruin Your Artwork

That beautiful print you finally bought, the family photograph you cherish, or the original artwork you invested in – these pieces deserve more than just a frame; they deserve the perfect one. Yet, navigating the world of mounts, glass types, and materials can feel overwhelming. It’s easy to make common picture framing mistakes to avoid that could, at best, fail to do your art justice, and at worst, cause costly and irreversible damage over time. Don’t let uncertainty prevent you from creating a stunning display.

As passionate experts in bespoke craftsmanship, we’re here to guide you. This article will walk you through the ten most common pitfalls, ensuring you can confidently choose the right elements for your piece. You’ll learn how to protect your artwork from fading, achieve a spectacular, gallery-quality finish in your own home, and understand exactly when it’s worth investing in a professional service. Let’s ensure your art is beautifully and safely displayed for a lifetime.

Mistake #1: Ignoring Conservation-Grade Materials

One of the most significant picture framing mistakes to avoid is viewing a frame as purely decorative. While a beautiful frame enhances your artwork and complements your décor, its most crucial role is preservation. A well-made picture frame is a protective shield, and opting for cheap, low-quality materials can cause irreversible damage to the very piece you wish to display. This is where the professional standard of ‘conservation framing’ becomes essential, ensuring your art is protected for generations.

At its core, conservation framing uses premium materials specifically designed to protect your artwork from environmental damage. To see why this is so important, the video below offers an excellent overview of common pitfalls.

Using Acidic Mounts and Backing Boards

Standard mount boards are often made from wood pulp, which contains acid. Over time, this acid leeches out of the board and into your artwork, causing a brownish stain known as ‘mat burn’. This discolouration is permanent and is perhaps the most common cause of damage we see. To prevent this, always insist on professional-grade materials like acid-free or, for ultimate protection, 100% cotton rag mounts and backing boards. These are chemically inert and will not harm your art.

Choosing the Wrong Type of Glazing (Glass)

Think of standard glass as a window that lets in damaging sunlight. It offers virtually no protection from ultraviolet (UV) rays, which are the primary cause of fading in photographs, prints, and original watercolours. The damage is gradual but devastating. In contrast, conservation-grade glazing is coated to filter out 99% of harmful UV rays, dramatically slowing the fading process. For crystal-clear viewing without distracting reflections, you can also opt for premium anti-reflective glass.

Improperly Securing the Artwork

Never, ever use household tapes like Sellotape or masking tape to attach your art to its mount. These tapes contain acids and adhesives that will yellow, become brittle, and leave a sticky, damaging residue that is extremely difficult to remove. The professional method involves using specialised acid-free paper ‘T-hinges’ to suspend the artwork from the backing board. This allows the paper to expand and contract naturally with changes in humidity, preventing buckling while ensuring it can be safely removed in the future.

Mistake #2: Making Poor Aesthetic and Design Choices

While the first mistake focuses on preservation, this one is about presentation. A frame does more than just protect; it’s a critical design element that completes the artwork. The right choice enhances the piece, pulling you into the picture, while the wrong one can be a jarring distraction. The goal is to create harmony between the art, the frame, and your room’s decor. The impact of picture frames on an interior space is significant, and getting the colour and proportions right is crucial for a spectacular result.

Selecting the Wrong Frame Size or Proportions

Proportion is everything. A frame that is out of scale with the artwork can make the entire presentation feel unbalanced. A large, powerful piece of art will look flimsy and unsupported in a frame that’s too thin. Conversely, a delicate sketch or a small photograph can be completely overwhelmed by a thick, bulky frame. A good rule of thumb is for the frame’s width to be a noticeable accent but never so wide that it competes with the art for attention. Think of it as the final, perfecting touch, not the main event.

Mismanaging the Mount (Mat Board)

The mount, or mat board, provides visual breathing space and is key to a professional finish. One of the most common picture framing mistakes to avoid is using a mount with perfectly equal borders. For a more balanced and visually stable look, the bottom border should be slightly ‘weighted’-or deeper-than the top and sides. This subtle adjustment prevents the optical illusion of the artwork ‘slipping’ down inside the frame. We also advise choosing a neutral mount colour, like off-white or soft grey, to let the artwork’s colours shine without competition.

Clashing the Frame Style with the Artwork

Your frame style should always complement the artwork’s personality. Placing a sleek, contemporary abstract print into a heavily ornate, traditional gold frame creates a jarring visual disconnect that serves neither the art nor the frame. The key is to consider the artwork’s era, style, and mood. Minimalist black or natural wood frames often pair beautifully with modern photography, while classic art may call for a more detailed profile. It’s about creating a harmonious pairing that feels intentional. See how we pair frames with art in our gallery.

Mistake #3: Falling into the ‘Ready-Made’ Frame Trap

We’ve all been there. You find a piece of art you love, and the next logical step is a frame. The high street and online giants offer a tempting solution: cheap, ready-made frames that promise a quick fix for just a few pounds. While the low price tag seems like a victory, it often hides a much greater cost down the line. Many people believe professional framing is too expensive, but this is one of the most common picture framing mistakes to avoid. Think of it not as an expense, but as an investment in protecting something you cherish. The real cost of a cheap frame is the potential damage to your art-a classic case of “pay now or pay later.”

Forcing Your Art into a Standard Size

The first problem you’ll encounter is the one-size-fits-all approach. Most original art, prints, and photographs don’t conform perfectly to standard A4 or 50x70cm dimensions. This leaves you with a difficult choice: do you crop the edges of your beautiful artwork, or do you leave awkward, uneven gaps around it? Neither option does justice to the piece. A bespoke frame, however, is built with precision craftsmanship around your art, ensuring a perfect, harmonious fit that elevates the final presentation from amateur to spectacular.

Overlooking Low-Quality Construction

Beyond the poor fit, the materials used in mass-produced frames are simply not designed for preservation. You’ll often find:

  • Flimsy plastic or styrene glazing that scratches easily and offers no UV protection.
  • Thin, acidic backing boards made of cardboard that will leach chemicals and cause yellowing over time.
  • Poorly joined corners held by staples that can separate, leaving the frame unstable.

These materials are a false economy. They actively harm your artwork. True preservation requires archival-quality, acid-free materials as outlined in professional conservation framing guidelines. Choosing a quality, professionally made frame is the single best way to ensure your art is protected for years to come, avoiding one of the costliest picture framing mistakes to avoid. A premium frame is a protective home, not just a decorative border. To see the profound difference that professional craftsmanship makes, we invite you to explore our online gallery.

Infographic titled Picture Framing Mistakes to Avoid highlights key picture framing mistakes to avoid, such as using wrong materials or proportions. Icons and coloured boxes help illustrate these common errors and warn against cheap framing choices.

Mistake #4: Committing Hanging and Placement Errors

You’ve invested in a beautiful, bespoke frame that perfectly complements your art. The job is done, right? Not quite. How and where you hang your artwork is the final, crucial step in its presentation. Even a professionally framed masterpiece can look out of place if hung incorrectly. Committing these common placement errors is one of the most disheartening picture framing mistakes to avoid, but thankfully, they are simple to fix.

Here are our expert tips for hanging your art with the precision and care it deserves.

Hanging Artwork Too High

This is perhaps the most frequent interior design mistake we see. Art hung too high feels disconnected from the room and its furniture. The solution is simple: follow the gallery rule. The centre of your artwork should be at average eye level, which is between 57 and 60 inches (approximately 145-152 cm) from the floor. This standard creates a natural, comfortable viewing experience and ensures your art feels grounded in the space.

Poor Lighting and Environmental Placement

Where you hang your art matters just as much as how high you hang it. The wrong environment can not only diminish its visual impact but also cause irreversible damage over time. Keep these key points in mind:

  • Avoid Direct Sunlight: Even with UV-protective glazing, prolonged exposure to harsh, direct sunlight will cause colours to fade. Choose a wall that doesn’t receive direct sun.
  • Beware of Humidity and Heat: High-moisture areas like bathrooms or kitchens can lead to warping and mould. Similarly, hanging art above a radiator or fireplace can cause the materials to dry out and crack.
  • Illuminate Intentionally: To make your art truly stand out, consider using directional spotlights or a dedicated picture light. This ensures your piece is beautifully lit without being exposed to harmful elements.

Creating Awkward Groupings or Spacing

The relationship between artworks and the space around them is critical. A tiny frame floating alone on a vast wall will look lost, while a gallery wall with inconsistent, wide gaps can feel chaotic. When creating a gallery wall, treat the entire collection as one single unit. A professional tip is to lay out your arrangement on the floor first. Trace each frame onto paper, cut them out, and tape them to the wall to perfect your spacing before hammering a single nail.

Getting the placement right is the final flourish that honours your art. Once you’ve mastered these hanging techniques, you’ll be ready to find your next spectacular piece. Explore our gallery for inspiration.

Frame Your Memories, Flawlessly

Your artwork tells a story, and its frame is a crucial part of the narrative. From selecting conservation-grade materials that protect against fading to making aesthetic choices that enhance its beauty, the details matter immensely. Escaping the ‘ready-made’ trap and ensuring correct placement are just as vital. By understanding these common picture framing mistakes to avoid, you can ensure your cherished art is preserved and presented perfectly for generations to enjoy.

Don’t leave it to chance. At First4Frames Gallery, we bring over 20 years of professional framing experience to every project. Our passion lies in craftsmanship, using only the finest conservation-grade materials to offer a truly bespoke service tailored to your artwork and your home. We build the perfect bridge between your piece and your décor, ensuring a flawless result every time. Avoid these mistakes. Trust our experts with your bespoke framing needs.

Embark on your framing journey with confidence. Let’s give your art the spectacular, lasting home it truly deserves.

Frequently Asked Questions

Is professional picture framing really worth the cost?

Absolutely. While professional framing can range from £50 to over £200, it’s a worthwhile investment in protecting your art. A professional framer uses archival, acid-free materials and UV-protective glass that prevent fading and irreversible damage over time. This bespoke craftsmanship not only enhances the artwork’s beauty but ensures its longevity, making it a crucial step for any piece you truly value, whether its worth is sentimental or monetary.

How can I tell if my current picture frame is damaging my art?

Look for tell-tale signs of poor-quality framing. Yellowing or brown marks on the artwork or mount board, known as acid burn, are a clear red flag. If the colours in your print appear faded, it likely lacks UV-protective glass. Also, check if the artwork is pressed directly against the glass; this can cause moisture damage and sticking. A flimsy frame that feels loose or weak also fails to provide adequate physical protection for your piece.

What is the most important thing to invest in: the frame, the mount, or the glass?

While all three elements work together, the mount and the glass are most critical for preservation. An acid-free, archival-quality mount is essential to prevent chemical burns that can destroy your artwork. Secondly, investing in glazing with at least 99% UV protection is the only way to prevent colours from fading over time. The frame provides the structural support and aesthetic finish, but the mount and glass do the real heavy lifting in protecting your art.

Can I frame a canvas painting myself?

While it is possible to frame a stretched canvas at home, especially with a simple floater frame, it requires care and precision. The main challenge is ensuring the canvas is stretched with perfect, even tension to avoid sagging or rippling over time. For valuable or sentimental paintings, we always recommend professional framing. This ensures the canvas is handled correctly and securely fitted, helping you steer clear of common DIY picture framing mistakes to avoid long-term damage.

How do I clean the glass on my framed pictures without causing damage?

The golden rule is to never spray cleaner directly onto the glass. Liquid can easily seep under the edge of the frame and damage the mount or the artwork itself. Instead, lightly spray a gentle, ammonia-free glass cleaner onto a clean microfibre cloth. Wipe the glass carefully, then use a dry part of the cloth to buff away any streaks. For acrylic or Perspex glazing, use only a cleaner specifically designed for acrylic to prevent scratching.

What’s the best way to hang a very heavy picture frame securely?

For any frame weighing over 10kg, standard picture hooks are not sufficient. The most secure method is to use two heavy-duty D-rings screwed into the back of the frame, hung on two separate, robust wall hooks. This distributes the weight evenly and helps keep the frame level. Always ensure your wall fixings are drilled into a solid stud in a plasterboard wall or secured with appropriate rawl plugs in a brick wall for maximum safety.

Posted on

Picture Framing Supplies UK: The Ultimate Guide for Artists & DIYers

Picture Framing Supplies UK: The Ultimate Guide for Artists & DIYers

Have you ever held a piece of art, a cherished photograph, or your own creative work and felt that mix of pride and slight panic? You know it deserves a beautiful, bespoke frame, but navigating the vast world of picture framing supplies uk can be daunting. Which mount will complement the colours? What glazing offers the best protection? And are you investing in the right tools, or risking a costly mistake with your treasured piece?

Embark on your framing journey with confidence. This guide is your trusted partner, created to demystify the entire process. We’ll provide a clear checklist of every tool and material you need, from premium mount boards to conservation-grade tapes. You’ll learn to distinguish quality craftsmanship, achieve a professional-looking result, and ensure your artwork is protected for years to come. We’ll also help you understand when to embrace the rewarding DIY challenge and when to call in a professional for that perfect, lasting finish.

The Anatomy of a Frame: Core Supplies You’ll Need

A beautifully finished picture frame is a work of craftsmanship, a sum of carefully chosen parts working in harmony to protect and present your art. Each layer, from the visible moulding to the hidden backing board, plays a crucial role in both the final look and the long-term preservation of your piece. Understanding The Anatomy of a Picture Frame is the first step towards making informed choices when sourcing your materials. This foundational checklist will guide you through the essential components for any project.

To see how these components come together, this short video provides a helpful overview:

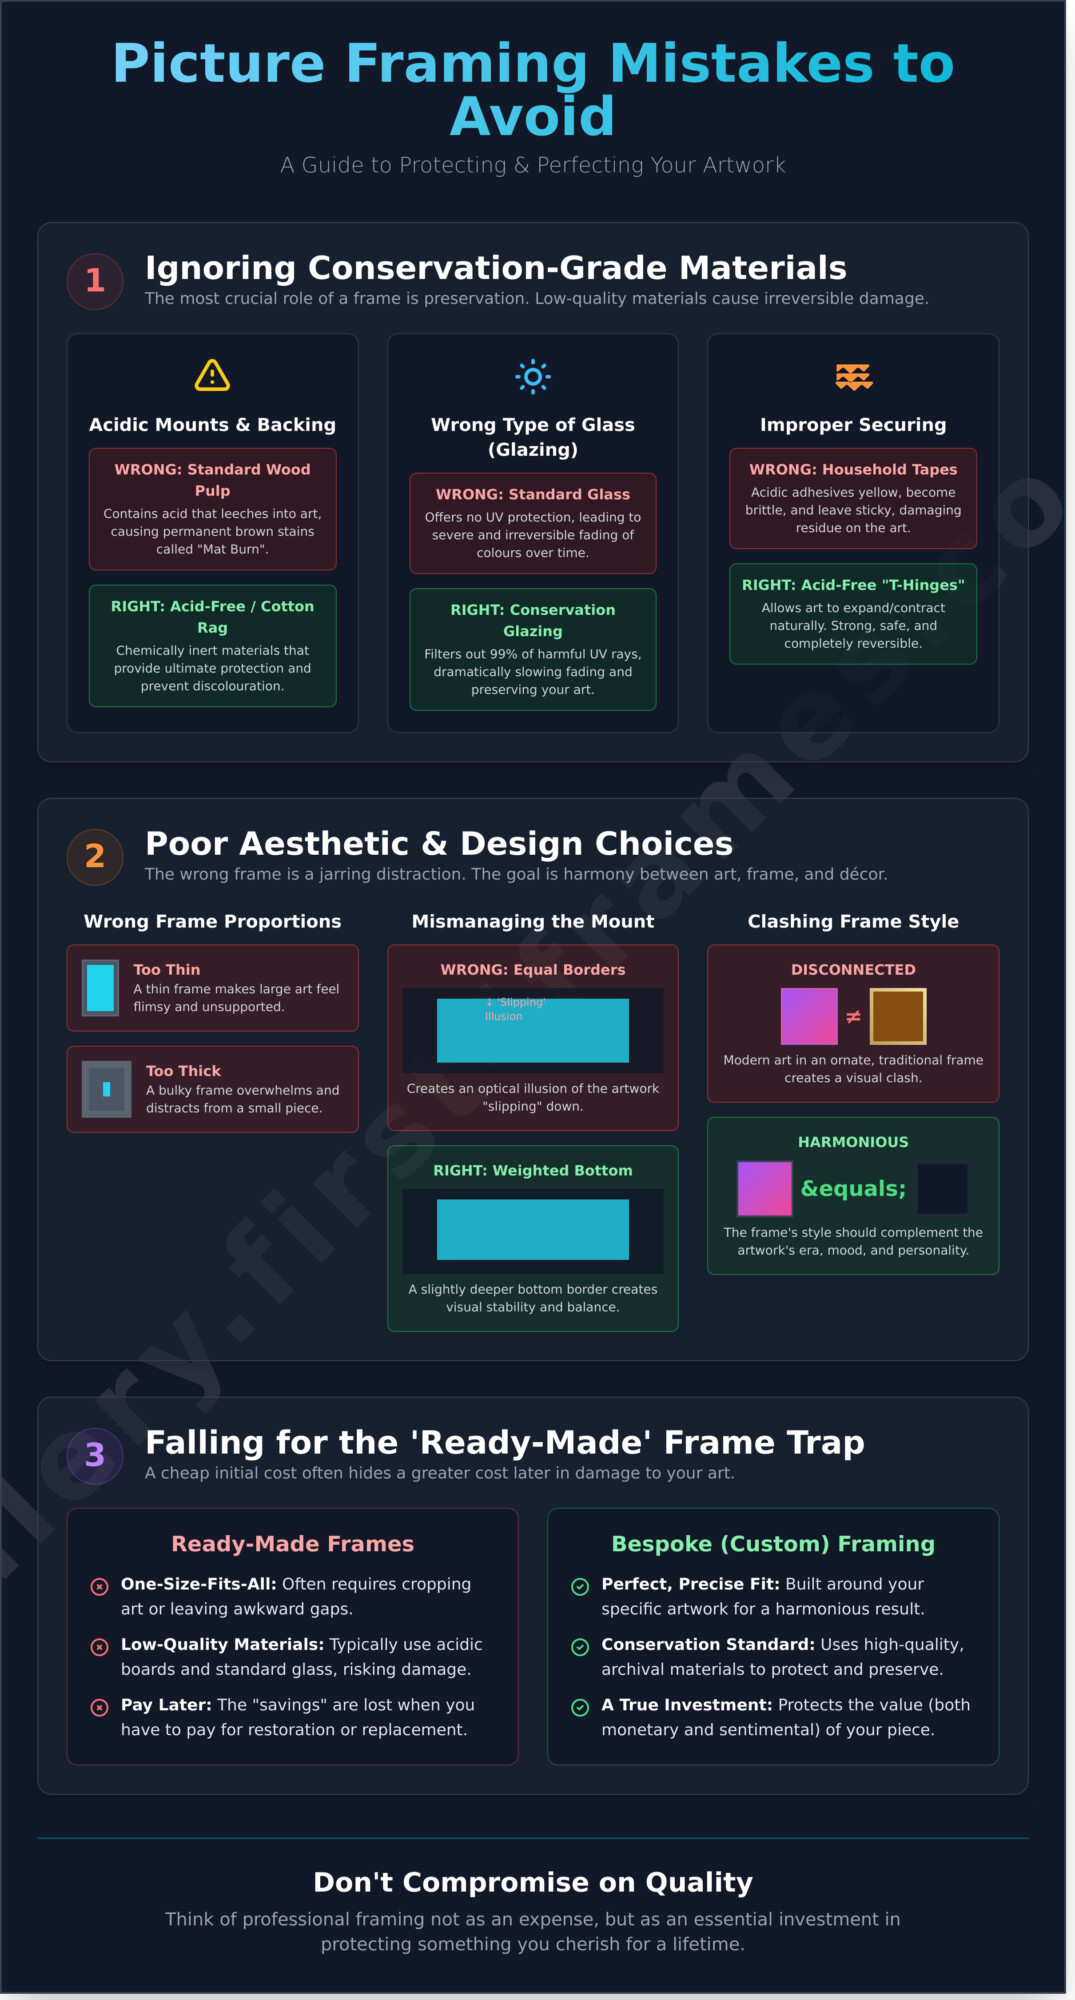
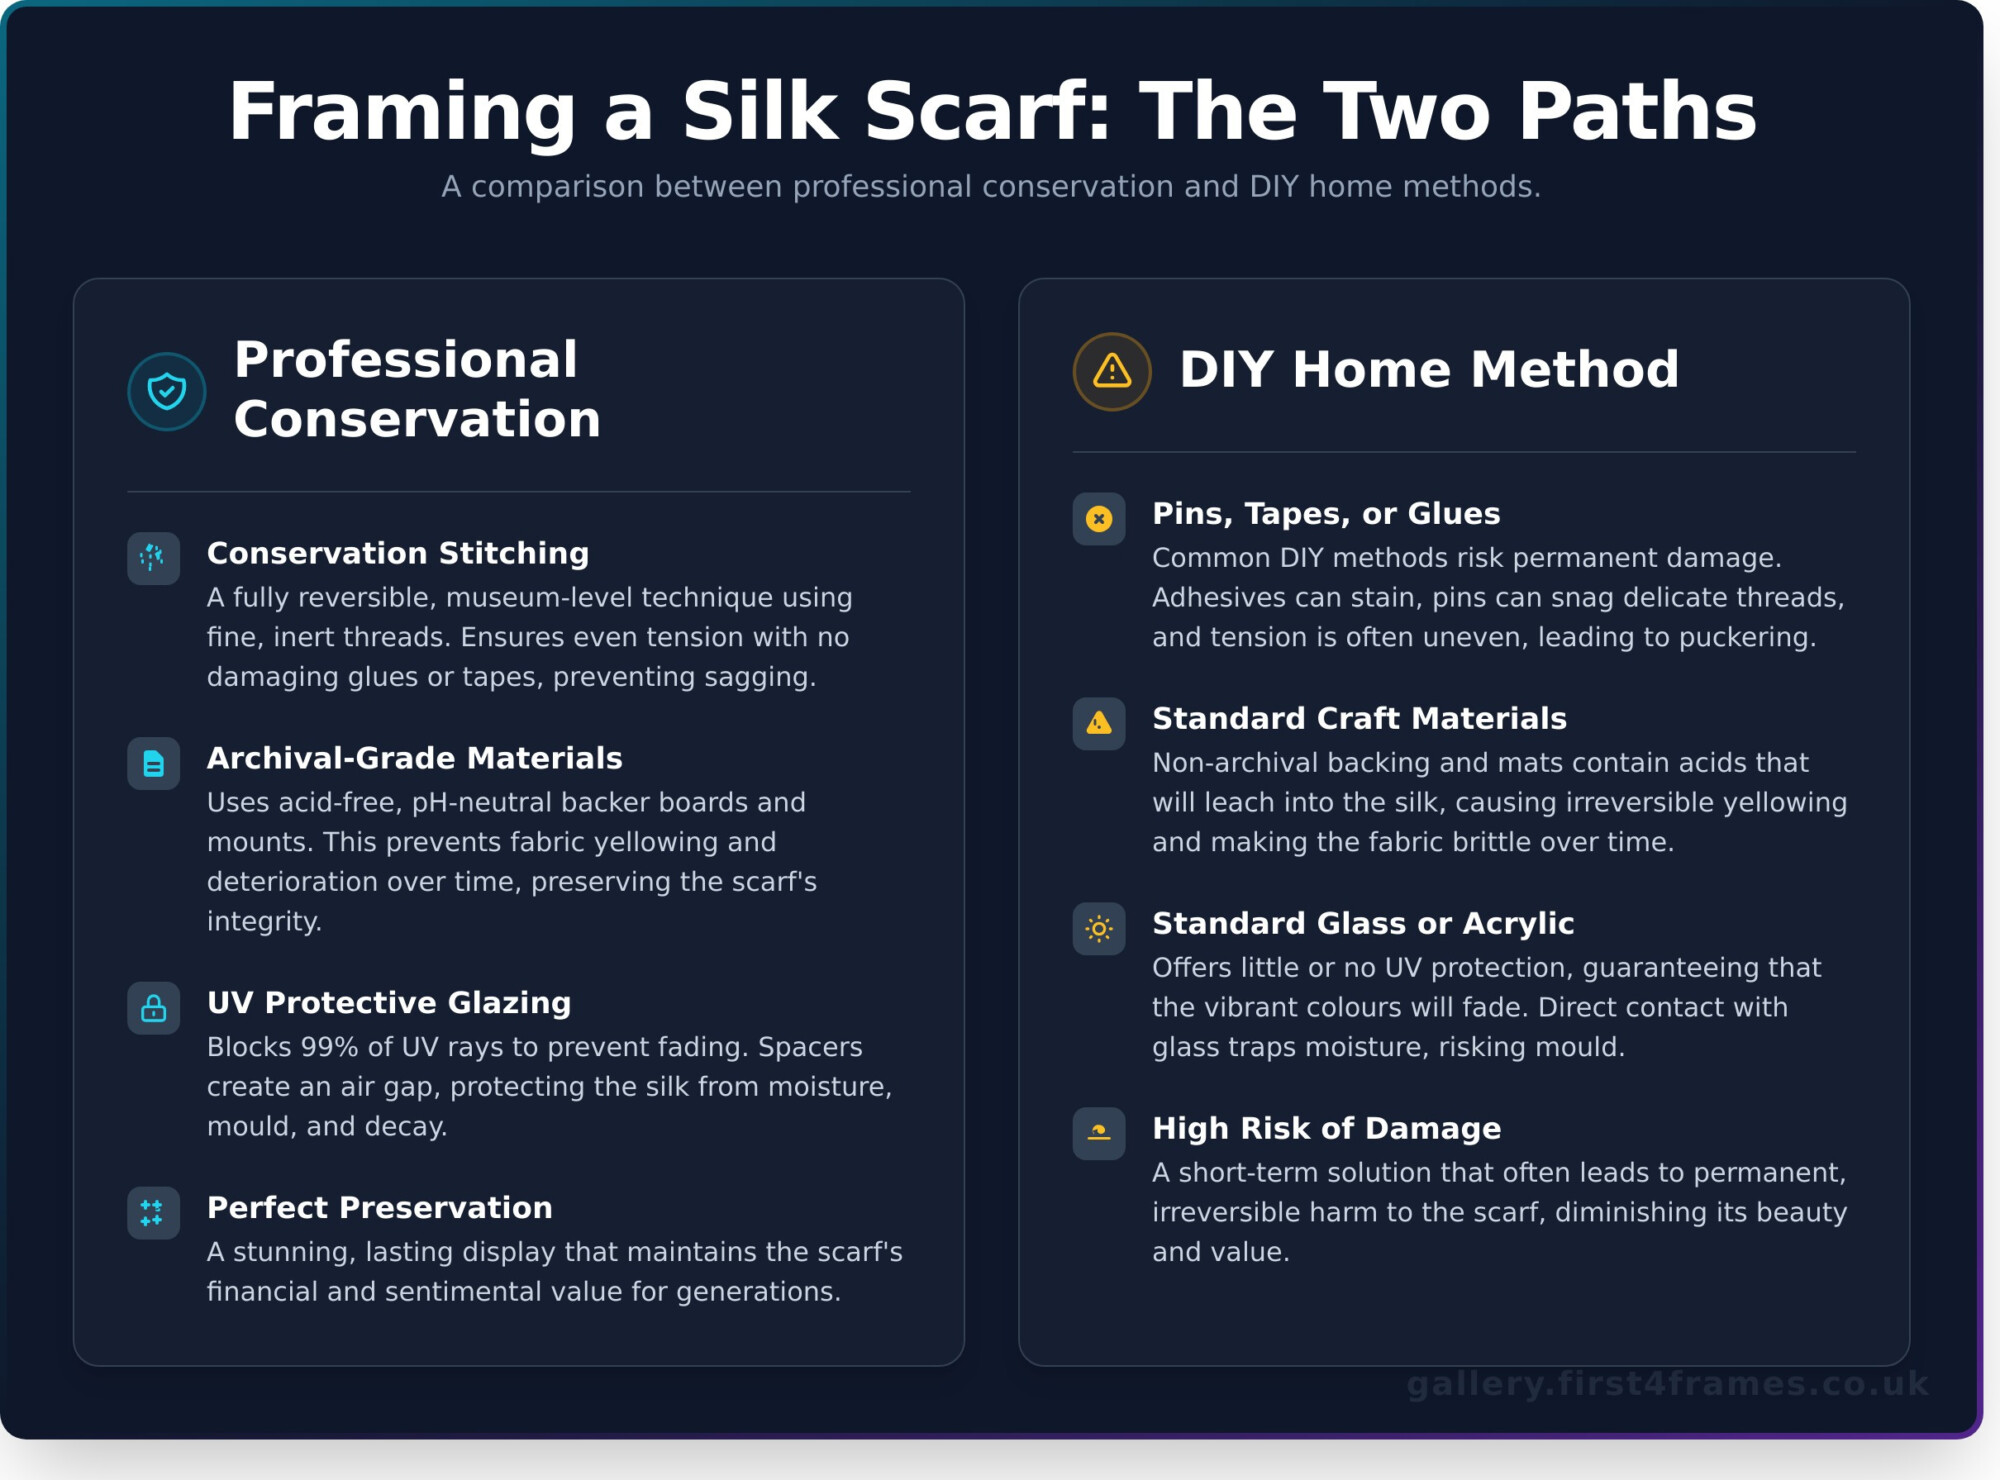
Before you begin, it’s important to distinguish between standard decorative framing and ‘conservation framing’. While standard framing focuses primarily on aesthetics, conservation framing uses archival-quality, acid-free materials to protect valuable or sentimental artwork from environmental damage. Choosing the right picture framing supplies uk retailers offer is key to achieving the level of protection your artwork deserves.

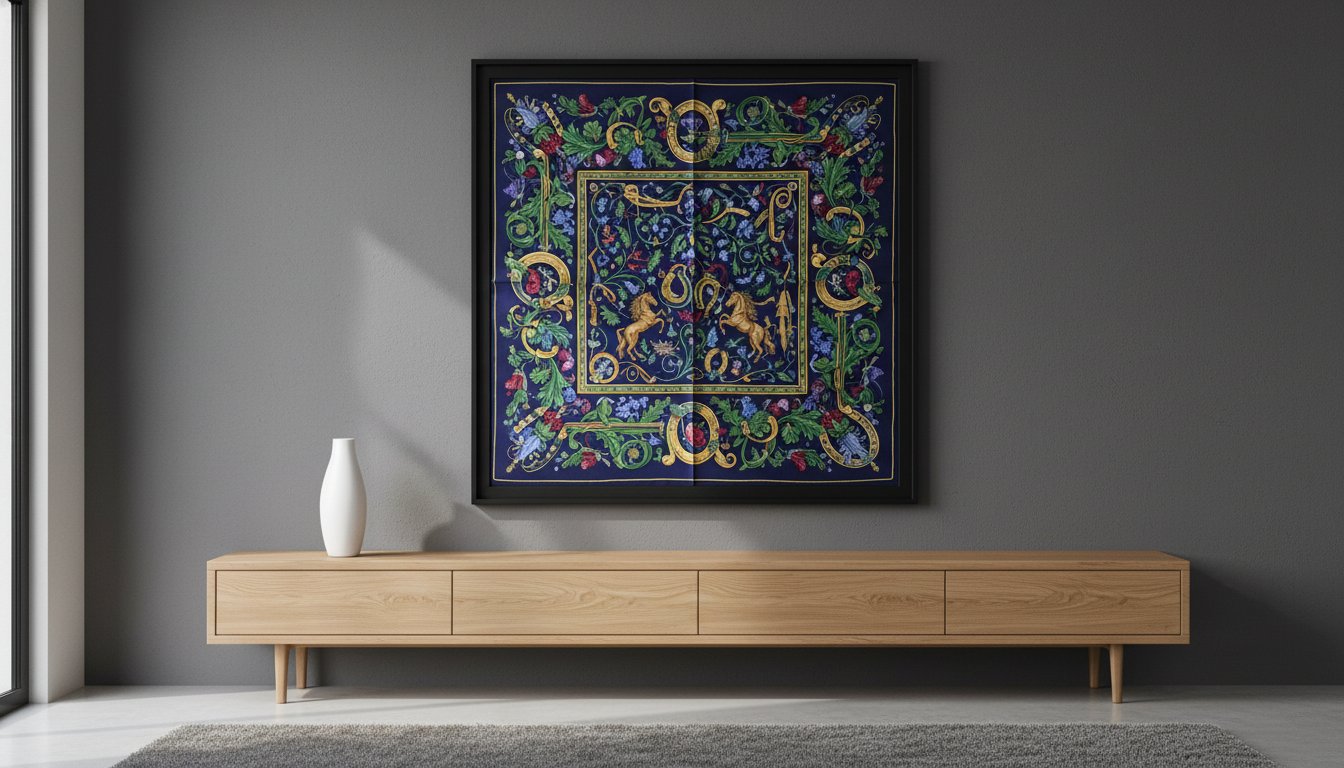
Frame Moulding: The Foundation of Your Design

The moulding is the structural and decorative border of your frame. The material and profile you choose set the tone for the entire piece.

  • Materials: Wood offers timeless warmth and versatility, aluminium provides a sleek, modern finish, and Polcore (a recycled polystyrene) is a durable and cost-effective alternative that beautifully mimics wood.
  • Profiles: Common styles include flat, contemporary profiles; curved ‘scoop’ profiles that draw the eye inward; ornate, traditional designs; and ‘floater’ frames for canvas art.
  • Sizing: Ensure the moulding width is proportional to your artwork-a delicate print needs a slender frame, while a large canvas demands a more substantial one. You can buy moulding in lengths to cut yourself or use a chop service for precise, mitred corners.

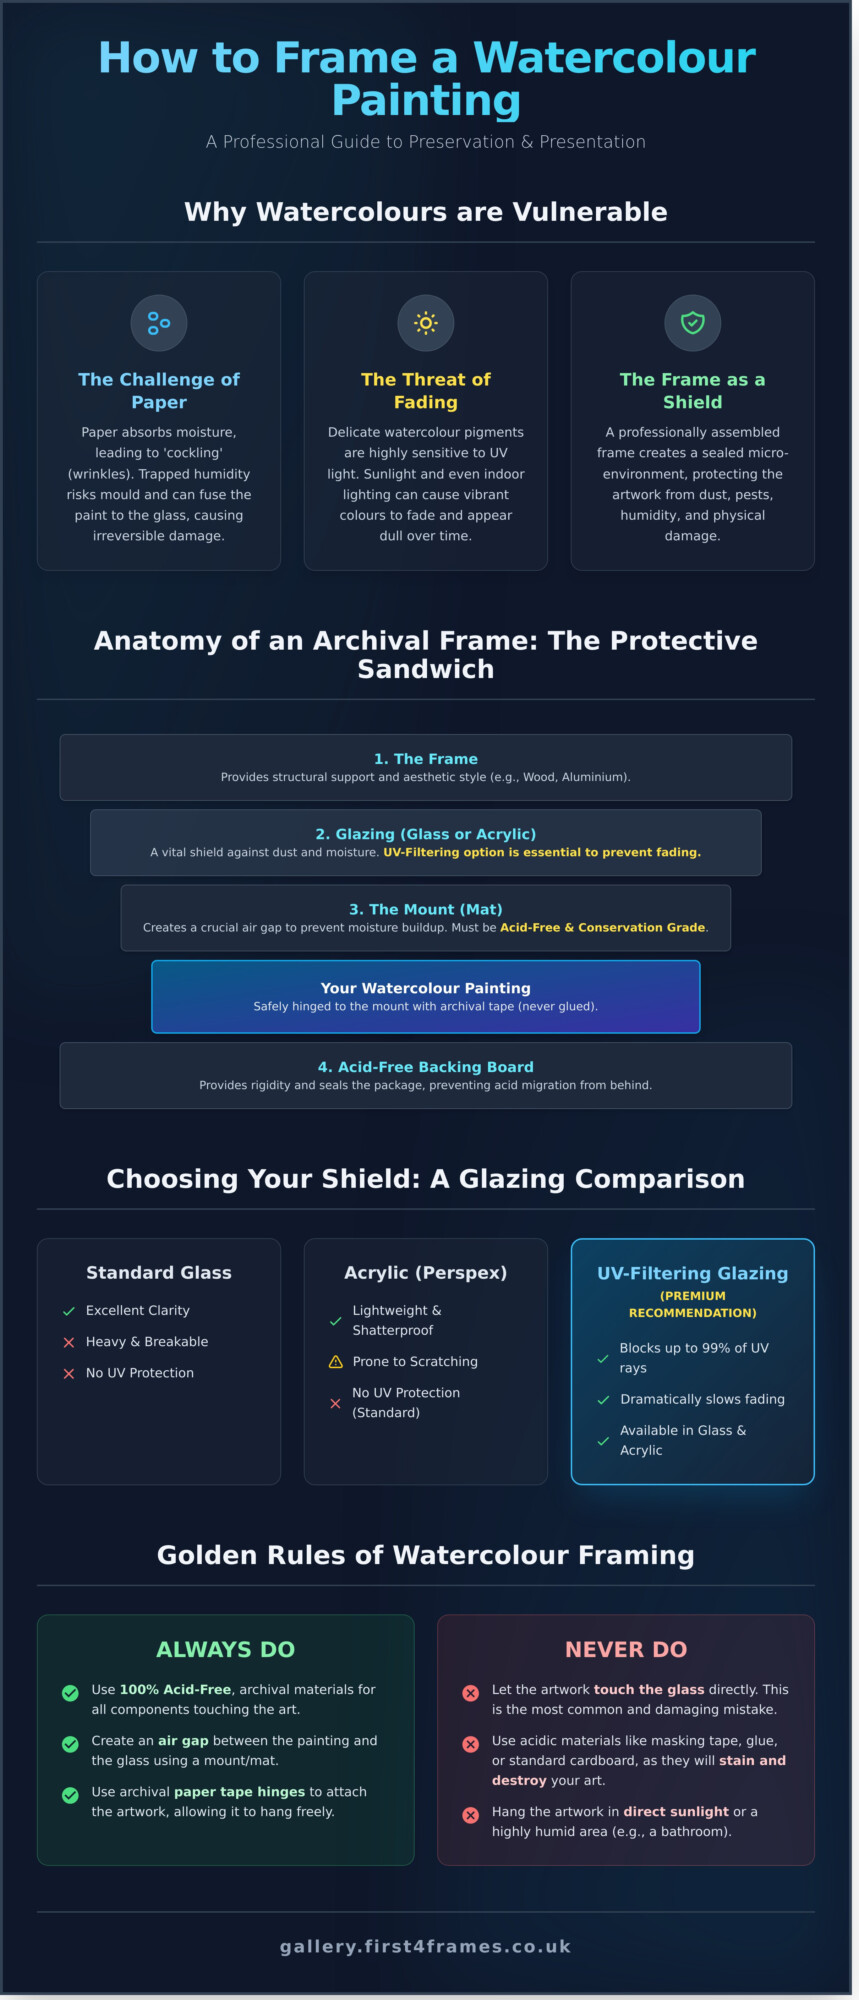
Glazing: Protecting Your Artwork

Glazing is the clear protective layer covering your art. Its primary job is to shield the piece from dust, moisture, and damaging light. The main options include standard glass, which is clear and scratch-resistant but heavy, and acrylic (often known by the brand name Perspex), which is lightweight, shatter-resistant, and an excellent choice for large frames or pieces that will be shipped. For precious artwork, always opt for glazing with at least 99% UV-filtering properties to prevent fading caused by sunlight.

Mountboard and Backing Board: Presentation and Preservation

The window mount (or mat) serves two purposes: it provides a visual border that draws the eye to the artwork and creates a crucial air gap between the art and the glazing. It’s vital to choose between a standard, decorative mountboard and an acid-free, conservation-grade board. Standard boards contain acids that can ‘burn’ and discolour your artwork over time, whereas conservation boards are archival quality. Finally, the backing board provides structural support and seals the frame ‘sandwich’, protecting it from behind.

Essential Tools for the DIY Framer’s Toolkit

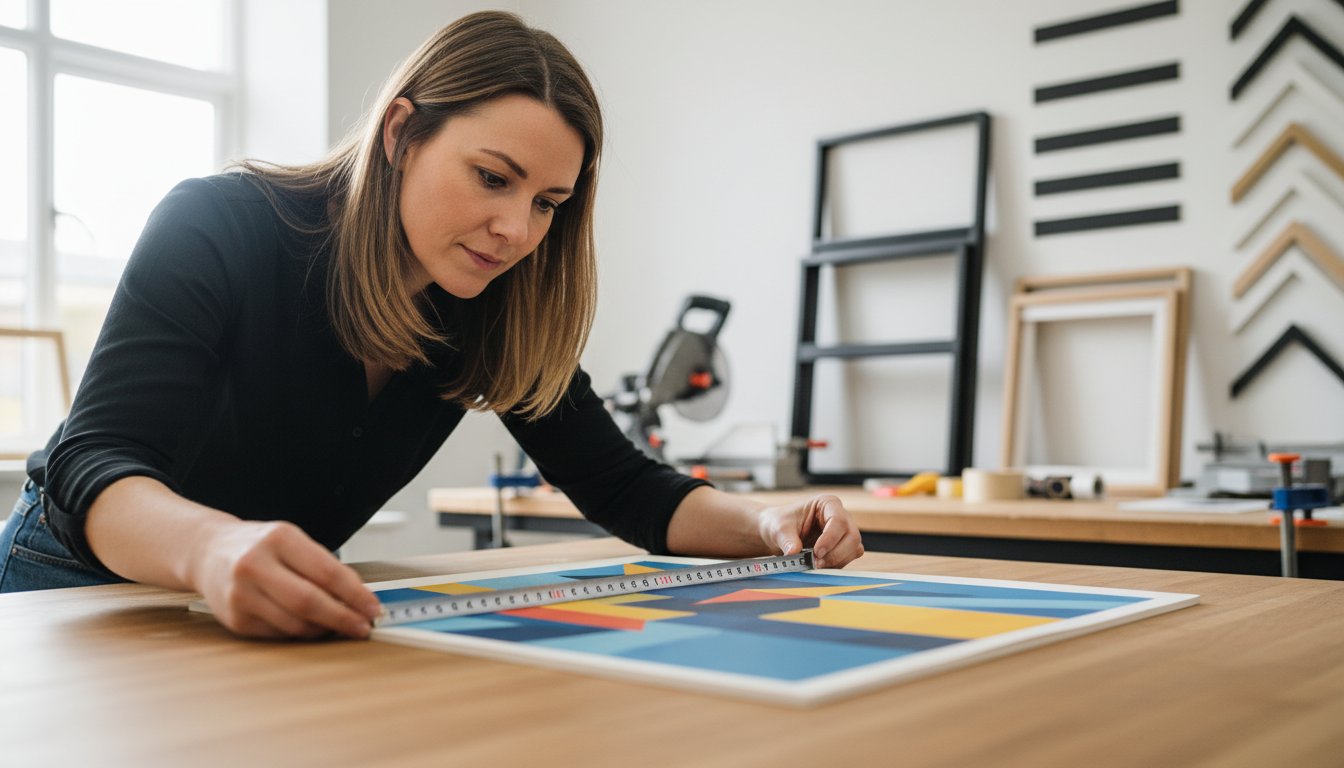
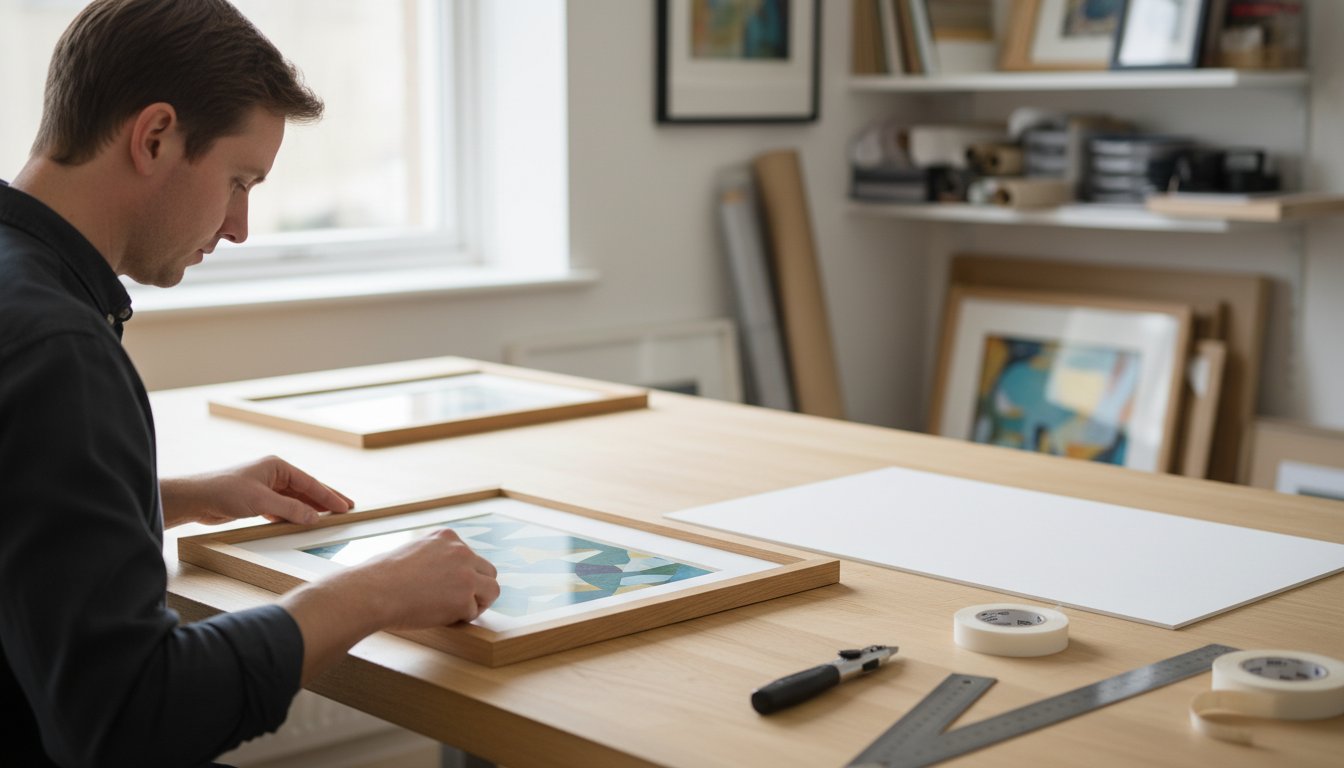
While premium materials are the heart of a beautiful frame, the right tools are the skilled hands that bring it all together. Achieving those crisp, professional-looking corners and clean lines isn’t about luck; it’s about precision. Investing in a basic toolkit is the single most important step you can take to elevate your DIY framing from a hobby to true craftsmanship. To get started, it’s helpful to understand the Essential Tools for the DIY Framer and how they function. We’ve broken them down into three key stages: cutting, joining, and finishing.

Cutting and Sizing Equipment

Precision starts here. To create a perfect frame, every component must be sized with complete accuracy. A tiny error at this stage can compromise the entire project.

  • Mitre Saws or Guillotines: These are essential for cutting your moulding to a perfect 45-degree angle. A sharp, accurate cut is non-negotiable for seamless, gap-free corners.
  • Mat/Mount Cutters: A specialised cutter is the secret to achieving that clean, bevelled edge on your window mount, adding depth and a truly professional finish to the artwork.
  • Glass/Acrylic Cutters: A simple scoring tool allows you to cleanly and safely size your glazing to fit the frame dimensions perfectly.

Joining and Assembly Tools

Once your pieces are cut, you need the right equipment to join them securely. While professional framers use heavy-duty underpinners that drive V-nails into the corners for an instant bond, there are excellent, more accessible alternatives for the home workshop.

  • Frame or Band Clamps: An essential for the DIY framer, these tools hold the four corners of your frame tightly and squarely together while the wood glue dries, ensuring a strong, permanent bond.
  • Point Drivers or Tab Guns: This handy tool fires flexible or rigid points into the back of the frame, holding your artwork ‘sandwich’ (glazing, mount, artwork, and backing board) securely in place.

Finishing and Hanging Hardware

The final touches are what separate a good frame from a great one. Sealing the back and adding the right hardware ensures your artwork is protected and ready for beautiful display. When searching for these specific picture framing supplies UK retailers offer a wide variety to suit any project.

  • Framing Tape: Use this to seal the gap between the frame and the backing board. This creates a crucial barrier against dust, moisture, and even insects.
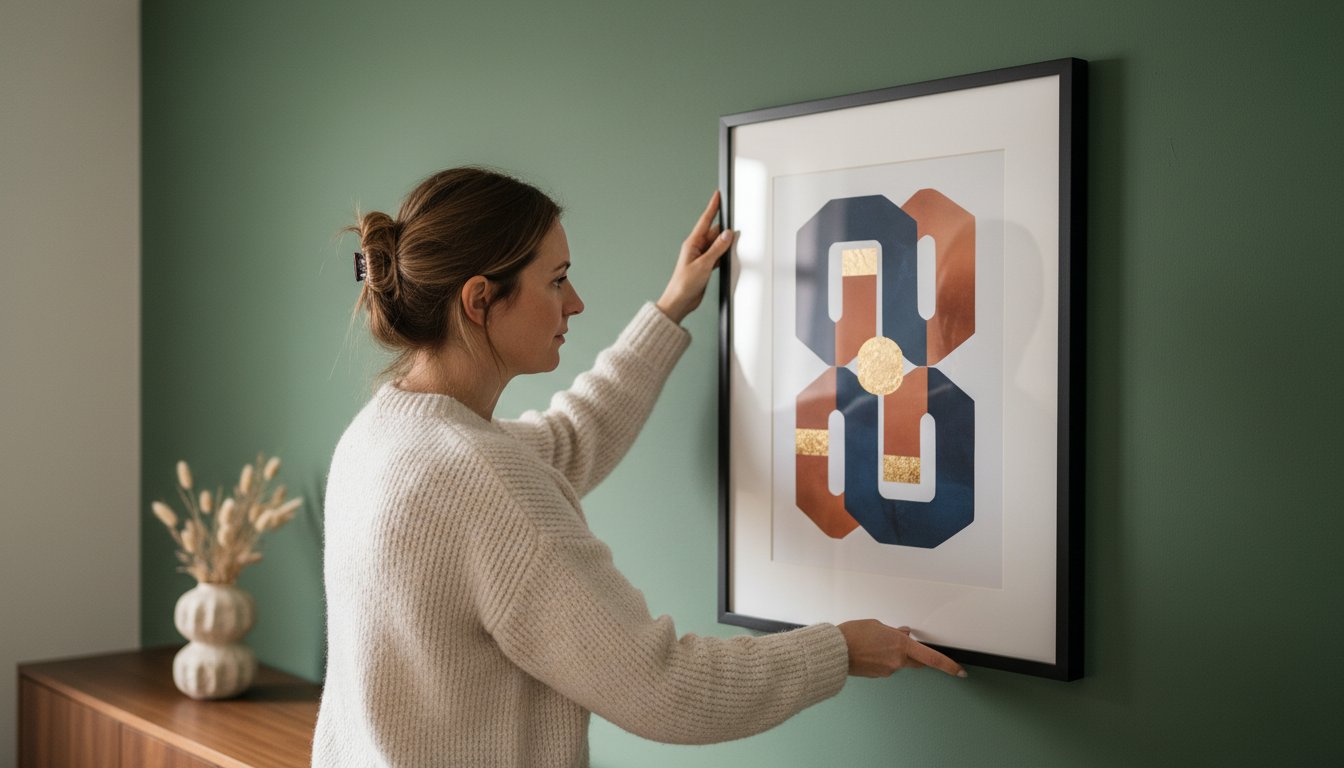
  • Hanging System: Choose from D-rings and picture wire for a traditional gallery hang, or a simple sawtooth hanger for smaller, lighter frames.
  • Felt Bumpers: Stick these small pads on the bottom corners to protect your wall from scuffs and allow air to circulate evenly behind the frame.

DIY vs. Professional Framing: A Cost and Quality Comparison

One of the biggest decisions you’ll face is whether to do it yourself or entrust your artwork to an expert. There’s an undeniable satisfaction in a successful DIY project, but it’s a craft that requires precision and patience. This comparison isn’t just about the initial price tag; it’s about understanding the true cost, the time involved, and matching the right approach to the value of the piece you’re framing.

The True Cost of DIY Framing

Venturing into DIY framing can be incredibly rewarding. However, before you start buying picture framing supplies UK, it’s crucial to understand the full investment. Beyond the frame moulding and mount board, you’ll need specialised tools for a quality finish. A common mistake is underestimating the cost of wastage from mis-measured mounts or poorly cut corners. For a simple poster or a child’s drawing, the DIY route can be a fun and cost-effective choice. For anything more, the costs quickly add up.

Item / Service Typical DIY Investment Typical Professional Cost (One-off)
Decent Mount Cutter £80 – £150+ Included in service
Mitre Saw / Guillotine £100 – £300+ Included in service
Tools (Glass cutter, tabs, etc.) £40 – £60 Included in service
Total Initial Tool Cost £220 – £510+ £0
Bespoke A3 Frame Service (Plus materials & time) £60 – £100

The Value of a Professional Framing Service

When you commission a professional framer, you’re not just buying a product; you’re investing in years of expertise and a guaranteed result. Professionals use specialist equipment that ensures perfectly joined corners, flawless, dust-free mounting, and structural integrity. They provide access to an extensive range of premium mouldings and conservation-grade materials designed to protect your art. These experts follow best practices, often guided by standards from the Fine Art Trade Guild, to shield your piece from UV light and environmental damage, preserving it for a lifetime. The result is a spectacular, gallery-quality finish that elevates your art and your home. See how affordable professional quality can be. Get a Bespoke Framing Quote.

Checklist: When to Choose a Professional

Still unsure which path to take? Here’s a quick checklist to help you decide when calling in an expert is the wisest choice for your art:

  • The artwork is valuable, an original, or has significant sentimental importance.
  • You are framing a large, oversized, or unusually shaped piece that requires specialist handling.
  • You need guaranteed conservation-grade, archival framing to protect your art for decades to come.
  • You want a flawless, premium finish that looks perfectly at home in a gallery, your office, or living space.

Picture Framing Supplies UK: The Ultimate Guide for Artists & DIYers

Sourcing High-Quality Picture Framing Supplies in the UK

Once you understand the essential components, the next step is finding them. The quality of your materials is not just a detail; it’s the very foundation of a beautiful, long-lasting frame. The right components act as the perfect bridge between your artwork and your decor, so choosing your source wisely is paramount to achieving a professional finish.

Where to Look for Materials

Your search for picture framing supplies UK will lead you to several types of vendors, each catering to different needs. For the widest selection of professional-grade mouldings, conservation boards, and specialist glazing, online suppliers dedicated to the framing industry are your best resource. For those just starting out or working on less critical projects, large high-street art retailers offer a good range of hobbyist and student-grade materials. And for the true artisan, local timber merchants can provide raw, unfinished wood to create bespoke mouldings from scratch.

What to Look for in a Supplier

A reliable supplier is more than just a shop; they are a partner in your creative process. When evaluating where to buy, look for these key indicators of quality and service:

  • Conservation-Grade Options: A reputable supplier will clearly label and offer a wide range of acid-free mountboards, backing boards, and UV-filtering glass or acrylic to ensure your artwork is protected from fading and degradation.
  • Helpful Services: Many online specialists offer a ‘chop service’, which provides moulding cut precisely to your required lengths with perfect mitre cuts. This saves you time and the need for specialised equipment.
  • Verified Reviews: Check customer feedback regarding the quality of the materials, the accuracy of their descriptions, and the care they take in packaging items for shipping to prevent damage.

The Professional Alternative: Let Us Source for You

While the DIY route is rewarding, it can also be a path of trial and error. Sourcing premium materials, ensuring compatibility, and achieving a flawless finish requires expertise. This is where our passion and experience come in. As professional framers, we have access to exclusive, trade-only suppliers and a deep understanding of which materials will best protect and enhance your specific piece of art.

We take the guesswork out of the equation, selecting only the finest mouldings, archival boards, and crystal-clear glazing for every project. We believe your art deserves nothing less than perfection. We source only the best materials for our frames. Discover Our Craftsmanship.

Your Masterpiece Deserves the Perfect Frame

Whether you’re an artist or a dedicated DIYer, framing your own work is a uniquely rewarding journey. This guide has equipped you with the essentials, from understanding the anatomy of a frame to sourcing the best picture framing supplies uk has to offer. The right materials and tools are the foundation of a project you can be proud of for years to come.

But for those pieces that demand an expert touch, or when you simply want a guaranteed, museum-quality result, nothing compares to professional craftsmanship. With over 20 years of experience, our Falkirk-based team at First4Frames Gallery uses only premium, conservation-grade materials to create stunning bespoke frames for art lovers across the UK.

Ready for a flawless finish? Let our experts create the perfect bespoke frame for your art. Get Your Quote Today and give your masterpiece the celebration it deserves.

Frequently Asked Questions

Is it cheaper to frame a picture yourself in the UK?

Framing a picture yourself can certainly be more cost-effective, particularly if you plan to frame multiple pieces. While there’s an initial investment in tools, the cost of materials for a single frame is often significantly lower than a bespoke framing service. For example, materials for a standard A4 frame could cost around £15-£25, whereas a professional service might start from £40. For those passionate about craftsmanship, the savings and satisfaction are well worth it.

What are the most essential supplies for a beginner picture framer?

To begin your framing journey, you’ll need a few essential tools to ensure a professional finish. We recommend starting with a quality mount cutter for crisp, clean bevels, a sturdy mitre box and saw for accurate corner cuts, and a reliable measuring tape. Wood glue for joining corners and a point driver to secure your artwork in the frame are also fundamental. These core items form the perfect foundation for your new craft, allowing you to create beautiful, bespoke frames at home.

What is conservation framing and why is it important?

Conservation framing is a premium method designed to protect and preserve your artwork for generations. It uses archival-quality, acid-free materials, including mountboards, backing boards, and tapes, to prevent yellowing and degradation. Crucially, it often incorporates special glazing that blocks up to 99% of harmful UV light, which is the primary cause of fading. This level of craftsmanship is essential for valuable or sentimental pieces, ensuring their beauty remains spectacular for years to come.

How do I choose the right size mount for my picture?

Choosing the right mount is about creating visual balance and drawing the eye towards the artwork. A good rule of thumb is to make the mount borders at least 1.5 times the width of your frame moulding, with a typical minimum of 50-65mm (2-2.5 inches). For a more traditional or dramatic effect, consider a ‘weighted’ bottom border, making it slightly deeper than the top and sides. This simple technique prevents the artwork from looking like it’s visually ‘slipping’ down.

Can I buy professional-grade frame moulding online?

Absolutely. The internet has made it incredibly easy to access a spectacular range of professional-grade materials. Many specialist retailers now offer the same high-quality frame mouldings used by bespoke framers directly to the public. When searching for picture framing supplies uk online, you can find everything from solid oak and ash to ornate Polcore and sleek aluminium profiles. This allows you to achieve a truly premium, gallery-quality finish for your projects right from your own workshop.

What’s the best way to seal the back of a picture frame?

Sealing the back of your frame provides a final, professional touch and, more importantly, protects your artwork from dust, humidity, and insects. The best method is to use a quality self-adhesive framing tape, such as brown Kraft tape. Simply apply the tape neatly over the gap where the backing board meets the frame moulding, ensuring you press it down firmly for a secure seal. This simple step elevates your work from homemade to beautifully handcrafted and ensures its longevity.

Posted on

How to Frame a Watercolour Painting: A Professional Guide

How to Frame a Watercolour Painting: A Professional Guide

That beautiful watercolour painting deserves a place of honour on your wall, but the thought of framing it can be daunting. The delicate paper, the vibrant pigments-it’s natural to worry about the artwork wrinkling, the colours fading, or choosing the wrong materials for your precious piece. This is precisely why understanding how to frame a watercolour painting correctly is not just a skill, but an act of preservation and celebration.

Consider this your professional guide, where our passion for craftsmanship meets practical, clear advice. We will bridge the gap between your art and its perfect presentation, giving you the confidence to do it yourself or the knowledge to choose a professional framer. We’ll walk you through the essential steps, from selecting premium archival mounts and UV-protective glass to ensuring your art is perfectly secure. By the end, you’ll have the secrets to create a spectacular, lasting display that protects your treasured artwork for a lifetime.

Why Framing Watercolours Requires Special Care

Watercolour paintings possess a unique, luminous quality, where light seems to glow from within the paper itself. This delicate beauty, however, is also their greatest vulnerability. Unlike robust oil or acrylic paintings on canvas, watercolours on paper are incredibly susceptible to damage from their environment. Understanding how to frame a watercolour painting correctly is not just about aesthetics; it’s a crucial act of preservation to protect your beautiful artwork for generations to come.

To see these principles in action, take a look at this helpful guide:

The Challenge of Watercolour Paper

At its core, watercolour paper is a natural fibre that breathes. It absorbs and releases moisture from the air, causing it to expand and contract. In a humid environment, this can lead to a wavy, wrinkled effect known as ‘cockling’. This is why a watercolour painting should never be placed in direct contact with the frame’s glass. Trapped moisture can lead to mould growth and can even cause the paint to permanently fuse to the glass, causing irreversible damage.

Protecting Delicate Pigments from Fading

The transparent pigments used in watercolour are notoriously sensitive to light. The ultraviolet (UV) rays in sunlight and even some indoor lighting can break down the chemical bonds in the colours, causing them to fade and appear dull over time. A vibrant crimson can become a pale pink, and a rich blue can wash out completely. A professional framing solution includes UV-protective glazing, which acts as a vital shield, blocking up to 99% of harmful rays without compromising the view of your artwork.

The Frame’s Role: More Than Just a Border

A well-chosen frame does more than just complement your artwork; it creates a complete, protective micro-environment. This sealed package provides the essential structure to hold the glazing, mount, and backing board securely in place. This approach aligns with established art conservation principles, which emphasize creating a stable environment to shield the art from physical damage, dust, humidity, and insects. It is the foundation of any professional guide on how to frame a watercolour painting.

The Essential Components for Framing a Watercolour

Properly framing a watercolour is about more than just aesthetics; it’s about preservation. Think of the final assembly as a protective, archival sandwich, with your beautiful artwork nestled safely in the middle. Each layer has a specific job, and understanding them is the key to knowing how to frame a watercolour painting for lifelong enjoyment. The single most important rule is to use archival, acid-free materials at every stage to protect your art from damage and discolouration over time.

The Mount (or Mat): Creating Essential Airspace

The mount, often called a mat in the US, is the elegant cardboard border that sits between the frame and your artwork. Its primary job is practical: it creates a crucial air gap that prevents the watercolour paper from touching the glazing. This stops moisture condensation from causing mould and prevents the delicate paint from sticking to the surface. Aesthetically, a well-chosen mount provides visual breathing room, drawing the viewer’s eye inward to the heart of the painting. Always insist on acid-free, conservation-grade mountboard to avoid ‘mat burn’-a permanent yellowing stain caused by acid leaching into the artwork.

The Glazing: Your Artwork’s Shield

Glazing is the clear barrier that protects your art from dust, moisture, and, most importantly, light. Watercolours are particularly susceptible to fading, so choosing the right shield is vital. Your main options include:

  • Standard Glass: Offers excellent clarity but can be heavy and reflective.
  • Acrylic (Perspex): Much lighter and shatterproof, making it safer for larger pieces or shipping.
  • UV-Filtering Options: Available in both glass and acrylic, this is our premium recommendation. It blocks up to 99% of harmful ultraviolet rays, acting as a powerful sunscreen for your art and dramatically slowing the fading process.

The Frame & Backing Board: Structure and Support

The frame itself provides the structure and style, with materials like natural wood or sleek aluminium offering different finishes to complement your artwork and decor. Behind your art sits the backing board, the final layer of the protective sandwich. This board provides rigidity and seals the entire package from dust and pests. Just like the mount, it must be an acid-free foam core or conservation backing board. This final layer is critical for long-term preservation, a principle detailed in the National Gallery of Art’s guide to paper conservation, as it prevents harmful acids from migrating into the artwork from behind.

Step-by-Step Guide: How to Assemble Your Watercolour Frame

Ready to bring all the elements together? This is where the magic happens and your creative vision truly comes to life. Assembling your frame requires a delicate touch and a clean workspace, but following these steps will ensure a professional, gallery-quality result that protects your beautiful artwork for years to come. This is the most hands-on part of learning how to frame a watercolour painting.

Step 1: Preparing Your Artwork and Workspace

First, ensure your painting is perfectly flat. If the paper has buckled slightly, you can gently flatten it by placing it between two sheets of acid-free paper under a smooth, heavy board for a day or two. Prepare a large, clean, and dust-free surface to avoid any debris getting trapped in the frame. Gather your essential tools:

  • Acid-free archival tape (paper gummed tape is ideal)
  • A sharp craft knife
  • Measuring tape
  • A soft, lint-free microfibre cloth

Step 2: Hinging the Artwork to the Mount

Never be tempted to glue or tape your watercolour directly to the backing board. Paper needs space to breathe, expanding and contracting with changes in humidity. Permanently fixing it will cause buckling and irreversible damage. In fact, professional Library of Congress guidelines on preservation stress that allowing for this natural movement is crucial for the artwork’s longevity.

The correct method is ‘T-hinging’. Attach two small tabs of archival tape to the top edge of the back of your artwork, sticky-side down, with half the tape on the art and half hanging off. Lay the artwork in position on the back of the mount board, and then place another piece of tape across each tab to form a ‘T’, securing it to the mount. This creates a strong yet flexible hinge, allowing the art to hang naturally.

Step 3: Assembling the Frame ‘Sandwich’

The assembly process is all about layering correctly. Lay your frame face down on your clean surface. Carefully clean both sides of your glazing (glass or acrylic) with a microfibre cloth to remove any dust or fingerprints. Place it inside the frame’s rebate. Next, gently lower your mounted artwork, face down, onto the glazing. Finish the stack by placing the backing board on top. Secure the ‘sandwich’ in place by pressing down the flexible tabs or, for a more secure fit, by using a point driver to insert framer’s points.

Step 4: Finishing Touches and Hanging

For a truly professional finish that shows exceptional craftsmanship, seal the gap between the frame and the backing board with framing tape. This creates a robust barrier against dust, insects, and humidity, offering premium protection for your art. Finally, attach your hanging hardware. Measure one-third of the way down from the top of the frame on both sides and screw in your D-rings. Thread a picture cord between them, tying secure knots and leaving just enough slack for it to hang neatly on a picture hook.

Feeling unsure about the process? Sometimes, the best approach is to trust an expert to achieve that perfect, lasting result. Let our experts handle the framing for you.

Infographic titled How to Frame a Watercolour Painting, outlining watercolour vulnerabilities, archival frame anatomy, glazing choices, proper frame backing, and essential dos and don’ts for how to frame a watercolour painting.

Aesthetic Choices: How to Choose the Perfect Frame and Mount

With the technical essentials covered, we can now turn to the most exciting part: the artistic choices. A frame does more than protect; it acts as a beautiful bridge between your artwork and your room’s décor, enhancing the piece and drawing the viewer’s eye. This is where the thoughtful consideration in how to frame a watercolour painting truly pays off. Before you begin, always consider where the finished piece will hang-the colours and style of the room should help guide your creative decisions.

Matching the Frame to Your Watercolour’s Style

The golden rule is to complement, not compete. The delicate, often translucent nature of watercolour means the artwork can easily be overpowered by a heavy or distracting frame. Your goal is to find a perfect partner for the painting.

  • For modern or abstract pieces: A simple, clean-profile frame often works best. Think thin black, crisp white, or a light natural wood like oak to maintain a contemporary feel.
  • For traditional landscapes or portraits: You can explore frames with more character. A warm, natural wood or a classic frame with subtle, soft gold or silver detailing can beautifully echo the painting’s timeless quality.

Selecting the Right Mount Colour and Size

The mount (also known as a mat) provides essential breathing space, preventing the glass from touching the artwork and giving the piece visual impact. For a truly professional finish, the mount is non-negotiable.

Colour: While brilliant white can be too stark against the soft paper, a classic off-white or pale cream is a failsafe choice that allows the watercolour’s own colours to shine. For a more harmonious, bespoke look, consider choosing a mount in a very subtle, muted tone pulled directly from the painting itself-a soft grey from a sky, for instance, can be spectacular.

Width: Be generous with your mount width. A wider mount of at least 2.5 to 3 inches often gives a more professional, gallery-style look that elevates the artwork and gives it presence on the wall.

Considering Single vs. Double Mounts

For a touch of pure elegance, a double mount is an exceptional choice. This technique involves layering two mounts, with the bottom one visible as a very thin border (or ‘reveal’) of colour around the artwork. This subtle detail is a hallmark of high-quality, bespoke framing. Using an inner mount that picks up an accent colour from the painting-a deep blue from the sea or a rich terracotta from a roof-is a masterful way to add depth and tie the entire presentation together. It’s this level of craftsmanship that transforms a framed picture into a cherished piece of art.

For inspiration on pairing frames and mounts, explore the beautifully curated pieces in our online gallery.

DIY vs. Professional Framing: When to Call an Expert

After carefully selecting your materials and preparing your artwork, the final decision is whether to frame it yourself or entrust it to an expert. The right choice depends on the artwork’s value, your confidence, and your desired finish. The DIY approach to how to frame a watercolour painting can be a satisfying project, but for treasured pieces, a professional touch is invaluable.

The Pros and Cons of a DIY Approach

Assembling a frame yourself can be cost-effective, especially for practice pieces or inexpensive prints. It offers a hands-on connection to the finished product. However, the risks are significant. One slip can damage your art, and off-the-shelf frames from high-street shops often lack the essential conservation-grade materials. They rarely include UV-protective glazing or acid-free mounts, leaving your watercolour vulnerable to fading and discolouration over time.

When You Should Always Use a Professional Framer

While DIY has its place, certain situations demand the skill and resources of a professional. Consider this your checklist for when to call in an expert:

  • The Artwork is Valuable: If the piece has significant monetary or sentimental value, professional framing is non-negotiable. It’s an investment in its preservation.
  • It Requires Conservation Materials: To protect your art for a lifetime, you need archival-quality mounts, backing boards, and UV-filtering glazing.
  • The Size is Unconventional: Custom sizes require bespoke frames that you simply cannot find ready-made.
  • You Desire a Flawless Finish: For a truly spectacular, gallery-quality result that enhances the artwork, nothing beats the precision and craftsmanship of a professional.
  • You Need Design Guidance: A professional framer acts as a design consultant, helping you choose the perfect frame and mount combination to complement both the art and your decor.

What to Expect from Our Bespoke Framing Service

At First4Frames Gallery, we believe that framing is an art in itself. Our bespoke service begins with a personal consultation where we listen to your vision. We guide you through our extensive collection of premium, conservation-grade materials, from beautiful solid wood mouldings to museum-quality glazing. Our expert craftspeople then bring it all together with meticulous attention to detail, ensuring your watercolour is not just protected, but beautifully presented. We handle every piece with the care it deserves, delivering a perfect finish every time. Start your bespoke framing journey with us today.

The Perfect Finish for Your Watercolour Masterpiece

Framing a watercolour is about more than just aesthetics; it’s a vital step in preserving its delicate beauty for a lifetime. From choosing the right conservation-grade materials to selecting a mount and frame that elevates the art, you now have the knowledge to give your piece the protection it deserves. Understanding how to frame a watercolour painting is the final, crucial brushstroke in its journey from paper to pride of place on your wall.

For those special pieces that demand a flawless, professional finish, our team is here to help. With over 20 years of professional framing experience, we use only the finest conservation-grade, acid-free materials. Our friendly Falkirk team offers expert design advice to create a truly bespoke frame that acts as the perfect bridge between your artwork and your home.

Ready to give your art the beautiful, lasting home it deserves? Explore our bespoke framing services for your artwork.

Frequently Asked Questions

Do you really need a mount for a watercolour painting?

Absolutely. A mount is essential for professionally framing a watercolour. Its most important job is to create a small air gap between the painting’s surface and the glass. This prevents moisture from being trapped against the artwork, which can lead to mould or the paint sticking to the glass. A mount also provides a beautiful visual border, allowing the artwork to breathe and drawing the viewer’s eye inward, enhancing the overall impact of your piece.

Can you frame a watercolour without glass to avoid glare?

We strongly advise against framing any watercolour without glass. The delicate paper and water-soluble pigments are highly vulnerable to irreversible damage from dust, humidity, and airborne pollutants. Glazing is the only way to protect your art from these elements and from fading caused by UV light. To combat glare, you can opt for premium anti-reflective or museum-grade glass, which offers crystal-clear viewing while providing vital protection for your treasured artwork.

What is the best way to stop my watercolour paper from buckling inside the frame?

The key to preventing buckling, or ‘cockling’, is correct mounting. Your artwork should be attached to an acid-free backing board using a ‘T-hinge’ method with archival tape along the top edge only. This allows the paper to hang naturally and expand or contract with humidity changes without warping. Taping the artwork down on all four sides is a common mistake that restricts this movement, which is what causes the paper to buckle and ripple over time.

What’s the difference between standard framing and ‘conservation framing’?

The difference lies in the quality and longevity of the materials. Standard framing may use mounts and backing boards with acidic cores that can cause your artwork to yellow and deteriorate. Conservation framing exclusively uses acid-free, archival-quality materials for everything that touches the art, including the mount, backing, and tapes. This professional method, often paired with UV-protective glass, is designed to preserve the beauty and value of your fine art for generations to come.

How much does it cost to get a watercolour professionally framed?

In the UK, the cost for professional framing depends on several factors: the artwork’s size, your choice of frame moulding, the type of mount, and the glazing. For a small, simple piece, you might expect to pay between £60 and £90. For a larger painting with a bespoke frame, a double mount, and specialist anti-glare glass, the cost could be £150 to £300 or more. Think of it as a crucial investment in protecting and showcasing your beautiful art.

What kind of tape should I use to mount my watercolour painting?

It is vital to use only archival, acid-free tape. Everyday tapes like masking tape or Sellotape contain acids that will leech into the paper, causing irreversible yellow stains and damage. For a secure and safe mount, always choose a gummed archival paper or linen tape. This is the professional standard and a crucial step in how to frame a watercolour painting to conservation levels, ensuring your artwork remains pristine within its frame.

Posted on

How to Choose the Right Size Picture Frame: A Complete Guide

How to Choose the Right Size Picture Frame: A Complete Guide

The excitement of finding the perfect artwork can quickly turn to confusion when faced with measurements, mounts, and a sea of frame sizes. The fear of making a costly mistake is real, and it can leave your treasured pictures languishing in a tube instead of taking pride of place on your wall. But it doesn’t have to be this complicated. Learning how to choose the right size frame is the most crucial step in transforming a simple print into a spectacular, professionally finished piece that you’ll be proud to display.

In this complete guide, we’ll demystify the entire process with our expert advice. We’ll walk you through everything from accurately measuring your artwork to understanding the essential role of a picture mount and decoding confusing terms. You’ll discover how to make a choice that not only fits perfectly but also beautifully enhances your picture, turning that framing challenge into a simple, enjoyable act of craftsmanship. Let’s embark on this journey together and give your art the beautiful home it deserves.

First Things First: Understanding the Three Key Measurements

Embarking on the journey to frame your art is an exciting step, but the secret to a spectacular result lies in precision. Before you fall in love with a particular style, getting your measurements right is the essential foundation. Understanding the difference between your artwork size, the mount aperture, and the final frame size will prevent any guesswork and ensure a perfect, professional fit. This is the most important part of learning how to choose the right size frame and guarantees your piece will look its absolute best.

To see these principles in action, this helpful video provides a clear visual guide:

How to Measure Your Artwork Accurately

To achieve a bespoke, gallery-quality finish, accuracy is paramount. Always begin by measuring the artwork itself, not the paper it is on, unless you want the border to show. For the most reliable results, follow these simple steps:

  • Use a steel tape measure, as fabric ones can stretch and give inaccurate readings.
  • Carefully measure the exact height and width of the image area you want to display.
  • Measure each dimension twice to confirm your numbers and avoid any small errors.
  • Note down your dimensions clearly, ideally in both millimetres (mm) for precision and inches for reference.

Frame Size vs. Aperture: What’s the Difference?

These two terms are often confused, but they refer to distinct measurements. The frame size relates to the inner dimensions of the frame itself-the size of the glass and backing board that will fit inside it. The aperture, on the other hand, is the opening or ‘window’ in the picture mount through which your artwork is viewed. To hold your art securely, the aperture should be slightly smaller than your artwork. A 5-10mm overlap on all sides is standard, preventing your picture from slipping through the opening.

The Crucial Role of the Picture Mount

A picture mount (or mat) is far more than just a decorative border; it is a key component of professional framing. It creates a visual space between the artwork and the frame, drawing the viewer’s eye inward. Crucially, it also separates your art from the glazing (the glass or acrylic), protecting it from potential damage caused by condensation. Whether you have a bespoke piece or one that fits common standard photo print sizes, a mount provides a beautiful finish. Remember, the width of the mount’s border adds to the overall dimensions, so you must factor this in when determining the final frame size you need.

Standard Sizes vs. Bespoke Framing: Which Path is Right for You?

Once you have carefully measured your artwork, you arrive at a crucial decision point. Do you opt for a convenient, ready-made frame, or invest in a bespoke service for a truly perfect finish? Both paths have their merits, and understanding the difference is a key part of how to choose the right size frame. Let’s explore the pros and cons to help you find the ideal solution for your art.

A Guide to Common Ready-Made Frame Sizes

Standard, or “off-the-shelf,” frames are manufactured to fit the most common photo and paper dimensions. In the UK, you’ll frequently find sizes designed for photographs like 6×4, 7×5, and 10×8 inches, as well as the international ‘A’ series for prints and documents (A4, A3, A2). If your art matches one of these dimensions, a standard frame can be a simple solution. Remember to account for a mount (also called a mat or passe-partout), which adds a border and requires a larger frame.

When is a Standard Size Frame the Best Choice?

A ready-made frame is often the most practical choice in several situations. It’s an excellent, cost-effective option when you need a frame quickly or are framing a piece of lower sentimental or monetary value. Consider a standard frame if:

  • You are framing standard-sized photos, posters, or certificates.
  • You are working with a tight budget.
  • You need a frame immediately for a last-minute gift.
  • You are happy with a more limited selection of styles and colours.

Why Bespoke Framing Guarantees a Perfect Result

For artwork that is unusually sized, valuable, or deeply personal, bespoke framing is the ultimate expression of care. A custom frame is crafted to the precise millimetre of your piece, ensuring a flawless, gallery-quality presentation. Our experts, who adhere to the highest standards of craftsmanship upheld by organisations like the Professional Picture Framers Association, provide a premium service. The key benefit of learning how to choose the right size frame with a bespoke service is the unlimited potential it unlocks-giving you complete control over the materials, colour, mount style, and glazing to create a truly unique and protective home for your art.

This level of personalisation is particularly meaningful when framing cherished photographs of loved ones to create a lasting tribute. While a beautiful frame honours a memory at home, services like Funera focus on creating a respectful and beautiful service to honour a life lived.

The Art of Proportion: Matching Frame Size to Artwork and Style

Finding the perfect frame goes beyond simply matching the dimensions of your artwork. It’s an exercise in visual balance and harmony. The real secret behind how to choose the right size frame lies in understanding proportion-how the width of the mount and the thickness of the frame itself work together to complement and elevate the piece. A well-proportioned frame doesn’t just protect your art; it enhances its story and draws the viewer in, becoming the perfect bridge between your art and your decor.

Giving Your Art ‘Breathing Room’ with Mounts

A mount creates vital space between the artwork and the frame, preventing the glass from touching the art’s surface while adding visual separation. This ‘breathing room’ is crucial for creating a professional finish. For a balanced look, a general rule is that the mount should be significantly wider than the frame moulding. For a classic, gallery-style aesthetic, consider an off-centre or ‘weighted’ mount, where the bottom border is slightly wider, which gives the artwork a subtle visual lift. Understanding these basic principles is a great first step, and a comprehensive a guide to framing art can provide even more foundational knowledge on achieving the perfect balance.

Framing Small Art for a Big Impact

Don’t let a small piece of art get lost on your wall. Instead, turn it into a deliberate, spectacular focal point. Using an oversized frame with a very wide mount is a professional technique that creates drama and immediately draws the eye towards the centre, making a small print feel more significant and luxurious. For a contemporary touch, you could also:

  • ‘Float’ the artwork: Mounting the art on top of the mount board creates a subtle shadow and a striking 3D effect.
  • Create a gallery wall: Grouping several small, identically framed pieces creates a cohesive and powerful display.

See these professional techniques in action by exploring the beautiful examples in our online gallery.

How to Frame Large Art Without Overpowering It

When you’re deciding how to choose the right size frame for a large, statement piece, the philosophy is often “less is more.” A large painting or print already has a commanding presence, so a thick, ornate frame can feel overwhelming and compete for attention. Instead, opt for a relatively thin, simple frame that acts as a clean, crisp border. This keeps the focus squarely on the artwork itself. For very large pieces, a mount may not be necessary at all, allowing the art to extend to the edge. Most importantly, ensure your chosen frame is built with premium craftsmanship to support the weight safely and securely for years to come.

An infographic titled How to Choose the Right Size Frame guides you through key measurements, how to measure accurately, differences between standard and bespoke options, and tips for achieving balanced or weighted mounts.

Beyond the Art: Choosing a Frame Size for Your Space

The perfect frame does more than just protect your artwork; it acts as a beautiful bridge between the piece and your room’s décor. When you consider the context of your space-the scale of the wall, the surrounding furniture, and the overall style-the right frame size can transform a picture into a stunning focal point. Understanding how to choose the right size frame for your wall is a key step in achieving a polished, professionally styled interior.

The 2/3 Rule: Scaling Your Frame to the Wall

A simple yet powerful interior design principle is the two-thirds rule. Aim for your artwork, whether a single statement piece or a curated gallery wall, to occupy roughly two-thirds to three-quarters of the available wall space. This prevents a small frame from looking lost and insignificant on a large wall, creating a sense of balance and intentionality that instantly elevates your room.

Hanging Art Above Furniture (Sofas, Beds, Tables)

When placing art above furniture like a sofa, bed, or console table, scale is crucial. Your framed art should be approximately two-thirds the width of the furniture it hangs over. To create a cohesive look, hang the piece so its bottom edge is 6-8 inches above the furniture. This creates a strong visual anchor, ensuring the art and furniture feel connected rather than floating apart.

Planning a Gallery Wall: Mixing and Matching Sizes

A gallery wall is a spectacular way to display a collection of treasured pieces. To create a harmonious composition, start by placing your largest frame first, often slightly off-centre, as an anchor. Arrange your smaller frames around it, maintaining a consistent spacing (usually 2-3 inches) between each one. A top tip: lay your entire arrangement on the floor first to perfect the layout before a single nail touches the wall.

A Final Checklist for Choosing the Perfect Frame Size

Feeling confident? Here is our simple checklist to guide you through the final steps for selecting a beautiful, perfectly-proportioned frame:

  • Step 1: Carefully measure your artwork’s height and width.
  • Step 2: Decide if you want a mount, and calculate its dimensions.
  • Step 3: Assess the wall space and apply the design rules for scale and placement.
  • Step 4: Choose a standard size for convenience or opt for a bespoke frame for a perfect fit.

If you’re still unsure or need bespoke advice for a tricky space, our team is always here to help. Need expert advice? Contact our framing specialists today!

The Final Piece: Finding Your Perfect Frame

Choosing a frame is about more than just measurements; it’s an art in itself. By understanding the key relationship between your artwork, the mat, and the frame, and considering the proportions of your space, you now have the knowledge for how to choose the right size frame with confidence. This ensures your treasured piece doesn’t just hang on a wall-it truly belongs.

For those special pieces that deserve nothing less than perfection, a bespoke solution is the ultimate expression of care. At First4Frames Gallery, we bring over 20 years of professional framing experience to every project. From our Falkirk workshop, our expert craftsmen use only high-quality, conservation-grade materials to create a beautiful, lasting home for your art. Let us handle the details with the precision and passion your artwork deserves.

Find the perfect fit with our bespoke framing service.

Embark on your framing journey today and give your art the spectacular presentation it was made for.

Frequently Asked Questions

What size frame do I need for an A4 picture?

For a standard A4 print (21cm x 29.7cm), you have two beautiful options. For a simple, contemporary look, choose an A4 frame where your artwork will fit perfectly edge-to-edge. If you desire a more classic, gallery-style presentation, we recommend using a larger frame, such as 30cm x 40cm, with a mount. This creates a professional border that draws the eye to the artwork and gives it space to breathe.

Should a picture frame be bigger than the picture?

In most cases, yes. Selecting a frame that is larger than your artwork allows for the inclusion of a mount. This beautiful border serves two key purposes: it creates visual separation between the art and the frame, enhancing its impact, and it protects your print by preventing it from touching the glass. While a frame that is the exact size of the picture offers a modern, ‘full-bleed’ effect, a larger frame with a mount provides a timeless, professional finish.

How do I measure for a frame if I want to include a mount?

First, carefully measure the exact height and width of your artwork. This measurement will be the ‘aperture’ size, or the opening, of the mount. Next, decide on your desired mount border width-for example, 5cm. To find the required frame size, add double the mount width to both the height and width of your artwork. For a 20x30cm print with a 5cm mount, you would need a 30x40cm frame.

How wide should a picture frame border (the mount) be?

The perfect mount width creates a harmonious balance between the art and the frame. As a general rule of thumb, the mount should be noticeably wider than the frame moulding itself-never narrower. A border of between 5cm and 8cm is a popular and well-proportioned choice for many standard-sized prints. For smaller artworks, a more generous mount can add presence, while larger pieces may suit a proportionally smaller border. It is an artistic choice that should ultimately complement the piece.

Is it better to choose a frame that matches the art or the room?

A truly perfect frame acts as a bridge between your artwork and your room’s décor, so it should ideally complement both. The frame’s primary role is to enhance the art, so its style and colour should harmonise with the piece first. However, it must also feel at home in your space. Consider the frame and mount as the elements that seamlessly integrate your chosen art into your existing interior design, creating a cohesive and polished look.

Can I put a small picture in a large frame?

Absolutely! Using an oversized frame with a wide mount is a spectacular way to give a small piece of art significant visual impact. This technique creates a dramatic, gallery-quality effect that turns a cherished photograph or a delicate sketch into a premium focal point. Deciding to give a small piece more presence is a creative answer to the question of how to choose the right size frame, making a confident and stylish statement on your wall.

Posted on

How to Frame a Silk Scarf: A Professional Guide

How to Frame a Silk Scarf: A Professional Guide

That beautiful silk scarf – a vibrant designer piece, a treasured gift, or a vintage find – is a work of art in its own right. Yet, too often, these masterpieces are hidden away, their spectacular colours and stories unseen. The thought of framing a silk scarf can feel daunting. What if it wrinkles? How do you prevent the delicate fabric from sagging or fading? The fear of damaging something so precious is completely understandable, and it stops many from showcasing their treasures.

In this professional guide, we will demystify the entire process with the passion and craftsmanship we apply to all our work. We’ll share our expertise on the correct mounting techniques that ensure a smooth, lasting display, the premium archival materials needed for preservation, and how to select the perfect bespoke frame to transform your scarf into a stunning piece of wall art. Prepare to feel confident in turning your cherished textile into a beautiful, protected centrepiece for your home.

Why Frame a Scarf? Turning Wearable Art into Wall Art

A beautiful silk scarf from a designer like Hermès, Liberty of London, or Chanel is more than just a fashion accessory; it is a piece of wearable art. Each one tells a story through its intricate design, spectacular colours, and exquisite craftsmanship. Often, these scarves carry deep sentimental value, marking a special occasion, a cherished gift, or an heirloom passed down through generations. Leaving such a treasure tucked away in a drawer means its beauty goes unseen. The process of framing a silk scarf elevates it from a beloved item into a stunning piece of bespoke wall art, allowing you to celebrate its story every single day.

To see how this transformation can look, this video offers some great visual inspiration:

Preserving Memories and Value

Silk is a delicate, organic material susceptible to damage. When stored or worn, it’s at risk from accidental snags, spills, and even pests like moths. More insidiously, exposure to sunlight can cause its vibrant colours to fade permanently. Professional framing is the ultimate act of preservation. By using conservation-grade materials, including UV-protective glazing and acid-free mounts, we create a safe, stable environment that protects the fabric. This approach is grounded in established textile conservation principles, ensuring your scarf’s financial and sentimental value is maintained for years to come.

Creating a Unique Focal Point

Choosing to frame a treasured scarf provides a personal touch that mass-produced prints simply cannot match. It becomes a unique statement piece that reflects your personal history and style. The rich colours and dynamic patterns can act as the perfect bridge between your room’s decor and the artwork, tying the entire space together. A professionally framed scarf can create a spectacular focal point in any room.

  • Above a Mantelpiece: A large, colourful scarf can command attention and set the tone for a living room.
  • In a Hallway or Landing: Greet guests with a piece of art that is both beautiful and deeply personal.
  • In a Dressing Room or Bedroom: Add a touch of luxury and elegance to your most private spaces.

By framing a silk scarf, you are not just decorating a wall; you are curating your home with objects that hold meaning, beauty, and memories.

The Professional Approach: Conservation Methods for Framing Scarves

When it comes to professionally framing a silk scarf, the process is as much about preservation as it is about presentation. A trusted framer approaches your beautiful textile not just as a decorative item, but as a delicate piece of art. The guiding principle of this bespoke craftsmanship is simple yet crucial: every step must be fully reversible, ensuring your scarf can be returned to its original state without a trace of ever being framed. This means no damaging adhesives, tapes, or glues will ever touch the precious silk, and only premium, archival-grade materials are used from start to finish.

Step 1: Preparation and Tensioning

The journey begins with a meticulous inspection of the scarf to assess its condition, fabric weight, and any unique features. To achieve a perfectly flat and smooth display, any creases are gently removed using a controlled, low-temperature steaming process-never a direct, hot iron that could scorch the delicate fibres. The scarf is then carefully positioned and stretched over an acid-free foam core backer board. This provides a stable, pH-neutral foundation that prevents yellowing over time. Special care is taken to respect the scarf’s plump, hand-rolled edges, ensuring they are showcased, not flattened.

Step 2: The Art of Stitch Mounting

This is where true expertise in framing a silk scarf shines. Instead of using destructive pins or permanent glues, a professional employs a conservation stitching technique. Using fine, inert threads (often silk or polyester) that won’t discolour or damage the fabric, tiny, almost invisible stitches are strategically placed to secure the scarf to the backer board. This painstaking method, a cornerstone of museum-level archival mounting methods, ensures even tension across the entire surface, preventing sagging or puckering. Most importantly, these stitches can be easily snipped and removed years later, leaving the silk completely unharmed.

Step 3: Choosing Archival Glazing and Spacers

To protect your scarf for decades, the glazing and spacing are critical. The glass should never touch the surface of the silk, as this can trap moisture and lead to mould or fabric decay. To prevent this, custom-cut ‘spacers’ are fitted into the frame’s recess, creating a crucial air gap between the silk and the glazing. We always recommend using glass with at least 99% UV protection to prevent the vibrant colours from fading due to sunlight. For a truly spectacular and uninterrupted view of your artwork, premium anti-reflective glass can be used to minimise glare and enhance clarity.

DIY Scarf Framing: A Guide to the Home Method & Key Risks

We understand the appeal of a personal project, especially for a beautiful scarf that holds sentimental, but not significant monetary, value. If you’re keen to try framing a silk scarf yourself, it’s essential to approach the task with care and the right materials to avoid accidental damage. This guide offers a simplified method for home framing, while honestly highlighting the compromises and risks compared to a professional, conservation-grade service.

What You’ll Need

The foundation of any successful framing project is the quality of your components. Using the wrong materials can cause irreversible yellowing and deterioration over time. For a deeper dive into the conservation science behind choosing framing materials, archival resources offer expert guidance, but here are the non-negotiable basics:

  • A Deep ‘Box’ Frame: This is crucial. A deep frame creates a space between the silk and the glazing (glass or acrylic), preventing direct contact that can trap moisture and damage the delicate fibres.
  • Acid-Free Mount Board or Foam Core: You will wrap your scarf around this board. It must be certified acid-free to prevent chemical burns and discolouration of the fabric.
  • Stainless Steel Entomology Pins: Do not use standard sewing or craft pins, which can rust and stain the silk. Ultra-fine entomology pins are sharp, rust-proof, and minimally invasive.

A Simplified Mounting Process

With your materials ready, you can begin the delicate process of mounting. Patience is key to achieving a smooth, beautiful finish.

  1. Prepare the Silk: Set your iron to its lowest heat setting (the ‘silk’ setting) with the steam turned off. Place a clean, white cotton cloth over the scarf and gently press out any creases. Never place a hot iron directly onto the silk.
  2. Mount the Scarf: Lay your ironed scarf face down on a clean surface. Place the acid-free board in the centre. Carefully wrap the edges of the scarf around the board, ensuring the fabric is taut and smooth without pulling the weave out of shape.
  3. Secure with Pins: Secure the scarf by inserting the stainless steel pins into the edge of the mount board, passing through the folded-over fabric on the back. This method avoids piercing the visible front of your beautiful scarf.

Common DIY Mistakes to Avoid

While the process seems straightforward, several common pitfalls can lead to permanent damage. Here’s what to avoid at all costs when attempting to frame your silk scarf:

  • Warning #1: Never use adhesives. Glue, sticky tape, and spray adhesives will stain the silk and become brittle over time, causing irreversible damage to the delicate fibres.
  • Warning #2: Avoid standard cardboard. The acidic wood pulp in standard cardboard backing will leach into the fabric, causing unsightly yellow-brown marks known as ‘acid burn’.
  • Warning #3: Don’t use a shallow frame. Pressing the silk directly against the glass is one of the fastest ways to cause damage from condensation and potential mould growth.

Your beautiful Hermès or Liberty scarf deserves the highest level of care and craftsmanship to ensure it remains a spectacular centrepiece for decades. For a treasured scarf, trust the experts with your bespoke framing.

An infographic titled Framing a Silk Scarf: The Two Paths compares framing a silk scarf with professional conservation (secure stitching, UV glass, archival materials) versus DIY methods (pins, tapes, glues, standard craft supplies, risk of damage).

Design Masterclass: Choosing the Perfect Frame & Mount

Having covered the technical methods of preservation, we now move to the most creative and personal stage of framing a silk scarf: the design. A frame is much more than a simple border; it acts as a crucial bridge, connecting the artwork to your interior décor. The right choice will harmonise with your space while making the colours and intricate details of your silk truly sing. This bespoke design consultation is a cornerstone of our professional service, ensuring your treasured scarf becomes a spectacular and perfectly integrated centrepiece.

Selecting a Frame Style

The scarf’s own design is the best guide for choosing a frame. We recommend:

  • Simple, slim frames in black, white, or natural wood for bold, contemporary scarves. This minimalist approach allows the vibrant, modern pattern to take centre stage.
  • Ornate or detailed frames for classic or traditional patterns, such as intricate florals or paisley. A touch of classic elegance in the frame can beautifully echo the heritage of the design.
  • Float frames for a modern, gallery-style finish. This technique makes the scarf appear to levitate within the frame, perfectly showcasing beautiful hand-rolled edges.

A great tip is to select a frame colour that pulls out a subtle accent shade from within the silk, creating a truly cohesive and professional look.

To Mount or Not to Mount?

A window mount (the card border around the art) provides essential visual breathing space, preventing the design from feeling crowded by the frame. A crisp, neutral mount is a timeless choice, but a coloured one can create a stunning effect, making the scarf’s colours appear even more vibrant. Alternatively, ‘float mounting’ involves carefully positioning the entire scarf on top of a backing board so that no part of it is covered. This is the premier method for displaying the delicate, hand-finished edges that are the hallmark of a luxury silk scarf.

Matching Your Interior Décor

Finally, consider the room where your framed scarf will hang. Take note of the existing wood tones, metal finishes, and overall style. A sleek silver frame might complement a minimalist room with chrome accents, while a warm oak frame would feel at home in a classic or bohemian space. Our team of experts are passionate about the art of framing and are always on hand to provide personalised advice, ensuring the final piece harmonises perfectly with your home.

Feeling inspired? The perfect frame is waiting to bring your vision to life. Explore our range of custom frames to find your perfect match.

Your Scarf’s Next Chapter: From Drawer to Display

Your beautiful silk scarf holds stories and artistry within its threads, making it far too precious to remain hidden away. As we’ve explored, transforming this wearable art into stunning wall art is a delicate process. While a home attempt is possible, professional conservation framing is the only way to truly protect the delicate fabric, prevent fading, and ensure its longevity. The right bespoke frame acts as a bridge, connecting your scarf’s unique design to your room’s decor to create a truly personal and spectacular centrepiece.

When it comes to the expert task of framing a silk scarf, trust and craftsmanship are paramount. With over 20 years of bespoke framing experience, our team is passionate about preservation. We use only conservation-grade, acid-free materials to protect your treasured item, providing expert guidance on both design and preservation to create a display you’ll adore for a lifetime.

Ready to give your scarf the beautiful presentation it deserves? Get a no-obligation quote for your scarf framing today and let its unique story shine.

Frequently Asked Questions

How much does it cost to professionally frame a silk scarf?

The cost of framing a silk scarf can vary significantly based on your chosen materials and its size. For a standard 90cm x 90cm scarf, you can expect prices to start from around £180 for a quality bespoke frame with standard glass. If you opt for premium mouldings and specialist UV-protective or anti-reflective glass to preserve the vibrant colours, the cost could be £300 or more. We always provide a detailed, no-obligation quote to find the perfect option.

Will framing my valuable Hermès scarf decrease its value?

Quite the opposite! When done professionally using conservation methods, framing protects your valuable Hermès scarf from environmental damage like dust, insects, and UV light, thus preserving its condition and value. We use completely reversible, acid-free mounting techniques, meaning no glues or harmful adhesives ever touch the silk. The scarf can be removed in the future in its original, pristine condition. It’s an investment in preserving your investment.

Can you frame a scarf without glass to avoid reflections?

While it is technically possible, we strongly advise against it. Glazing is the primary barrier that protects the delicate silk fibres from dust, airborne pollutants, and accidental damage. To combat reflections, we recommend specialised anti-reflective glass. This premium option offers crystal-clear viewing without compromising on essential UV protection, which is vital for preventing colour fade. It truly gives you the best of both worlds: perfect visibility and complete protection.

How do you get deep wrinkles or creases out of a silk scarf before framing?

Preparing the silk is a crucial step in our process, which we handle with the utmost care. To remove creases, we use a professional-grade steamer or a very low-temperature iron with a protective cloth. This gently relaxes the delicate fibres without risking heat damage, ensuring the scarf lies perfectly flat and smooth for a flawless presentation. You can trust our expertise to prepare your scarf perfectly before it is mounted by our skilled team.

What is a ‘box frame’ and why is it recommended for scarves?

A ‘box frame’, or shadow box, is a deep frame that uses a spacer to create a gap between the artwork and the glazing. This is essential when framing a silk scarf because it prevents the delicate fabric from pressing against the glass. This air gap is crucial for conservation, as it stops any potential moisture transfer and prevents the risk of mould growth or the silk fibres adhering to the glass over time, ensuring long-term preservation.

How long does the bespoke scarf framing process take?

Our bespoke framing service is a meticulous craft, and quality takes time. From your initial consultation to the finished piece, the entire process typically takes between 2 to 3 weeks. This allows us to order your specific chosen materials, carefully prepare and mount your scarf using conservation techniques, and expertly handcraft the frame. We will always provide you with a more precise timeline once your design choices have been finalised.

Posted on

The Best Way to Frame a Poster: A Complete Guide for 2026

The Best Way to Frame a Poster: A Complete Guide for 2026

That beautiful tour poster or limited-edition art print deserves better than a life rolled up in a tube. But when you start searching for the best way to frame a poster, the options can feel overwhelming. What if it’s an unusual size that won’t fit a standard frame? How do you handle it without causing damage? And does a professional, gallery-quality finish have to come with a hefty price tag? It’s easy to feel stuck, worried about making the wrong choice for a piece you love.

Consider this your complete guide for 2025 to transforming that cherished paper into a spectacular piece of wall art. We believe the perfect frame acts as a bridge between your décor and the artwork, and finding it should be a journey of discovery, not a hassle. We’ll explore all your options, from simple and effective DIY tricks to the lasting value of bespoke, professional craftsmanship. You’ll learn how to protect your poster from dust and fading and gain the confidence to choose the perfect framing solution for your style and budget.

Why Frame a Poster? The Crucial Role of a Good Frame

That poster you love-the one rolled up in a tube or temporarily stuck to the wall with Blu-tack-holds immense potential. With the right frame, it can be transformed from a disposable print into a beautiful piece of lasting wall art. A premium, bespoke frame does more than just hang your poster; it protects, elevates, and integrates it into your home, turning a simple image into a cherished feature.

Understanding the dual role of a frame is the first step in discovering the best way to frame a poster for a flawless finish. It’s about both preservation and presentation. To see these principles in action, this short video offers a great overview:

Protection: Your Frame’s Most Important Job

First and foremost, a frame is a shield. A professionally sealed frame creates a crucial barrier against the elements that can degrade your poster over time. This includes:

  • Physical Damage: Protection from rips, creases, and scuffs.
  • Environmental Factors: A defence against dust, moisture, and airborne pollutants.
  • UV Light: High-quality glazing with UV protection is essential to prevent the vibrant inks in your poster from fading and discolouring due to sunlight exposure.

Furthermore, using a mount (the card border inside the frame) prevents the poster from pressing directly against the glazing. This small gap is vital, as it stops the artwork from sticking to the surface over time, which can cause irreversible damage to a vintage or limited edition print.

Aesthetics: Elevating Your Poster to Art

While protection is practical, the aesthetic power of a frame is what truly brings your poster to life. A well-chosen frame provides structure, defines the artwork’s boundaries, and creates a clear focal point. It acts as the perfect bridge between the art and your room’s decor, tying everything together harmoniously. For centuries, artisans have understood this relationship; you can learn more about the history of picture frames and their role in art presentation. Think of it as the finishing touch to an outfit-the right frame completes the look, making the entire composition feel deliberate and sophisticated. It signals that this isn’t just a poster; it’s a piece of art worth preserving and admiring.

Your Framing Options: A ‘Good, Better, Best’ Approach

When it comes to framing, one size certainly does not fit all. The right choice depends entirely on your budget, the value of your poster, and the final look you want to achieve. Not all framing methods are created equal, and understanding the differences is the first step toward a beautiful, lasting result. To simplify your decision, we’ve broken down the options into three distinct tiers: Good, Better, and Best. This approach helps you match your investment to your artwork, ensuring every poster gets the treatment it deserves.

Good: The Quick & Affordable Off-the-Shelf Frame

Ideal for inexpensive, easily replaceable posters or temporary displays, the off-the-shelf frame is the most accessible option. You can find these in major retailers for as little as £10-£30. Their main advantage is immediate availability and low cost. However, the trade-offs are significant. You are limited to standard sizes, and the materials are often low-quality, featuring thin acrylic glazing and flimsy MDF backings. Crucially, these frames lack UV protection and use acidic materials that can cause your poster to yellow and degrade over time.

Better: The Quality Ready-Made Frame

This is a fantastic middle-ground for posters you care about but that aren’t priceless heirlooms. A step-up in both quality and price, these frames offer a more polished and protective home for your art. Look for features like solid wood or sleek aluminium construction, real glass, and an included acid-free mount to separate the poster from the glazing. While you’re still constrained by standard sizing, the superior materials provide a more professional finish and better long-term protection than the budget alternatives.

Best: Professional Bespoke Framing

For valuable, sentimental, or uniquely sized posters, bespoke framing is the ultimate solution. This is the best way to frame a poster to ensure it is both perfectly presented and preserved for generations. A professional framer provides a tailored service that mass-produced frames simply cannot match. The benefits are clear:

  • A Perfect Fit: Your frame is built to the exact millimetre of your poster’s dimensions, ensuring a flawless, gallery-quality presentation.
  • Conservation-Grade Materials: You gain access to premium, acid-free mounts and backings, plus UV-protective glazing that shields your art from 99% of harmful light.
  • Expert Guidance: A professional can help you navigate the vast choices of frame styles, materials, and mount colours to perfectly complement your artwork and your home’s decor. You can find excellent guides on what to consider, but nothing beats expert advice.

For a perfect finish that lasts a lifetime, explore our bespoke framing services.

A Framer’s Checklist: Key Components of the Perfect Frame

Understanding the anatomy of a picture frame transforms the selection process from guesswork into a confident choice. Each component plays a vital role in both the final look and the long-term preservation of your poster. Whether you’re choosing a ready-made frame or commissioning a bespoke piece, this checklist covers what professional framers consider, ensuring you find the best way to frame a poster for a spectacular, lasting finish.

Frame Moulding: Material, Style, and Colour

The moulding is the structure of your frame, and its material sets the tone. Wood frames offer a classic, warm feel and are incredibly versatile, from the natural grain of oak and ash to sleek painted finishes in black or white. For a more contemporary aesthetic, aluminium frames provide a modern, minimalist look with clean lines and slim profiles. The key is to choose a style that acts as a bridge between your poster and your room’s decor, complementing the artwork’s mood and colour palette.

The Mount (or Mat): Giving Your Poster Breathing Room

A mount is the high-quality card border that sits between the frame and your poster. Its purpose is twofold. Visually, it creates breathing space, preventing the artwork from feeling cramped and drawing the viewer’s eye inward. More importantly, it serves a crucial protective function by stopping the poster from making direct contact with the glazing. This prevents potential moisture damage and ensures the print never sticks to the surface. Always insist on an acid-free or conservation-grade mountboard to prevent discolouration over time.

Glazing: The Protective Shield (Glass vs. Acrylic)

Glazing is the clear sheet that protects your poster from dust, moisture, and damage. Your main choices are:

  • Standard Glass: Offers excellent clarity and is scratch-resistant, but it can be heavy and will shatter on impact.
  • Acrylic (Plexiglass): A lightweight and shatter-resistant alternative, making it ideal for large posters or frames in high-traffic areas. While durable, it can be more prone to scratching than glass.

For premium protection, consider an upgrade. UV-protective glazing is essential for preventing the vibrant colours in your poster from fading due to sunlight. For ultimate clarity, anti-reflective options like Museum Glass minimise glare, making it seem as though there’s nothing between you and the art.

Infographic titled Your Poster Framing Options compares Off-the-Shelf, Quality Ready-Made, and Professional Bespoke frames by price, materials, protection, and result, using icons and color-coded columns.

How to Frame a Poster Yourself: A Step-by-Step Guide

For those with a passion for hands-on projects, framing a poster yourself can be an incredibly rewarding experience. Achieving a professional, gallery-worthy finish at home is entirely possible with the right technique. This guide will walk you through assembling a ready-made frame, helping you avoid common pitfalls like trapped dust, fingerprints, or creased paper. Remember, your most important tools for this task are a clean workspace and a little patience.

Following these steps is the best way to frame a poster and ensure your artwork looks spectacular for years to come. Let’s begin the craftsmanship.

Step 1: Prepare Your Workspace and Poster

A flawless result starts with meticulous preparation. Before you even think about assembly, dedicate time to getting everything just right. A clean, spacious, and well-lit flat surface like a dining table is ideal. Taking these initial steps prevents frustrating mistakes later on.

  • Flatten Your Poster: If your poster arrived rolled, carefully unroll it and place it on a clean surface. Lay a protective sheet of paper over it and weigh it down at the corners with heavy books. Leave it overnight to flatten completely.
  • Clean Your Materials: Gently wipe down the poster with a soft, dry cloth if needed. Use a microfibre cloth and glass cleaner to clean both sides of the frame’s glazing (whether glass or acrylic).
  • Prevent Fingerprints: Consider wearing a pair of soft cotton gloves. This simple trick prevents oils from your fingers from marking the poster or the inside of the glass.

Step 2: Position and Secure the Artwork

Properly mounting your poster is crucial as it allows the paper to breathe. Paper naturally expands and contracts with changes in temperature and humidity, and fixing it rigidly can cause it to ripple or buckle over time. Place your poster face down onto the mount or backing board, ensuring it is perfectly centred.

To secure it, use small pieces of acid-free artist’s tape to create a ‘T-hinge’ at the top edge only. This technique holds the artwork in place while allowing it to hang naturally. Never use standard sticky tape, as its acid content will cause the paper to yellow and become brittle over time.

Step 3: Assemble the Frame and Final Checks

With your poster beautifully mounted, the final assembly is straightforward. Carefully place the glazing, mount, and artwork into the frame. Add the backing board and secure it firmly using the provided metal tabs or points. Before sealing it completely, turn the frame over and perform one last visual check through the glass. Look for any trapped dust, hair, or smudges. If you spot anything, carefully reopen it and remove the debris.

Once you are satisfied, secure the backing and attach your hanging hardware, such as D-rings and cord. Your beautifully framed poster is now ready to take pride of place on your wall. If you’d rather leave it to the experts, you can always explore our gallery of professionally framed art.

Hanging Your Framed Poster for Maximum Impact

You’ve invested time and care into choosing the perfect print and a beautiful bespoke frame. The final step is hanging it, and this crucial stage is what truly transforms your poster into a spectacular centrepiece for any room. Proper placement isn’t just about putting a nail in the wall; it’s about creating harmony between the art, the frame, and your living space. A well-hung piece of art can elevate your décor and bring a room to life.

Finding the Right Location and Height

Where you hang your art is just as important as the frame itself. To achieve a professional, gallery-style look, follow the golden rule: hang the artwork so its centre point is at eye level. For most people, this is approximately 57-60 inches (145-152cm) from the floor. Also, consider the environment. To prevent fading and protect your print for years to come, avoid hanging it in a spot that receives prolonged, direct sunlight. Finally, think about scale. A large, statement piece looks magnificent above a sofa or on a wide, empty wall, while a smaller framed poster might get lost. Ensure the size of your art is proportional to the wall and the furniture around it.

Hardware and Hanging Techniques

Using the right hardware is essential for keeping your framed poster secure and perfectly straight. For the best way to frame a poster and hang it with a flawless finish, precision is key. Follow these simple steps for a professional result:

  • Use Two Hooks: For most frames, especially larger ones, using two picture hooks spaced apart is better than one. This provides greater stability and prevents the frame from shifting and becoming crooked over time.
  • Get it Level: There’s nothing more distracting than a wonky frame. Use a spirit level placed on top of the frame to ensure it is perfectly horizontal before you mark your drilling points.
  • Secure Your Fixings: For heavier frames, it’s crucial to ensure your hooks are secure. Whenever possible, screw them directly into a wall stud. If that’s not an option, use appropriate wall anchors designed for your wall type (e.g., plasterboard) to provide the necessary support.

Feeling overwhelmed by the options and technical details? Let our experts take the hassle out of the process. Let our experts create the perfect ready-to-hang piece for you.

Your Poster’s Perfect Finish Awaits

As we’ve explored, a well-chosen frame does more than just protect your poster; it transforms it into a genuine piece of art, ready to take pride of place on your wall. Whether you choose the hands-on satisfaction of a DIY project or the unmatched precision of a professional service, understanding the key components-from protective glazing to the elegant mount-is crucial for a spectacular result. Ultimately, the best way to frame a poster is one that honours the artwork, reflects your personal style, and seamlessly integrates with your space.

If you’re seeking a truly flawless finish that will stand the test of time, entrusting your poster to an expert is an investment in premium quality and craftsmanship. At First 4 Frames, we bring over 20 years of expert framing experience to every project. Based in Falkirk and proudly serving the entire UK, we use only high-quality, conservation-grade materials to ensure your cherished prints are beautifully preserved and professionally presented.

Ready for a flawless finish? Discover our professional bespoke framing services.

Let’s work together to give your poster the beautiful, bespoke display it truly deserves.

Frequently Asked Questions

How much does it cost to frame a poster?

The cost of professionally framing a poster in the UK varies based on size, materials, and glazing options. For a standard A2 poster, you might expect to pay between £50 and £90 for a quality bespoke frame. Larger pieces, premium wood mouldings, or specialist UV-protective glazing will increase the price. While it’s an investment, a professional frame protects your poster and transforms it into a beautiful, long-lasting piece of art for your home.

Should I use a frame with glass or acrylic for my poster?

Both options offer a beautiful finish, but serve different needs. Traditional glass provides exceptional clarity and a premium weight. However, high-quality acrylic (or perspex) is a fantastic modern alternative. It’s lightweight, shatter-resistant, and often has better inherent UV protection, making it ideal for large posters, children’s rooms, or high-traffic areas. We can help you choose the perfect glazing to protect and showcase your artwork beautifully and safely.

What’s the best way to frame an oversized or non-standard size poster?

For posters with unique dimensions, a bespoke framing service is essential. Off-the-shelf frames simply won’t provide the perfect, snug fit required for a flawless finish. A custom-made frame ensures your poster is properly supported without any trimming or damage. Our expert craftsmanship guarantees that the best way to frame a poster of any size is with a solution tailored specifically to it, creating a spectacular and professional-looking centrepiece for your wall.

How can I get wrinkles out of a poster before framing it?

To safely remove creases, place your poster face down on a clean, hard surface. Cover the back with a clean, thin cloth like a tea towel. Set your iron to its lowest heat setting with no steam and gently press the poster, moving from the centre outwards. Always test a small, inconspicuous corner first. For delicate or valuable posters, we recommend leaving them with a professional framer who can safely flatten them using specialist methods.

Is it worth paying for UV-protective glass for a poster?

Absolutely. If your poster will be displayed in a room with natural light, UV-protective glazing is a crucial investment. Standard glass or acrylic does not block the harmful ultraviolet rays that cause colours to fade and paper to become brittle over time. Opting for UV protection preserves the vibrant, original look of your poster for decades, ensuring your cherished artwork remains as spectacular as the day you framed it. It’s a small price for long-term peace of mind.

What is an ‘acid-free’ mount and why is it important?

An acid-free mount (or mat board) is a professional-grade material that prevents damage to your artwork. Standard mounts contain acids that can leach into your poster over time, causing a yellow or brown stain known as ‘acid burn’. Using premium, acid-free materials is a cornerstone of quality craftsmanship. It creates a protective barrier, ensuring your poster remains in pristine condition and doesn’t degrade, which is vital for preserving its value and beauty.