Have you got a special piece of art or a treasured memory tucked away, waiting for the perfect frame? It’s a common dilemma. You know it deserves more than a cheap, off-the-shelf solution, but the fear of damage and the challenge of finding a true expert for bespoke picture framing, especially if you’re seeking services in Nottingham, can feel overwhelming. How can you be sure you’re getting premium craftsmanship for a fair price, and that your sentimental item is in safe, skilled hands?
This expert guide is designed to give you clarity and confidence. We believe the right frame is a bridge between your art and your home, and choosing it should be an inspiring journey, not a stressful task. We will explore the essential differences in materials, explain key conservation techniques, and provide you with the questions you must ask to find a reliable local artisan. By the end, you’ll be ready to choose a bespoke framing service that not only enhances your art but protects it beautifully for a lifetime.
Key Takeaways
Learn the difference between a basic frame and the true craftsmanship that defines quality picture framing nottingham, actively protecting and enhancing your artwork.
Discover how bespoke services for picture framing nottingham can transform more than just prints, with creative techniques for displaying everything from memorabilia to heirlooms.
Before choosing a service for picture framing nottingham, arm yourself with our essential checklist of questions to guarantee a quality result.
Understand the benefits of a professional online framing service, offering expert craftsmanship and convenience delivered directly to your door.
What Defines Professional Picture Framing? A Quality Checklist
Choosing a frame for your cherished artwork, photograph, or memorabilia goes far beyond picking a colour you like. Professional framing is a craft that both protects and elevates your piece, ensuring it looks spectacular for decades. While the basic answer to ‘What is a picture frame?‘ is a simple structure to hold a picture, the professional execution involves a deep understanding of materials and conservation techniques. This checklist will empower you to identify true quality when seeking bespoke picture framing in Nottingham, turning a simple border into a perfect, lasting presentation.
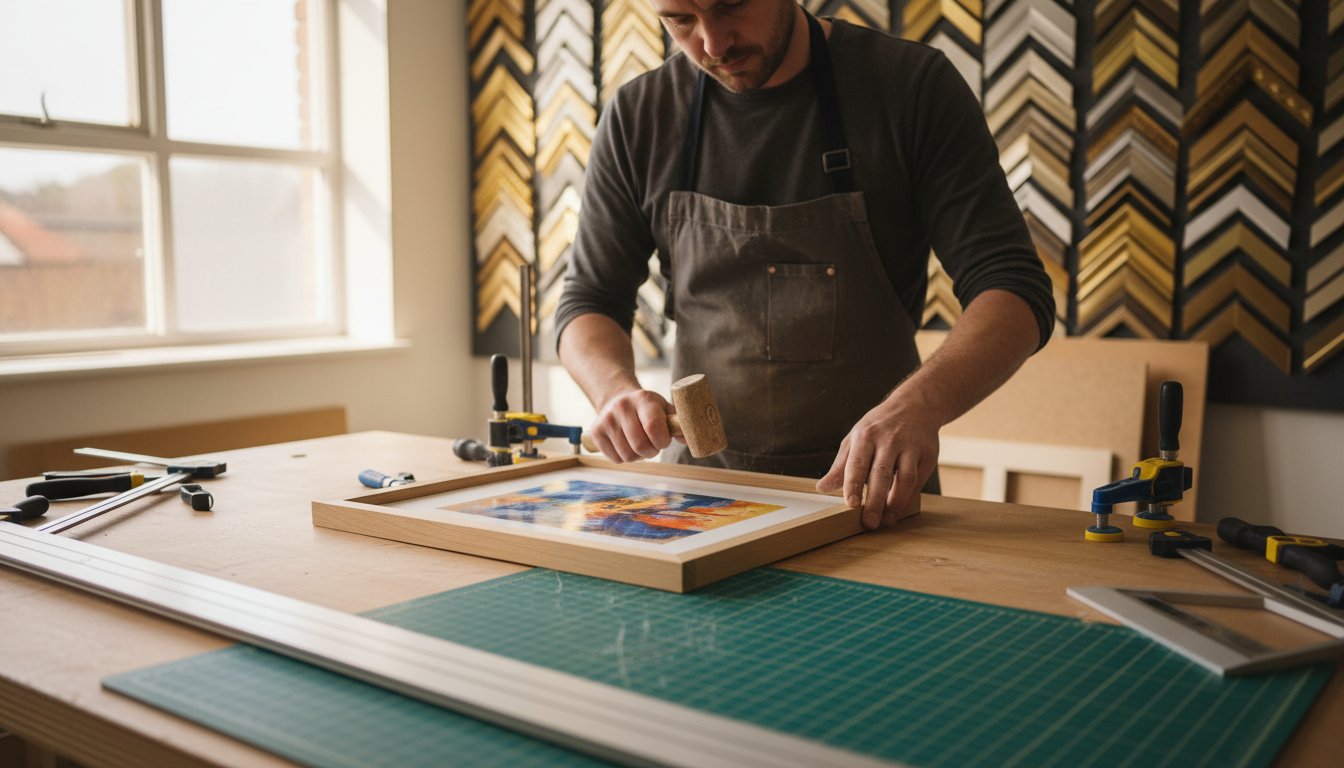
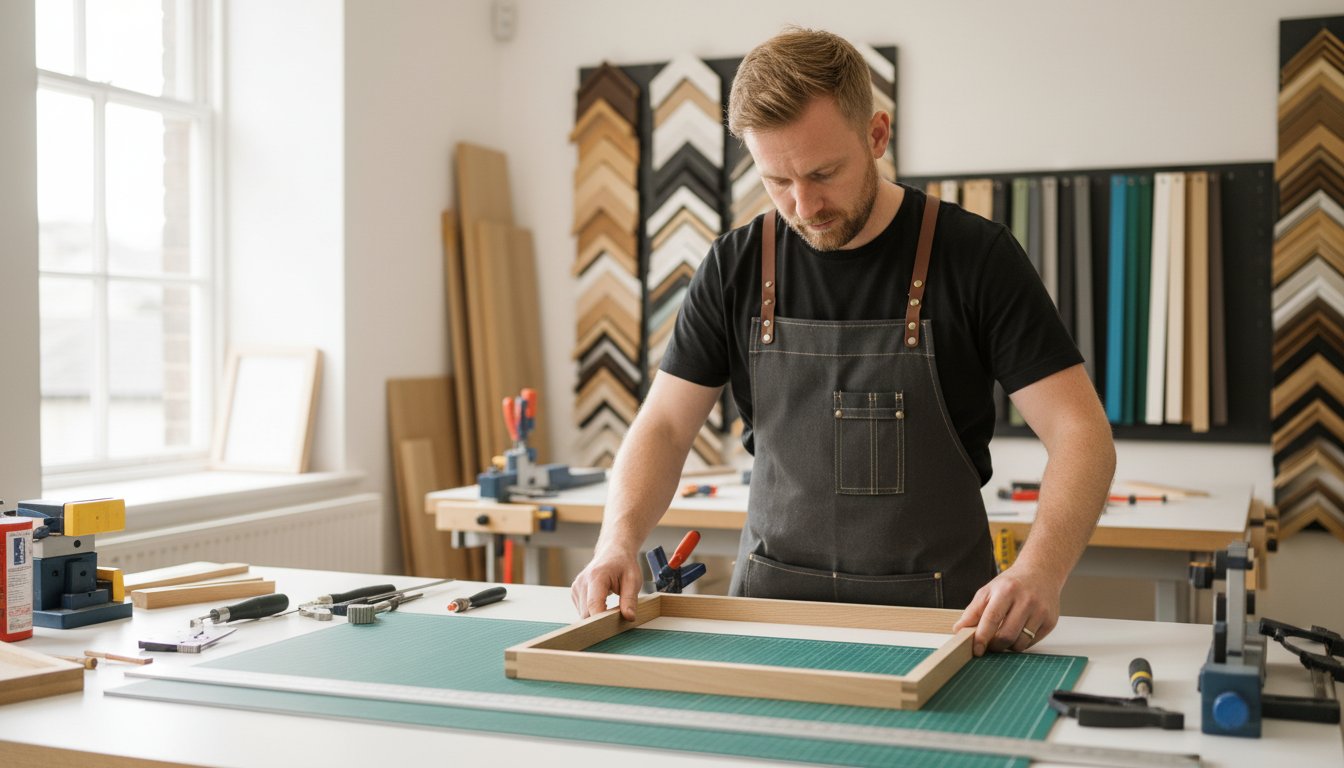
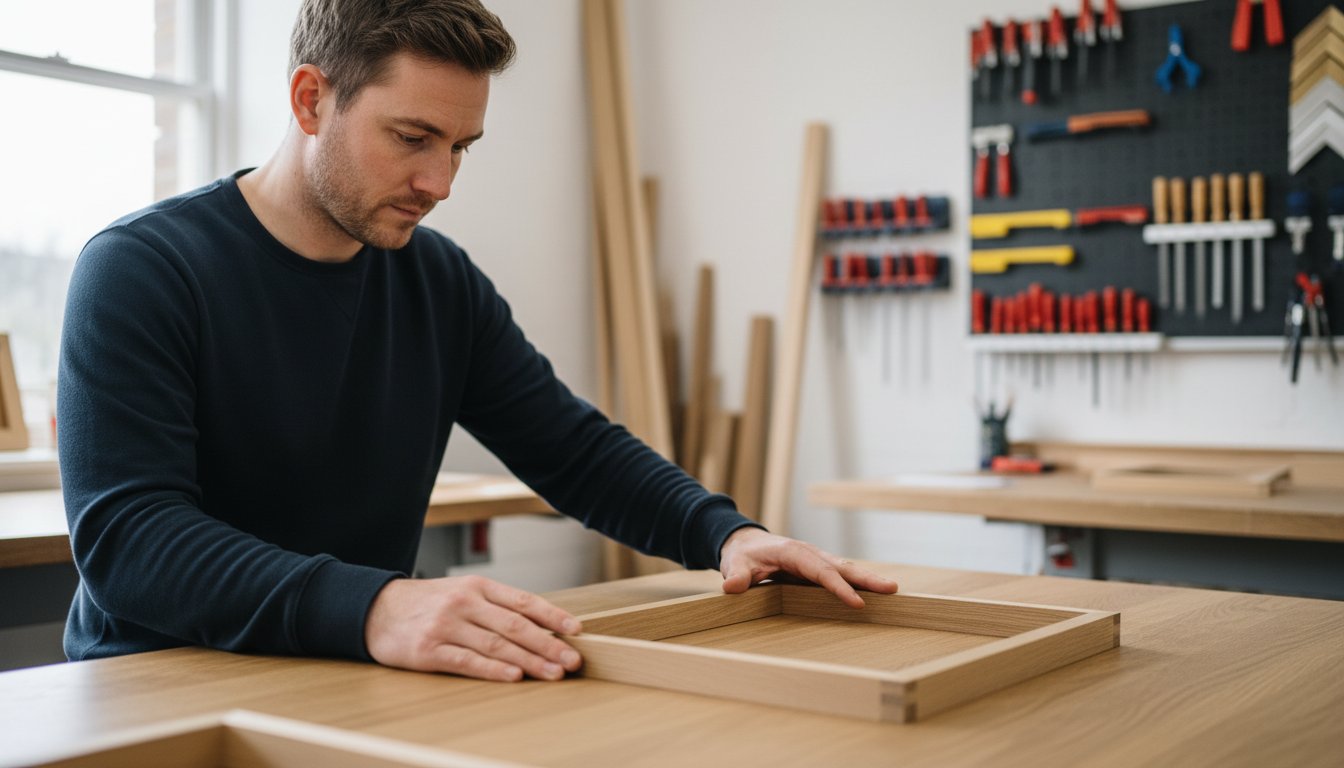
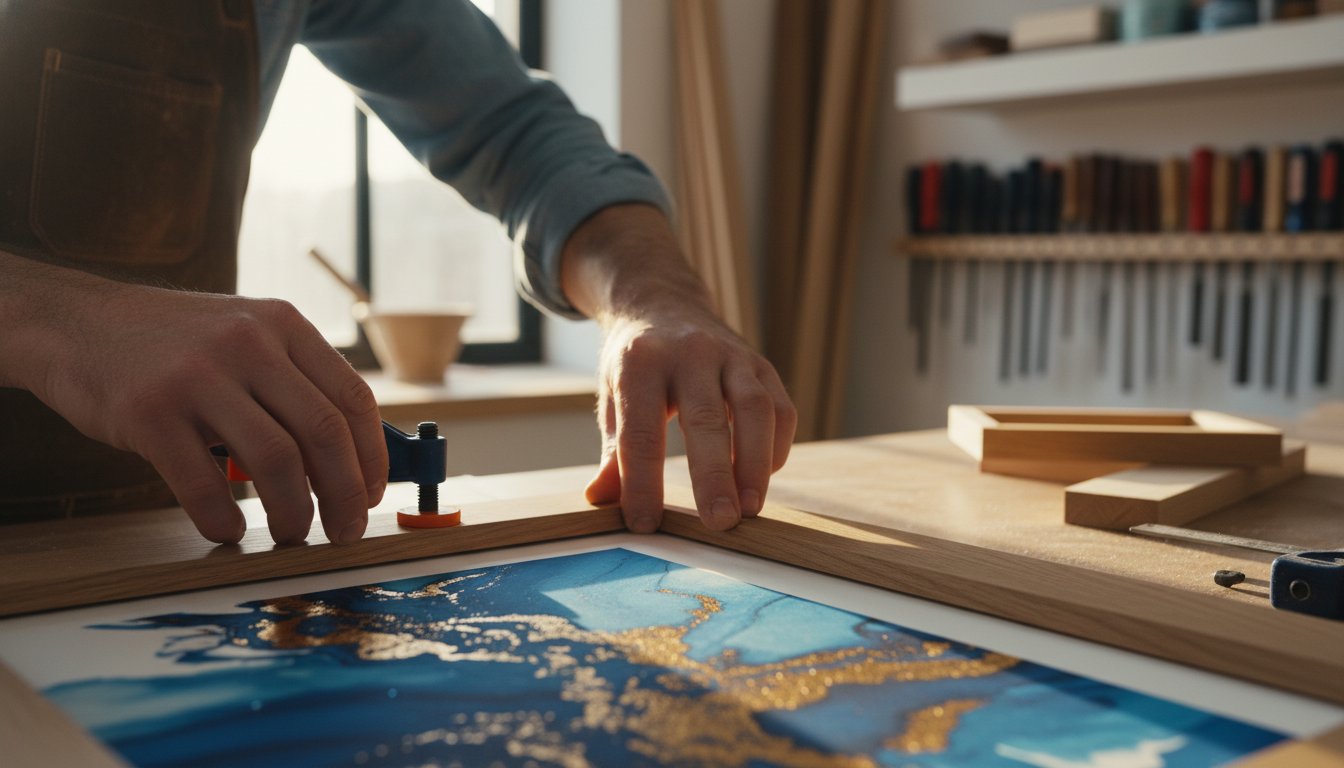
The Frame Itself: Moulding Materials and Finishes
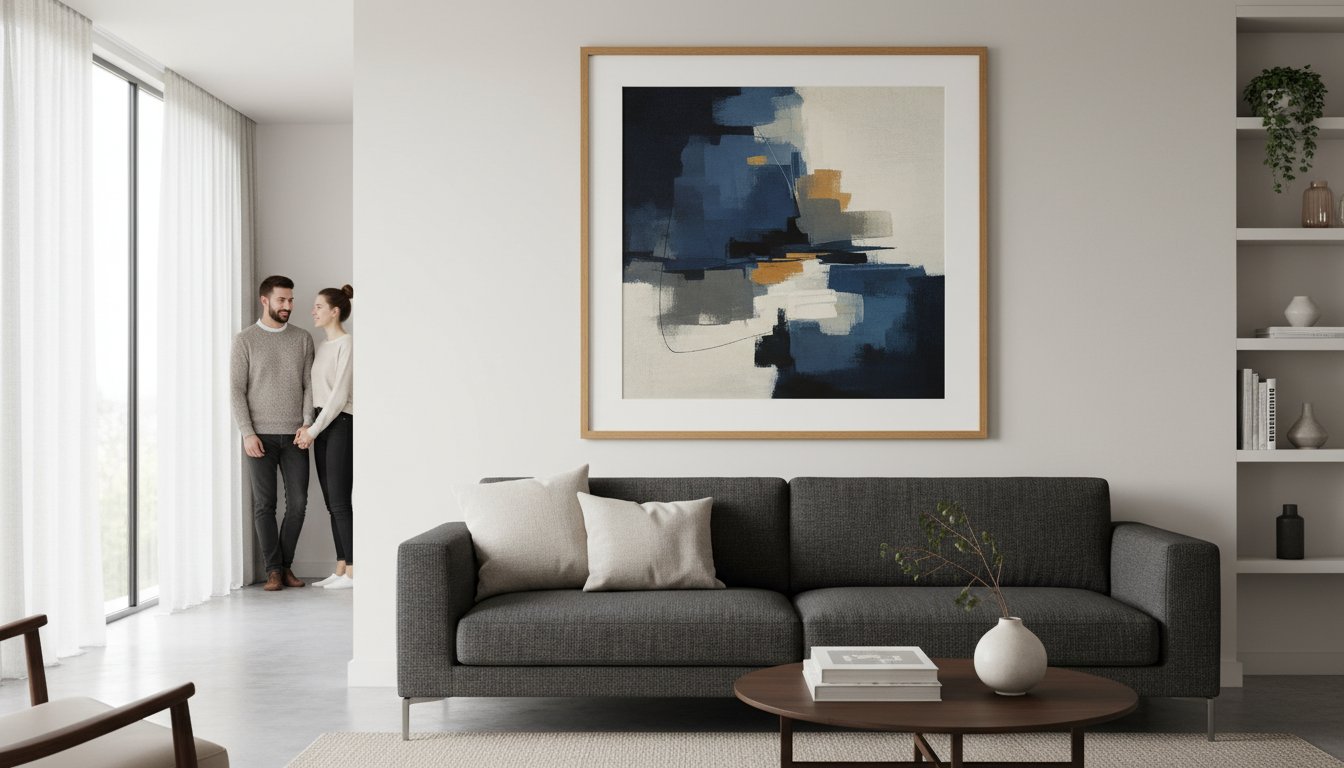
The foundation of any great frame is its moulding. Premium framers often use solid woods like oak, ash, or beech for their durability and beautiful grain. While budget options like MDF or Polcore have their place, they lack the longevity and refined feel of real wood. Pay close attention to the corners; a professional frame will have perfectly joined, seamless corners that are strong and stable. The finish-from natural wax to painted or hand-gilded surfaces-should act as a bridge between your artwork and your room’s decor.
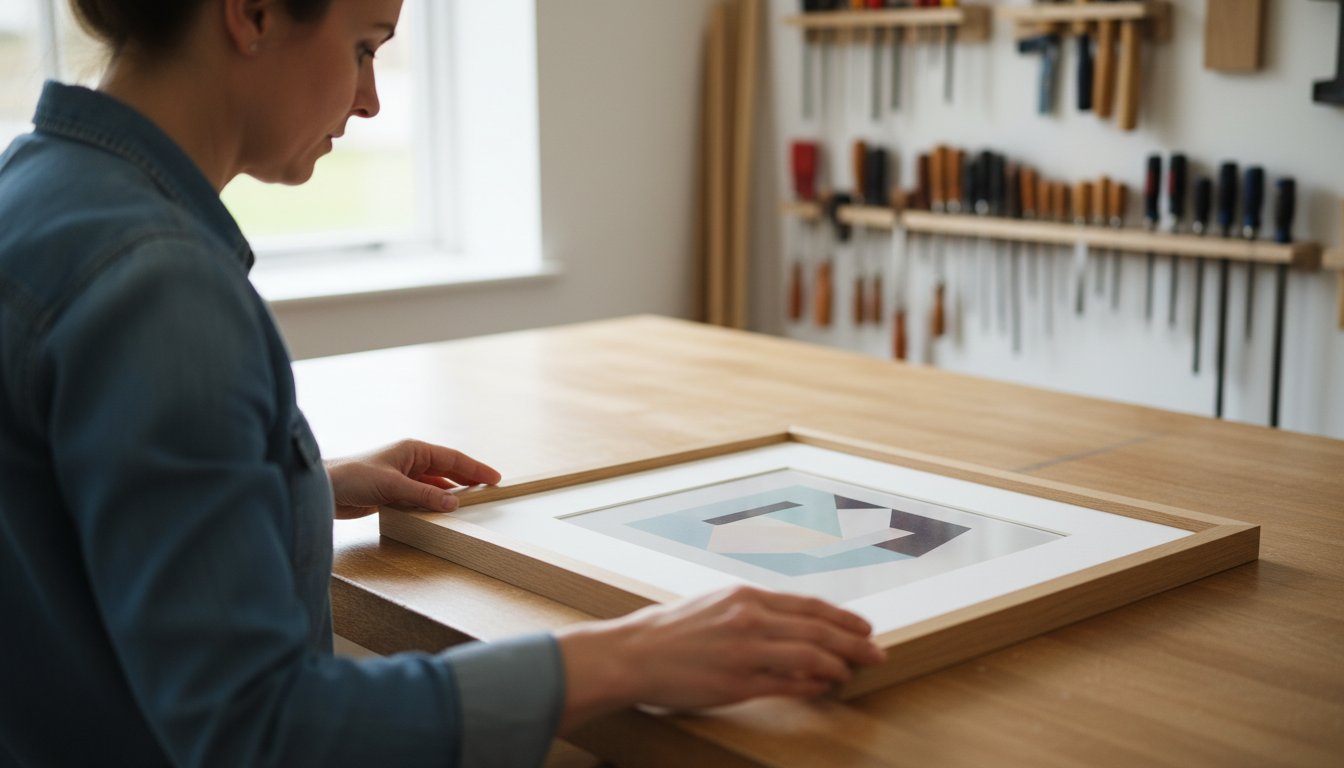
The Mountboard: More Than Just a Border
A mountboard (or mat) does more than create a visual border; its primary job is protective. It is essential to use an acid-free, conservation-grade mount to prevent yellowing and damage to your artwork over time. The mount creates a crucial air gap, stopping the art from touching the glass, which can lead to moisture damage and mould. A skilled framer will help you choose colours and textures that draw the eye inwards, using techniques like:
Single or Double Mounts: Adding depth and a complementary accent colour.
Float Mounting: A spectacular method where the artwork appears to “float” above the backing board, showcasing deckled or unique edges.
Glazing Options: Choosing the Right Glass for Your Piece
The glass, or glazing, is your artwork’s shield against the elements. Standard float glass is common, but upgrading can make a significant difference. Anti-reflective glass minimises glare for a crystal-clear view, while UV-protective glass is vital for preventing fading caused by sunlight. For valuable or irreplaceable pieces, museum-grade glass offers the highest level of UV protection and anti-reflection. For large frames or pieces in high-traffic areas, lightweight and shatter-resistant acrylic is an excellent, safe alternative.
A Guide to Framing Different Items: From Prints to Memorabilia
Bespoke framing is a beautiful craft that extends far beyond traditional pictures. It’s an opportunity to protect, preserve, and showcase the items that hold personal value, turning them into stunning displays. From fine art to three-dimensional memorabilia, the right frame acts as a bridge between your item and your décor, enhancing its story and significance. Discover the unique considerations for different objects and get inspired for your next project.
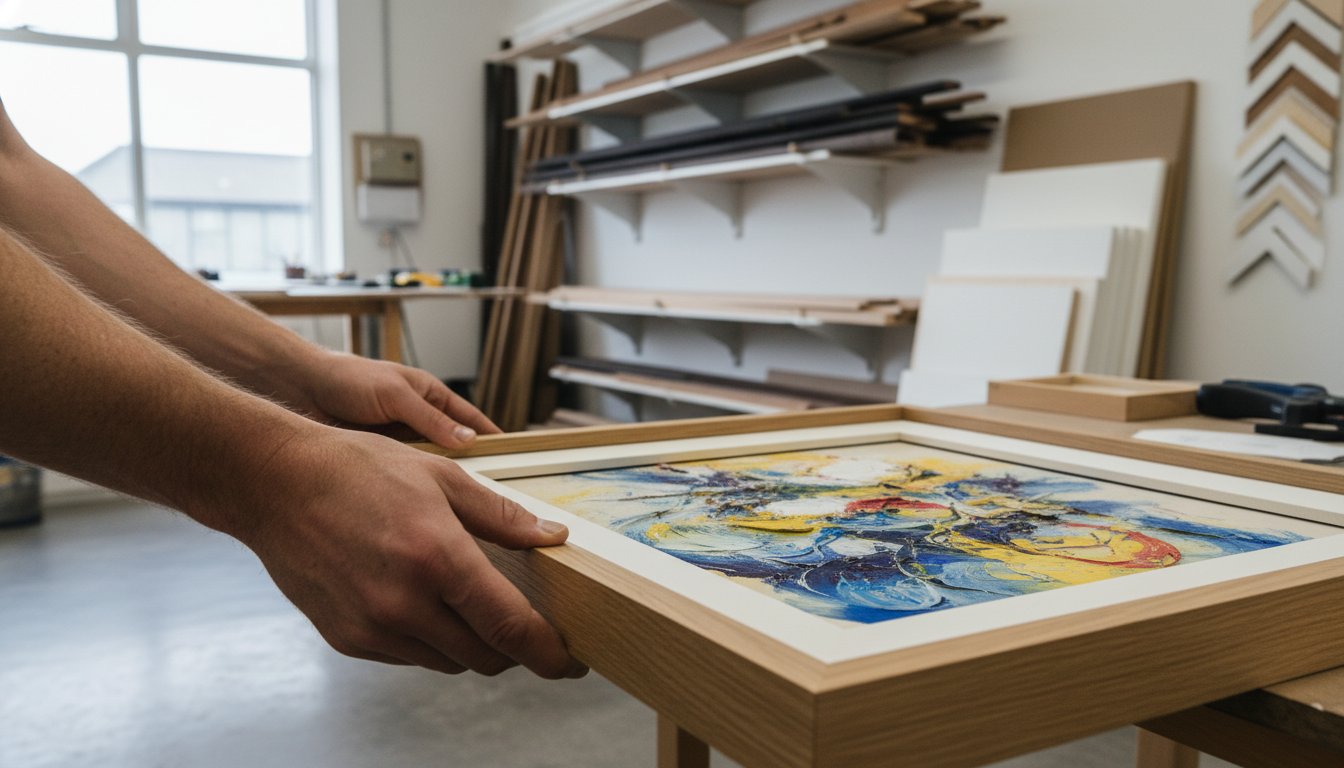
Framing Fine Art, Prints, and Posters
A professionally chosen frame can transform a piece of art. For premium Giclée prints, the right mount and frame combination will make the colours pop and bring out intricate details. We handle original paintings on paper or canvas with the utmost care, ensuring the mounting method is appropriate for the medium. Even a simple poster can be elevated to a gallery-quality piece with a sleek, minimalist frame, moving it from a temporary decoration to a permanent feature in your home.
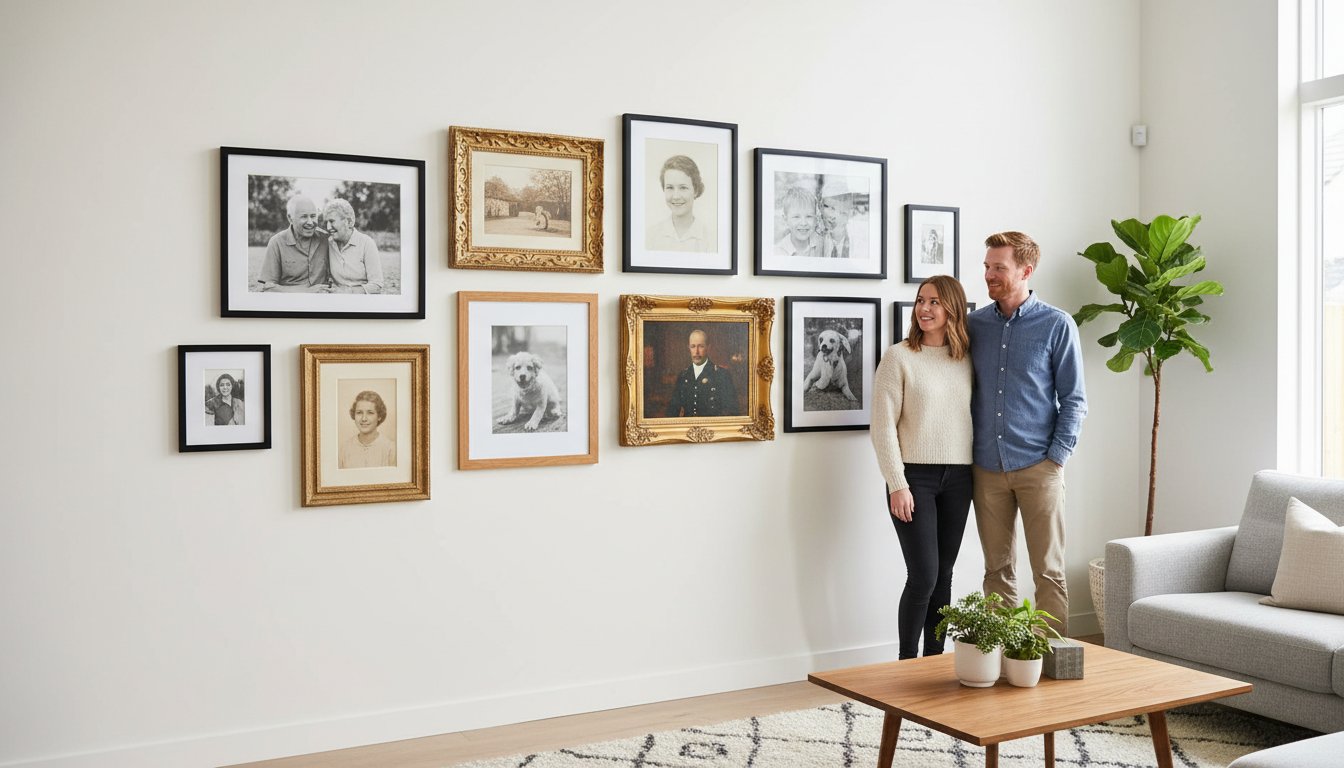
Preserving Cherished Photographs and Documents
Your most precious memories deserve the best protection. For wedding photos, family portraits, and irreplaceable documents, we use conservation-grade materials to prevent fading and degradation. When you need expert picture framing in Nottingham, we ensure every element is designed for longevity.
Archival Mounts: Acid-free mount boards prevent yellowing and protect your item from damage over time.
UV-Protective Glazing: Specialist glass can block up to 99% of harmful UV rays, safeguarding your photographs from fading.
Bespoke Collages: We can create beautiful multi-aperture frames to display a collection of photos, certificates, or awards in one cohesive piece.
3D Box Framing for Sports Shirts and Memorabilia
Some items can’t be confined to a flat frame. Our 3D box framing service is perfect for showcasing treasured objects like football shirts, medals, baby’s first shoes, or collectible figures. We create a deep, custom-built ‘shadow box’ that provides the necessary space. Crucially, we use specialised, non-damaging techniques like stitching to secure items, ensuring they remain in pristine condition. A box frame doesn’t just display an object-it tells a story.
How to Choose a Framer in Nottingham: 7 Key Questions to Ask
Finding the right expert for picture framing in Nottingham is about more than just finding the nearest workshop. The level of craftsmanship, quality of materials, and customer service can vary significantly. To ensure your treasured artwork, photograph, or memorabilia receives the care it deserves, it’s wise to be prepared.
Walking into a consultation armed with the right questions will help you gauge a framer’s expertise and commitment to quality. This ensures you can feel completely confident leaving your piece in their hands. Here are the key questions we recommend asking.
Questions About Their Process and Experience
A framer’s history and process speak volumes about their dedication to the craft. Understanding how they work is the first step to building trust.
Can I see examples of your previous work? A portfolio of completed projects is the best evidence of quality and style. Look for clean corners, precise mount cutting, and a professional finish.
How long have you been a professional framer? Experience often translates to a deeper understanding of different art mediums and conservation techniques.
Do you do all the work on-site? This is crucial for security and quality control. A framer who completes all work in their own workshop maintains oversight from start to finish.
What is your typical turnaround time? A clear timeframe helps manage your expectations, especially if the piece is for a gift or specific event.
Questions About Materials and Protection
A beautiful frame should also be a protective one. The materials used are the bridge between your artwork and its long-term preservation.
Are your mountboards acid-free as standard? Standard mounts contain acids that can “burn” and permanently discolour your artwork over time. Always insist on acid-free or conservation-grade board.
What are my options for UV-protective glazing? Standard glass offers minimal protection from fading caused by ultraviolet light. Ask about conservation glass with 99% UV filtering to preserve the colours and integrity of your piece.
How will you attach my artwork within the frame? Professional framers use reversible, conservation-approved methods like T-hinges with acid-free tape, never permanent adhesives that can damage the art.
Questions About Cost and Guarantees
Transparency is the hallmark of a trustworthy service. You should feel clear about what you are paying for and confident in the final result.
Can you provide a detailed, itemised quote? A professional quote should break down the cost of the frame moulding, mount, glazing, and labour.
What is included in the final price? Confirm that the price includes everything from assembly to hanging fixtures, ensuring there are no hidden costs.
Do you offer a satisfaction guarantee on your work? A framer who stands by their craftsmanship will offer a guarantee on the quality of their work, giving you complete peace of mind.
The First4Frames Alternative: Expert Craftsmanship Delivered to Your Door
Searching for the perfect picture frame on your local high street can be time-consuming, and you may not find the specialist skills or materials your artwork deserves. What if the ideal solution wasn’t local, but was delivered directly to you? At First4Frames Gallery, we bridge that gap. We combine over 20 years of professional framing experience with a seamless online service, offering an exceptional alternative for picture framing nottingham residents can trust. Get gallery-quality results without leaving your home.
Why Choose a UK-Wide Specialist?
Opting for a dedicated online framer like First4Frames Gallery opens up a world of possibilities that a local shop might not be able to offer. We provide a consistent, premium service for customers across the country, from artists and photographers to busy homeowners.
Unrivalled Material Access: We source a wider range of high-quality, professional-grade mouldings, mounts, and glazing than most high street stores.
Gallery-Level Quality Control: Every single order is handcrafted in our workshop to the same exacting standards, ensuring consistent, beautiful results every time.
Ultimate Convenience: Perfect for busy individuals who value their time. Design and order your perfect frame online in minutes, and we’ll handle the rest.
A Partner for Creatives: We are the trusted choice for artists and photographers who need a reliable, high-quality framing partner for their exhibitions and sales.
Our Simple 3-Step Process for Nottingham Customers
We believe that bespoke framing should be a joy, not a chore. Our straightforward process makes it easy to bring your vision to life from anywhere in Nottingham.
Choose Your Artwork: Browse our curated gallery of stunning Giclée prints or prepare your own photo or artwork for framing.
Design Your Perfect Frame: Use our intuitive online tool to select your ideal frame, choose a complementary mount, and visualise the final piece.
Expert Framing & Secure Delivery: Our master framers get to work, handcrafting your frame. We then securely package and deliver the finished masterpiece directly to your door.
Our Commitment to Quality and Service
Our reputation is built on a foundation of passion and precision. We treat every piece of art as if it were our own, using only the best materials to ensure it looks spectacular for decades. We use conservation-grade mount boards to protect your art from fading, and our Giclée prints offer breathtaking colour fidelity and detail. Every frame is meticulously handcrafted in our dedicated Falkirk workshop by our team of experts. Let us create the perfect bridge between your art and your decor. Explore our bespoke framing options today.
Bring Your Vision to Life with Expert Picture Framing
Choosing the right frame is an art in itself-a crucial final step that protects your memories and elevates your most treasured pieces. This guide has shown you what defines quality craftsmanship and the key questions to ask, empowering you to make an informed choice. While there are many local options for picture framing nottingham, the perfect blend of expertise, convenience, and quality is now delivered directly to your door.
At First4Frames, we channel over 20 years of professional experience into every project. As specialists in conservation and gallery-quality framing, we treat your art and memorabilia with the meticulous care they deserve. We believe premium craftsmanship should be accessible and straightforward, which is why we offer a hassle-free service with secure delivery across the UK.
The cost of bespoke picture framing is tailored to your unique piece. Key factors include the size of the artwork, your choice of frame moulding, the style of the mount, and the type of glazing selected. A small, simple frame might start from around £40, while a larger, more ornate frame with specialist UV-protective glass will be more. For a precise and competitive price for picture framing in Nottingham, we recommend getting a free, no-obligation quote.
How long does custom framing typically take?
Our standard turnaround time for custom framing is typically between 7 to 10 working days. This allows our skilled craftspeople the time to give your artwork the meticulous attention it deserves. This can vary depending on the complexity of the project and the availability of specific materials. If you have an urgent deadline, please let us know when you request your quote, and we will always do our best to accommodate your schedule.
What is the main difference between a custom frame and a ready-made one?
A ready-made frame is a standard size, offering a quick but often ill-fitting solution. In contrast, a custom frame is a bespoke creation, built precisely to your artwork’s dimensions for a perfect, professional finish. With custom framing, you also have a vast choice of premium mouldings, mounts, and conservation-grade materials that protect your art for years to come. It’s the difference between an adequate covering and a spectacular, protective showcase for your piece.
Can you frame a canvas painting that is already stretched?
Absolutely! We frequently frame stretched canvases. A popular and beautiful option is the ‘tray’ or ‘floater’ frame, which creates a shadow gap between the canvas and the frame, making the artwork appear to float. This modern style showcases the entire painting, including the sides. We can help you choose the perfect profile and finish to complement your canvas painting and create a stunning gallery-quality display in your home or office.
Is it worth paying extra for UV-protective glass?
Yes, for treasured or valuable pieces, we highly recommend it. Standard glass offers minimal protection from ultraviolet light, which causes colours to fade and paper to yellow over time. UV-protective glazing blocks up to 99% of harmful UV rays, acting as a crucial sunscreen for your art. It is a worthwhile investment to preserve the vibrancy and integrity of original artworks, limited edition prints, and sentimental photographs for a lifetime of enjoyment.
How do I measure my artwork for a custom frame?
For an accurate measurement, lay your artwork on a flat surface. Use a steel tape measure and measure only the image area you wish to be visible. Measure the width and the height in at least two different places to check for any variation, and provide us with these exact ‘artwork size’ dimensions. When you bring your piece to us, we will always double-check the measurements to ensure a perfect, bespoke fit for your art.
Have you ever held a piece of art, a precious photograph, or a treasured memento and felt a knot of anxiety? You know it deserves a beautiful frame, but the fear of it being damaged, the confusion over what makes a ‘good’ frame, and the worry about unpredictable costs can be overwhelming. Finding a professional for picture framing Newcastle residents can truly trust shouldn’t be so difficult, yet the search for a reliable local expert often is.
A perfect frame does more than just hang on a wall; it’s a vital partner to your art, preserving its story and seamlessly connecting it to your home. In this 2025 guide, we will demystify the entire process. We’ll explore the essential differences in materials, explain how to spot true craftsmanship, and provide clear insights into transparent pricing. Our goal is to empower you to find a bespoke framer who will protect and elevate your piece for a lifetime, giving you complete confidence in your choice.
Key Takeaways
Understand why a bespoke frame is an investment in protecting your artwork, not just a decorative border for your wall.
Discover the key questions to ask any service for picture framing Newcastle to ensure they have the expertise for your specific item.
Learn the simple, step-by-step bespoke framing process, from initial consultation to the final reveal of your perfectly preserved piece.
Explore the wide range of items that can be professionally framed, including cherished football shirts, medals, and unique memorabilia.
What to Look For in a Newcastle Picture Framing Service
A picture frame does more than just complement your artwork; it’s a vital shield against damage and the passage of time. While a cheap, ready-made frame might seem like a quick fix, it often lacks the protective qualities and aesthetic finish of a bespoke service. When searching for professional picture framing newcastle, knowing what to look for ensures your treasured pieces are beautifully presented and preserved for years to come. The key lies in a combination of expert craftsmanship, premium materials, and personalised guidance.
Expertise and Craftsmanship
True craftsmanship is the heart of quality framing. Look for a framer with years of experience and a strong local reputation built on trust. A passionate professional will offer a detailed consultation, guiding you through options rather than just taking an order. Don’t hesitate to ask to see their portfolio, especially for complex or unusual items. For a certified mark of excellence, check if they hold credentials like Guild Certified Framer (GCF), which demonstrates a commitment to the highest industry standards.
Quality of Materials: Mouldings and Mounts
The materials used are the foundation of a long-lasting, beautiful frame. Premium mouldings come in various woods, such as classic oak or contemporary ash, with finishes that enhance your artwork. Just as important is the mount board, which must be acid-free to prevent yellowing and irreversible damage to your art. The long history of picture frames has taught us the importance of conservation-grade materials. Different styles, like elegant double mounts or modern float mounting, can also dramatically alter the final visual impact.
Choosing the Right Glazing (Glass)
The glass, or glazing, is your artwork’s first line of defence against dust, moisture, and light. Understanding the primary options is key to making the right choice for your piece:
Standard Float Glass: A clear and cost-effective choice for most general-purpose framing projects.
Anti-Reflective Glass: Minimises glare and distracting reflections, making it perfect for pieces displayed in brightly lit rooms.
UV-Protection Glass: Essential for valuable or sentimental artwork, as it blocks up to 99% of harmful UV rays that cause fading.
Acrylic (Perspex): A lightweight and shatter-resistant alternative, ideal for very large frames or for use in high-traffic areas and children’s rooms.
Common Framing Services: From Art Prints to Football Shirts
A professional framer’s workshop is a place of incredible versatility. While we love working with beautiful art prints, our expertise extends far beyond the traditional photograph or poster. Bespoke framing is about creating the perfect home for your treasured items, whatever their shape or size. This guide will help you identify the specific service you need to protect your memories and elevate your most meaningful possessions.
Bespoke Framing for Prints and Photos
Our most frequent request is for the custom framing of fine art prints, posters, and personal photographs. Unlike standard off-the-shelf frames, a bespoke service ensures your artwork is perfectly proportioned. The right mount and frame combination acts as a bridge between the art and your room, transforming a simple print into a spectacular centrepiece that draws the eye. Our skilled team provides the expert guidance you need to make the perfect choice. Explore our gallery of beautifully framed art prints to see the difference craftsmanship makes.
Canvas Stretching and Framing
Paintings on canvas, whether oil or acrylic, require a specialised approach. The first step is professional stretching, where the canvas is carefully pulled taut over a wooden stretcher bar. This is a crucial process that prevents sagging and damage over time. Once stretched, you have beautiful options: a traditional frame can add a classic finish, while a modern floating frame creates a gallery-style look where the canvas appears to hover within the frame, offering a clean and contemporary display.
Memorabilia and 3D Object Framing
Some of the most precious items we handle aren’t flat. From a signed football shirt to a collection of war medals or a child’s first pair of shoes, 3D object framing preserves your story. Using custom-built box frames (or shadow boxes), we create a secure, dust-free display. For this kind of specialist picture framing newcastle residents trust, we employ conservation techniques to protect these irreplaceable items from fading and deterioration. Following standards set by organisations like the Professional Picture Framers Association ensures your keepsakes are preserved for generations to come.
The Bespoke Framing Process: A Step-by-Step Journey
Embarking on a bespoke framing journey with us is a collaborative and rewarding experience. We believe that professional picture framing should be accessible, enjoyable, and tailored perfectly to you and your art. We’ve simplified our process into three clear steps to demystify the craft and guide you from your initial idea to a beautifully finished piece you’ll treasure for years to come.
Step 1: The Initial Consultation
Your journey begins with a friendly, no-obligation consultation at our workshop. All you need to bring is your artwork and a few thoughts about where it will hang. Our expert framers will listen to your ideas, discuss your personal style, and consider the existing decor of the room. We act as your creative partners, offering guidance and inspiration to help you discover the perfect presentation for your piece.
Step 2: Designing Your Frame
This is where your vision comes to life. Together, we will explore the key elements that make a frame truly special. This collaborative design stage for picture framing in Newcastle involves:
Choosing the Moulding: We’ll browse our extensive collection of high-quality wood and metal mouldings, matching the style, colour, and texture to complement your artwork. For inspiration, you can see examples in our online gallery.
Selecting the Mount Board: The right mount creates breathing space and draws the eye inward. We’ll help you choose the perfect colour, width, and number of layers. We use conservation-grade, acid-free boards that align with established Preservation Guidelines for Matting and Framing to ensure your art is protected from damage and discolouration.
Deciding on Glazing: We offer a range of glazing options to suit your needs and budget, from standard glass to premium anti-reflective and UV-protective glass that safeguards your art from fading.
Step 3: Crafting and Collection
Once you are delighted with the design, our skilled craftspeople get to work. Behind the scenes, we use precision equipment and time-honoured techniques to cut, join, and assemble your frame by hand. We then carefully fit your artwork, glazing, and backing board, ensuring a flawless, dust-free finish. Our typical turnaround time is 7-10 working days, and we will contact you the moment your beautiful, professionally framed piece is ready for collection.
Why Choose a Specialist? The First4Frames Gallery Advantage
While finding a local framer is one option, some artwork demands more than convenience-it demands uncompromising expertise. For pieces that are valuable, sentimental, or simply central to your home’s design, choosing a specialist is the best investment you can make. At First4Frames Gallery, we combine over two decades of master craftsmanship with the passion of a fine art gallery, offering a level of quality and service that transcends location.
A One-Stop-Shop for Fine Art and Framing
We are not just framers; we are curators and art specialists. Our unique position as both a gallery and a framing workshop means you can embark on your entire artistic journey with us. Browse our spectacular collection of premium Giclée prints from talented artists, select the perfect piece for your space, and have it professionally framed in one simple, seamless process. Our in-depth knowledge of fine art printing ensures that every colour is true and every detail is preserved before the frame is even built.
Unmatched Quality and Conservation Standards
Your artwork deserves the very best protection. We are committed to using only superior, archival-quality materials to ensure your piece is preserved for a lifetime. This is our standard, not an optional extra. Our bespoke service includes:
Solid Wood Mouldings: Sourced for their beauty and durability.
Museum-Quality Mounts: Acid-free boards that prevent discolouration and damage.
Conservation Framing: Techniques and materials that protect your art from environmental factors.
This commitment makes us the trusted choice for artists, collectors, and anyone looking to protect an irreplaceable investment.
Convenience with UK-Wide Delivery to Newcastle
Expertise should never be out of reach. Our service brings professional picture framing to Newcastle without you ever needing to leave your home. We consult with you remotely to design the perfect frame, then our artisans get to work. Once complete, your artwork is securely packaged and delivered directly to your door, ready to hang. It’s a completely hassle-free way to access specialist craftsmanship, no matter where you are in the UK.
Choosing the perfect frame is a journey of turning a cherished item-be it a fine art print or a beloved football shirt-into a true centrepiece. As we’ve explored, the key is to find a specialist who offers bespoke craftsmanship and understands the art of preservation. Finding the right partner for picture framing newcastle ensures your memories are not just displayed, but beautifully protected for years to come.
At First4Frames, we bring over 20 years of professional experience to every project. As passionate specialists in high-quality Giclée printing and framing, we believe in a hassle-free, premium service. We provide secure, insured delivery across the UK, bringing our workshop’s expertise directly to your home in Newcastle.
Are you ready to see the difference professional craftsmanship makes? Embark on your own journey of artistic discovery and find the perfect finishing touch for your space.
How much does custom picture framing typically cost?
The cost of bespoke picture framing by First4Frames Gallery is tailored to your specific piece. A small, simple frame may start from around £45, while a large, conservation-grade frame for a valuable piece could be £200 or more. The final price depends on the size, the choice of frame moulding and mount, and the type of glazing, such as UV-protective or anti-reflective glass. We always provide a clear, no-obligation quote before any work begins.
How long does bespoke framing take from consultation to collection?
Our standard turnaround time for most bespoke framing projects is between 7 and 14 working days. This allows our artisans the dedicated time needed to achieve a perfect, handcrafted finish. If you have an urgent request for a specific date or event, please let us know during your consultation. We will always do our very best to accommodate your schedule, though complex projects may require a little more time.
Can you frame a football shirt or other 3D memorabilia?
Absolutely! We specialise in creating beautiful 3D box frames for all kinds of treasured items. From football shirts and sports memorabilia to medals, rosettes, and even baby shoes, we can craft the perfect display case. Our expert techniques ensure your item is securely and safely mounted using conservation-approved methods, protecting it from damage while showcasing it for everyone to admire. Let us help you preserve those precious memories.
What is conservation framing and do I need it for my artwork?
Conservation framing is a premium method designed to protect and preserve your artwork for the long term. It uses entirely acid-free materials, including mounts and backing boards, along with specialist glass that filters out 99% of damaging UV light. We highly recommend it for any artwork that is valuable, sentimental, or irreplaceable, such as original art, limited edition prints, or historic photographs. It is the ultimate way to safeguard your investment.
Do you deliver framed pictures to Newcastle and the surrounding area?
Yes, First4Frames Gallery offers secure and professional nationwide delivery for your finished pieces, including directly to customers in Newcastle upon Tyne and across the wider North East region. We understand how important your newly framed art is, so we take exceptional care in packaging it from our workshop to ensure it arrives at your home or office in pristine condition. Please ask us about our delivery options and pricing during your consultation for a completely hassle-free experience from start to finish.
What’s the difference between a mount and a frame?
The frame is the outer wooden or metal border that provides the structure, while the mount (also called a mat) is the card border that sits directly around the artwork, inside the frame. A mount creates a vital breathing space, drawing the eye towards the image and enhancing its visual appeal. It also serves a crucial protective function by preventing the artwork’s surface from touching the glass, which can cause damage over time.
That treasured photograph, a piece of art you fell in love with, or a precious piece of memorabilia deserves more than just a standard frame. It deserves a bespoke finish that protects and enhances it for a lifetime. But choosing from the many picture framers Liverpool has to offer can feel daunting. You worry about your item, you’re unsure which options will look best, and you want to be certain you’re investing in true, lasting quality without the process becoming complicated or expensive.
This guide is here to change all that. We believe the process of professional framing should be an exciting journey, not a stressful chore. We’ll walk you through how to identify superior craftsmanship, understand the different choices of frames, mounts, and glazing, and ultimately, find a skilled and trustworthy framer who shares your passion. By the end, you’ll have the confidence to commission a beautifully finished piece that you will be proud to display for years to come.
Key Takeaways
Learn the key signs of superior craftsmanship, from conservation-grade materials to expert art handling, ensuring your piece is beautifully preserved.
Discover the best bespoke framing approaches for everything from treasured family photos and football shirts to original canvas art.
Understand the custom framing journey from start to finish, so you can confidently work with the best picture framers in Liverpool to bring your vision to life.
Explore the convenience of modern online framing services that deliver premium, professionally framed art directly to your door.
What to Look For in a Quality Picture Framer in Liverpool
Choosing a picture framer is about finding a skilled partner who understands that a frame does much more than just surround a picture. A truly great framer sees the frame as the essential bridge between your art and your space. It must both protect the piece for years to come and enhance its visual impact, drawing the eye and completing the story the artist began. Understanding what is a picture frame in its entirety-its history, materials, and purpose-is the foundation of exceptional craftsmanship. This expertise is crucial whether you’re framing a priceless oil painting, a delicate watercolour, or a cherished family photograph.
Liverpool’s own galleries, like the magnificent Walker Art Gallery, showcase how powerful and transformative professional framing can be. To see the kind of art that inspires our bespoke services, take a look at this short tour:
When you’re ready to find a framing service, here are the key qualities to look for.
Craftsmanship and Attention to Detail
The difference between an average frame and a spectacular one lies in the details. A passionate craftsman takes immense pride in their work, and it shows in the finished product. Don’t be afraid to inspect their work closely and ask about their process.
Perfectly Joined Corners: Look for seamless, tight corners with no visible gaps or glue. This is a hallmark of precision.
Dust-Free Finish: Check that there are no specks of dust, hair, or debris trapped between the glazing and the artwork.
Immaculate Process: A professional framer will have a clear, meticulous process for handling your art to ensure it remains pristine from start to finish.
Quality of Materials: Mouldings, Mounts, and Glazing
The materials used are just as crucial as the artisan’s skill. Premium materials not only look better but also provide vital long-term protection for your artwork.
Mouldings: Solid wood offers a classic, timeless feel, while aluminium provides a sleek, modern look. High-quality synthetic options can also be durable and versatile.
Mount Boards: Always insist on acid-free or conservation-grade mount boards. Standard boards contain acids that can “burn” the artwork over time, causing irreversible yellowing and damage.
Glazing: Standard glass is common, but consider upgrading to anti-reflective glass for clarity or UV-protective museum glass to prevent fading from sunlight.
Reputation and Customer Reviews
A framer’s portfolio and customer feedback are your most reliable guides. Before committing, do some research to ensure you’re choosing one of the best picture framers Liverpool has to offer. A strong reputation is built on consistent, high-quality results.
Check Online Reviews: Look at Google, social media, and local directories for authentic feedback from previous customers.
Read Testimonials: Seek out reviews that mention specific details, such as their skill with conservation framing or their helpful design advice.
View Their Portfolio: A gallery of past projects is the strongest proof of a framer’s capabilities and style.
Popular Bespoke Framing Services in Liverpool Explained
Every treasured item tells a story, and a bespoke frame is the perfect way to share it. From a priceless painting to a child’s first drawing, the right frame not only protects your piece but elevates it into a work of art for your home. As experienced picture framers Liverpool residents trust, we handle a diverse range of items, each with its own unique requirements for preservation and presentation.
Fine Art and Print Framing
Whether you have a delicate watercolour, a textured oil painting, or a vibrant Giclée print, professional framing is essential. We use conservation-grade materials, such as acid-free mount boards and backing, to protect your art from deterioration over time. Following professional Preservation framing guidelines ensures your valuable pieces are shielded from environmental damage. The frame itself acts as a bridge between the artwork and your décor, and our experts can help you select a style that perfectly complements the artist’s vision and your interior.
Photograph and Certificate Framing
Moments like weddings, graduations, and family gatherings deserve to be celebrated, not hidden away on a hard drive. We offer beautiful framing solutions for everything from single portraits and university degrees to custom multi-photo frames that create a stunning family gallery wall. To ensure your memories last a lifetime, we strongly recommend using UV-protective glass, which prevents the heartbreak of faded photographs and keeps the colours as vivid as the day they were printed.
Memorabilia and Football Shirt Framing
In a city as passionate as Liverpool, memorabilia holds immense sentimental value. We specialise in 3D box framing, creating the perfect depth to display items like football shirts, medals, signed vinyl records, and other personal treasures. Our process for framing football shirts is meticulous; we carefully stitch the shirt onto a custom mount, never using damaging glues or tapes. This reversible method ensures your prized possession is perfectly preserved while being displayed with the pride it deserves.
The Bespoke Framing Process: From Consultation to Finished Piece
Embarking on a custom framing journey can feel daunting, but it’s a beautifully collaborative process designed to celebrate your artwork. We believe a frame is the essential bridge between your art and your space, and our role is to guide you every step of the way. At **First4Frames Gallery**, we’ve refined our service into a simple, enjoyable experience. Here’s how we transform your piece from a cherished item into a spectacular display.
Step 1: The Initial Consultation
Your journey begins with an initial consultation to discuss your artwork. This first meeting is a friendly conversation where we get to know your piece and your vision. We’ll discuss:
Your Artwork: We’ll guide you on how to provide us with the necessary details about your piece’s dimensions and assess its condition.
Your Style: We talk about the room where it will hang-the colour scheme, the lighting, and the existing decor.
Your Ideas: Don’t worry if you’re unsure what you want! We provide expert advice, helping you explore options that will truly make your art sing. This is also where we provide a clear, no-obligation quote.
Step 2: Choosing Your Frame, Mount, and Glass
This is where the magic happens. We’ll guide you through our extensive range of premium frame and mount samples, helping you visualise how different combinations will enhance your artwork. A mount (or passe-partout) does more than just create a border; it gives the artwork breathing space and prevents it from touching the glass. Our acid-free mounts and backing boards adhere to strict conservation framing standards, ensuring your piece is protected for decades. We’ll also guide you through glazing options, from standard glass to anti-reflective and UV-protective varieties that shield your art from fading.
Step 3: Crafting and Delivery/Collection
Once you’ve made your selections, our expert picture framers at **First4Frames Gallery** get to work in our dedicated workshop. Every element-the frame, mount, and glass-is precision-cut to size. The frame is then carefully joined, and the final piece is meticulously assembled by hand with the utmost care. This level of bespoke craftsmanship typically takes around 1-2 weeks. When your beautiful, professionally framed piece is ready, we’ll notify you. We offer a secure, specialist delivery service, or you can arrange for collection from our workshop. See examples of our finished work in our online gallery.
The Online Alternative: Expert Framing Delivered to Your Door in Liverpool
While visiting a local shop has its charm, modern life demands convenience, choice, and uncompromising quality. What if you could access a national-level gallery’s expertise and selection without leaving your home? The rise of specialist online services means you no longer have to choose between convenience and craftsmanship. This isn’t a compromise; it’s a premium, modern approach to bespoke framing.
For those seeking the best picture framers Liverpool has to offer, expanding your search online opens up a world of new possibilities, connecting you with dedicated artisans who deliver directly to you.
Unmatched Selection and Quality
Online galleries are not constrained by the physical space of a high street shop. This means you can browse a vastly superior range of frame mouldings, mount colours, and specialist materials. From conservation-grade mounts that protect your artwork to anti-reflective museum glass, you gain access to premium options that ensure your piece is preserved and presented beautifully for decades to come.
The Convenience of Ordering from Home
Imagine finalising the perfect frame for your art during your lunch break or from the comfort of your sofa. Our online service makes it simple. You can easily upload your own photos for printing and framing or enter the precise dimensions of your existing artwork. If you need guidance, our expert team is just a phone call or email away, ready to provide the same dedicated advice you’d expect in person. It’s the perfect solution for busy schedules.
Secure, Insured Delivery
We understand that the safety of your artwork is paramount. That’s why every single frame is meticulously packaged in custom-built, reinforced containers designed to withstand the rigours of transit. We partner exclusively with trusted, insured couriers to provide complete peace of mind. Your finished masterpiece will arrive at your Liverpool home in perfect condition, ready to hang and transform your space.
First4Frames Gallery: Your Specialist Online Framer for Liverpool
At First4Frames Gallery, we combine our passion for art with over 20 years of professional framing experience. We are a dedicated online art gallery and framer, committed to providing a hassle-free, bespoke, and speedy service. We source only the best materials to ensure every frame we build is a work of art in itself, acting as the perfect bridge between your decor and your treasured piece. Discover the quality and convenience that has made us a trusted choice across the UK.
Your Art Deserves the Best: Find Your Perfect Frame in Liverpool
Choosing the right frame is a crucial final step in honouring your artwork. As we’ve explored, finding the best picture framers liverpool has to offer means looking for a blend of expert craftsmanship, premium materials, and a passion for preservation. Whether you need a bespoke solution for a family portrait or conservation-grade protection for fine art, the right partner makes all the difference, even if that expertise is delivered directly to your door.
At First 4 Frames, we bring over 20 years of professional framing experience to every project. As specialists in conservation framing for fine art, we are dedicated to protecting and enhancing your most treasured pieces with unparalleled skill. Ready to see your vision come to life? Get a quote for your custom framing project today. We provide secure and insured delivery across the UK, bringing our workshop’s expertise right to your home in Liverpool.
Let’s create something beautiful together that you can admire for years to come.
Frequently Asked Questions
How much does custom picture framing cost in Liverpool?
The cost of bespoke framing is unique to each project, reflecting the materials and size you choose. A simple, smaller frame for an A4 print might start from around £40, while a large or ornate frame with specialist glass will be more. Key factors influencing the final price include the frame moulding, mount style, glazing choice (like anti-reflective museum glass), and the overall dimensions. For an accurate price, we recommend using our online quote tool or visiting us for a consultation.
How long does bespoke framing usually take?
Our standard turnaround time for most bespoke framing projects is typically 7-10 working days. This allows our skilled craftspeople the time to give your artwork the meticulous attention it deserves. More complex jobs, such as framing 3D memorabilia or orders requiring specially sourced materials, may take a little longer. If you have an urgent deadline, please contact us directly and we will always do our best to accommodate your request with our express service options.
Can you frame a football shirt or other 3D memorabilia?
Absolutely! We specialise in creating beautiful shadow box frames for all kinds of 3D items. Football shirts are a very popular request, and we also frame medals, rosettes, baby shoes, and other treasured keepsakes. Our expert framers use conservation techniques to mount your item securely, creating a stunning display piece that both protects and showcases your memorabilia. We build the frame with the perfect depth to house your item safely and create a spectacular visual effect.
What is the difference between standard glass and museum glass?
Standard picture framing glass is a high-quality 2mm float glass that offers excellent clarity and protection. However, museum glass provides two significant upgrades for treasured pieces. Firstly, it features an advanced anti-reflective coating that makes the glass seem almost invisible, offering a crystal-clear view of your artwork. Secondly, it blocks over 99% of harmful UV rays, preventing fading and preserving the colours of your art or photographs for decades to come.
Do you offer a delivery service for framed pictures to Liverpool?
Yes, we provide a fully insured and secure delivery service across Liverpool and the surrounding areas. As professional picture framers Liverpool residents trust, we ensure your finished artwork is packaged with the utmost care in custom-built, protective materials to guarantee it arrives in perfect condition. Once your piece is ready, we will arrange a convenient delivery time with our trusted courier partners, bringing your beautifully framed art directly to your door and ready to hang.
How do I measure my artwork for an online framing quote?
For an accurate quote, it’s crucial to measure your artwork precisely. Lay the piece on a flat surface and use a firm steel tape measure. You should measure the exact height and width of the image area you want to be visible. Do not include any white borders unless you specifically want them to show inside the frame. We recommend measuring twice to ensure accuracy and providing the dimensions in millimetres (mm) for the most precise result.
That empty wall in your living room is calling out for a beautiful piece of art, but the sheer number of choices can feel more daunting than inspiring. From choosing the right size and style to worrying if a piece will truly complement your decor, the journey to finding the perfect artwork can feel overwhelming. This is where the transformative power of high-quality framed prints comes in, offering a simple yet spectacular way to express your personality and elevate your space.
In this ultimate guide, we’ll embark on a journey of artistic discovery together. We’ll demystify the process, helping you understand the hallmarks of exceptional craftsmanship-from the archival quality of a print to the bespoke beauty of a professionally built frame. You will gain the confidence to select art that not only enhances your home but brings you genuine joy, turning those blank walls into a personal gallery. Consider this your go-to resource for choosing and displaying art with purpose and passion.
Key Takeaways
A framed print is a complete artistic statement. Learn to assess the four key components: the print, mount, glazing, and frame.
Choose the perfect artwork for your home by considering three simple factors: the room, your interior style, and the ideal size for the space.
Not all framed prints are created equal. Discover the tell-tale signs of premium craftsmanship to ensure you invest in quality that lasts.
Find art that truly speaks to you by exploring different genres and themes to help define your personal taste.
The Anatomy of a Perfect Framed Print: More Than Just a Picture
Choosing art for your home is an exciting journey, but the magic truly happens when the art is perfectly presented. A high-quality framed print is far more than just a picture with a border; it’s a complete artistic statement where every component works in harmony. Each element-the print, the mount, the glazing, and the frame itself-plays a crucial role in protecting, preserving, and enhancing the beauty of the artwork within.
To see how these elements come together to create a stunning display, this short video offers some wonderful inspiration:
The Art of the Print: Understanding Giclée Quality
The heart of any piece is the print itself. We use the Giclée printing method, a sophisticated inkjet process renowned for its exceptional quality. By using premium, archival inks on fine art paper, Giclée prints deliver spectacular colour accuracy and depth that captures the artist’s original vision. Unlike standard posters that can fade and lose detail within a few years, a Giclée print is an investment in longevity, ensuring your art remains vibrant for decades.
The Frame: The Bridge Between Your Art and Your Room
A frame does more than just hold everything together; it’s the bridge connecting the artwork to your room’s decor. The material and style you choose have a significant impact. Warm woods can add a rustic, traditional touch, while sleek metal frames in black or silver offer a contemporary feel. From ornate and classic to minimalist and modern, the frame completes the aesthetic. The careful construction of a frame is a craft in itself, a concept explored in detail in the Anatomy of a Picture Frame. A professionally chosen frame ensures this connection feels seamless and intentional.
Mounts and Glazing: The Unsung Heroes
Often overlooked, the mount (or mat board) and glazing are essential for both protection and presentation. A mount provides vital breathing space between the print and the glazing, preventing potential damage from condensation. Its colour can be chosen to complement the tones in the artwork, drawing your eye inward. The glazing acts as a protective shield. While standard glass is an option, UV-protective acrylic offers a shatter-resistant and lightweight alternative that filters out damaging ultraviolet light. Using archival, acid-free materials for all components is non-negotiable for premium framed prints, as it prevents yellowing and preserves the piece for a lifetime.
Ultimately, a professionally assembled piece guarantees that all these elements are of the highest quality and perfectly fitted, offering a level of protection and finish that a simple off-the-shelf combination cannot match.
How to Choose the Right Framed Print for Your Space
Choosing art is a deeply personal journey, an opportunity to infuse your home with personality and soul. While there are no strict rules, a few guiding principles can transform the process from daunting to delightful. To find the perfect piece, we recommend focusing on three key considerations: the room’s purpose, your interior style, and the scale of the artwork. Think of it as a simple, creative exercise to find art that not only looks beautiful but feels right.
Consider the Room’s Function and Mood
Every room has a unique purpose, and the art you choose can enhance its intended atmosphere. Before you select a piece, ask yourself: what mood do I want to create here? A well-chosen framed print can set the tone the moment you walk in.
Living Room: As the heart of the home, this space calls for a focal point that sparks conversation. Choose bold abstracts, captivating landscapes, or personal pieces that reflect who you are.
Bedroom: This is your sanctuary. Opt for calming and serene artwork, such as soft botanicals, tranquil seascapes, or romantic figures to create a peaceful retreat.
Kitchen & Dining Area: Liven up your culinary space with vibrant, fun, or food-related themes. Think colourful still life, charming illustrations, or prints that make you smile.
Home Office: Boost creativity and focus with inspiring artwork. Motivational quotes, architectural prints, or thought-provoking abstract pieces can help set a productive tone.
Of course, art isn’t the only way to transform a room’s mood. In the kitchen, for example, refinishing the cabinetry can have a massive impact on the overall style. If that’s a project you’re considering, you can learn more about Painting Kitchen Cabinet Denver to see how professionals approach it.
Matching Art to Your Interior Design Style
A beautiful frame acts as the perfect bridge between your room’s décor and the artwork itself. Harmonising your choice with your existing interior style ensures a cohesive and polished look. Our bespoke framing options make it easy to find the perfect match.
Modern/Minimalist: Complement clean lines with abstract art, geometric patterns, or monochrome photography. Simple black, white, or slim metallic frames work beautifully.
Traditional/Classic: Enhance timeless elegance with classic landscapes, portraits, or botanical studies. Ornate gold or rich, dark wood frames add a touch of sophistication.
Bohemian/Eclectic: Embrace a free-spirited mix of styles. Vibrant colours, global patterns, and diverse subjects look spectacular in natural or reclaimed wood frames.
Coastal/Scandinavian: Create a light, airy feel with seascapes, minimalist nature prints, and a palette of soft blues, greys, and whites. Light oak or white-washed frames are the ideal choice.
A Practical Guide to Sizing and Scale
Getting the size right is crucial for making an impact. A common rule of thumb is to choose art that fills two-thirds to three-quarters of the available wall space, typically above a piece of furniture like a sofa or headboard. You can create a stunning focal point with a single, oversized statement piece or curate a dynamic gallery wall with multiple smaller framed prints. Beyond aesthetics, a professionally crafted frame protects your investment. High-quality materials are essential, adhering to principles similar to the photograph preservation guidelines used by archivists to ensure your print remains vibrant for years to come.
Pro Tip: Before committing, map out the size on your wall using paper cutouts or painter’s tape. This simple step helps you visualise the scale and ensures you’ll love the final result.
Decoding Quality: How to Spot a Superior Framed Print
When you invest in art for your home, you’re choosing a piece that will live with you for years. But not all framed prints are created equal. The difference between a mass-produced item and a piece of genuine craftsmanship lies in the details-details that protect the art and enhance its beauty. Understanding what to look for empowers you to choose a piece that offers both lasting quality and spectacular visual appeal.
The Print Itself: Look for Richness and Detail
The heart of any great print is the image itself. We use premium Giclée printing, a fine art digital method that produces incredibly rich, vibrant colours that won’t fade over time. A quality print should be on substantial, textured fine art paper; it should feel luxurious, not like a standard poster. Critically, examine the image for sharp, clear details and smooth tonal transitions. A deep appreciation for the core elements of art, like colour and line, will help you recognise when a print is truly gallery-quality.
The Frame Construction: Sturdy and Seamless
A bespoke frame does the heavy lifting, acting as the bridge between the art and your decor. A quality frame should feel solid and substantial in your hands, never flimsy. Check the corners: they should be perfectly joined with no visible gaps or glue. The finish, whether it’s a natural wood grain or a painted colour, must be even and consistent across the entire structure. This is a hallmark of true attention to detail. See our commitment to quality craftsmanship.
The Finishing Touches: Professional Assembly
The final assembly is where professionalism truly shines. A superior framed print will always be finished with the same care on the back as on the front. Key signs of quality include:
A Sealed Back: Professional framer’s tape should seal the back to keep out dust and moisture.
Secure Hardware: The hanging hardware should be firmly attached and ready for your wall.
A Perfect Mount: If your print includes a mount, its bevelled edges should be flawlessly cut and crisp.
Finally, ensure all materials are archival, from the mount board to the tape, to protect your beautiful artwork for decades to come.
Discover Your Style: Exploring Artists and Themes
The most rewarding part of choosing art is the moment you find a piece that truly speaks to you. It’s a personal journey of discovery, moving beyond trends to find what resonates with your taste and personality. Whether you’re drawn to bold colours or serene scenes, exploring different artists and themes is the key to unlocking a home filled with character and inspiration.
Popular Art Genres to Explore
To help you identify your preferences, consider these popular genres. Each offers a unique way to express emotion and enhance your space:
Abstract: This genre moves beyond the literal, using colour, shape, and form to create a mood or feeling. Abstract art is perfect for adding a dynamic focal point and a splash of vibrant energy to a room.
Landscape & Seascape: Bring the breathtaking beauty of the natural world indoors. From the dramatic coastlines of Scotland to tranquil forest scenes, these pieces create a sense of peace and escape.
Figurative: Centred on the human form, figurative art captures stories, emotions, and characters. It can be classic or contemporary, adding a deeply personal and narrative quality to your walls.
Still Life: A timeless genre that finds beauty in the arrangement of everyday objects. Modern still life art can be minimalist or richly detailed, offering a sophisticated and classic touch.
Spotlight on Scottish Artists: A Touch of Local Talent
As a gallery with deep roots in Scotland, we take immense pride in showcasing the incredible work of our local artists. Talents like John Lowrie Morrison (Jolomo) and Jack Vettriano capture the unique spirit of the country, from its rugged, light-filled landscapes to its evocative, story-rich scenes. Choosing a piece from a Scottish artist means bringing home more than just a beautiful image; it’s an opportunity to own a piece of art with a distinct perspective and a powerful sense of place.
Building a Collection You Love
Creating an art collection shouldn’t be intimidating. The best approach is to start with a single piece that you connect with on an emotional level. Don’t worry about matching everything perfectly; a home with a mix of styles often feels more authentic and curated. Remember, investing in beautiful framed prints is an investment in your home’s atmosphere and, most importantly, in your own daily happiness. The right art transforms a house into a home.
From Blank Walls to Beautiful Statements: Your Journey Starts Now
As we’ve explored, a framed print is far more than just a picture; it’s a complete artistic statement where the image, mount, and frame work in perfect harmony. Armed with the knowledge to spot superior quality and define your personal style, you are now ready to choose art that doesn’t just fill a space-it brings it to life.
This is where your adventure truly begins. At First4Frames Gallery, we believe finding beautiful framed prints should be a joy. That’s why we combine over 20 years of bespoke framing craftsmanship with premium Giclée prints for stunning, lasting colour. Our collection is expertly curated, featuring incredible work from talented Scottish artists, ensuring every piece meets our exacting standards.
What is the difference between a framed print and a framed poster?
The key difference lies in the quality and longevity of the materials used. A fine art print, like those we offer, is created using premium, archival-quality paper and pigment-based inks in a process known as Giclée printing. This ensures spectacular colour accuracy and prevents fading for decades. A poster is typically mass-produced on thinner paper with less durable inks. While great for temporary decoration, a framed print is a lasting piece of art for your home.
How do I clean and care for my framed art prints?
Caring for your artwork is simple and ensures it remains beautiful for years. For dusting, gently wipe the frame and the glazing with a soft, dry microfibre cloth. Avoid spraying cleaning solutions directly onto the surface; instead, lightly spray the cloth if needed. To preserve the vibrant colours of your print, we recommend hanging it away from direct, prolonged sunlight and areas of high humidity to protect its integrity and prevent any damage over time.
Can you frame a print or photograph that I already own?
Absolutely! We specialise in bespoke framing and would be delighted to create the perfect frame for your treasured print or photograph. Our team of expert framers brings over twenty years of experience to every project, ensuring your artwork is handled with the utmost care. Simply get in touch with our team with the dimensions of your piece, and we can provide a custom quote for our professional, hassle-free framing service. We’re here to help you display your art beautifully.
What does ‘limited edition print’ mean and is it worth more?
A limited edition print is one of a fixed number of copies produced from a single artwork. Once that number has been printed, no more are made. Each print is often hand-numbered (e.g., 5/100) and may be signed by the artist. This scarcity makes them more exclusive and collectible than open-edition prints. While not guaranteed, this exclusivity often means they hold or increase their value over time, making them a wonderful investment for art lovers.
Are your framed prints delivered ready to hang on the wall?
Yes, every one of our beautiful framed prints is delivered fully assembled and ready to hang straight on your wall. We take pride in our craftsmanship, professionally fitting each frame with secure D-rings and a durable hanging cord on the back. All you need to do is choose the perfect spot, put a hook in the wall, and your new artwork is ready to be admired. It’s part of our commitment to providing a simple, high-quality service from start to finish.
How do I choose the right colour mount for my artwork?
The mount acts as a beautiful bridge between the artwork and the frame, enhancing the overall presentation. For a classic, timeless look that lets the art take centre stage, choose a neutral off-white or cream, as this works for almost any piece. For a more coordinated, bespoke feel, select a mount colour that picks up on a subtle, secondary colour within the artwork itself. This can create a truly spectacular and cohesive look, perfectly tying the whole piece together.
Your art tells a story, but finding the perfect frame to continue that narrative can feel like a daunting task. Concerns about protecting your treasured piece, the uncertainty of choosing the right mount and glass, and the inconvenience of finding a truly reliable expert can stand in the way. At First4Frames, we believe the framing process should be as beautiful as the result. As passionate, professional picture framers for Bristol, we have removed the hassle and replaced it with a seamless, trustworthy service designed entirely around you and your art.
Imagine commissioning a spectacular, museum-quality bespoke frame, handcrafted with premium materials, all from the comfort of your home. In this guide, we’ll walk you through our simple, expert-led process. You’ll discover how our craftsmanship not only enhances your artwork but provides lasting protection, giving you complete confidence that your piece is in safe, skilled hands. Embark on a journey to find the perfect frame-the bridge between your art and your home, delivered securely to your door.
Key Takeaways
Understand why bespoke framing is essential for protecting and enhancing your artwork, going far beyond standard shop-bought frames.
Discover how a convenient online service brings expert, handcrafted framing directly to your door, wherever you are in Bristol.
Learn to identify premium materials and choose the perfect moulding-from classic wood to sleek metal-to complement your specific piece.
Use our expert checklist to confidently select the best picture framers Bristol has to offer, focusing on craftsmanship and quality.
Why Choose a Bespoke Framer for Your Art in Bristol?
Your artwork, whether it’s a spectacular fine art print or a cherished family photograph, deserves more than an off-the-shelf solution. A standard frame can often compromise the integrity and beauty of your piece, whereas a bespoke frame acts as the perfect bridge between your art and your home décor. It does the heavy lifting, pulling you into the picture and ensuring it is presented with the care and craftsmanship it warrants. Choosing professional picture framers Bristol is the first step in protecting your investment for decades to come.
To see the level of care and precision that goes into bespoke framing, take a look at the process:
The Difference Between Ready-Made and Custom Frames
Ready-made frames are limited by standard sizes, which rarely provide the perfect fit for unique pieces. Custom framing, however, is tailored to your item’s exact dimensions, creating a balanced and professional finish. More importantly, understanding what is a picture frame includes appreciating its protective qualities. We use premium, acid-free mounts and conservation-grade materials that shield your art from long-term damage caused by fading, dust, and humidity-a level of protection you simply won’t find in a standard frame.
What Can You Frame? Ideas for Your Bristol Home
Our bespoke framing service is designed to accommodate a spectacular range of items. We believe anything you love is worth framing beautifully. Consider bringing us your:
Fine Art: From original paintings and drawings to Giclée prints and limited editions that require archival-quality protection.
Precious Memories: Family portraits, wedding photographs, certificates, and precious children’s drawings that tell your family’s story.
Memorabilia & 3D Objects: We specialise in framing sports shirts, medals, concert tickets, and other three-dimensional heirlooms that deserve to be displayed, not hidden away.
Our expertise as dedicated picture framers ensures we find the perfect combination of frame, mount, and specialist glass to enhance your piece, match your décor, and preserve it for a lifetime.
Your Expert Online Framing Service for Bristol: How It Works
From our specialist workshop, we bring over 20 years of bespoke framing craftsmanship directly to your doorstep. While we’re not a traditional high street shop, we are proud to be the trusted online choice for discerning art lovers looking for professional picture framers in Bristol. We have perfected a fully online, door-to-door service that combines the precision of traditional techniques with the ease of modern convenience. Your precious artwork is in safe, expert hands every step of the way.
Our simple, secure three-step process makes protecting and beautifully presenting your art completely hassle-free. Here’s how you can get a premium, custom-made frame delivered directly to your Bristol home.
Step 1: Get Your Personalised Quote
Begin your framing journey with our intuitive online quote tool. Simply enter the dimensions of your artwork to get started. You can then explore our extensive collection of premium, sustainably sourced mouldings and mount options to find the perfect combination. As you design, our system provides a transparent, itemised quote instantly, with no hidden fees or obligation to purchase. It’s the perfect way to visualise your finished piece.
Step 2: Securely Send Us Your Artwork
Once you’re happy with your design, we’ll guide you through the next step. We provide clear, detailed instructions on how to package your artwork safely for its journey to our workshop. For complete peace of mind, we arrange a fully insured courier collection from your address at a time that suits you. The moment your piece arrives, it is carefully logged, inspected, and stored securely, ready for our framing experts.
Step 3: Handcrafted Framing & Secure Delivery to Bristol
This is where our passion for craftsmanship shines. Our skilled framers get to work, handcrafting your bespoke frame to your exact specifications. We professionally fit your art using museum-quality materials and techniques that meet strict conservation framing standards, ensuring its protection for years to come. Once complete, your beautifully framed artwork is meticulously packaged and delivered safely back to you in Bristol, ready to hang and admire.
Choosing Your Perfect Frame: A Guide to Our Materials
A beautiful, lasting frame begins with exceptional materials. The right combination of moulding, mount, and glazing does more than just protect your artwork; it becomes the bridge between the piece and your décor, enhancing its story and ensuring it looks spectacular for years to come. We are passionate about craftsmanship, which is why we source only premium, high-quality components for every project. Explore our bespoke options to find the perfect finish for your piece.
Frame Mouldings: Finding Your Style
The moulding is the foundation of your frame’s character. Our extensive collection offers something for every taste, from the timeless warmth of solid wood like oak, ash, and walnut to the clean lines of contemporary profiles. For a modern aesthetic, consider sleek black, crisp white, or sophisticated metallic finishes. If you have a traditional painting or print, one of our ornate and decorative frames will provide the classic elegance it deserves.
Mount Boards: Colour and Conservation
A mount board, or passe-partout, provides essential breathing room between the art and the glazing, preventing damage while drawing the viewer’s eye inward. As professional picture framers in Bristol, we insist on using acid-free, conservation-quality boards that meet Fine Art Trade Guild standards, protecting your artwork from discolouration. We can help you select the perfect colour to complement your piece, using a single or double mount to add extra depth and impact.
Glazing Options: Clarity and Protection
The final layer of protection is the glass, and choosing the right type is crucial for both viewing pleasure and preservation. We offer a range of glazing options to suit your specific needs and budget:
Standard Picture Glass: A high-quality, cost-effective choice that offers excellent clarity for most framing projects.
Anti-Reflective Glass: This specialist glass minimises glare and reflections, providing a crystal-clear view of your artwork, even in brightly lit rooms.
UV-Protection Glass: Essential for preserving valuable or sentimental art, this glass blocks up to 99% of harmful ultraviolet rays that cause fading and damage over time.
Our expert team is always on hand to discuss these options and help you make the best choice for your artwork.
What to Look For in a Bristol Picture Framer (Online or Local)
Choosing the right framer is as important as choosing the art itself. The frame acts as a bridge between your artwork and your decor, protecting and enhancing it for years to come. Whether you prefer a local walk-in workshop or the convenience of a specialist online service, the core principles of quality craftsmanship remain the same. To help you find the best picture framers Bristol has to offer, we’ve created this simple checklist to guide your decision.
Essential Checklist for Choosing a Framer
Use these criteria to evaluate any framer, ensuring your cherished artwork receives the professional treatment it deserves.
Experience and Portfolio: A proven track record is essential. Look for a framer with a gallery of past work you can review. A history of handling diverse projects, from fine art prints to treasured photographs, demonstrates true expertise.
Conservation-Grade Materials: This is non-negotiable for long-term preservation. Always ask if they use acid-free, conservation-quality mount boards and backing. This prevents the dreaded yellowing and protects your art from irreversible damage.
Positive Customer Reviews: Check for genuine testimonials on their website or independent review platforms. Consistent positive feedback is a strong indicator of reliable service, excellent communication, and beautiful results.
Clear Communication and Pricing: A professional framer should provide a clear consultation, listen to your needs, and offer transparent pricing without hidden fees. You should feel confident and informed at every step of the process.
First4Frames: The Specialist Choice for Bristol
At First4Frames, we combine the meticulous care of a traditional artisan with the ease of a modern online service. We proudly tick every box on the checklist, offering a premium, bespoke framing experience delivered directly to your door. Our commitment to excellence is built on three pillars: over 20 years of dedicated framing experience, an unwavering promise to use museum-quality materials for every project, and a hassle-free process designed entirely for your convenience. We believe that spectacular, professionally framed art should be accessible to everyone. Ready to see the difference expertise makes? Start your framing project with our experts today.
Bespoke Framing for Bristol’s Businesses, Artists & Galleries
At First4Frames Gallery, our passion for craftsmanship extends far beyond the home. We are proud to partner with Bristol’s vibrant commercial and creative communities, offering bespoke framing solutions that enhance professional spaces and showcase artistic talent. We understand that a frame does more than just protect; it acts as a bridge between the artwork and its environment. Whether you need a single, spectacular statement piece for your reception or a large-volume order for a new development, our team provides the same meticulous attention to detail and premium quality.
Art for Offices and Commercial Spaces
Transform your workspace from a simple office into an inspiring environment that reflects your brand’s quality and creativity. Professionally framed art can elevate your aesthetic, welcome clients, and motivate your team. We provide tailored solutions for a range of commercial clients, including:
Corporate Offices: Enhancing reception areas, boardrooms, and communal spaces.
Hospitality: Volume framing for hotels, restaurants, and bars.
Property Developers: Cohesive art packages for show homes and new builds.
Our team offers consultations to ensure every piece perfectly aligns with your interior design and brand identity, helping you make a lasting impression.
Services for Artists and Galleries
We understand that for artists and galleries, consistency and quality are paramount. As dedicated picture framers in Bristol, we provide a reliable service for exhibition-ready framing, ensuring your work is always presented at its best. Our workshop acts as your one-stop-shop, offering premium Giclée printing and framing under one roof. This integrated service streamlines your process and guarantees a perfect, archival-quality finish every time. Trust our team to meet your crucial deadlines with precision and professional care.
We also collaborate closely with interior designers and property staging professionals across the city. We act as a reliable creative partner, delivering beautiful, high-quality finished pieces that complete any design vision. From initial concept to final installation, we are here to bring your project to life. Explore our gallery for inspiration or contact our team to discuss your commercial framing needs today.
Frame Your Bristol Memories with Unmatched Craftsmanship
Choosing the right frame is the final, crucial step in celebrating your art. It’s the bridge between your piece and your space, a decision that deserves care and expertise. From treasured family photos to bold gallery commissions, a bespoke frame does more than just decorate; it preserves precious moments, enhances aesthetic beauty, and completes your story. When searching for the best picture framers bristol has to offer, it’s this dedication to both form and function that truly matters.
At First4Frames, we combine over 20 years of professional framing experience with the seamless convenience of a dedicated online service. We are passionate about our craft, using only museum-quality, conservation-grade materials to ensure your artwork is not just displayed, but impeccably protected for years to come. Your finished masterpiece is then delivered safely to your Bristol home or business with our secure, fully insured UK-wide service.
While our workshop, First4Frames Gallery, is based in Falkirk, Scotland, we proudly serve art lovers and collectors throughout Bristol and the wider UK. Our service is designed to be conveniently managed entirely online, allowing you to access our expert bespoke framing from anywhere. We combine traditional craftsmanship with the ease of an online service to bring beautiful, bespoke frames that protect and enhance your art, delivered directly to your door in Bristol.
How do I safely ship my valuable artwork to your workshop?
We understand your artwork is precious. To ensure it arrives safely, we recommend wrapping it in bubble wrap and placing it between two sturdy pieces of cardboard. Then, pack it into a well-fitting, robust box with extra padding to prevent movement. For complete peace of mind, always use a tracked and insured delivery service, such as Royal Mail Special Delivery or a trusted courier. This ensures your piece is protected every step of the way.
Is it more expensive to use an online framer than a local one in Bristol?
Not at all. In fact, you may find our prices are more competitive. As a dedicated workshop without a high-street retail space, our overheads are lower, allowing us to invest in premium materials while passing the savings to you. We provide the same bespoke, high-quality service you’d expect from the best local picture framers in Bristol, but with the convenience and value that our modern, online model offers. It’s the perfect blend of quality and affordability.
What is your typical turnaround time for a custom framing order?
Our standard turnaround for a bespoke framing order is typically 7-10 working days from the moment we receive your artwork. For more intricate projects or those requiring specialist materials, it may take a little longer. We believe in clear communication and will always provide you with an accurate estimated completion date when you place your order, so you’ll know exactly when to expect your beautifully framed piece to arrive.
Can I see samples of the frames and mounts before I place my order?
Yes, we want you to be completely confident in your choice. We offer a convenient sample service that allows you to see and feel the quality of our materials firsthand. For a small fee, we can post you samples of your chosen frame mouldings and mount boards. This way, you can perfectly match them to your artwork and your home’s decor before committing to your final, spectacular frame. Just get in touch with our team to arrange it.
What happens if my frame arrives damaged?
In the unlikely event your frame arrives with any damage, please don’t worry. Your satisfaction is our top priority. Simply contact us within 48 hours of delivery, sending a few photos of the issue. We will immediately arrange to have the damaged item collected and will promptly craft a perfect replacement for you at no additional cost. We stand by our craftsmanship and will ensure you receive the flawless finish you expect from us.
That cherished piece of art, family photograph, or precious memorabilia deserves more than just a frame; it deserves to be celebrated. But finding professional picture framing in Birmingham that you can trust, without the worry of damaging your item in transit or the confusion of choosing the right materials, can feel overwhelming. The hassle of taking a delicate or large piece to a shop is often enough to put the project on hold indefinitely, leaving your beautiful items hidden away.
Imagine a seamless service where expert craftsmanship meets ultimate convenience. This guide will walk you through how to achieve a spectacular, gallery-quality finish for your art from the comfort of your home. Discover how to get personalised advice on the perfect bespoke frame, premium mount, and protective glass, all created by our passionate artisans and delivered securely to your door. It’s time to transform your treasured items into beautifully protected masterpieces that will enhance your home for a lifetime.
Key Takeaways
Learn how a bespoke frame protects and enhances your art in ways that off-the-shelf options simply cannot match.
Discover our simple and secure service for professional picture framing birmingham, bringing 20+ years of expert craftsmanship to your door.
Understand our fully-insured process for safely sending us your artwork for picture framing birmingham and receiving a perfectly finished piece, hassle-free.
Get clear, expert guidance on choosing the ideal combination of frame mouldings, mounts, and glazing to achieve a stunning, gallery-quality result.
Why Choose Bespoke Picture Framing for Your Valued Items?
Whether it’s a treasured family photograph, a spectacular piece of fine art, or a cherished memento, every item you choose to display deserves to be presented perfectly. While off-the-shelf frames from high-street shops can seem like a quick solution, they often fall short of providing the tailored fit and long-term protection your valuables need. A bespoke frame is more than just a border; it’s a bridge between your artwork and your décor, designed to enhance its beauty and preserve its condition for a lifetime.
Embarking on a custom framing journey ensures your piece is treated with the care and craftsmanship it warrants. To understand some of the core principles behind a great finish, this video offers some helpful insights:
The Pitfalls of Ready-Made Frames
Standard-sized frames force your artwork into a one-size-fits-all box, which can lead to a host of problems. These mass-produced options often compromise on quality, putting your valued items at risk. Key issues include:
Incorrect Sizing: A frame that is too large or small can cause creasing, warping, or damage to the edges of your artwork over time.
Acidic Materials: Many ready-made frames use cheap, acidic paper mounts and backing boards that cause permanent discolouration, known as ‘mat burn’, and accelerate fading.
Poor Construction: Flimsy joints and low-quality materials mean the frame can easily break or fall apart, offering little physical protection.
No UV Protection: Standard glass offers almost no defence against harmful UV rays, which are the primary cause of colours fading in prints and photos.
The Professional Difference: Artistry and Protection
Choosing professional picture framing in Birmingham is an investment in both aesthetics and preservation. A skilled framer provides a level of artistry and technical expertise that ready-made frames simply cannot match. The benefits of this bespoke service include perfectly sized frames and mounts tailored to your piece, ensuring it is supported and displayed correctly. We use only premium, acid-free materials for mounts and backing boards, which is a fundamental principle of archival framing discussed in this detailed Picture frame overview. This commitment to quality protects your art for decades to come.
You also gain access to a spectacular choice of high-quality wood and metal mouldings to perfectly complement your item and your home. To complete the protective shield, we offer specialist glazing options, including anti-reflective glass for crystal-clear viewing and conservation-grade UV-protective glass to safeguard your memories against sun damage. This is the ultimate way to honour your art.
Our Custom Framing Services for Birmingham Art Lovers
At First4Frames Gallery, we believe a frame is the bridge between your art and your space. With over 20 years of dedicated craftsmanship, we offer a comprehensive range of bespoke framing services, delivered directly to your home in Birmingham. Whether you wish to frame a treasured piece you already own or select a beautiful print from our gallery, our passion is to protect and present your art perfectly. Our expertise spans from timeless, traditional styles to sleek, contemporary designs, ensuring we find the perfect match for your artwork and your interior.
Fine Art, Prints, and Photography Framing
Every piece of art tells a story, and our job is to give it the perfect voice. We provide expert framing for a wide variety of mediums, ensuring each one is treated with the care it deserves. Our services include:
Original Artwork: Specialist framing for delicate watercolours, rich oil paintings, and original works on paper.
Giclée Prints: Using premium materials to preserve the vibrant colour and intricate detail of your fine art prints.
Photographs: From cherished family portraits to professional artistic shots, we create displays that last a lifetime.
Canvas Work: We also offer professional canvas stretching and modern floating frames for a clean, gallery-ready finish.
Memorabilia and 3D Object Framing
Some of our most precious items aren’t flat. We specialise in creating stunning, custom-built box frames to display your treasured memories. Our team has extensive experience in the delicate art of securely mounting 3D objects without causing any damage, making us a leading choice for specialist picture framing delivered across Birmingham. Popular requests include:
Football shirts and sports memorabilia
Military and sports medals
Graduation certificates and awards
Personal keepsakes and collections
Let us transform your memorabilia from a box in the attic into a beautiful display case you can be proud of.
Mirrors and Commercial Projects
Beyond artwork, we create beautiful bespoke mirrors, framed to your exact specifications to perfectly complement your interior décor. We are also a trusted partner for commercial projects, offering bespoke framing solutions to businesses across Birmingham. We work closely with Birmingham-based interior designers, businesses, and property developers to provide high-quality framing for offices, hotels, restaurants, and show homes. If you have a larger project in mind, we can provide a tailored solution to meet your needs and budget. Contact us for a commercial framing consultation.
Our Process: How We Bring Scottish Craftsmanship to Birmingham
You might wonder how our Scottish workshop can provide exceptional picture framing in Birmingham without you ever leaving the city. The answer is a seamless, secure, and surprisingly simple process designed entirely around your convenience. We’ve perfected our remote service to ensure your cherished artwork is treated with the utmost care from the moment it leaves your hands to the moment it returns, beautifully framed and ready to display.
Our four-step journey is fully insured, completely transparent, and puts our passion for quality at the forefront.
Step 1: Get Your Free Online Quote
It all begins with a conversation. Simply fill out our online quote form with a few key details about your piece. We’ll typically ask for:
The dimensions of your artwork (height and width).
The type of frame you have in mind (e.g., wood, colour, style).
Your preference for a mount and glazing (glass).
Once submitted, one of our framing experts will contact you for a free, no-obligation consultation to discuss your vision, offer professional advice, and provide a final quote.
Step 2: Secure Collection from Your Birmingham Address
Once you’re happy to proceed, we arrange for our specialist, fully-insured art courier to collect your piece directly from your home or office at a time that suits you. We can send a custom, professional-grade art box for you to package your work in, or we can provide detailed guidance on how to pack it safely. From the moment of collection, your artwork is tracked and in safe hands.
Step 3: Expert Framing in Our Workshop
This is where the magic happens. Back in our state-of-the-art workshop, our skilled artisans begin the bespoke framing process. We use only the highest quality, conservation-grade materials and premium wood mouldings to protect and enhance your artwork. Our commitment to craftsmanship ensures every corner is perfect and every detail is considered. We can even send you progress photos for complete peace of mind. To see examples of our finished work, feel free to browse our online gallery.
Step 4: Safe and Secure Delivery Back to You
The final step is the most exciting. We encase your newly framed artwork in robust, custom-built packaging to ensure it is completely protected during transit. The same secure, insured courier service will deliver it right back to your door in Birmingham. Your piece will arrive ready to hang, a perfect bridge between your art and your decor, ready to be admired for years to come.
A Guide to Frame Mouldings, Mounts, and Glazing
Choosing a bespoke frame is a journey of creative discovery. With over two decades of experience in picture framing birmingham, we’re here to be your trusted guide. Understanding the three core components-the moulding, the mount, and the glazing-empowers you to make choices that will protect and beautifully showcase your art for years to come. Let’s demystify the terminology together.
Choosing a Frame Moulding
The moulding is the frame itself, the primary element that acts as a bridge between your artwork and your room’s décor. The material and style you choose can dramatically alter the final look. We source only the best materials to suit any piece:
Solid Wood: Offers timeless warmth and natural grain, perfect for traditional art and photography.
Painted Finishes: From simple black and white to any custom colour, these offer incredible versatility for a modern, cohesive look.
Ornate & Gilt: Adds a touch of classic elegance, ideal for oil paintings or antique prints.
Metal Frames: Provides a sleek, minimalist finish well-suited to contemporary art, posters, and certificates.
As a rule of thumb, a wider, more substantial frame can give a small piece more presence, while a delicate artwork often benefits from a thinner, more understated moulding.
The Importance of the Mount (Mat)
More than just a border, the mount (or mat) serves two critical functions. Firstly, it creates visual breathing space, drawing the viewer’s eye inward towards the artwork. Secondly, it separates the art from the glass, preventing potential damage from condensation or direct contact. A single, crisp white mount is a classic choice, but using colour can accentuate tones within your piece. For added sophistication, a double mount introduces a second layer, creating spectacular depth and a truly professional finish.
Selecting the Right Glass (Glazing)
Glazing is the final, protective shield for your artwork. The right choice depends on your piece’s value and where it will be displayed. We offer several premium options:
Standard Picture Glass: A clear, high-quality, and cost-effective option for general framing.
Anti-Reflective Glass: Dramatically reduces glare and reflections, ensuring crystal-clear viewing in brightly lit spaces.
Conservation UV-Protective Glass: This is our top recommendation for any valuable or sentimental artwork. It blocks 99% of harmful UV rays, the primary cause of fading and discolouration, preserving your art’s vibrancy for a lifetime.
Investing in UV-protective glass is the single best step you can take to protect your memories and investments. Feeling inspired? Explore our online gallery to see how these elements come together to create the perfect frame.
Your Art’s Perfect Partner: Bespoke Framing in Birmingham
Choosing the right frame is an art in itself, the final, crucial step in celebrating a piece you love. As we’ve explored, a bespoke frame does more than just surround your artwork; it creates a bridge to your décor, protects your investment with conservation-grade materials, and enhances its visual story. From selecting the perfect combination of mouldings and mounts to applying our time-honoured Scottish craftsmanship, every step in our process is designed to honour your treasured pieces.
With over 20 years of professional experience, we are passionate about providing the finest picture framing birmingham residents can trust. We combine this expertise with a commitment to quality, using only the best materials and a fully insured specialist courier service to ensure your artwork receives the ultimate protection from our workshop directly to your wall. Your art is in expert, caring hands.
How much does bespoke picture framing in Birmingham cost?
The cost of bespoke picture framing varies depending on the size of your artwork, the choice of frame moulding, and the type of glazing you select. As a guide, a simple, elegant frame for an A4 print typically starts from around £45. For larger pieces or those requiring premium materials like conservation-grade glass, the price will be higher. We always provide a transparent, no-obligation quote before any work begins, ensuring complete clarity.
Is my artwork insured when I send it to you for framing?
Absolutely. We understand the value-both monetary and sentimental-of your artwork. From the moment your piece arrives at our workshop to the moment it is safely returned to you, it is fully insured against damage or loss. Our professional team handles every item with the utmost care and respect in our secure, purpose-built facility, giving you complete peace of mind throughout the entire process.
How long does the entire framing and delivery process take?
Our standard turnaround for most projects is typically between 7 to 10 working days. This allows our artisans the time needed to give your artwork the attention and craftsmanship it deserves. More intricate or large-scale commissions may take slightly longer. Once complete, we use a trusted courier for secure delivery, which usually takes an additional 1-2 working days. We will always keep you informed of your order’s progress.
Can you help me choose the right frame if I’m unsure?
Of course! We would be delighted to help. Our passion is finding the perfect frame to complement your art and your home. We offer a complimentary consultation service where our experienced team will guide you through our beautiful collection of mouldings and mounts. We consider your art, your décor, and your personal style to ensure the final result is a spectacular piece you’ll treasure for years to come.
Do you only frame prints bought from your gallery?
While we love framing our own fine art prints, we are proud to offer our expert framing services for your personal treasures too. Whether it’s an original painting, a family photograph, a concert poster, or a child’s first drawing, we apply the same meticulous care and premium craftsmanship. Our goal is to be your trusted partner for all professional picture framing in Birmingham, no matter the origin of the artwork.
What is the largest size you can frame and deliver?
Our workshop is equipped to handle large-scale projects, and we can professionally frame pieces up to approximately 200cm x 150cm. For artwork of this size, we take special care in selecting materials that ensure structural integrity and a perfect finish. We also arrange for specialist couriers to ensure safe and secure delivery of oversized frames, so your new statement piece arrives in flawless condition.
That treasured piece of art, sentimental photograph, or irreplaceable print sitting in storage deserves to be the centrepiece of your room. But the process of getting it framed can feel daunting, filled with questions and worries. Will your precious item be safe? How do you choose the right combination of frame and mount to truly make it shine? For many, the perceived complexity means their most cherished pieces never make it to the wall.
We believe that premium, bespoke picture framing in Manchester should be an inspiring and simple experience. This guide will show you how our passionate, expert craftspeople make it possible. We’ll walk you through our straightforward online service, designed to help you create the perfect, museum-quality frame that protects your art for a lifetime. Discover how easy it is to achieve a spectacular finish that perfectly complements your home, delivered securely from our workshop to your door.
Key Takeaways
Learn how a bespoke frame does more than just fit your art; it actively protects, preserves, and enhances it for years to come.
Access specialist craftsmanship for your picture framing manchester needs without leaving home, thanks to a simple and secure UK-wide service.
Understand the key components of a custom frame-from mouldings to glazing-to make confident choices that perfectly complement your artwork.
Explore the wide range of items we can frame, from delicate prints and family photos to unique 3D objects and treasured memorabilia.
Why Choose Bespoke Picture Framing Over Off-the-Shelf?
You’ve found the perfect piece of art, but the search for a frame leaves you compromising. Standard, off-the-shelf frames force your artwork into a one-size-fits-all box, often failing to do it justice. A true frame has three vital roles: to protect, preserve, and perfectly present your piece. When you choose bespoke picture framing in Manchester, you’re not just buying a border; you’re commissioning a tailor-made home for your art that enhances its beauty and secures its future.
To see how precision and care come together in the framing process, take a look at this insightful video:
The Perfect Fit for Any Artwork
Every piece of art is unique, and its frame should be too. Whether you have a sweeping panoramic photograph, an unusual square print, or a deep-edged canvas, a bespoke frame is crafted to the millimetre for a flawless fit. We use custom-cut mounts to create visual space, drawing the eye to the heart of the image and preventing the art from touching the glass. More than just a fit, a custom frame acts as a bridge between your art and your interior, allowing you to select the perfect moulding, colour, and finish to complement your décor.
Preservation and Protection for Your Valuables
An off-the-shelf frame can actively damage your art over time. The acidic materials in cheap mounts and backings can cause ‘mat burn’-a permanent yellowing stain-while standard glass does little to stop the fading caused by UV light. Conservation framing is the professional solution. A purpose-built picture frame creates a safe micro-environment for your art, using:
Conservation-Grade Mounts: 100% acid-free materials that will never discolour or damage your artwork.
Protective Glazing Options: Choose from glass that filters up to 99% of harmful UV rays or anti-reflective glass for crystal-clear viewing without glare.
This level of protection is essential for preserving original art, limited edition prints, and cherished memorabilia for generations to come. It’s an investment in the longevity of your valuables.
Our Framing Services for Manchester Art Lovers
From the vibrant art scene of the Northern Quarter to the treasured memories in your own home, Manchester is a city full of stories worth preserving. We understand that every piece you bring to us has a unique value, whether it’s a high-end gallery purchase or a cherished family photograph. Our bespoke picture framing Manchester service is designed to honour that value, providing the perfect showcase for everything you love.
Our craft is built on a passion for detail and a deep respect for the items entrusted to us. We combine traditional techniques with premium, conservation-grade materials to create frames that not only look spectacular but also provide lasting protection.
Fine Art Prints, Paintings & Photography
Whether you have a beautiful Giclée print from a local artist, a delicate watercolour, or a bold oil painting, we have the expertise to frame it perfectly. We understand the specific needs of different media. For works on paper framed behind glass, we use subtle spacers to create a crucial air gap, preventing moisture damage and ensuring the artwork never touches the glazing. For canvases, our service includes professional canvas stretching to ensure a taut, flawless finish before it’s set into a traditional or floating frame.
Memorabilia & 3D Object Framing
Some of life’s most precious items won’t lie flat. We specialise in creating stunning displays for your three-dimensional treasures, from football shirts and military medals to wedding bouquets and certificates. Using custom-built box frames, we create the necessary depth to house your objects beautifully. Every item is meticulously mounted using secure, non-invasive methods that hold it firmly in place without causing any damage, preserving your memorabilia for years of enjoyment.
Posters, Photos, and Family Treasures
Professional framing isn’t just for expensive art; it’s for anything that matters to you. A quality bespoke frame can transform a simple concert poster into a piece of wall art or elevate a collection of family photos into a breathtaking feature. The right frame acts as a bridge between your décor and the image itself. For those seeking inspiration on this, Christie’s offers some expert tips on choosing the perfect frame to complement your piece. Let us help you create a stunning gallery wall that tells your family’s story with elegance and style.
How Our UK-Wide Service Works for Manchester Customers
While our workshop isn’t located in Manchester, we believe this is one of our greatest strengths. It means you can access specialist, museum-quality craftsmanship from the comfort of your home, without being limited to local options. Our dedicated UK-wide service for picture framing manchester customers is designed to be simple, secure, and completely transparent. We bring over twenty years of expertise directly to you through a seamless and convenient process.
Here’s how our trusted three-step service works:
Step 1: Online Consultation & Quoting
Embark on your framing journey by getting in touch via our contact form or a quick phone call. To provide you with an accurate, no-obligation quote, we’ll ask for a few details:
The dimensions of your artwork (height and width).
A few photos of the piece.
Any initial ideas you have for the style, colour, or finish.
Our experts will then provide personalised advice, guiding you through our premium selection of mouldings, mounts, and glazing options to find the perfect combination that acts as a beautiful bridge between your art and your décor.
Step 2: Sending Your Artwork To Our Workshop
We understand that your art is precious. That’s why we’ve made this step as secure as possible. We will provide clear, detailed instructions on how to package your artwork safely for transit. We recommend trusted couriers like Parcelforce or DPD for reliable collection and delivery to our workshop. The moment your piece arrives, we will contact you immediately to confirm its safe receipt, so you have complete peace of mind.
Step 3: Secure Delivery Back to Your Manchester Address
Once our artisans have completed their work, your beautifully framed artwork is ready for its journey home. We use professional, art-safe packaging with multiple layers of protection to ensure it arrives in perfect condition. Every single shipment is fully insured against damage or loss. From the day we receive your art, you can typically expect your professionally framed piece to be delivered back to your Manchester address within 7-10 working days.
A Guide to Choosing Frame Mouldings, Mounts & Glazing
Embarking on a bespoke framing journey is an exciting creative process. The right combination of frame, mount, and glazing doesn’t just protect your artwork; it elevates it, turning a simple picture into a spectacular centrepiece. Understanding these core components empowers you to make confident choices that perfectly reflect your style and enhance your art. Think of us as your guide to creating something truly special.
Selecting the Right Frame Moulding
The moulding is the beautiful border of your artwork, the bridge between the piece and your room’s décor. The material you choose sets the tone. Natural woods like oak or ash offer warmth and timeless appeal, while sleek black or white painted finishes provide a contemporary edge. For traditional pieces, an ornate, decorative frame can add a touch of classic grandeur. The width is also crucial; a delicate frame suits smaller pieces, whereas larger artworks often require a wider, more substantial moulding to feel balanced and impactful.
The Importance of the Mount
Often overlooked, the mount (or mat) is essential for professional presentation and preservation. This high-quality card border serves two key functions: it creates vital visual “breathing room” around your artwork, drawing the eye inward, and it separates the art from direct contact with the glazing, preventing potential moisture damage. While classic off-whites and creams are eternally popular, choosing a mount with a subtle accent colour drawn from the artwork can create a stunning, cohesive look. For added depth, a double mount introduces a second, slim border of colour for a truly refined finish.
Choosing the Best Glass (Glazing)
The final protective layer, glazing, is more than just a sheet of glass. The right choice ensures your art is both safe and seen at its best. At our workshop for picture framing in Manchester, we offer several premium options:
Standard Glass: Offers excellent clarity for most projects in rooms without direct sunlight.
Acrylic (Perspex): A lightweight and shatter-resistant alternative, perfect for very large frames or pieces in high-traffic areas.
UV-Filtering Glass: Think of this as sunscreen for your art. It blocks up to 99% of harmful UV rays, preventing fading and preserving colours for decades. An essential for valuable or sentimental works.
Anti-Reflective Glass: For rooms with bright lights or windows, this specialist glazing minimises reflections and glare, providing a crystal-clear, almost invisible finish.
Navigating these choices is part of the joy of bespoke picture framing in Manchester. Our expert team is always here to provide advice, ensuring your final piece is nothing short of perfect. See how these elements come together in our online gallery for inspiration.
Why Manchester Trusts First4Frames for Bespoke Framing
In a city as creative and vibrant as Manchester, your art deserves a frame that enhances its beauty and protects its value for years to come. While you have many options, discerning art lovers, galleries, and homeowners choose First4Frames Gallery because we combine two decades of master craftsmanship with a genuinely personal and straightforward service. We are not just a framing company; we are your dedicated partners in presentation.
Over 20 Years of Master Craftsmanship
Our passion for art is matched only by our dedication to the craft of framing. For over 20 years, our team of expert artisans has been creating beautiful, bespoke frames that stand the test of time. We believe in quality without compromise, which is why we meticulously source only the finest, conservation-grade materials, from sustainable wood mouldings to UV-protective glazing. This commitment ensures your artwork is not only spectacularly displayed but also perfectly preserved.
A glimpse into our workshop’s recent creations, showcasing our precision and care.
A Hassle-Free, Personal Service
We’ve streamlined our process to make professional picture framing in Manchester simpler than ever, but we’ve never lost the personal touch. Unlike faceless online retailers or high-street chains, you’ll deal directly with the expert framers handling your piece. We provide friendly, practical advice to help you find the perfect combination of mount, frame, and glazing to make your art sing.
“The advice from the team was invaluable, and the final frame is a work of art in itself. First4Frames Gallery treated my print with such care and professionalism. I wouldn’t trust anyone else.”
Feeling inspired? Explore the possibilities and see how a bespoke frame can transform your art. View Our Gallery for Inspiration.
Your art is a reflection of you. Give it the expert attention and premium finish it deserves. Contact our friendly team today to start your bespoke framing journey.
Your Masterpiece Awaits its Perfect Frame
Choosing the right frame is the final, crucial step in honouring your artwork. As we’ve explored, a bespoke frame does far more than an off-the-shelf alternative; it elevates the piece, protects it with conservation-grade materials, and creates a seamless bridge to your interior décor. For discerning clients seeking expert picture framing manchester wide, our service combines traditional craftsmanship with modern convenience. We believe every print, photo, and painting has a story, and our passion is to craft the perfect final chapter for it.
With over 20+ years of framing expertise, we ensure every detail is perfect, from the mount to the glazing. Our commitment to excellence is why we use museum-quality materials and offer a secure, insured delivery service across the UK, bringing our workshop’s quality directly to your Manchester home. Don’t let your art be an afterthought-give it the beautiful, lasting presentation it deserves.
Do I need to visit your workshop or do you have a shop in Manchester?
We operate from a dedicated workshop where our skilled artisans create every beautiful frame. While we don’t have a public retail shop, our service is designed for your complete convenience. You can arrange everything online or over the phone, and we offer a hassle-free collection and delivery service across the Manchester area. This approach allows us to focus entirely on premium craftsmanship while keeping our bespoke services accessible and straightforward for you.
How do I measure my artwork correctly for an online quote?
Measuring for a quote is simple and ensures accuracy. Using a tape measure, please record the exact height and width of the visible image you want to frame, not including any white borders. Provide these dimensions in millimetres (mm) for the greatest precision. If you have a specific request regarding a border, just let us know. Don’t worry, as we always re-measure your piece professionally once it arrives at our workshop to guarantee a perfect fit.
What is the safest way to post my art or photograph to you?
To ensure your artwork arrives safely, we recommend sandwiching it between two pieces of sturdy cardboard, cut slightly larger than the art itself. Secure this with tape, then wrap it in a protective layer of bubble wrap before placing it in a well-fitting box. For peace of mind, always use a tracked and insured service like Royal Mail Special Delivery. For high-value pieces, we can help you arrange a specialist art courier for maximum security.
How much does bespoke picture framing typically cost?
The cost of a bespoke frame is shaped by your unique choices, including the frame size, moulding style, mount board, and type of protective glazing. As a guide, a simple, elegant frame for an A4-sized print could start from around £45. Larger or more ornate projects will vary. We are committed to transparency and will provide you with a detailed, no-obligation quote before any work begins, so you know the full cost upfront.
How long will it take to get my artwork framed and delivered to Manchester?
Our standard turnaround for bespoke picture framing in Manchester is typically between 7 and 10 working days from the moment we receive your artwork. This timeframe allows our craftspeople to give your piece the meticulous attention it deserves. If you require your frame for a specific date or event, please let us know when you order. We will always do our utmost to accommodate your schedule and meet your deadline.
Can you frame a 3D object like a football shirt or a medal?
Absolutely. We specialise in creating stunning 3D box frames for all kinds of treasured objects and memorabilia. From sports shirts and medals to family heirlooms, our expert framers use conservation-grade techniques to mount and display your item beautifully. This process not only creates a spectacular display piece but also protects your precious keepsake from dust, damage, and UV light for years to come, turning memories into timeless art.
What happens if my frame arrives damaged?
While we package every frame with the utmost care, accidents can happen. In the unlikely event your order arrives damaged, please contact us within 48 hours. Simply email us a few photos showing the damage to the frame and the packaging. Your satisfaction is our priority, and we will immediately arrange to have the frame repaired or replaced at no cost to you, ensuring you receive the perfect, professionally finished product you expected.
That beautiful print, treasured family photograph, or one-of-a-kind piece of art deserves to be the star of the show, not left in a tube because it won’t fit a standard-sized frame. If you’ve ever felt the frustration of odd dimensions, or felt overwhelmed by the thought of choosing mounts, materials, and glazing, you’re not alone. The world of custom size picture frames can seem complex and expensive, but achieving a perfect, professional finish is more accessible than you might think.
You’ve found a piece of art you love-a beautiful print, a cherished family photograph, or an original painting. The next step is framing, but this is where many people are forced to compromise. Settling for a standard, off-the-shelf frame often means accepting a ‘close enough’ fit that ultimately does a disservice to the artwork inside. While you can discover more about Standard Size Picture Frames online, the reality is that whether it’s an oddly-sized concert poster or a panoramic photograph, they simply don’t cater to the unique. A frame is far more than just a border; to understand what is a picture frame is to see it as a structural and aesthetic bridge connecting the art to your space.
A bespoke frame is the ultimate choice for your art; it’s the bridge that connects the piece to your room’s décor and protects your cherished item for a lifetime. In this guide, we’ll embark on a journey to find the perfect fit. We will demystify the process, showing you how to measure with confidence and select the ideal materials-from the wood of the frame to the type of glass-to create a spectacular result you’ll be proud to hang on your wall.
Key Takeaways
Discover why a standard ‘close enough’ frame can diminish your art, while a custom fit provides the perfect, professional presentation it deserves.
Understand the three key components of any frame-moulding, mount, and glazing-and how to combine them to perfectly complement your piece.
Ordering custom size picture frames online is a simple and straightforward process, and our guide breaks it down into three easy-to-follow steps.
Get inspired with creative ideas for framing more than just prints, from treasured family heirlooms to unique three-dimensional objects.
Why Choose a Custom Size Frame Over a Standard One?
You’ve found a piece of art you love-a beautiful print, a cherished family photograph, or an original painting. The next step is framing, but this is where many people are forced to compromise. Settling for a standard, off-the-shelf frame often means accepting a ‘close enough’ fit that ultimately does a disservice to the artwork inside. Whether it’s an oddly-sized concert poster or a panoramic photograph, standard frames simply don’t cater to the unique. A frame is far more than just a border; to understand what is a picture frame is to see it as a structural and aesthetic bridge connecting the art to your space.
To see how a thoughtful choice can transform your art, take a look at this helpful video:
The Aesthetic Advantage: Perfect Proportions
A bespoke frame is crafted to the exact dimensions of your artwork, ensuring perfect, harmonious proportions. This tailored approach eliminates the awkward gaps or forced cropping that occur with standard sizes, allowing the artist’s original composition to shine. This makes the entire presentation look more intentional and professional, as if the frame and art were always meant to be together. Furthermore, the mount can be precisely sized to give the image vital breathing room, drawing the eye inward. With custom size picture frames, you also gain complete control over the style, finish, and colour, creating a spectacular, seamless connection between the artwork and your home décor.
Superior Protection and Longevity
Beyond aesthetics, a custom frame is a crucial investment in preserving your treasured piece for a lifetime. Unlike many mass-produced options that use lower-grade materials, professional custom framing prioritises conservation. These aren’t just fancy terms; they are the industry standard for museum-quality preservation, safeguarding your art’s colour and integrity. Key benefits include:
Conservation-Grade Materials: We use acid-free mounts and backing boards to prevent the yellowing and degradation that can ruin artwork over time.
A Perfect Seal: A properly sealed backing creates a robust barrier against environmental threats like dust, humidity, and even insects.
UV-Protective Glazing: You have the option to choose glazing that shields your art from up to 99% of harmful UV rays, preventing fading and ensuring vibrant colours for decades.
This perfect, secure fit also prevents the artwork from slipping or warping inside the frame, ensuring it remains pristine for years to come. It’s the professional standard for a reason.
Decoding the Elements of a Bespoke Frame: A Beginner’s Guide
Creating the perfect frame is a journey of craftsmanship, where three core components come together to protect and enhance your artwork. Think of a premium frame not just as a border, but as a carefully constructed bridge between your art and your room’s decor. Understanding the role of the moulding, mount, and glazing is the first step in moving beyond a basic holder to a truly spectacular, personalised display. Each choice contributes to the final look of your custom size picture frames, ensuring the result is a perfect fit in every sense.
Choosing Your Frame Moulding
The moulding is the main structure of your frame, defining its character and style. Your choice should complement both your artwork and your interior design. We source only the best materials to offer beautiful, lasting options:
Wood Frames: Timeless, warm, and wonderfully versatile. Natural grains from woods like oak, ash, and pine bring an organic, classic feel to any piece, from family portraits to fine art prints.
Metal Frames (Aluminium): Sleek, modern, and minimalist. The clean lines and slim profiles of metal are perfect for contemporary photography, posters, and abstract art.
Consider the moulding’s profile (its width and depth) in relation to the art’s size. A wide, substantial profile can give a large piece the presence it deserves, while a delicate profile is better suited to smaller works. The key is to find a balance that draws the eye inward, not one that overwhelms the art itself.
The Importance of the Picture Mount
A picture mount (also known as a matboard) is the decorative card border that sits between the moulding and your artwork. It serves two vital purposes: it provides visual breathing space, preventing the art from feeling cramped, and it keeps the artwork from touching the glazing, which is crucial for preservation. You can choose a single mount for a clean, classic look or a double mount to introduce a second accent colour for added depth and a professional finish. While neutral whites are a popular choice, a coloured mount can be used to pick out a subtle shade in the artwork, tying the whole piece together beautifully. For lasting quality, always opt for a conservation-grade, acid-free mount to prevent discolouration and protect your print for years to come.
Selecting the Right Glazing (The ‘Glass’)
Glazing is the clear, protective front of your frame. While it might seem like a simple choice, the right glazing makes a significant difference to both the viewing experience and the longevity of your art. Here are the most common options for custom size picture frames:
Standard Float Glass: A high-quality, clear, and budget-friendly option suitable for most framing projects.
Acrylic/Perspex: Significantly lighter and more shatter-resistant than glass, making it the safest choice for very large frames, public spaces, or children’s rooms.
Anti-Reflective Glass: Offers crystal-clear viewing by minimising glare and reflections, ensuring your artwork can be seen perfectly from any angle.
UV-Filtering Glass: Essential for preserving valuable or original artwork. This specialist glazing blocks up to 99% of harmful UV rays that cause colours to fade over time.
How to Order Your Custom Size Frame: A Simple 3-Step Process
Ordering custom size picture frames online shouldn’t be complicated. We believe the journey to protecting and showcasing your art should be as enjoyable as the art itself. This simple, three-step guide demystifies the process, turning what can seem daunting into a creative and rewarding experience. With precise measurements and a clear vision for your style, you’re just a few clicks away from the perfect, professional finish for your piece.
Step 1: Measure Your Artwork Accurately
Precision is the foundation of a perfectly fitting frame. Before you begin designing, take a moment to measure your piece with care. This ensures your frame is crafted to the exact millimetre, providing a professional, gallery-quality fit. For best results, follow these simple guidelines:
Use a steel tape measure for the most reliable reading; fabric tape measures can stretch and lead to inaccuracies.
Measure the exact height and width of the artwork itself, not including any existing border or mount you wish to replace.
Double-check your numbers before entering them into our online designer. A quick second look can save a lot of trouble!
Note the depth if you are framing a 3D object like a medal or piece of memorabilia, as this will require a deeper box frame.
Step 2: Choose Your Style and Materials
This is where your vision truly comes to life. Our intuitive online visualiser is your digital workshop, allowing you to experiment with hundreds of combinations to find the one that makes your art sing. A great frame acts as a bridge between your piece and your room’s decor, tying everything together beautifully. Consider the key elements that make up your custom frame:
Frame Moulding: Explore different styles, from sleek modern profiles to ornate traditional designs. Think about the colours and textures in both your artwork and your living space.
Mount Combination: A mount (or passe-partout) gives your artwork essential breathing space. Decide on the ideal width and select from our extensive range of colours to create stunning contrast or subtle harmony.
Glazing Choice: Select the right “glass” for your needs. We offer high-quality acrylic for excellent clarity and safety, as well as premium anti-reflective and UV-protective options for precious pieces or frames hung in direct sunlight.
Step 3: Finalise and Place Your Order
Before you complete your purchase, take a final moment to review your creation. Our summary page will show you a preview of your design along with all your chosen specifications, from the exact dimensions to the materials. Your frame will arrive ready to hang, complete with a sturdy backing board and all the necessary hanging hardware.
If you have any last-minute questions or need a bit of expert advice, our passionate team of craftspeople is always here to help. We are dedicated to ensuring your finished frame is nothing short of perfect.
Beyond Prints: Inspirational Ideas for Custom Framing
A frame is more than a border; it’s a stage for your most cherished memories. While we often think of framing photos and art prints, custom size picture frames open up a world of creative possibilities for unique objects and keepsakes. With a little imagination, you can transform these items into spectacular wall art, creating a display that is deeply personal and truly one-of-a-kind.
Framing Textiles and Memorabilia
Think of that treasured football shirt from a memorable match, a set of military medals, or a delicate piece of embroidery passed down through generations. These items tell a story and deserve to be displayed with pride, not hidden away in a drawer. A custom box frame is the perfect solution, creating the necessary depth to house three-dimensional objects. Our professional mounting techniques ensure your memorabilia is held securely without causing damage, using acid-free materials to preserve its integrity for years to come. We can help you create a beautiful 3D display for items such as:
Sports shirts and medals
Concert tickets and programmes
Embroideries, tapestries, and fabric art
Baby’s first shoes or christening gowns
Showcasing Oversized Art and Posters
A large-format art print or a vintage concert poster can be a spectacular focal point in a living room or hallway, but finding a standard frame that fits is often impossible. This is where custom size picture frames are not just a luxury, but a necessity. They ensure a perfect, gallery-quality fit for your non-standard pieces, providing the essential support and aesthetic finish they demand.
For heavier items, choosing a sturdy, premium moulding is crucial for structural integrity. We also recommend options like lightweight acrylic glazing, which offers a safer, shatter-resistant alternative to glass with the added benefit of UV protection to prevent fading. A professionally crafted frame doesn’t just fit your art; it elevates it, turning a simple poster into a significant piece of décor.
Feeling inspired? Explore our online gallery to see what’s possible with bespoke craftsmanship.
The First4Frames Difference: Craftsmanship from Falkirk
Choosing the right frame is essential, but the expertise of the framer truly makes the difference. At First4Frames Gallery, we believe that exceptional framing is an art form in itself. From our workshop right here in Falkirk, we combine precision technology with time-honoured, hands-on craftsmanship to create something truly special for your artwork. Every single frame is hand-built to order by our dedicated team, who are as passionate about art as you are.
We see a frame as the crucial bridge between your art and your space. It shouldn’t just border the piece; it should enhance it. This philosophy drives every cut, join, and finish that leaves our workshop, ensuring your art is given the beautiful presentation it deserves.
Our Commitment to Quality Materials
A spectacular frame begins with superior materials. We are uncompromising in our commitment to quality, ensuring your art is both beautifully displayed and properly protected for years to come. This attention to detail is at the core of what we do.
Premium Mouldings: We source high-quality, sustainable wood and sleek, durable metal mouldings to provide a perfect foundation for any style.
Conservation-Grade Mounts: All our mounts are acid-free and meet conservation standards, preventing damage and discolouration to your precious artwork over time.
Specialist Glazing: We offer a complete range of glazing options, from crystal-clear standard acrylic to anti-reflective and 99% UV-protective glass for ultimate preservation.
Flawless Finish: Our meticulous attention to detail is evident in every perfectly joined corner and smooth, immaculate finish.
Expert Advice from Passionate Framers
With over 20 years of experience, we are more than just framers; we are your partners in presentation. We understand that choosing the right combination of moulding, mount, and glazing for your custom size picture frames can feel overwhelming. That’s why our knowledgeable team is here to guide you, ensuring your final frame not only fits perfectly but also elevates the piece within. Serving art lovers across Scotland and the entire UK, we bring our expertise to every single project.
As we’ve explored, choosing a custom frame over a standard size is a transformative decision for your art. It’s about more than just fitting an unusual dimension; it’s about elevating your artwork, complementing your décor, and preserving your memories with precision and personal style. From decoding the elements of a bespoke frame to our simple three-step ordering process, you now have the knowledge to create the perfect showcase for any piece.
At First4Frames, this is our passion. With over 20 years of professional framing experience, every one of our custom size picture frames is hand-built with care in our Falkirk workshop. We are a trusted partner for artists and galleries across Scotland because we pour our expertise and dedication into every single project, ensuring a flawless, beautiful finish for your treasured items.
Your masterpiece is waiting for its final touch. If you’re ready to give your art the bespoke home it deserves, our team is here to help. Start designing your custom size frame with our experts today. We look forward to helping you create something truly spectacular.
Frequently Asked Questions
How much more expensive is a custom size frame compared to a standard one?
The cost of a bespoke frame is determined by the specific materials and dimensions you choose, rather than a flat “custom” fee. While a very large or ornate custom frame might cost more than a small, mass-produced one, you may find our prices are surprisingly competitive. For example, a simple 30x40cm custom wood frame could be around £35, offering a perfect, handcrafted fit for a similar price to a premium off-the-shelf option, ensuring spectacular results for your artwork.
What happens if I measure my artwork incorrectly?
We craft each frame to the precise dimensions you provide, so it’s crucial to measure carefully. We recommend measuring your artwork twice for accuracy! As our custom frames are made-to-order, they are non-returnable if incorrect measurements are supplied. If you’re unsure how to measure, please consult our measuring guide or contact our friendly team for advice before placing your order. We are passionate about helping you achieve the perfect fit for your piece.
How long does it take to make and deliver a custom picture frame?
Our commitment to craftsmanship means we take great care with every order. Typically, your bespoke frame will be handcrafted in our workshop within 5-7 working days. Once it’s ready and has passed our quality checks, we securely package it and dispatch it via a trusted courier. You can usually expect delivery within 2-3 days after dispatch. We’ll keep you informed throughout the process, from our workshop to your wall, ensuring a hassle-free experience.
Can you frame something that is very large or heavy?
Absolutely. We have over twenty years of experience framing a wide variety of pieces, including large and heavy items. We use robust materials and reinforced construction techniques to ensure the frame is both beautiful and structurally sound. For exceptionally large or heavy artwork, we recommend contacting us directly to discuss the specifics. This allows our expert team to advise on the best frame profile, glazing, and hanging system to safely and spectacularly display your art.
What is a ‘box frame’ and when would I need one?
A box frame, or a ‘deep rebate’ frame, is a wonderful way to display three-dimensional objects. It features a spacer between the glazing and the backing board, creating depth. This is perfect for framing items like sports memorabilia, medals, textiles, or any artwork with a textured surface. The space prevents the object from being pressed against the glass, protecting it while creating a stunning, museum-quality display that truly draws you into the piece.
Do your custom frames come ready to hang?
Yes, every one of our custom size picture frames arrives fully assembled and ready to hang on your wall. We fit the appropriate hanging hardware for the size and weight of your frame, typically a cord or sawtooth hangers, so you can display your art immediately. Our goal is to provide a hassle-free, complete service, making it simple for you to transform your space with professionally framed art. All you need is a hook on the wall!
Is that treasured piece of art, a precious family photograph, or a unique piece of memorabilia still waiting for its perfect finishing touch? The search for quality can be a frustrating journey, filled with worries about potential damage from inferior frames and the disappointment of a limited local selection. We believe that finding beautiful, bespoke picture framing in Leeds shouldn’t be a chore. It should be an inspiring, creative process that you can enjoy right from the comfort of your home.
In this guide, we’ll introduce you to our world of handcrafted, gallery-quality frames, designed to protect and elevate your most cherished items. Discover our simple, hassle-free service that brings an extensive collection of premium materials and expert advice directly to you. We’ll show you how to select the perfect frame and mount combination, ensuring your piece is beautifully finished and delivered securely from our workshop to your doorstep.
Key Takeaways
Learn how a professional frame does more than decorate-it provides essential, long-term protection for your most cherished art and memories.
Discover the advantage of using a framer with a fine art gallery perspective, ensuring an artistic eye is cast on every single project.
Find out how our simple, guided process makes bespoke picture framing leeds a seamless and hassle-free experience, right to your door.
Explore the possibilities of custom framing for a wide range of items, from fine art and photographs to treasured 3D memorabilia.
Why Professional Picture Framing Matters for Your Leeds Home
Your artwork, family photographs, and treasured memorabilia are more than just decorations; they are personal stories displayed on your walls. While an off-the-shelf frame might seem like a quick solution, it often falls short of doing your pieces justice. Bespoke picture framing is an art in itself, where craftsmanship meets personal style to create something truly special. A professionally chosen picture frame does more than just hang on a wall-it acts as a beautiful bridge between your artwork and your interior décor, enhancing and protecting your memories for years to come.
To see the level of care and detail involved, take a look at the work of a professional framing workshop:
Preservation and Protection
The most crucial role of a quality frame is to protect what’s inside. Standard frames often use acidic materials that can cause your artwork to yellow and deteriorate over time. When you choose professional picture framing in Leeds, you gain access to conservation-grade materials designed for longevity.
Acid-Free Mounts: We use premium, acid-free mount boards that prevent discolouration and chemical damage, keeping your art looking as vibrant as the day it was created.
UV-Protective Glazing: Sunlight and even artificial light can cause irreversible fading. UV-protective glass or acrylic blocks up to 99% of harmful rays, safeguarding your piece from light damage.
Proper Sealing: A bespoke frame is expertly sealed at the back to create a barrier against dust, humidity, and even insects, ensuring the internal environment remains stable and clean.
Aesthetics and Design
A custom frame elevates your art from a simple print to a stunning centrepiece. It’s a design choice that harmonises the artwork with the style of your room. Our experts guide you through choosing the perfect combination of moulding, mount, and glazing to create a spectacular visual impact. Whether your home is classic or contemporary, the right frame completes the picture.
Consider how different elements can be tailored to your piece: the width and profile of the moulding can add drama or subtlety, while the colour of the mount can draw out specific tones in the artwork, making them truly pop. It’s this attention to detail that transforms a simple image into a professionally finished work of art.
Our Bespoke Framing Services for Art Lovers in Leeds
At First4Frames Gallery, we believe a frame is the essential bridge between your art and your space. Our comprehensive service combines time-honoured craftsmanship with modern techniques to deliver spectacular results for every client. From a single cherished photograph to an entire exhibition of large canvases, no project is too big or small for our passionate team. We offer a truly bespoke approach to picture framing leeds residents can trust to protect and elevate their most valued items.
Explore our most popular framing categories, each tailored to meet the unique needs of your art and memorabilia.
Fine Art, Giclée Prints & Posters
Protecting and enhancing original art requires expertise and respect for the piece itself. Our specialist framing respects the integrity of your artwork, following professional Framing Guidelines to ensure its longevity. We use premium materials to make the rich colours of Giclée prints truly pop and can employ elegant floating techniques for art on paper, creating a beautiful sense of depth that draws the viewer in.
Photographs & Certificates
Turn your treasured memories into a stunning home gallery. We provide professional framing for everything from wedding portraits and family photos to university degrees and corporate awards. To tell a richer story, consider our custom multi-aperture mounts, which allow you to create compelling photo collages that capture a moment in time, all within one beautifully crafted frame.
Memorabilia & Shirt Framing
Some items deserve to be seen, not stored away. Our 3D box frames are the perfect solution for sports shirts, medals, and other treasured objects. Whether you want to showcase your passion for Leeds United or preserve a piece of family history, we ensure your memorabilia is not only displayed beautifully but also protected for years to come. Our expert picture framing leeds service brings your passions to life.
The First4Frames Difference: Why Choose Us Over a Local Framer?
You might be wondering why you should choose a framer based in Falkirk when you’re searching for picture framing in Leeds. The answer is simple: we offer a level of expertise and convenience that transcends distance. We aren’t just a framing workshop; we are a working fine art gallery. This unique perspective means every project is approached with an artist’s eye, ensuring your piece is not just framed, but perfectly presented.
Our service is built on three core pillars: gallery-level expertise, a seamless online process, and secure, nationwide delivery.
Gallery-Level Expertise & Curation
Our daily work with artists and collectors gives us an intimate understanding of how to complement and elevate a piece of art. We don’t just offer frames; we provide access to a curated collection of premium, high-quality mouldings selected to create a bridge between your art and your decor. Our passionate team brings this gallery-level knowledge to your project, advising on the perfect combination of materials to make your artwork truly spectacular.
A Seamless Online Experience
Forget battling city centre traffic or searching for parking. Our entire bespoke framing service is designed for your convenience. From the comfort of your Leeds home, you can receive expert, one-to-one consultation via phone or email. Our website makes it easy to explore our extensive range of framing options and get a clear, comprehensive quote. We bring the expertise of a dedicated framer directly to you, making the process simple and enjoyable.
Secure, Insured Delivery to Your Door
We understand that your artwork is precious. With over two decades of experience, we are experts in packaging and shipping framed art safely across the UK. Every single shipment is fully insured for its journey, giving you complete peace of mind. Your beautifully framed picture will arrive securely at your Leeds address, professionally finished and ready to hang on your wall. Experience the difference that quality and care can make.
Our Simple 4-Step Framing Process for Leeds Customers
We believe that getting a bespoke frame for your treasured art should be a simple and enjoyable experience. We’ve designed our service to be completely transparent and hassle-free, demystifying the process of remote custom framing. From the initial chat to the final delivery, we guide you every step of the way, making professional picture framing in Leeds more accessible than ever.
See just how easy it is to give your artwork the beautiful, protective home it deserves.
Step 1: Get in Touch & Discuss Your Vision
Your journey begins with a simple conversation. Contact our expert team with the details and dimensions of your artwork, photograph, or memorabilia. You can share your own ideas or let our passionate framers provide professional recommendations tailored to your piece and your décor. Based on this discussion, we’ll provide a clear, no-obligation initial quote.
Step 2: Send Us Your Artwork
Once you’re ready to proceed, we provide clear, step-by-step instructions on how to package your item securely for its journey to our workshop. Simply use a trusted courier service to send it to us. For your complete peace of mind, we will contact you to confirm its safe receipt the moment it arrives.
Step 3: Finalising the Design & Crafting
This is where your vision truly comes to life. We will confirm all the final details with you, including your choice of frame moulding, mount colour, and specialist glazing. With your approval, our skilled framers begin the meticulous work of crafting your bespoke frame. We use only the best conservation-grade materials to ensure a lasting, premium-quality finish.
Step 4: Secure Delivery Back to Leeds
The final step is the grand return. Your beautifully framed piece is professionally packed with the utmost care to ensure it remains pristine. We then arrange a fully insured delivery directly to your home or office anywhere in the Leeds area. Your artwork arrives perfectly finished and ready to hang, so you can start admiring it straight away.
Ready to see what’s possible? Find inspiration for your next project in our online gallery.
Your Art Deserves the Best: Professional Framing in Leeds
Your cherished artwork, prints, and photographs deserve more than a standard, off-the-shelf frame. They require a bespoke setting that not only protects them with conservation-quality materials but also enhances their beauty within your home. We’ve simplified the entire process, bringing two decades of expertise directly to you with a convenient, hassle-free online service that delivers gallery-quality results.
As specialists trusted by artists and galleries across the UK, we combine a passion for craftsmanship with an unwavering commitment to quality. For the very best picture framing leeds has to offer, delivered with care and precision, look no further than First4Frames. We are dedicated to helping you display your pieces with the pride they command.
Is it safe to send my valuable or sentimental artwork in the post?
Absolutely. We understand that your artwork is precious. We advise sending your pieces to us using a tracked and insured courier service for your own peace of mind. Once here, it is treated with the utmost care in our workshop. For the return journey, we use specialist, art-safe packaging and a fully insured courier to ensure your beautifully framed piece arrives back with you in perfect, ready-to-hang condition.
How can I choose the right frame without seeing it in person?
We make the remote design process simple and inspiring. Our website offers high-resolution images of our mouldings, and we encourage you to send us a photo of your artwork. Our expert team can provide digital mock-ups, showing you how different frame and mount combinations will look. This professional guidance ensures you can confidently choose the perfect frame to act as a bridge between your art and your room’s décor.
How long does the bespoke framing process take from start to finish?
Our commitment to premium craftsmanship means we never rush the process. From the moment we receive your artwork, a typical bespoke order takes between 7-10 working days to complete. This allows our artisans time for meticulous construction, finishing, and quality checks. If you are working to a specific deadline for your picture framing leeds project, please contact us, and we will always do our best to accommodate your request.
What are the delivery costs for shipping a framed picture to Leeds?
We offer a secure and convenient delivery service across the local area. For standard-sized framed pictures delivered to any address in Leeds, our fully insured courier service costs a flat rate of £12.95. This includes robust, protective packaging to guarantee your new artwork arrives in pristine condition. For larger or more complex orders, we will provide a clear, bespoke delivery quote before you finalise your order.
Can you frame unusual or 3D items like sports memorabilia?
Yes, we certainly can. Our bespoke framing service is perfect for more than just prints and paintings. We specialise in creating spectacular deep-rebate or ‘box’ frames to display three-dimensional objects. From sports jerseys and medals to concert tickets and personal heirlooms, we can design a stunning display that both protects and celebrates your most treasured items. Let our craftsmanship bring your memories to life on your wall.
What if I’m not happy with the final result?
Your complete satisfaction is our highest priority. We are proud of our work and are confident you will love your professionally framed art. We maintain communication throughout the process to ensure we are fulfilling your vision. However, in the unlikely event you are not entirely happy with the result, please contact us within 14 days of receipt. We are committed to working with you to find a perfect solution.
Have you ever wandered through the hallowed halls of a gallery, completely captivated by the stories captured in each face, and wished you could bring that same magic to your own walls? It’s a common feeling. You leave inspired by spectacular art, but the thought of curating your own display feels daunting, and the world of professional framing can seem complex. Nowhere is this feeling more potent than at London’s magnificent National Portrait Gallery, home to some of the most iconic figures in British history, from Tudor monarchs to modern-day trailblazers.
This guide is designed to bridge that gap between inspiration and creation. We’ll embark on a journey through the gallery’s most celebrated masterpieces, uncovering the secrets behind their timeless appeal. Then, armed with that knowledge, we will demystify the art of choosing, arranging, and framing portraits for your own space. You’ll learn the principles of beautiful curation and gain the confidence to build a stunning, bespoke portrait wall that tells your unique story, transforming your house into a home filled with personal, meaningful art.
Key Takeaways
Discover the unique mission of the National Portrait Gallery and how it uses art to tell the captivating story of a nation through its people.
Learn why the right frame is more than just a border; it’s a crucial bridge that connects your artwork to your room’s décor and enhances its story.
Uncover the secrets behind iconic masterpieces and how the principles of great portrait display can be applied to your own home.
Get a simple, step-by-step guide to curating, framing, and hanging your own beautiful portrait wall, transforming your space with personal art.
What Makes the National Portrait Gallery an Iconic Institution?
Though physically situated in London, the National Portrait Gallery stands as a spectacular treasure trove of British history and culture, its collection narrating the story of a nation through the faces of its people. Its unique mission is to chronicle the individuals who shaped the UK, offering a deeply personal and human connection to the past and present. This focus on the sitter, rather than the artist, sets it apart as a truly national institution, appreciated across the country, from Falkirk to Cornwall. For those of us at **First4Frames Gallery** in Falkirk, Scotland, it serves as a powerful inspiration for celebrating personal and national stories through portraiture.
To get a feel for its beautiful Tudor collection, this video offers a wonderful glimpse into the stories behind the portraits:
A Brief History: From Victorian Vision to Modern Landmark
Founded with a clear Victorian vision in 1856, the gallery was established to honour the great and good of British history. After several temporary locations, it found its permanent home at St Martin’s Place in 1896. As the world’s very first portrait gallery, its influence has been immense. A recent multi-million-pound redevelopment project has revitalised its spaces, ensuring it remains a modern and welcoming landmark for generations to come. The rich history of the National Portrait Gallery is a testament to its enduring importance in the nation’s cultural life.
More Than Just Paintings: A Diverse Collection
While home to some of the most famous paintings in British art, the collection’s diversity is one of its greatest strengths. Spanning from the Tudors to today, it includes not only celebrated monarchs, scientists, and artists but also unsung heroes who have contributed to the fabric of the nation. The collection, which numbers over 220,000 works, is a rich tapestry of different media, showcasing premium craftsmanship across centuries.
Paintings and Drawings: Iconic works from masters like Hans Holbein to contemporary visionaries such as David Hockney.
Photography: A vast and growing archive capturing modern British life and its defining personalities.
Sculpture: Powerful three-dimensional representations of historical and modern figures.
Must-See Masterpieces: Iconic Portraits Through the Ages
A walk through the National Portrait Gallery is a journey through British history, told by the faces that shaped it. Each portrait is more than just a painting; it’s a story of power, creativity, and influence. This spectacular collection fulfills the official mission of the National Portrait Gallery to promote the appreciation of the men and women who have made and are making British history. Here are a few unmissable masterpieces that showcase the gallery’s incredible range.
The Chandos Portrait: The Face of Shakespeare?
Perhaps the most famous face in the entire collection, the Chandos Portrait is widely believed to be the only likeness of William Shakespeare painted in his lifetime. Attributed to artist John Taylor, its mysterious origins and the endless debate over its authenticity only add to its allure. Presented within a beautiful, ornate gold frame, its intricate craftsmanship reinforces the historical weight and timeless importance of the man it portrays, pulling you into the gaze of a literary genius.
Tudor Royalty: The Ditchley Portrait of Elizabeth I
Commanding immediate attention, the Ditchley Portrait of Elizabeth I by Marcus Gheeraerts the Younger is a powerful statement of authority. The Queen stands upon a map of England, a storm raging behind her while the sun shines upon her-a masterful piece of political propaganda. Every detail was designed to project an image of a divine ruler. The grand, majestic frame is not merely a border; it’s an integral part of the composition, amplifying the portrait’s regal splendour and solidifying its majestic impression.
Modern Icons: From David Hockney to Malala Yousafzai
The gallery brilliantly connects the past with the present, showcasing modern icons who continue to shape our world. Here, historical oil paintings give way to vibrant contemporary works, from David Hockney’s insightful self-portraits to powerful photographic portraits of figures like Malala Yousafzai. This modern collection demonstrates the evolving nature of portraiture. The presentation shifts, too; these pieces are often housed in simpler, cleaner frames. This deliberate choice allows the artwork to breathe, ensuring the focus remains squarely on the subject’s powerful, contemporary story.
The Unsung Hero: Why Framing is Crucial for Great Portraits
After admiring the masterpieces within the National Portrait Gallery, it’s easy to overlook one of the most critical elements of their presentation: the frame. Far from being a simple border, a frame is an integral part of the artwork’s experience. It does the heavy lifting, completing the artist’s vision and connecting the portrait to the world in which it hangs. The gallery’s collection is a masterclass in this craft, offering powerful lessons we can bring into our own homes.
A Frame is a Window to the Story
Think of a frame as a window that isolates a portrait from the visual noise of its surroundings. It creates a dedicated space, commanding your attention and pulling you into the subject’s world. By defining the artwork’s boundaries, a frame directs your eye, focuses your engagement, and adds the final punctuation to the story the artist is telling. It provides context, enhances emotion, and transforms a simple image into a complete artistic statement.
Matching the Frame to the Artwork and a Room’s Decor
The curators at the NPG expertly match frames to the era and style of the portraits. Heavy, ornate gilded frames embrace the grandeur of Tudor monarchs, while sleek, minimalist profiles suit the clean lines of modern photography. This principle of thoughtful presentation is a hallmark of world-class institutions, from London to Australia’s National Portrait Gallery. At home, the frame acts as a beautiful bridge between your artwork and your interior style. Consider these tips:
Wood frames offer warmth and a timeless, traditional feel suitable for classic portraits and cosy interiors.
Metal frames provide a sleek, contemporary look that complements modern art and minimalist decor.
Colour choice is key. A frame can pick up a subtle colour from within the artwork or harmonise with the tones of your room to create a cohesive look.
Conservation and Protection: The Practical Role of a Frame
Beyond aesthetics, a frame serves a vital protective purpose. A professionally crafted frame shields precious art and memories from the permanent damage caused by dust, moisture, and fading from UV light. The key components-conservation-grade glazing, acid-free mounts, and protective backing boards-work together to preserve your artwork for generations. Viewing a frame as an investment in preservation ensures that your cherished portraits remain as vibrant as the day they were created. Learn more about our conservation-grade bespoke framing services.
How to Create Your Own Portrait Gallery at Home
Feeling inspired after a visit to a grand institution like the national portrait gallery? You can capture that same sense of history, personality, and beauty right in your own home. Creating a personal gallery wall isn’t about replicating a museum; it’s about telling your unique story through a curated collection of art and memories. It’s a spectacular way to bring character to any room, turning a blank wall into a beautiful focal point. Follow these simple steps to begin your journey.
Step 1: Curate Your Personal Collection
The first step is deciding what story you want to tell. Your collection should be a true reflection of you. Consider building your gallery around a central theme to create a cohesive narrative. Some ideas include:
Family History: Mix vintage family portraits with recent snapshots.
Travel Memories: Combine photographs from your adventures with art prints from places you’ve visited.
A Colour Palette: Choose pieces that share a complementary colour scheme for a harmonious look.
Don’t be afraid to mix professional fine art prints with your own treasured photographs. For lasting beauty, invest in high-quality Giclée prints, which use archival inks to prevent fading and preserve vibrant colour for decades.
Step 2: Choose the Perfect Frames
Frames are the essential bridge between your art and your decor. For a clean, uniform look, choose matching frames in a single colour and style. If you prefer a more eclectic, bohemian feel, mix and match different frame styles, materials, and colours. A professionally cut mount provides crucial ‘breathing space’ around your image, drawing the eye inward and giving it a premium finish. Always measure your artwork and wall space carefully to ensure a perfect, bespoke fit.
Step 3: Design Your Gallery Wall Layout
Before you pick up a hammer, plan your layout. A great tip is to start with a large “anchor” piece, placing it slightly off-centre, and then arranging smaller frames around it. Lay all your framed pieces on the floor to experiment with different arrangements until you find one you love. This allows you to visualise the final result without making unnecessary holes. As a general rule, aim for a consistent gap of 2-3 inches between each frame for a balanced and professional appearance.
From the National Portrait Gallery to Your Own Walls
The stories held within the National Portrait Gallery reveal the timeless power of a well-presented portrait. As we’ve explored, creating your own gallery wall is a deeply personal journey, and the secret to elevating it from a collection of pictures to a stunning display lies in the quality of the presentation. A beautiful, bespoke frame is the crucial bridge between your image and your decor, providing the finishing touch that turns a print into a cherished piece of art.
Ready to turn that inspiration into reality? At First4Frames Gallery, we bring over 20 years of bespoke framing experience to every project. Based in Scotland and serving the entire UK, we pair our passion for craftsmanship with beautiful, museum-quality Giclée prints from talented artists. We provide a simple, one-stop-shop to help you curate a spectacular portrait wall that tells your unique story.
Is the National Portrait Gallery in London free to enter?
Yes, visiting the main collection at the National Portrait Gallery is completely free for everyone, making it a wonderful and accessible day out in central London. While the permanent galleries don’t require an entry fee, it’s worth noting that some special or temporary exhibitions may have a charge. We recommend checking their official website before your visit for the most up-to-date information on ticketing for these unique displays, which often require pre-booking.
What is the most famous painting in the National Portrait Gallery?
While fame can be subjective, many consider the ‘Chandos’ portrait of William Shakespeare to be the most famous work in the collection. It’s the only portrait of the playwright believed to have been painted during his lifetime. Other spectacular highlights include powerful portraits of historical figures like Queen Elizabeth I and contemporary icons such as Malala Yousafzai. Each piece tells a unique story, making a visit a true journey through British history and culture.
Can you take photographs inside the National Portrait Gallery?
Yes, you are welcome to take photographs for personal, non-commercial use in most areas of the gallery. However, to protect the beautiful artwork, flash photography, tripods, and selfie sticks are not permitted. Some specific artworks or temporary exhibitions may have further restrictions, so always look for the accompanying signage. Capturing the memory of your favourite portrait is a wonderful way to bring a piece of the gallery experience home with you.
What is the difference between the National Gallery and the National Portrait Gallery?
It’s a common question, as they are neighbours in Trafalgar Square! The main difference lies in their collections. The National Gallery focuses on Western European paintings from the 13th to the 19th centuries, celebrating the art itself. The National Portrait Gallery, however, is dedicated to portraits of historically important and famous British people. Here, the primary focus is on the sitter-the person depicted-and their story, rather than the artist who painted them.
How do I choose the right size frame for my picture?
Choosing the perfect frame size begins with your artwork. First, carefully measure the exact height and width of your print or photo. Next, decide if you want to include a mount (the card border inside the frame), which adds breathing space and a professional finish. A mount will mean you need a larger frame. For a truly bespoke look, the frame should complement the art, not overpower it, acting as a beautiful bridge between the piece and your room’s décor.
Should all the frames in a gallery wall match?
Not at all! This is a matter of personal style. A uniform look with matching frames creates a clean, formal, and cohesive display that is very elegant. Alternatively, an eclectic mix of different frame styles, colours, and textures can create a dynamic, personal, and visually interesting gallery wall. The key is to find a common element, such as a consistent colour palette in the prints or a single frame colour mixed with different styles, to tie it all together.
How do I protect my photos and prints from fading?
Protecting your cherished memories and fine art prints from fading is crucial for their longevity. The most significant factor is light exposure, so always avoid hanging artwork in direct sunlight. For ultimate protection, we recommend using premium framing materials, including UV-protective glazing (glass or acrylic) and acid-free mounts and backing boards. This professional craftsmanship ensures your beautiful pieces are preserved and will not fade over time, remaining vibrant for years to come.