Have you got a special piece of art or a treasured memory tucked away, waiting for the perfect frame? It’s a common dilemma. You know it deserves more than a cheap, off-the-shelf solution, but the fear of damage and the challenge of finding a true expert for bespoke picture framing, especially if you’re seeking services in Nottingham, can feel overwhelming. How can you be sure you’re getting premium craftsmanship for a fair price, and that your sentimental item is in safe, skilled hands?
This expert guide is designed to give you clarity and confidence. We believe the right frame is a bridge between your art and your home, and choosing it should be an inspiring journey, not a stressful task. We will explore the essential differences in materials, explain key conservation techniques, and provide you with the questions you must ask to find a reliable local artisan. By the end, you’ll be ready to choose a bespoke framing service that not only enhances your art but protects it beautifully for a lifetime.
Key Takeaways
- Learn the difference between a basic frame and the true craftsmanship that defines quality picture framing nottingham, actively protecting and enhancing your artwork.
- Discover how bespoke services for picture framing nottingham can transform more than just prints, with creative techniques for displaying everything from memorabilia to heirlooms.
- Before choosing a service for picture framing nottingham, arm yourself with our essential checklist of questions to guarantee a quality result.
- Understand the benefits of a professional online framing service, offering expert craftsmanship and convenience delivered directly to your door.
What Defines Professional Picture Framing? A Quality Checklist
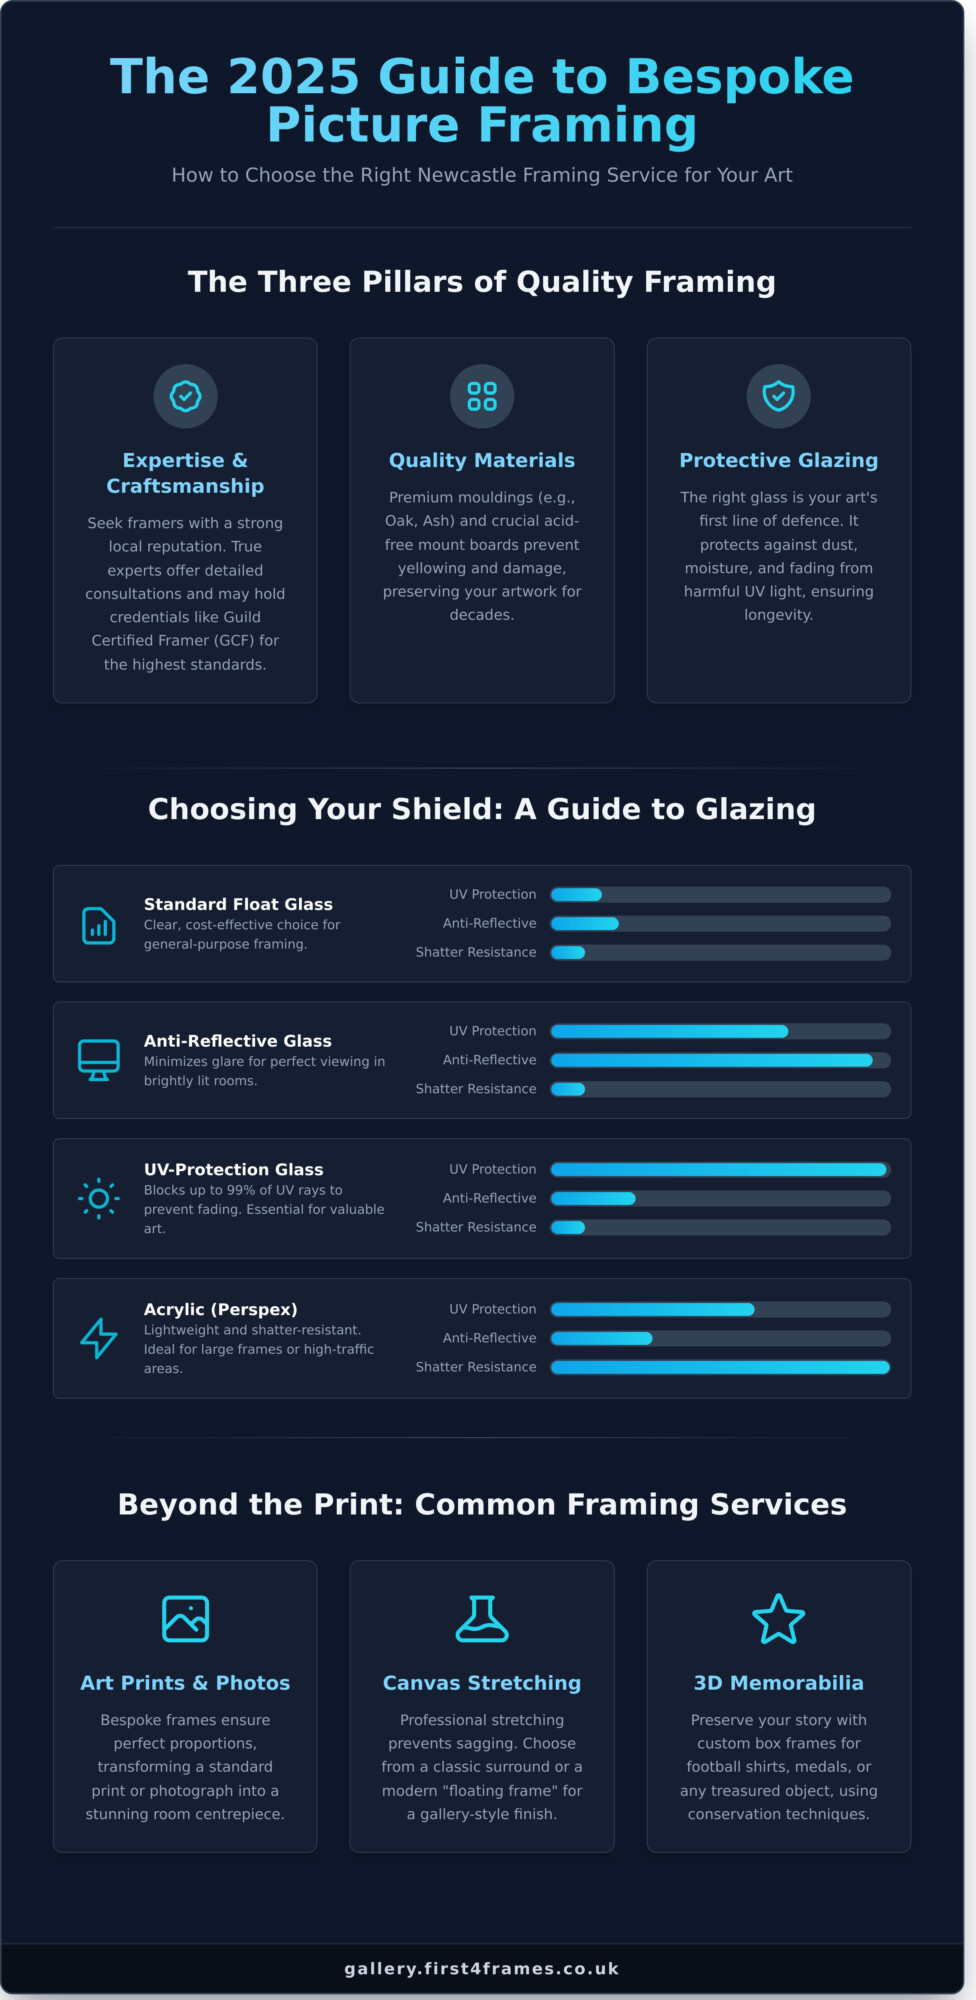
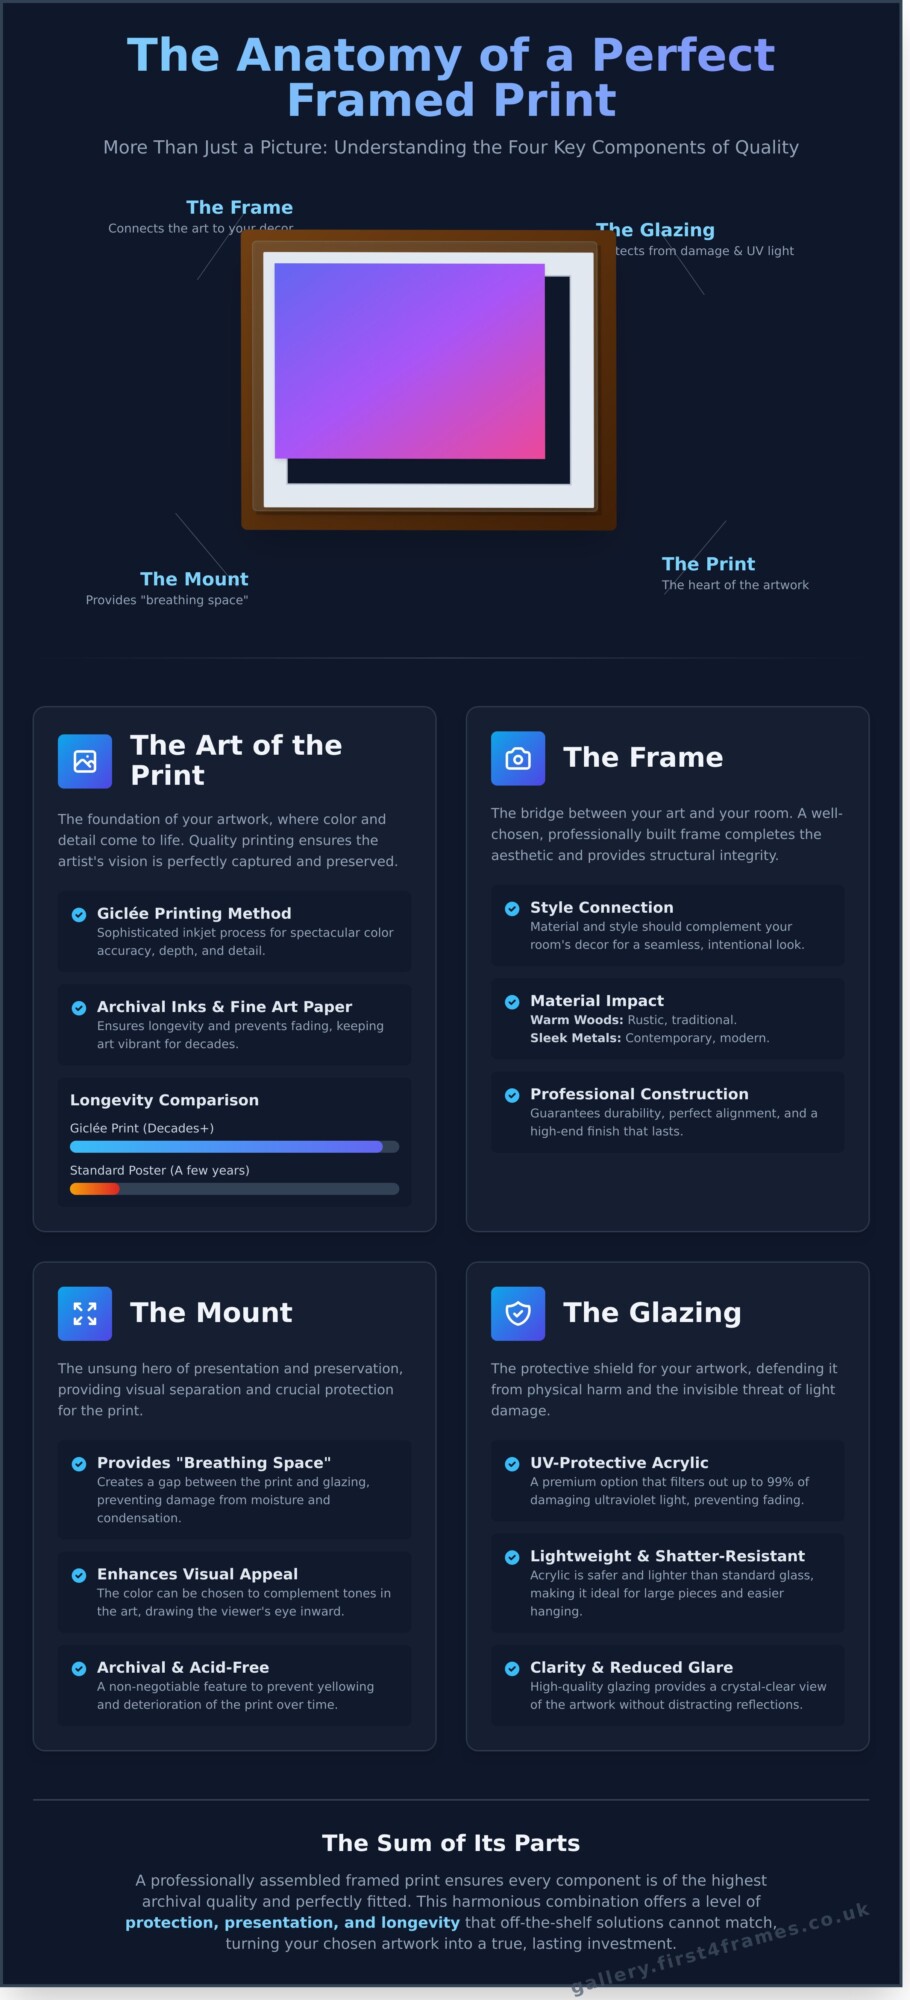
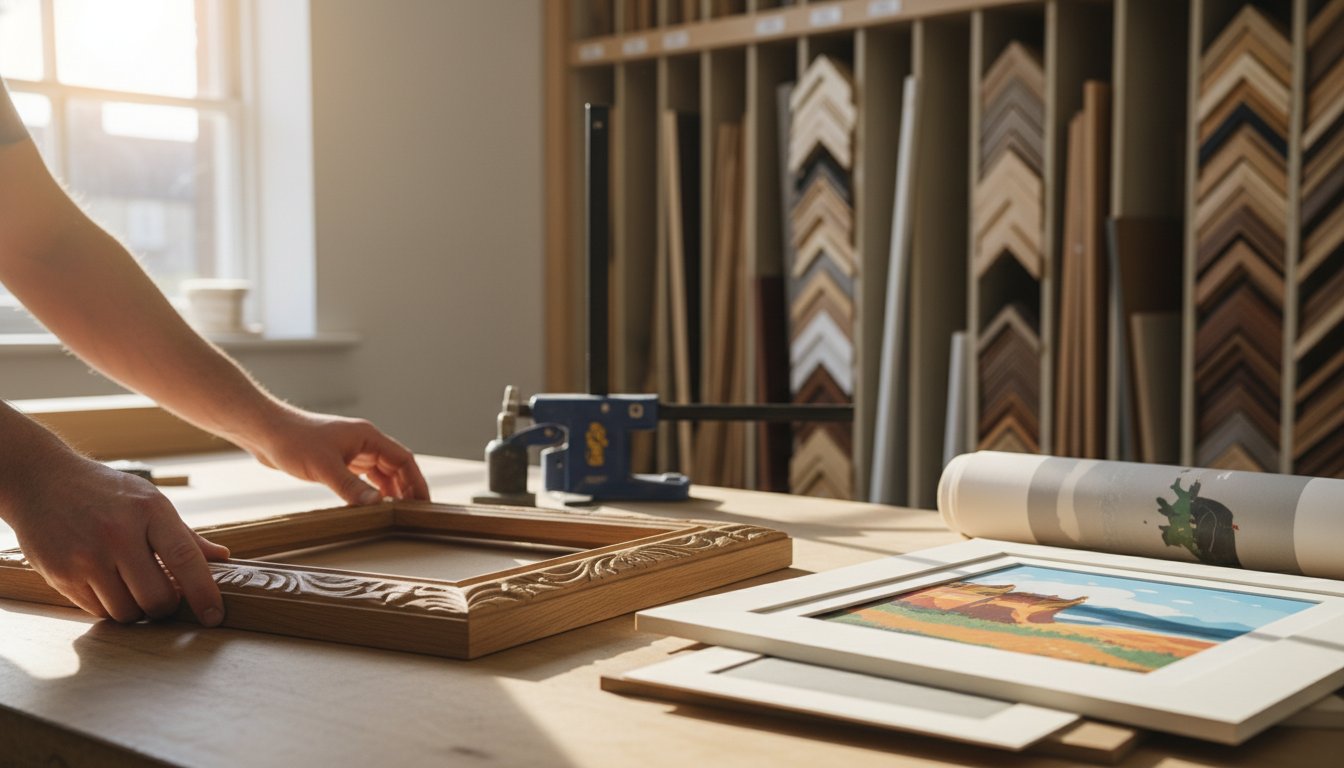
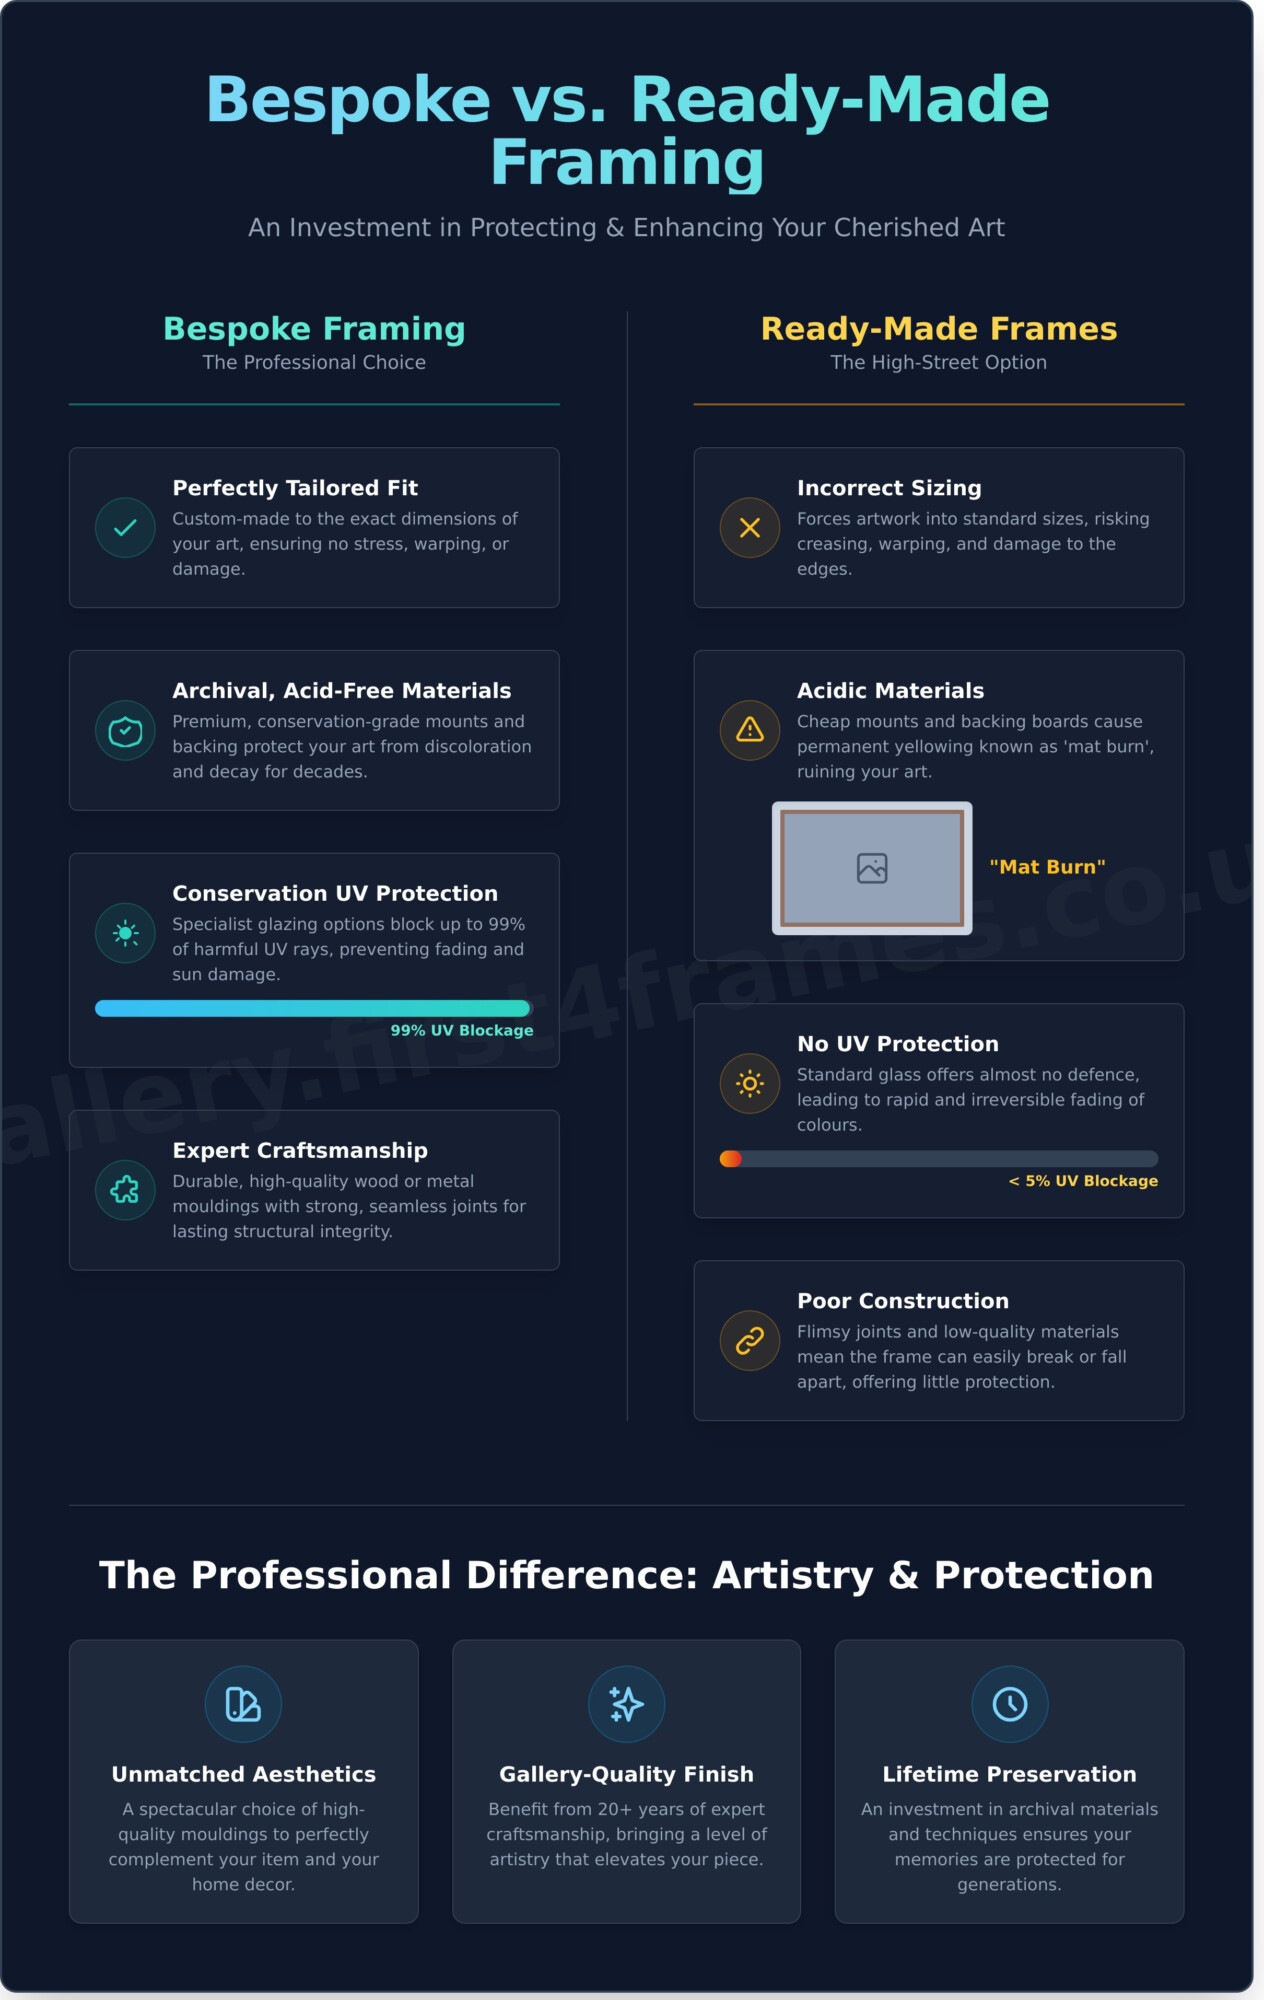
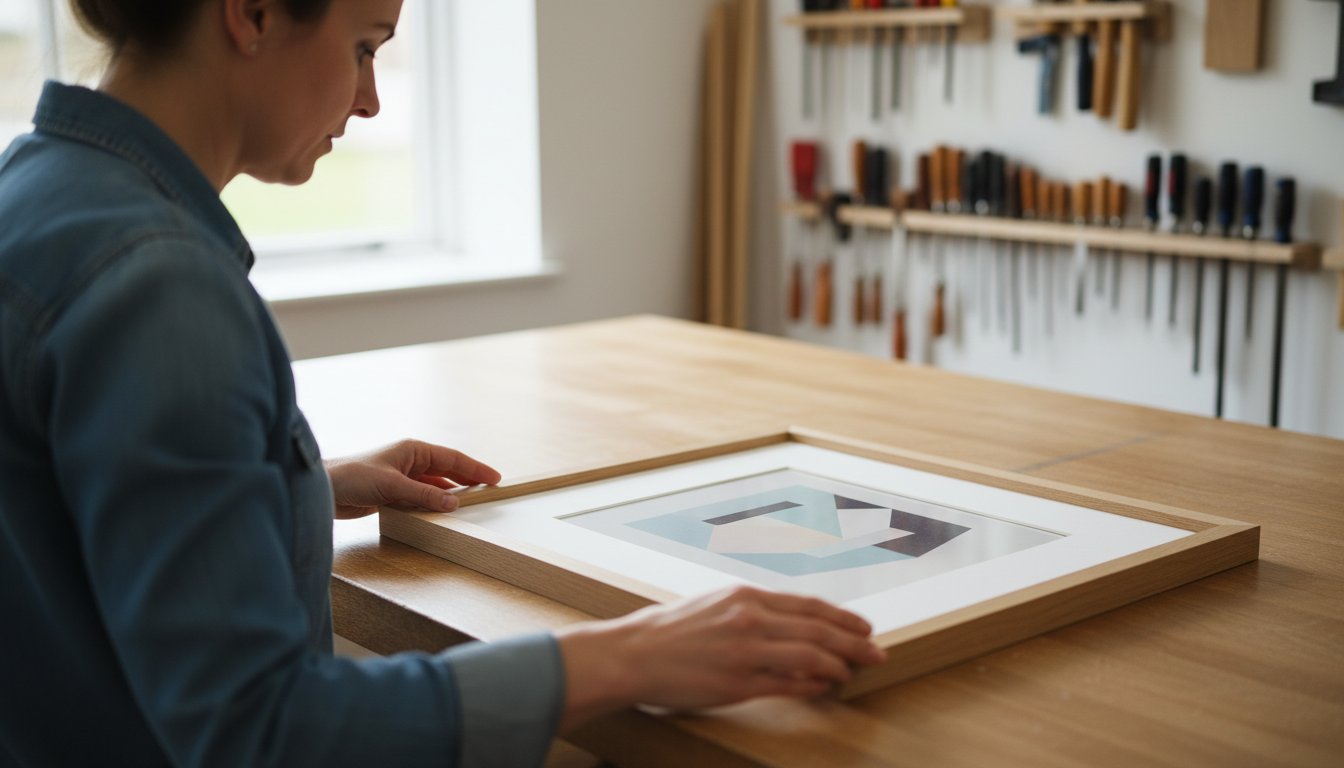
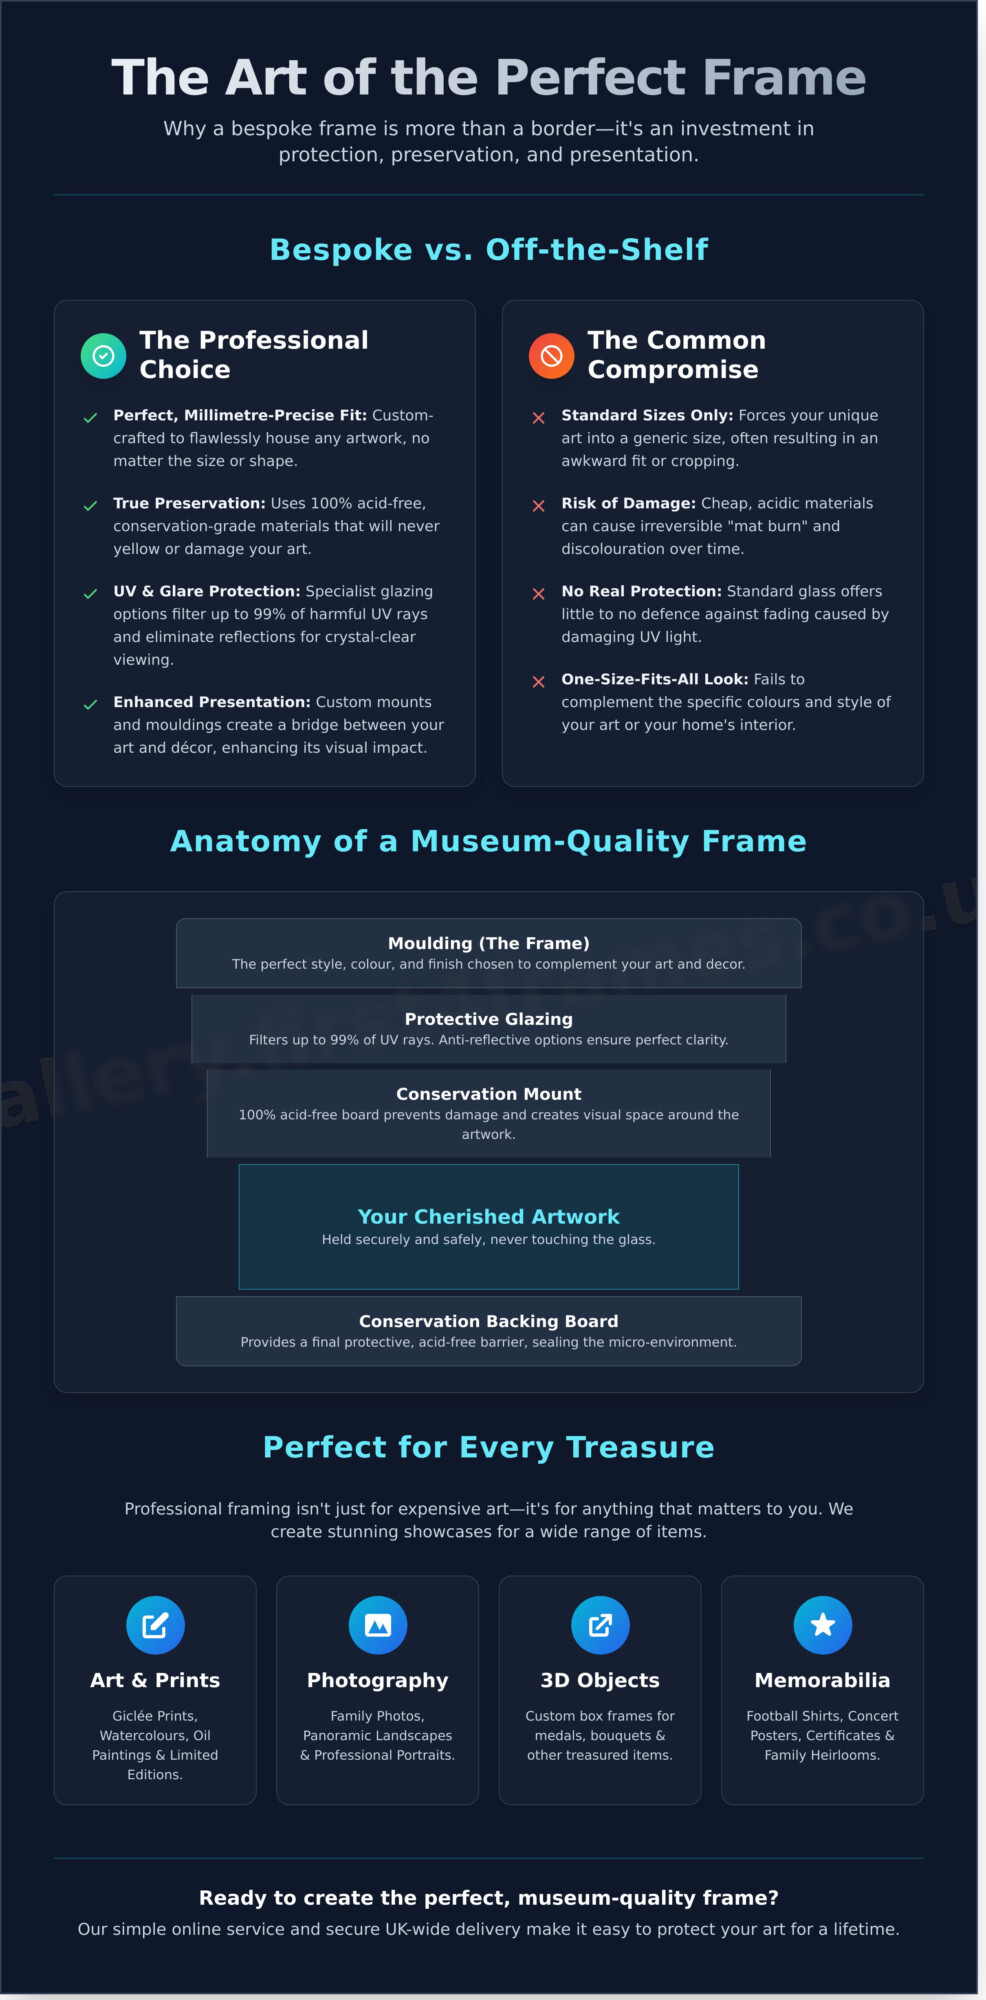
Choosing a frame for your cherished artwork, photograph, or memorabilia goes far beyond picking a colour you like. Professional framing is a craft that both protects and elevates your piece, ensuring it looks spectacular for decades. While the basic answer to ‘What is a picture frame?‘ is a simple structure to hold a picture, the professional execution involves a deep understanding of materials and conservation techniques. This checklist will empower you to identify true quality when seeking bespoke picture framing in Nottingham, turning a simple border into a perfect, lasting presentation.
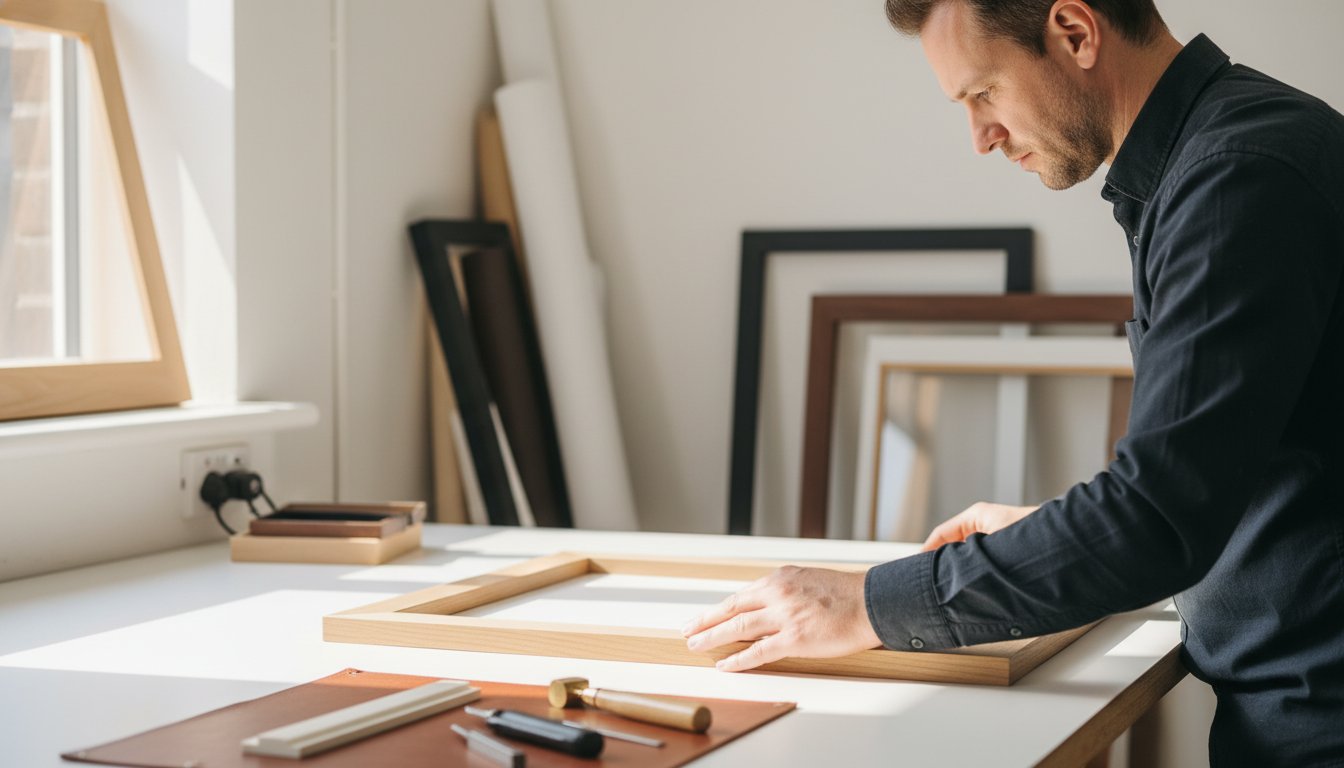
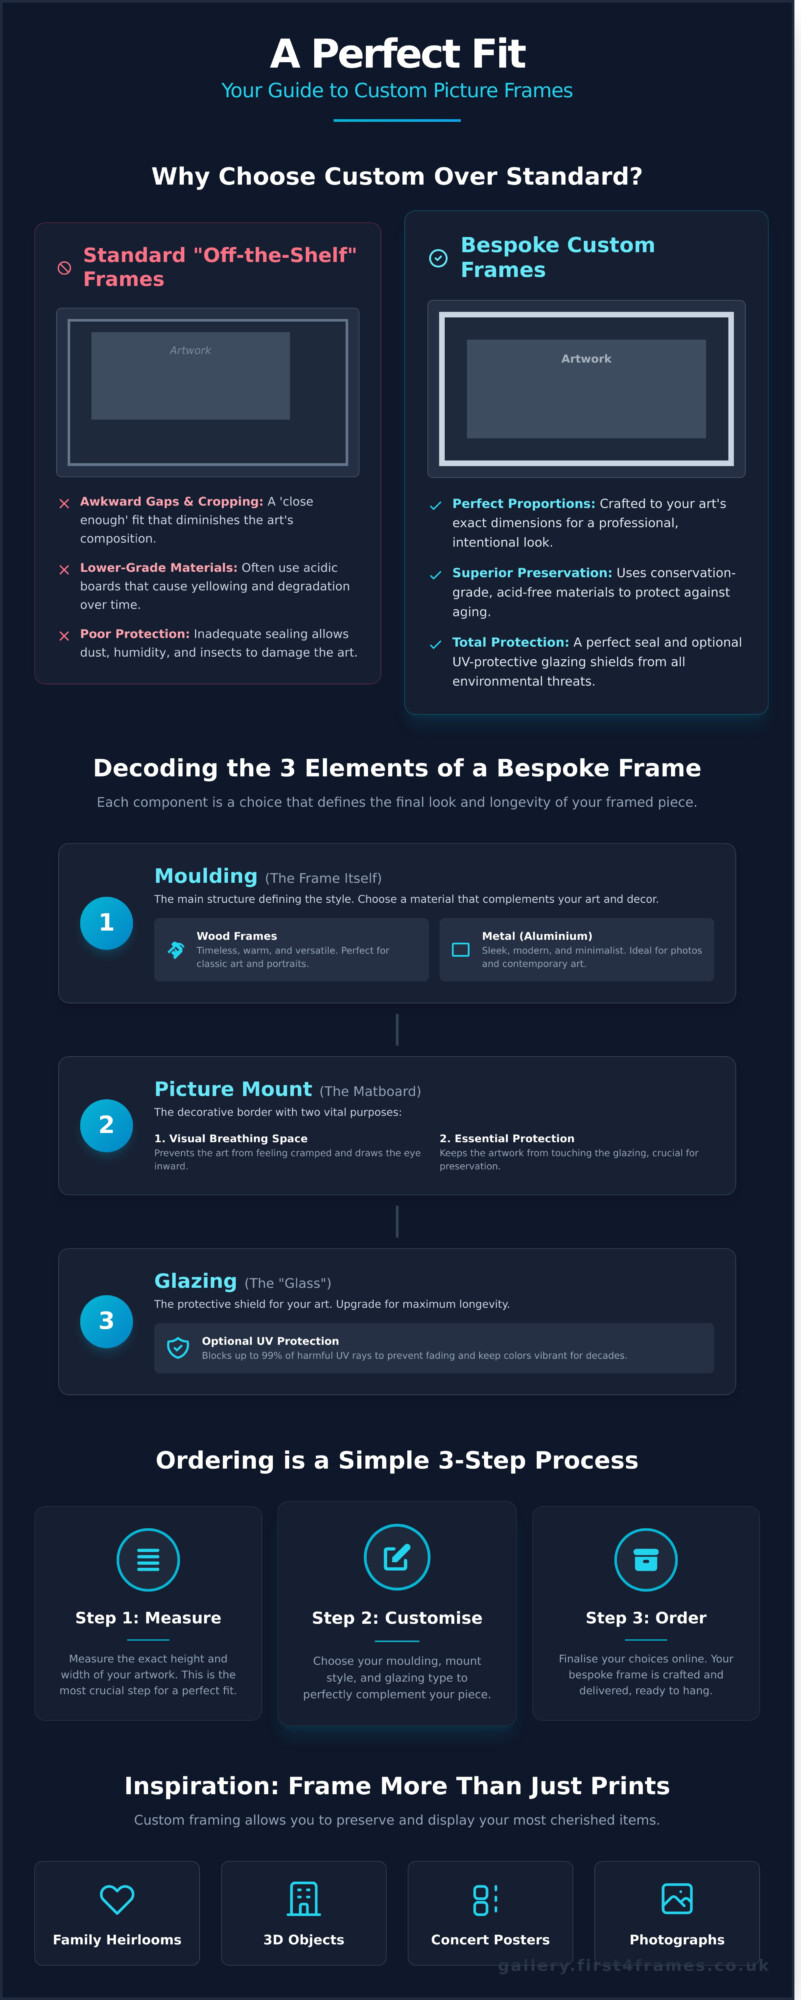
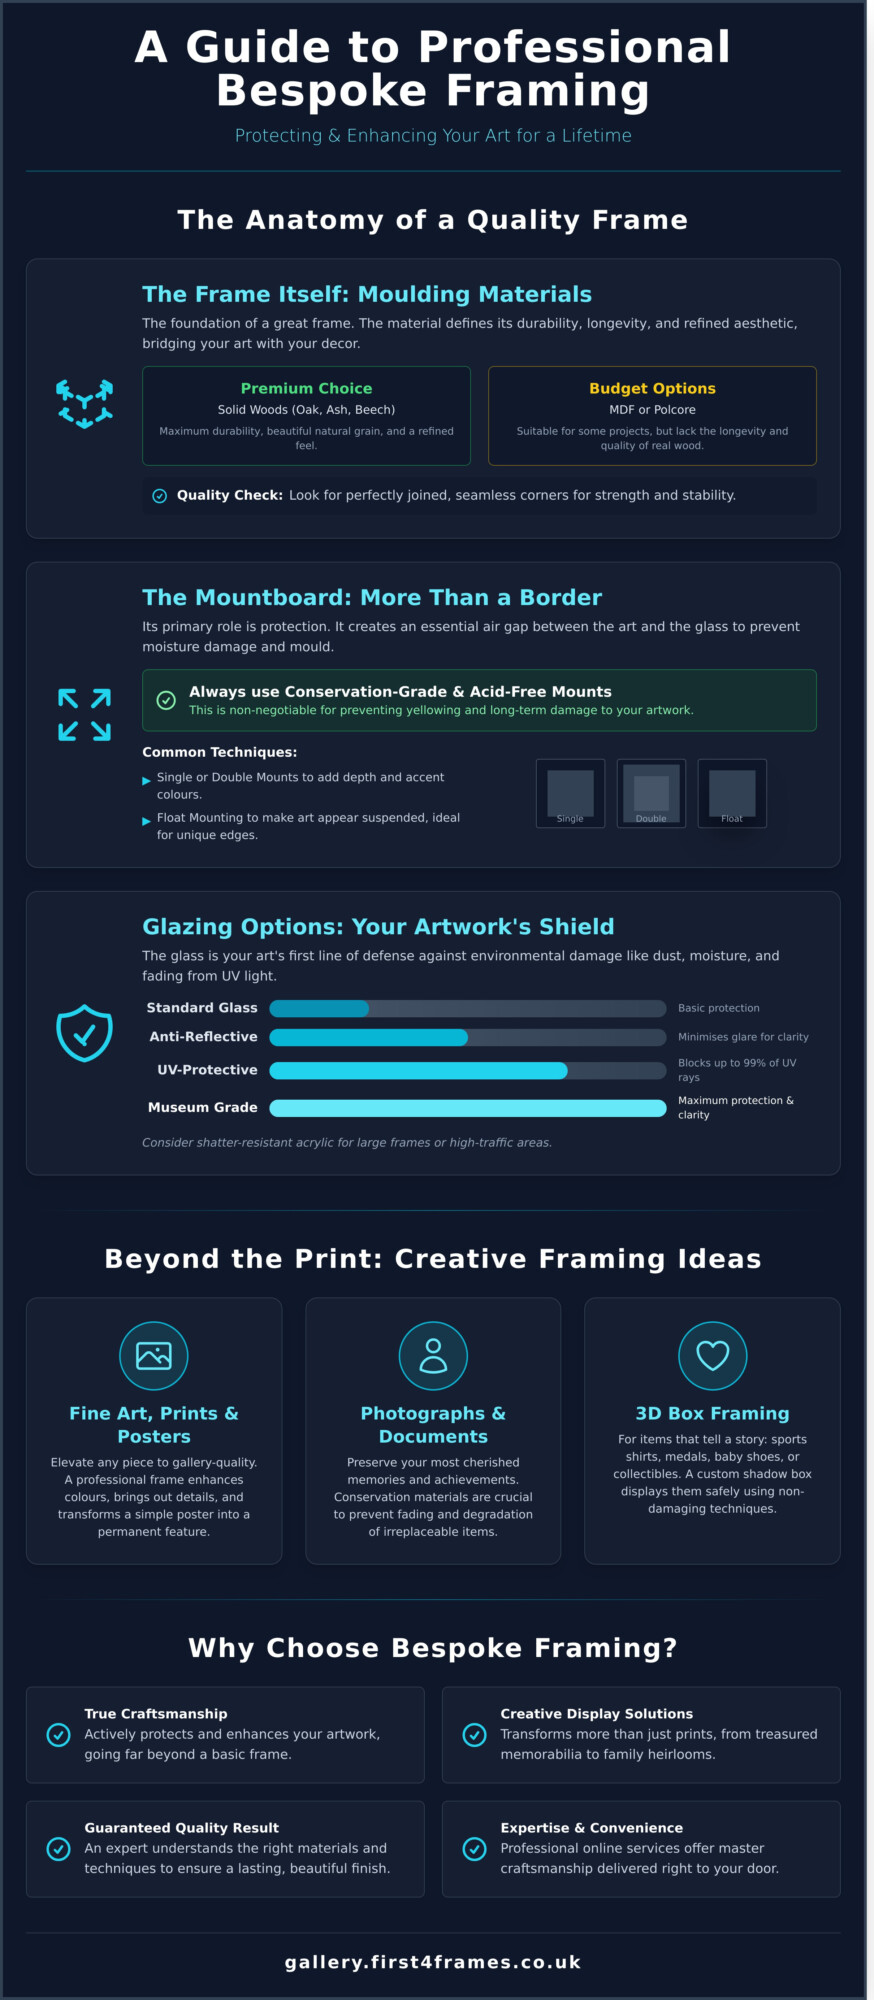
The Frame Itself: Moulding Materials and Finishes
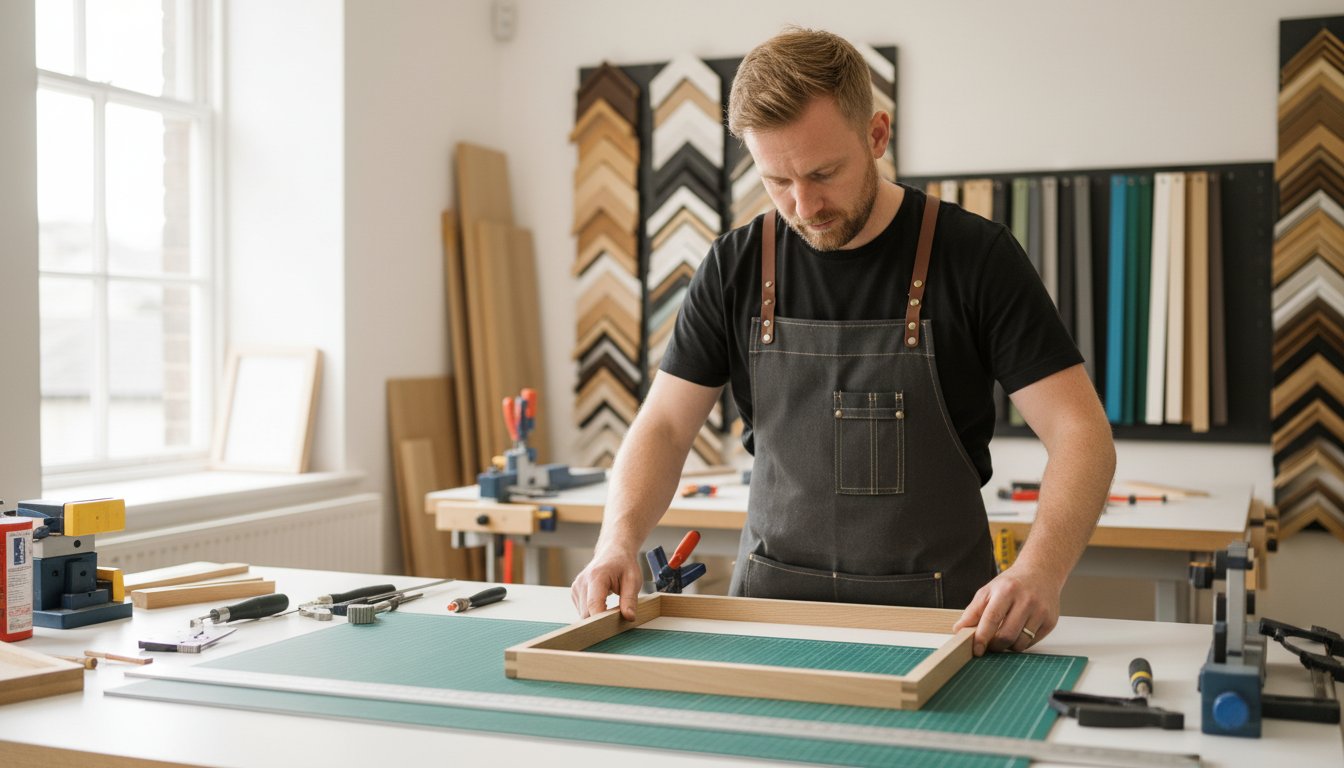
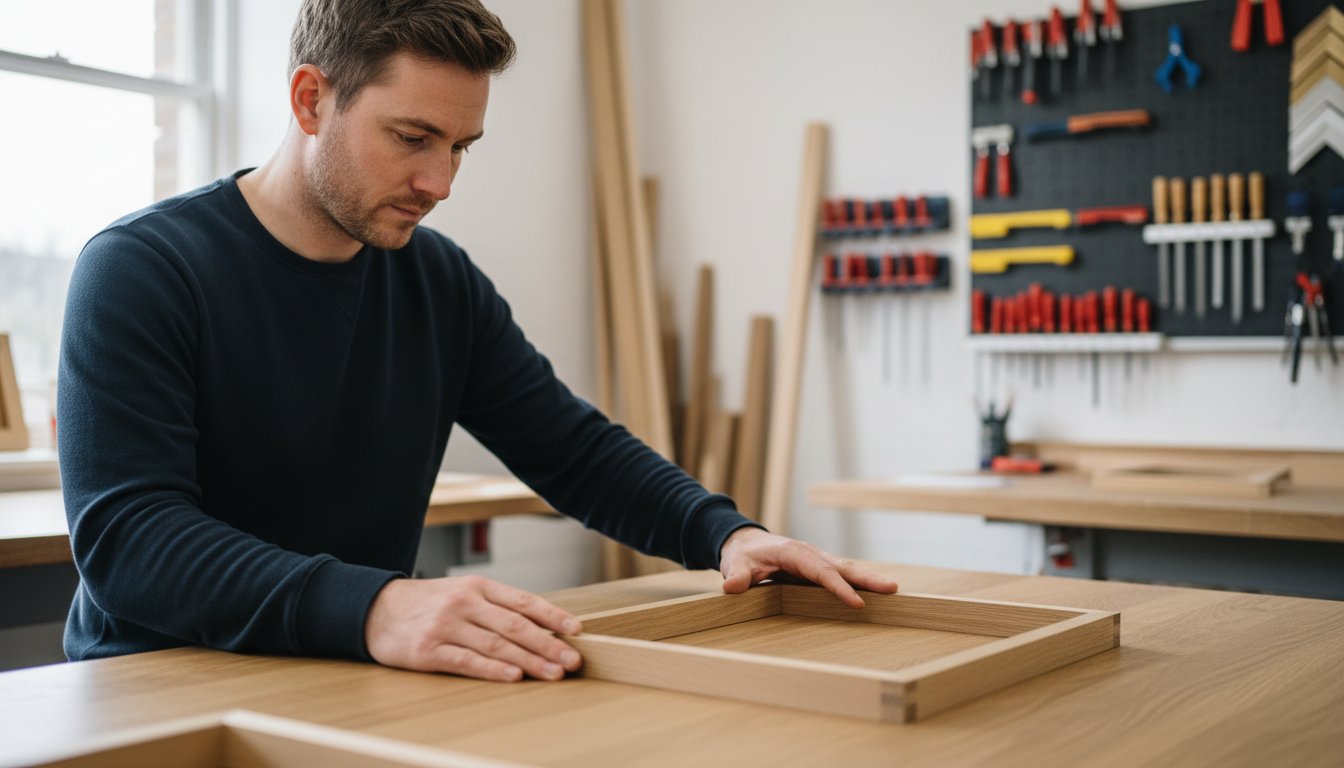
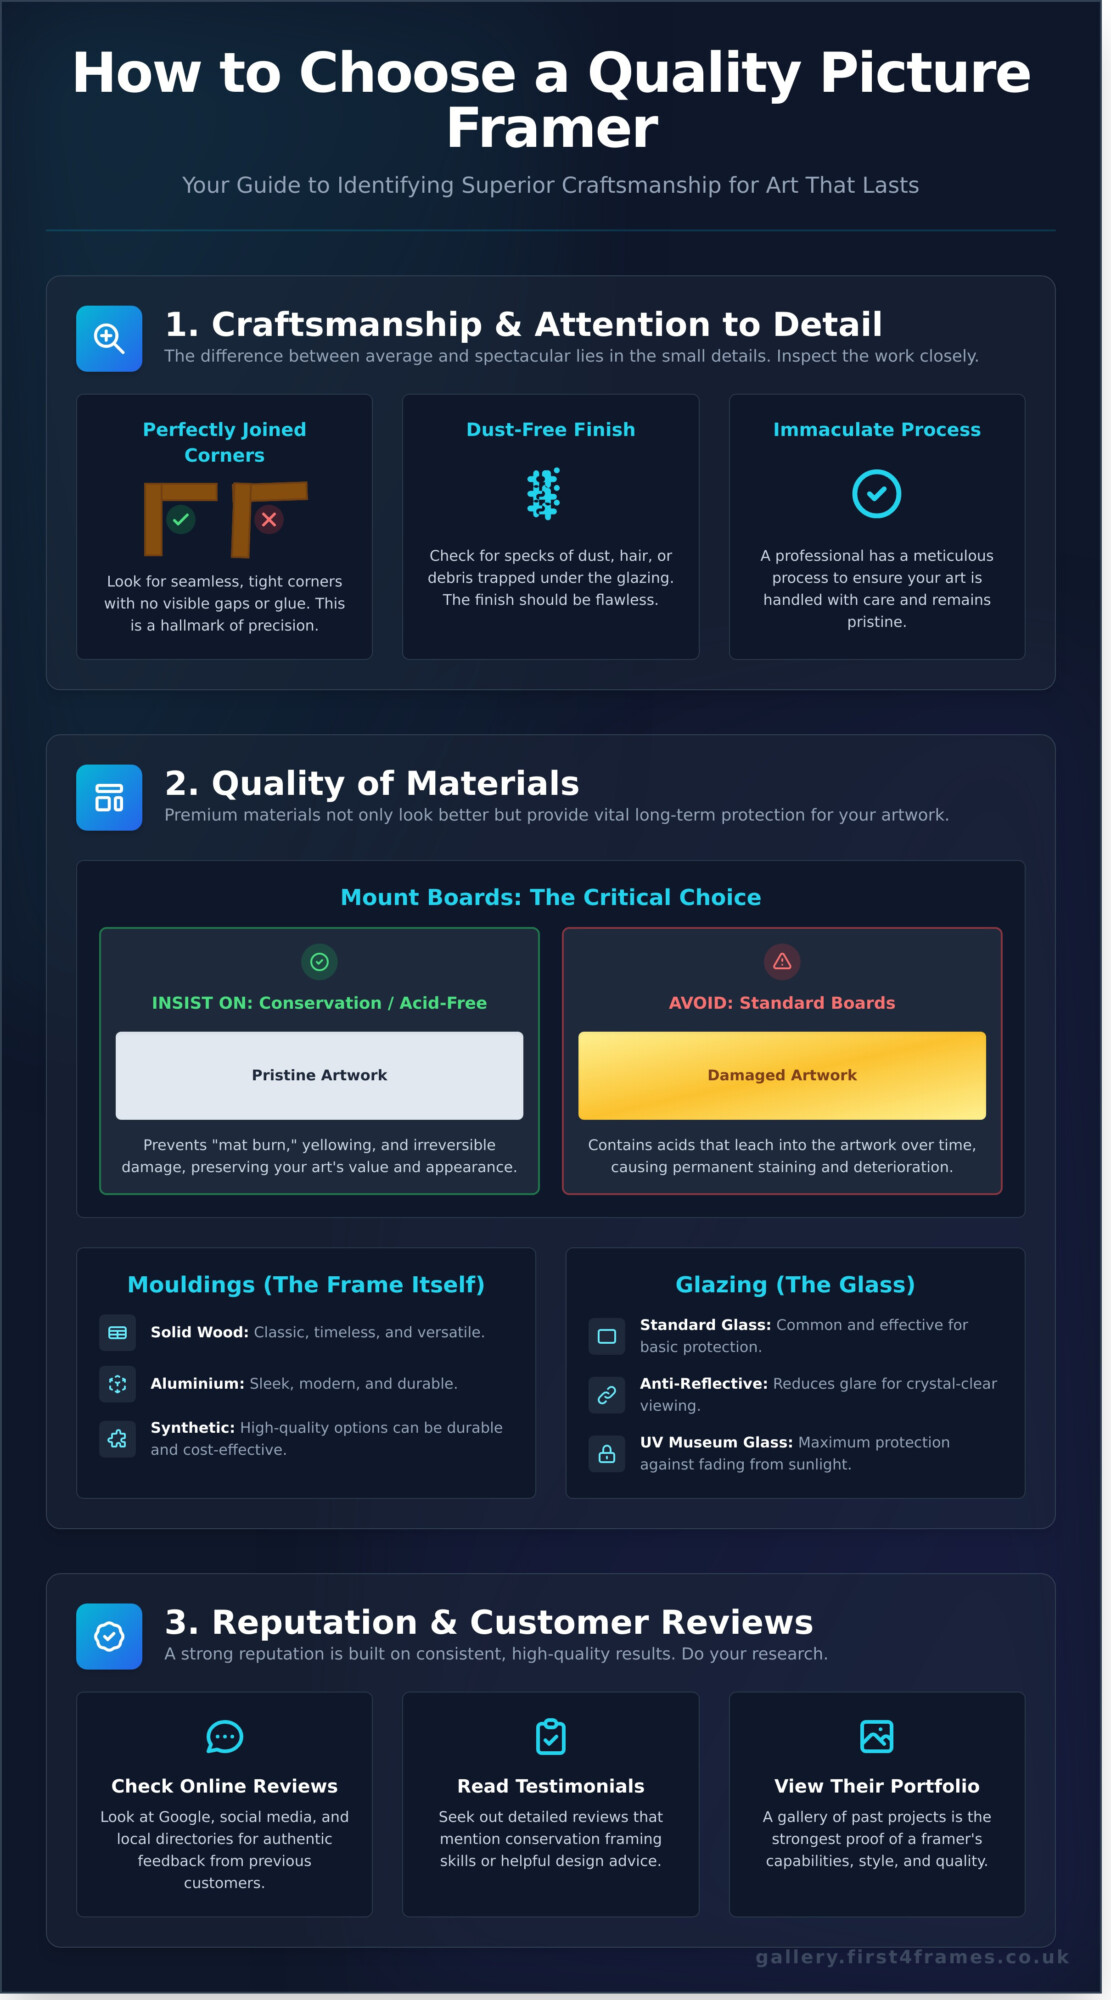
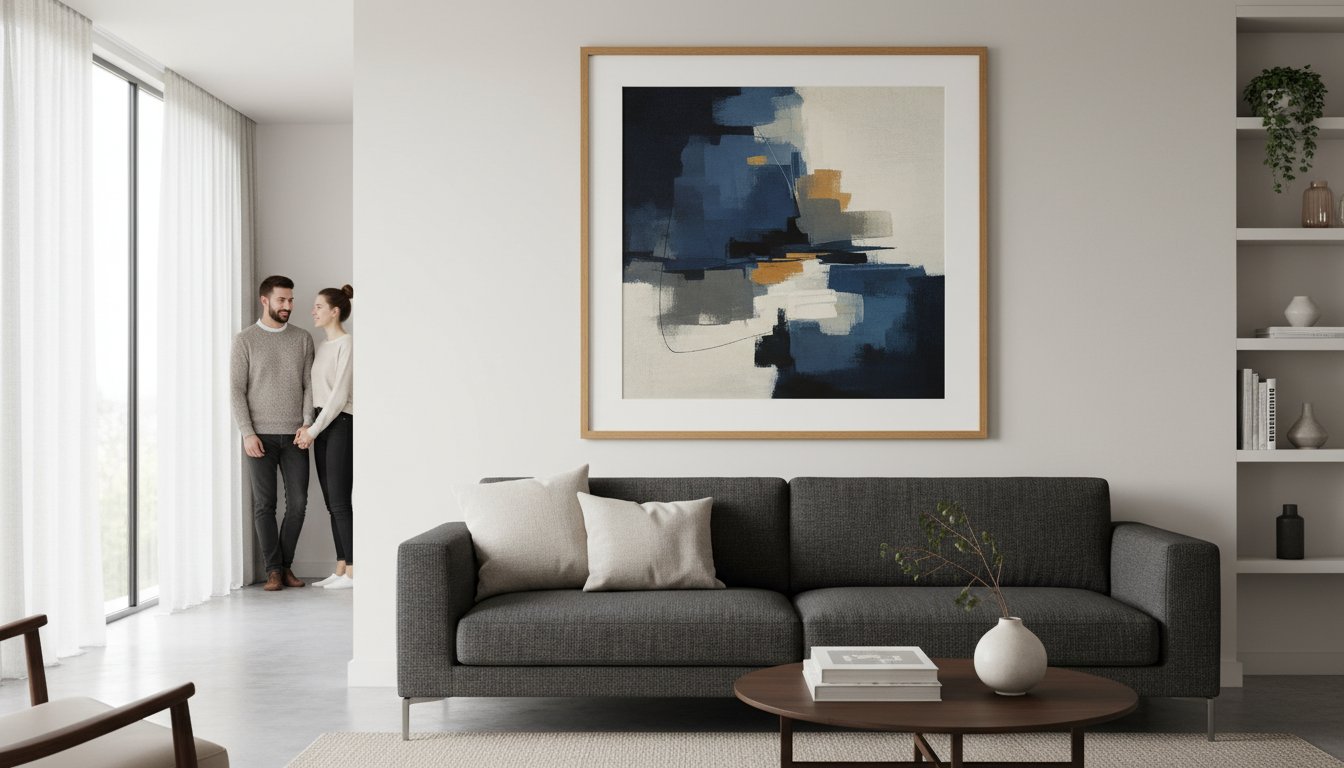
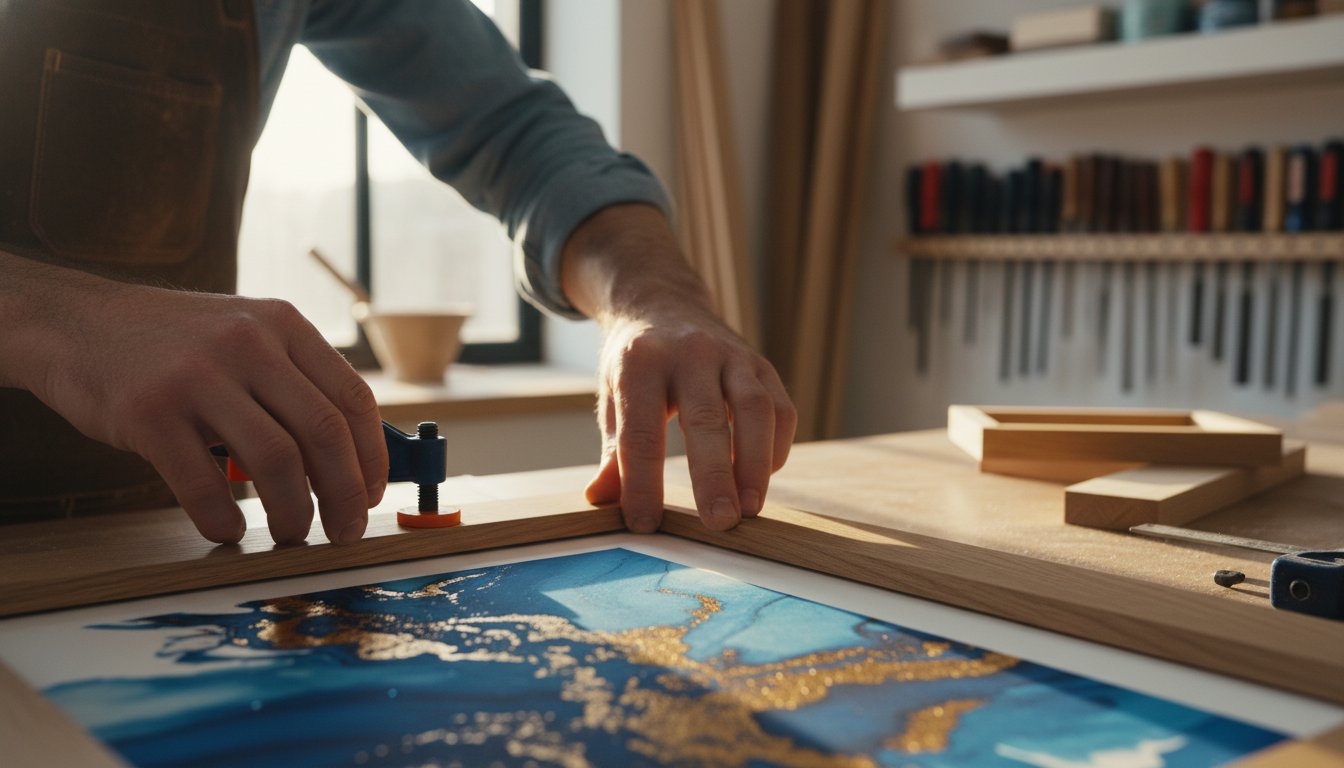
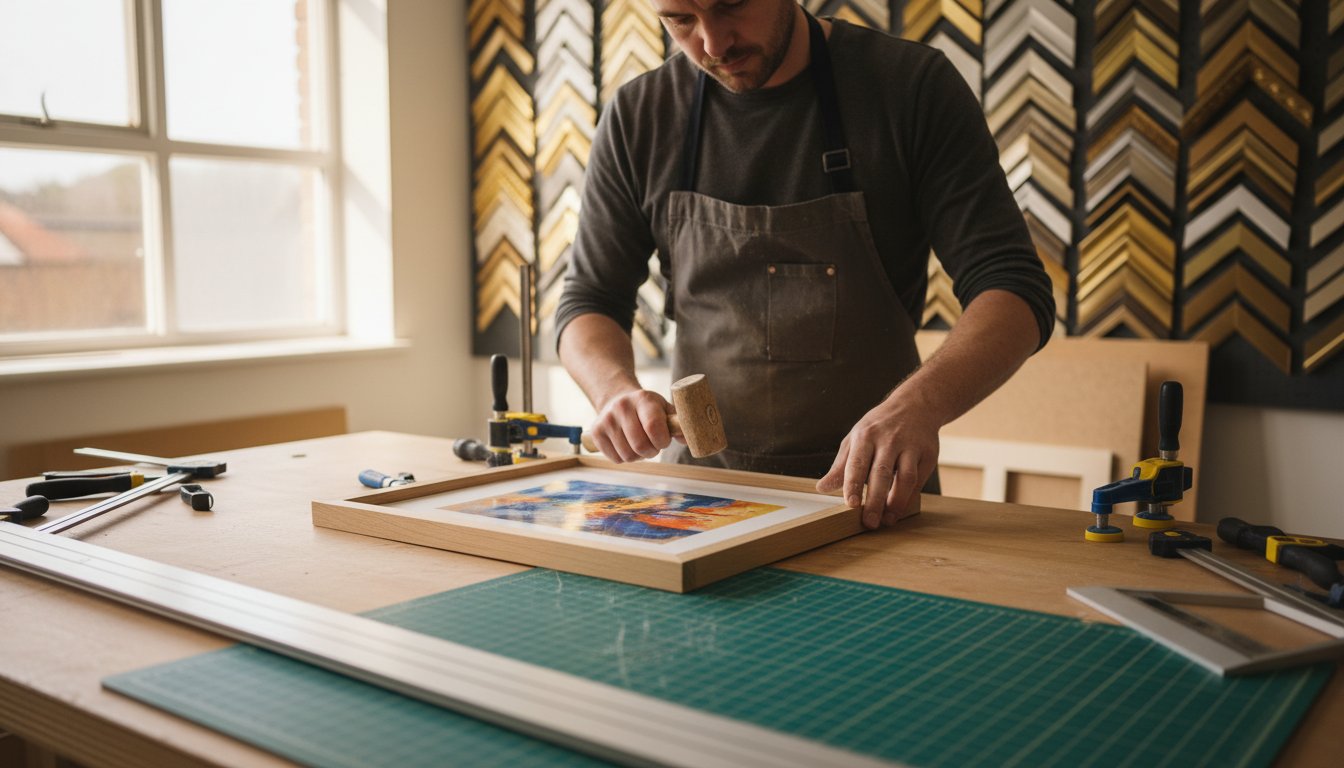
The foundation of any great frame is its moulding. Premium framers often use solid woods like oak, ash, or beech for their durability and beautiful grain. While budget options like MDF or Polcore have their place, they lack the longevity and refined feel of real wood. Pay close attention to the corners; a professional frame will have perfectly joined, seamless corners that are strong and stable. The finish-from natural wax to painted or hand-gilded surfaces-should act as a bridge between your artwork and your room’s decor.
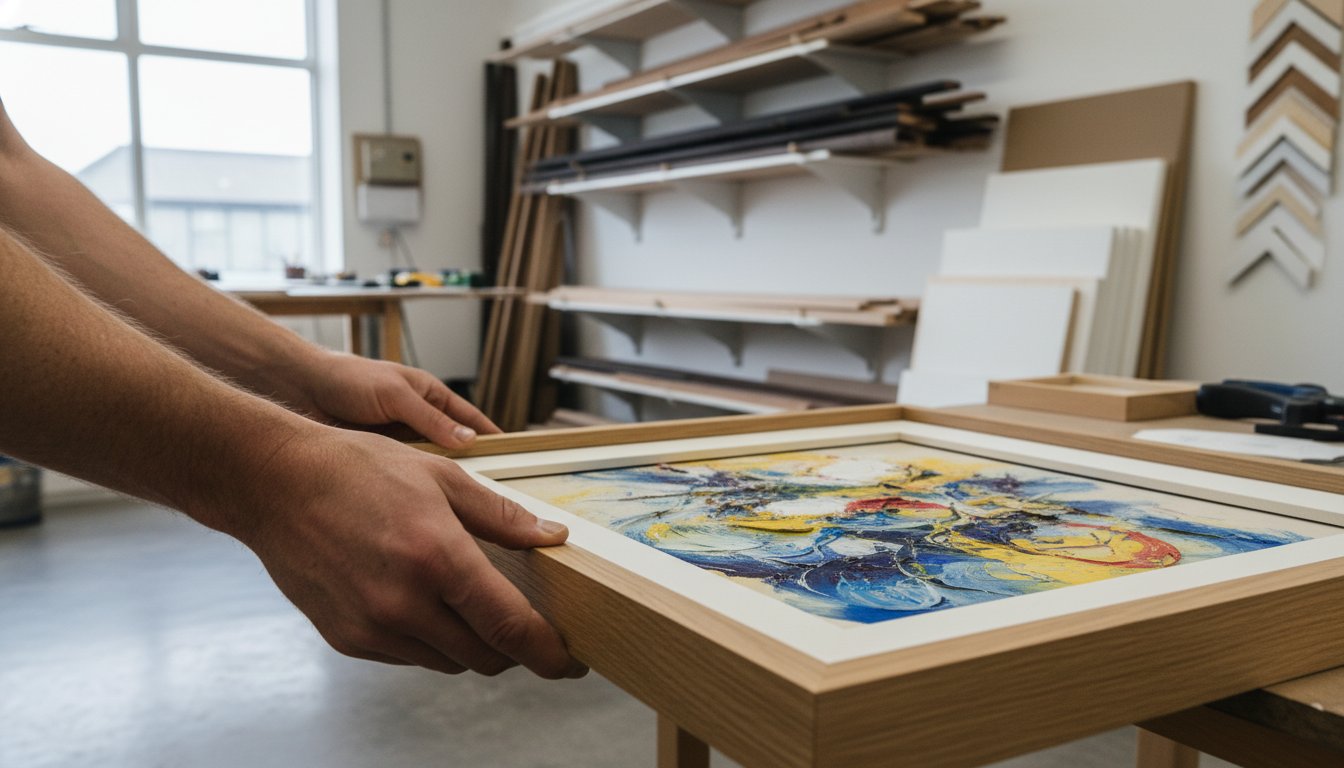
The Mountboard: More Than Just a Border
A mountboard (or mat) does more than create a visual border; its primary job is protective. It is essential to use an acid-free, conservation-grade mount to prevent yellowing and damage to your artwork over time. The mount creates a crucial air gap, stopping the art from touching the glass, which can lead to moisture damage and mould. A skilled framer will help you choose colours and textures that draw the eye inwards, using techniques like:
- Single or Double Mounts: Adding depth and a complementary accent colour.
- Float Mounting: A spectacular method where the artwork appears to “float” above the backing board, showcasing deckled or unique edges.
Glazing Options: Choosing the Right Glass for Your Piece
The glass, or glazing, is your artwork’s shield against the elements. Standard float glass is common, but upgrading can make a significant difference. Anti-reflective glass minimises glare for a crystal-clear view, while UV-protective glass is vital for preventing fading caused by sunlight. For valuable or irreplaceable pieces, museum-grade glass offers the highest level of UV protection and anti-reflection. For large frames or pieces in high-traffic areas, lightweight and shatter-resistant acrylic is an excellent, safe alternative.
A Guide to Framing Different Items: From Prints to Memorabilia
Bespoke framing is a beautiful craft that extends far beyond traditional pictures. It’s an opportunity to protect, preserve, and showcase the items that hold personal value, turning them into stunning displays. From fine art to three-dimensional memorabilia, the right frame acts as a bridge between your item and your décor, enhancing its story and significance. Discover the unique considerations for different objects and get inspired for your next project.
Framing Fine Art, Prints, and Posters
A professionally chosen frame can transform a piece of art. For premium Giclée prints, the right mount and frame combination will make the colours pop and bring out intricate details. We handle original paintings on paper or canvas with the utmost care, ensuring the mounting method is appropriate for the medium. Even a simple poster can be elevated to a gallery-quality piece with a sleek, minimalist frame, moving it from a temporary decoration to a permanent feature in your home.
Preserving Cherished Photographs and Documents
Your most precious memories deserve the best protection. For wedding photos, family portraits, and irreplaceable documents, we use conservation-grade materials to prevent fading and degradation. When you need expert picture framing in Nottingham, we ensure every element is designed for longevity.
- Archival Mounts: Acid-free mount boards prevent yellowing and protect your item from damage over time.
- UV-Protective Glazing: Specialist glass can block up to 99% of harmful UV rays, safeguarding your photographs from fading.
- Bespoke Collages: We can create beautiful multi-aperture frames to display a collection of photos, certificates, or awards in one cohesive piece.
3D Box Framing for Sports Shirts and Memorabilia
Some items can’t be confined to a flat frame. Our 3D box framing service is perfect for showcasing treasured objects like football shirts, medals, baby’s first shoes, or collectible figures. We create a deep, custom-built ‘shadow box’ that provides the necessary space. Crucially, we use specialised, non-damaging techniques like stitching to secure items, ensuring they remain in pristine condition. A box frame doesn’t just display an object-it tells a story.
How to Choose a Framer in Nottingham: 7 Key Questions to Ask
Finding the right expert for picture framing in Nottingham is about more than just finding the nearest workshop. The level of craftsmanship, quality of materials, and customer service can vary significantly. To ensure your treasured artwork, photograph, or memorabilia receives the care it deserves, it’s wise to be prepared.
Walking into a consultation armed with the right questions will help you gauge a framer’s expertise and commitment to quality. This ensures you can feel completely confident leaving your piece in their hands. Here are the key questions we recommend asking.
Questions About Their Process and Experience
A framer’s history and process speak volumes about their dedication to the craft. Understanding how they work is the first step to building trust.
- Can I see examples of your previous work? A portfolio of completed projects is the best evidence of quality and style. Look for clean corners, precise mount cutting, and a professional finish.
- How long have you been a professional framer? Experience often translates to a deeper understanding of different art mediums and conservation techniques.
- Do you do all the work on-site? This is crucial for security and quality control. A framer who completes all work in their own workshop maintains oversight from start to finish.
- What is your typical turnaround time? A clear timeframe helps manage your expectations, especially if the piece is for a gift or specific event.
Questions About Materials and Protection
A beautiful frame should also be a protective one. The materials used are the bridge between your artwork and its long-term preservation.
- Are your mountboards acid-free as standard? Standard mounts contain acids that can “burn” and permanently discolour your artwork over time. Always insist on acid-free or conservation-grade board.
- What are my options for UV-protective glazing? Standard glass offers minimal protection from fading caused by ultraviolet light. Ask about conservation glass with 99% UV filtering to preserve the colours and integrity of your piece.
- How will you attach my artwork within the frame? Professional framers use reversible, conservation-approved methods like T-hinges with acid-free tape, never permanent adhesives that can damage the art.
Questions About Cost and Guarantees
Transparency is the hallmark of a trustworthy service. You should feel clear about what you are paying for and confident in the final result.
- Can you provide a detailed, itemised quote? A professional quote should break down the cost of the frame moulding, mount, glazing, and labour.
- What is included in the final price? Confirm that the price includes everything from assembly to hanging fixtures, ensuring there are no hidden costs.
- Do you offer a satisfaction guarantee on your work? A framer who stands by their craftsmanship will offer a guarantee on the quality of their work, giving you complete peace of mind.
The First4Frames Alternative: Expert Craftsmanship Delivered to Your Door
Searching for the perfect picture frame on your local high street can be time-consuming, and you may not find the specialist skills or materials your artwork deserves. What if the ideal solution wasn’t local, but was delivered directly to you? At First4Frames Gallery, we bridge that gap. We combine over 20 years of professional framing experience with a seamless online service, offering an exceptional alternative for picture framing nottingham residents can trust. Get gallery-quality results without leaving your home.
Why Choose a UK-Wide Specialist?
Opting for a dedicated online framer like First4Frames Gallery opens up a world of possibilities that a local shop might not be able to offer. We provide a consistent, premium service for customers across the country, from artists and photographers to busy homeowners.
- Unrivalled Material Access: We source a wider range of high-quality, professional-grade mouldings, mounts, and glazing than most high street stores.
- Gallery-Level Quality Control: Every single order is handcrafted in our workshop to the same exacting standards, ensuring consistent, beautiful results every time.
- Ultimate Convenience: Perfect for busy individuals who value their time. Design and order your perfect frame online in minutes, and we’ll handle the rest.
- A Partner for Creatives: We are the trusted choice for artists and photographers who need a reliable, high-quality framing partner for their exhibitions and sales.
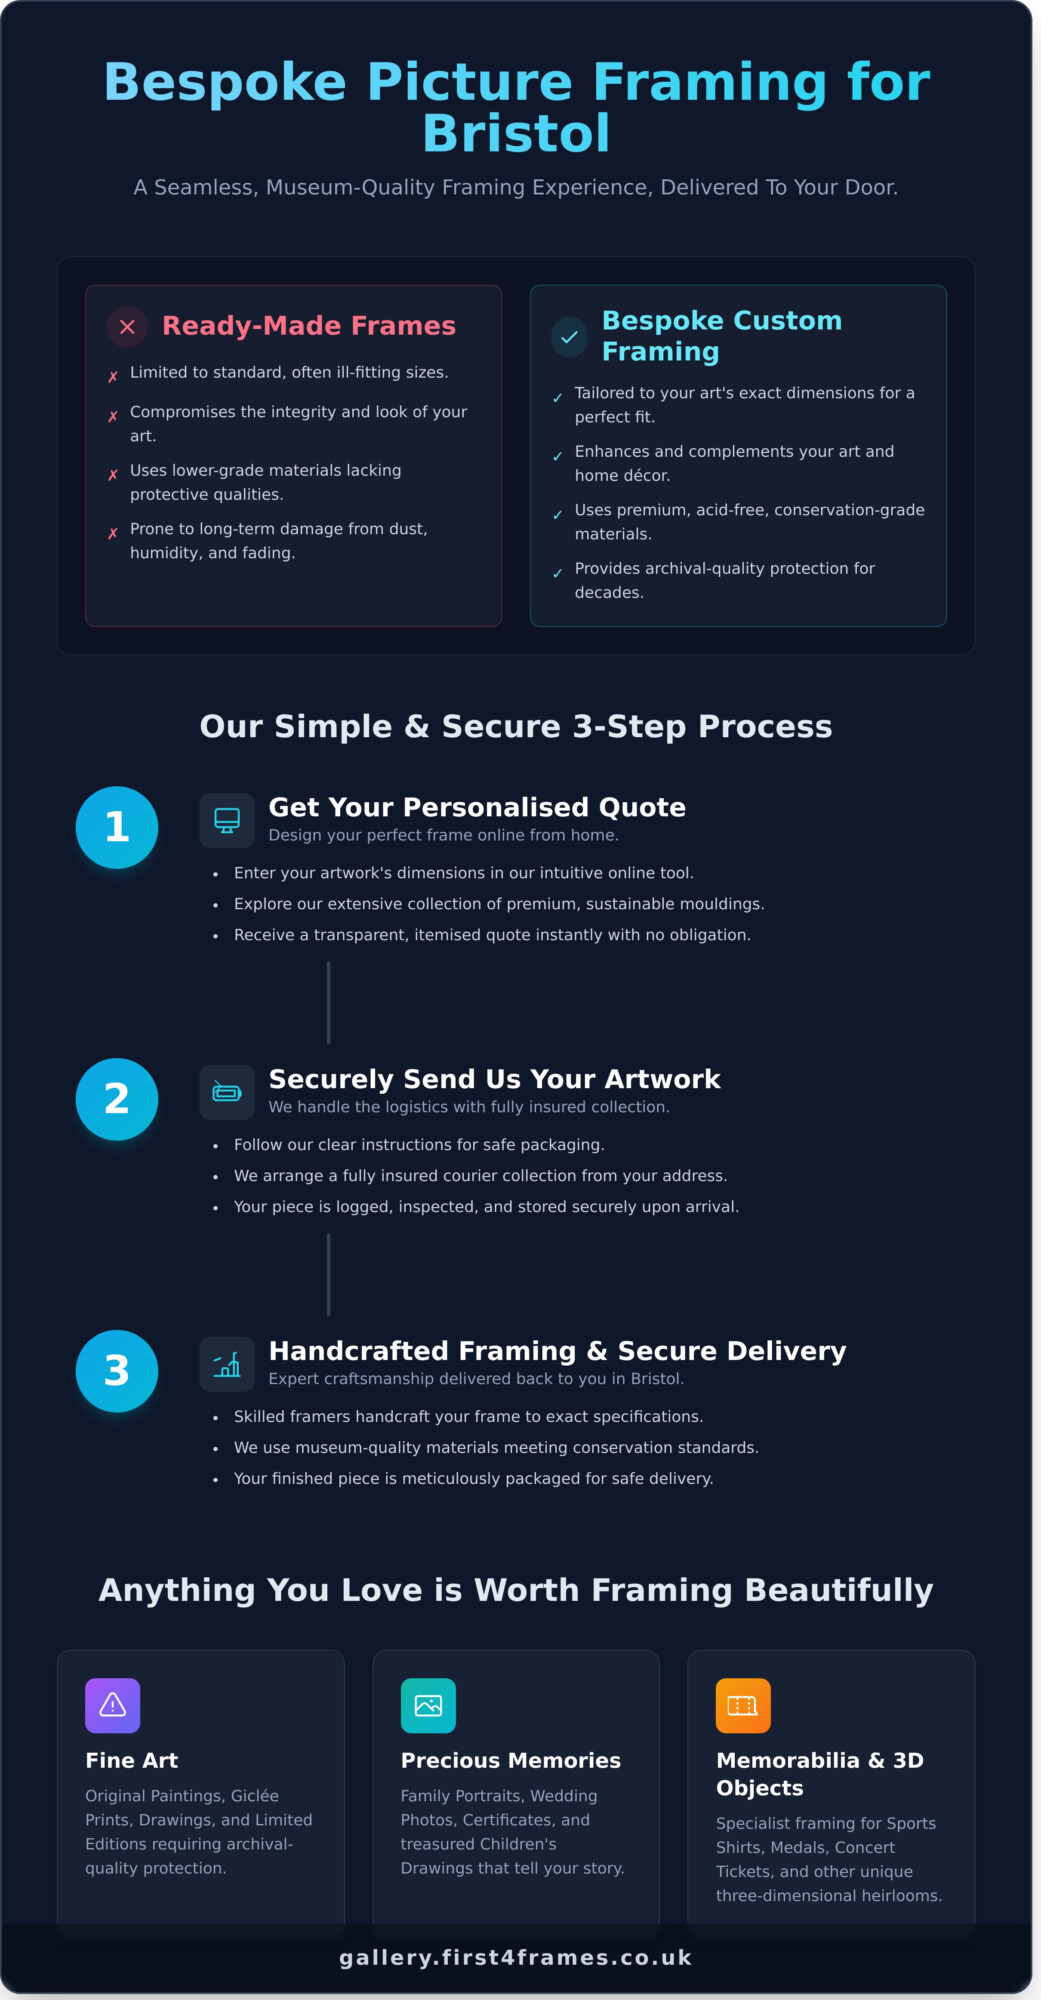
Our Simple 3-Step Process for Nottingham Customers
We believe that bespoke framing should be a joy, not a chore. Our straightforward process makes it easy to bring your vision to life from anywhere in Nottingham.
- Choose Your Artwork: Browse our curated gallery of stunning Giclée prints or prepare your own photo or artwork for framing.
- Design Your Perfect Frame: Use our intuitive online tool to select your ideal frame, choose a complementary mount, and visualise the final piece.
- Expert Framing & Secure Delivery: Our master framers get to work, handcrafting your frame. We then securely package and deliver the finished masterpiece directly to your door.
Our Commitment to Quality and Service
Our reputation is built on a foundation of passion and precision. We treat every piece of art as if it were our own, using only the best materials to ensure it looks spectacular for decades. We use conservation-grade mount boards to protect your art from fading, and our Giclée prints offer breathtaking colour fidelity and detail. Every frame is meticulously handcrafted in our dedicated Falkirk workshop by our team of experts. Let us create the perfect bridge between your art and your decor. Explore our bespoke framing options today.
Bring Your Vision to Life with Expert Picture Framing
Choosing the right frame is an art in itself-a crucial final step that protects your memories and elevates your most treasured pieces. This guide has shown you what defines quality craftsmanship and the key questions to ask, empowering you to make an informed choice. While there are many local options for picture framing nottingham, the perfect blend of expertise, convenience, and quality is now delivered directly to your door.
At First4Frames, we channel over 20 years of professional experience into every project. As specialists in conservation and gallery-quality framing, we treat your art and memorabilia with the meticulous care they deserve. We believe premium craftsmanship should be accessible and straightforward, which is why we offer a hassle-free service with secure delivery across the UK.
Ready to see your piece transformed? Let’s create something spectacular together. Start your bespoke framing project with us today!
Frequently Asked Questions
How much does bespoke picture framing cost?
The cost of bespoke picture framing is tailored to your unique piece. Key factors include the size of the artwork, your choice of frame moulding, the style of the mount, and the type of glazing selected. A small, simple frame might start from around £40, while a larger, more ornate frame with specialist UV-protective glass will be more. For a precise and competitive price for picture framing in Nottingham, we recommend getting a free, no-obligation quote.
How long does custom framing typically take?
Our standard turnaround time for custom framing is typically between 7 to 10 working days. This allows our skilled craftspeople the time to give your artwork the meticulous attention it deserves. This can vary depending on the complexity of the project and the availability of specific materials. If you have an urgent deadline, please let us know when you request your quote, and we will always do our best to accommodate your schedule.
What is the main difference between a custom frame and a ready-made one?
A ready-made frame is a standard size, offering a quick but often ill-fitting solution. In contrast, a custom frame is a bespoke creation, built precisely to your artwork’s dimensions for a perfect, professional finish. With custom framing, you also have a vast choice of premium mouldings, mounts, and conservation-grade materials that protect your art for years to come. It’s the difference between an adequate covering and a spectacular, protective showcase for your piece.
Can you frame a canvas painting that is already stretched?
Absolutely! We frequently frame stretched canvases. A popular and beautiful option is the ‘tray’ or ‘floater’ frame, which creates a shadow gap between the canvas and the frame, making the artwork appear to float. This modern style showcases the entire painting, including the sides. We can help you choose the perfect profile and finish to complement your canvas painting and create a stunning gallery-quality display in your home or office.
Is it worth paying extra for UV-protective glass?
Yes, for treasured or valuable pieces, we highly recommend it. Standard glass offers minimal protection from ultraviolet light, which causes colours to fade and paper to yellow over time. UV-protective glazing blocks up to 99% of harmful UV rays, acting as a crucial sunscreen for your art. It is a worthwhile investment to preserve the vibrancy and integrity of original artworks, limited edition prints, and sentimental photographs for a lifetime of enjoyment.
How do I measure my artwork for a custom frame?
For an accurate measurement, lay your artwork on a flat surface. Use a steel tape measure and measure only the image area you wish to be visible. Measure the width and the height in at least two different places to check for any variation, and provide us with these exact ‘artwork size’ dimensions. When you bring your piece to us, we will always double-check the measurements to ensure a perfect, bespoke fit for your art.